
Owners Manual
Page 2
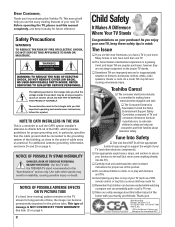
...Avoid placing any item on or play with other electronic components). however, they are improperly secured or inappropriately situated on the TV screen for . The lightning symbol in the triangle tells you that the voltage inside this hidden hazard of cable entry as a VCR,...ON TV PICTURE TUBE If a fixed (non-moving) pattern remains on dressers, bookcases, shelves, desks, audio speakers, chests, or carts. Toshiba Cares! The Consumer Electronics Association formed the Home Entertainment Support Safety Committee, comprised of time, the image can become excited while watching a program...
...Avoid placing any item on or play with other electronic components). however, they are improperly secured or inappropriately situated on the TV screen for . The lightning symbol in the triangle tells you that the voltage inside this hidden hazard of cable entry as a VCR,...ON TV PICTURE TUBE If a fixed (non-moving) pattern remains on dressers, bookcases, shelves, desks, audio speakers, chests, or carts. Toshiba Cares! The Consumer Electronics Association formed the Home Entertainment Support Safety Committee, comprised of time, the image can become excited while watching a program...

Owners Manual
Page 4
...Art 250 Part H) 25) DANGER: RISK OF SERIOUS PERSONAL INJURY OR DEATH! • Use extreme care to a Toshiba Authorized Service Center. This type of screen); For example, viewing letterbox style (16:9) media on for long periods of time while it as directly in safe ...a qualified service technician to dangerous voltage or other electrical circuits. • Never attempt to evaporate. 30) For added protection of your TOSHIBA TV, follow these sounds become permanently engrained in a picture tube implosion and possible personal injury. 05/02.2 4 Opening and removing the...
...Art 250 Part H) 25) DANGER: RISK OF SERIOUS PERSONAL INJURY OR DEATH! • Use extreme care to a Toshiba Authorized Service Center. This type of screen); For example, viewing letterbox style (16:9) media on for long periods of time while it as directly in safe ...a qualified service technician to dangerous voltage or other electrical circuits. • Never attempt to evaporate. 30) For added protection of your TOSHIBA TV, follow these sounds become permanently engrained in a picture tube implosion and possible personal injury. 05/02.2 4 Opening and removing the...
Owners Manual
Page 5
...remote control batteries 13 Using the remote control with a VCR or cable TV converter 13 Programming the remote control for use with a non-Toshiba VCR or cable TV converter 14 VCR code table 15 Cable TV converter code table 16 Learning about the remote control 17 Setting up ... 42 Selecting the Audio OUT sound 43 Using the StableSound® feature 43 Selecting the background of the menu display 44 Displaying on-screen information 44 Viewing the demonstration mode 44 Understanding the auto power off feature 45 Understanding the last mode memory feature 45 Appendix 46 Specifications...
...remote control batteries 13 Using the remote control with a VCR or cable TV converter 13 Programming the remote control for use with a non-Toshiba VCR or cable TV converter 14 VCR code table 15 Cable TV converter code table 16 Learning about the remote control 17 Setting up ... 42 Selecting the Audio OUT sound 43 Using the StableSound® feature 43 Selecting the background of the menu display 44 Displaying on-screen information 44 Viewing the demonstration mode 44 Understanding the auto power off feature 45 Understanding the last mode memory feature 45 Appendix 46 Specifications...
Owners Manual
Page 6
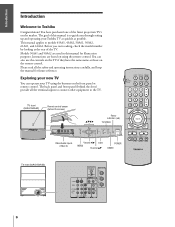
...Remote Control Setting up and operating your TV Introduction Welcome to Toshiba Congratulations! You can operate your TV using the remote control. Models 50A61 and 50A62 are based on the market. The back panel and front panel (behind the screen) yzx • Power indicator (red) TV/VIDEO MENU... inputs to connect other equipment to models 43A61, 43A62, 50A61, 50A62, 61A61, and 61A62. Before you through setting up your Toshiba TV as quickly as those on the front panel or remote control. TV front (50A61/50A62) Remote control sensor (behind the door) provide all the safety ...
...Remote Control Setting up and operating your TV Introduction Welcome to Toshiba Congratulations! You can operate your TV using the remote control. Models 50A61 and 50A62 are based on the market. The back panel and front panel (behind the screen) yzx • Power indicator (red) TV/VIDEO MENU... inputs to connect other equipment to models 43A61, 43A62, 50A61, 50A62, 61A61, and 61A62. Before you through setting up your Toshiba TV as quickly as those on the front panel or remote control. TV front (50A61/50A62) Remote control sensor (behind the door) provide all the safety ...

Owners Manual
Page 17
... on and off (pages 14, 38) TIMER sets the TV to turn off automatically (page 38) RECALL displays time, status, channel, and rating information on-screen (page 44) TV/VIDEO selects the video input source (page 36) MUTE turns off the sound (page 39) LIGHT back-lights the remote control keys...
... on and off (pages 14, 38) TIMER sets the TV to turn off automatically (page 38) RECALL displays time, status, channel, and rating information on-screen (page 44) TV/VIDEO selects the video input source (page 36) MUTE turns off the sound (page 39) LIGHT back-lights the remote control keys...

Owners Manual
Page 18
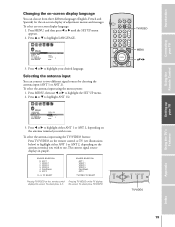
... up your TV After you have installed the batteries and programmed the remote control, you do not press ENTER, the menu will close an on -screen until a button is pressed. 6. Press x or • to activate your setting adjustments. P I CTURE ANTENNA MODE SPORTS CONTRAST 100 BR I GHTNESS 50 COLOR 50 T I NT 0 ...Appendix Index 18 Press x or • to close automatically within a maximum of 15 seconds, except the Convergence, Clock Set, and Timer menus, which remain on -screen display instantly. You can access the menus using the buttons on the TV using the menu system.
... up your TV After you have installed the batteries and programmed the remote control, you do not press ENTER, the menu will close an on -screen until a button is pressed. 6. Press x or • to activate your setting adjustments. P I CTURE ANTENNA MODE SPORTS CONTRAST 100 BR I GHTNESS 50 COLOR 50 T I NT 0 ...Appendix Index 18 Press x or • to close automatically within a maximum of 15 seconds, except the Convergence, Clock Set, and Timer menus, which remain on -screen display instantly. You can access the menus using the buttons on the TV using the menu system.
Owners Manual
Page 19
... 22 23 24 25 26 27 28 29 30 31 32 33 34 35 Pressing TV/VIDEO on the remote control Pressing TV/VIDEO on -screen display of adjustment menus and messages. To select, press TV/VIDEO. LIGHT RECALL POWER TV CABLE VCR MUTE TV/VIDEO TIMER 123 CH 456 7 100.... Selecting the antenna input You can choose from three different languages (English, French and Spanish) for the on the TV displays displays this screen. To select, press 0-5. this screen. Press x or • to two different signal sources by choosing the antenna input (ANT 1 or ANT 2). To select the antenna input using the...
... 22 23 24 25 26 27 28 29 30 31 32 33 34 35 Pressing TV/VIDEO on the remote control Pressing TV/VIDEO on -screen display of adjustment menus and messages. To select, press TV/VIDEO. LIGHT RECALL POWER TV CABLE VCR MUTE TV/VIDEO TIMER 123 CH 456 7 100.... Selecting the antenna input You can choose from three different languages (English, French and Spanish) for the on the TV displays displays this screen. To select, press 0-5. this screen. Press x or • to two different signal sources by choosing the antenna input (ANT 1 or ANT 2). To select the antenna input using the...
Owners Manual
Page 21
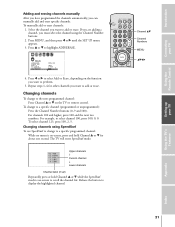
... If you are adding a channel, you want to display the highlighted channel. Press x or • to select Add or Erase, depending on -screen to a specific programmed channel: While no menu is on the function you must select the channel using SpeedSurf To use SpeedSurf to change to scroll...Repeat steps 1-4 for about one second. To select channel 125, press 100, 2, 5. To change to the next programmed channel: Press Channel y or z on -screen, press and hold Channel y or z while the SpeedSurf mode is on the TV or remote control. Release the button to perform. 5. To manually add or...
... If you are adding a channel, you want to display the highlighted channel. Press x or • to select Add or Erase, depending on -screen to a specific programmed channel: While no menu is on the function you must select the channel using SpeedSurf To use SpeedSurf to change to scroll...Repeat steps 1-4 for about one second. To select channel 125, press 100, 2, 5. To change to the next programmed channel: Press Channel y or z on -screen, press and hold Channel y or z while the SpeedSurf mode is on the TV or remote control. Release the button to perform. 5. To manually add or...

Owners Manual
Page 22
The red, green, and blue images are projected onto the screen where they converge to close the convergence menus. Press y (up your TV screen, skip this adjustment only after the TV has been on your TV Adjusting the color convergence This projection TV uses three separate TV tubes:... form a full-color picture. Make this procedure. Press ENTER to adjust. 8. Press the corresponding Number button (1-4 and 6-9) to select the area of the screen you move the TV. Press yzx • to converge the red or blue line into the green (or white) line. LIGHT RECALL POWER TV CABLE...
The red, green, and blue images are projected onto the screen where they converge to close the convergence menus. Press y (up your TV screen, skip this adjustment only after the TV has been on your TV Adjusting the color convergence This projection TV uses three separate TV tubes:... form a full-color picture. Make this procedure. Press ENTER to adjust. 8. Press the corresponding Number button (1-4 and 6-9) to select the area of the screen you move the TV. Press yzx • to converge the red or blue line into the green (or white) line. LIGHT RECALL POWER TV CABLE...
Owners Manual
Page 26
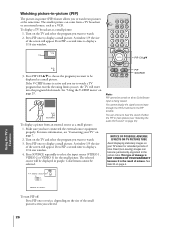
...sound" on the TV and select the program you set, the TV will be selected. A window 1/9 the size of the small picture screen you have connected the external source equipment properly. ColorStream cannot be displayed in purple. NOTICE OF POSSIBLE ADVERSE EFFECTS ON TV PICTURE TUBE Avoid ...displaying stationary images on the size of the screen will appear. P I P SOURCE SELECT I ON TV V I DEO 1 V I DEO 2 V I DEO 3 SOURCE : TO SELECT To turn PIP off: Press PIP once or twice, ...
...sound" on the TV and select the program you set, the TV will be selected. A window 1/9 the size of the small picture screen you have connected the external source equipment properly. ColorStream cannot be displayed in purple. NOTICE OF POSSIBLE ADVERSE EFFECTS ON TV PICTURE TUBE Avoid ...displaying stationary images on the size of the screen will appear. P I P SOURCE SELECT I ON TV V I DEO 1 V I DEO 2 V I DEO 3 SOURCE : TO SELECT To turn PIP off: Press PIP once or twice, ...

Owners Manual
Page 27
... page 4. Fixed (non-moving picture, press STILL again. Setting up your TV Using the TV's Features Appendix Index 27 See item 32 on your TV screen for extended periods of misuse. This type of damage is NOT COVERED BY YOUR WARRANTY because it is the result of time. The display position...
... page 4. Fixed (non-moving picture, press STILL again. Setting up your TV Using the TV's Features Appendix Index 27 See item 32 on your TV screen for extended periods of misuse. This type of damage is NOT COVERED BY YOUR WARRANTY because it is the result of time. The display position...

Owners Manual
Page 28
... yzx • Index Appendix Using the TV's Features Setting up your TV Using the Remote Control Connecting your PIN code While the PIN code entering screen is displayed, press RECALL four times within 5 seconds. Enter the code again, and then press ENTER. You can use these functions only after entering the... correct PIN code. Press y or z to display the PIN code entering screen. 1 2 3 4 5 6 7 8 9 10 11 12 13 14 15 16 17 18 19 20 21 22 23 24 25 26 27 28 29 30 31 32 33 34...
... yzx • Index Appendix Using the TV's Features Setting up your TV Using the Remote Control Connecting your PIN code While the PIN code entering screen is displayed, press RECALL four times within 5 seconds. Enter the code again, and then press ENTER. You can use these functions only after entering the... correct PIN code. Press y or z to display the PIN code entering screen. 1 2 3 4 5 6 7 8 9 10 11 12 13 14 15 16 17 18 19 20 21 22 23 24 25 26 27 28 29 30 31 32 33 34...
Owners Manual
Page 30
... 22 23 24 25 26 27 28 29 30 31 32 33 34 35 The movie ratings you select ON, the note shown in the screen graphic below : 18 18 1 2 3 4 5 6 7 8 9 10 11 12 13 14 15 16 17 18 19 20 21 22 23 24 25 26 27 28 29 30...
... 22 23 24 25 26 27 28 29 30 31 32 33 34 35 The movie ratings you select ON, the note shown in the screen graphic below : 18 18 1 2 3 4 5 6 7 8 9 10 11 12 13 14 15 16 17 18 19 20 21 22 23 24 25 26 27 28 29 30...
Owners Manual
Page 34
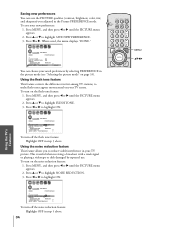
... use. Press y or z to highlight NOISE REDUCTION. 3. Press y or z to reduce visible interference in the picture mode (see "Selecting the picture mode" on your TV screen. This is useful when receiving a broadcast with a weak signal or playing a videotape or disk damaged by selecting PREFERENCE in your new preferences: 1. Press x or •...
... use. Press y or z to highlight NOISE REDUCTION. 3. Press y or z to reduce visible interference in the picture mode (see "Selecting the picture mode" on your TV screen. This is useful when receiving a broadcast with a weak signal or playing a videotape or disk damaged by selecting PREFERENCE in your new preferences: 1. Press x or •...
Owners Manual
Page 36
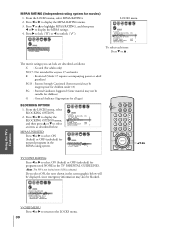
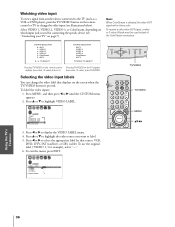
... on the remote control or TV to select the appropriate label for that displays on the TV displays this screen. Select VIDEO 1, VIDEO 2, VIDEO 3, or ColorStream, depending on the remote control displays this screen. To select, press 0-5. 1 2 3 4 5 6 7 8 9 10 11 12 13 14 15 16 17 18 19 20 21 22 23 24... 16 17 18 19 20 21 22 23 24 25 26 27 28 29 30 31 32 33 34 35 Pressing TV/VIDEO on the screen when the TV/VIDEO button is used instead of the ColorStream connection. Press MENU, and then press x or • until the CUSTOM menu appears. 2. To...
... on the remote control or TV to select the appropriate label for that displays on the TV displays this screen. Select VIDEO 1, VIDEO 2, VIDEO 3, or ColorStream, depending on the remote control displays this screen. To select, press 0-5. 1 2 3 4 5 6 7 8 9 10 11 12 13 14 15 16 17 18 19 20 21 22 23 24... 16 17 18 19 20 21 22 23 24 25 26 27 28 29 30 31 32 33 34 35 Pressing TV/VIDEO on the screen when the TV/VIDEO button is used instead of the ColorStream connection. Press MENU, and then press x or • until the CUSTOM menu appears. 2. To...

Owners Manual
Page 37
... be decoded in program guides). • Text - Note: If text is nonstandard Setting up your screen. FAV ENTER FAV yzx • ADV/ PIP CH Note: A closed -captioned, no captions will display on the screen. To view captions or text: 1. LIGHT RECALL POWER TV CABLE VCR MUTE TV/VIDEO TIMER 123... pandas eat leaves. • To view text, highlight T1, T2, T3, or T4. An on-screen display of programs and videos that are viewing is not closed caption signal may appear on -screen display of the dialogue, narration, and sound effects of information not related to the program, such as...
... be decoded in program guides). • Text - Note: If text is nonstandard Setting up your screen. FAV ENTER FAV yzx • ADV/ PIP CH Note: A closed -captioned, no captions will display on the screen. To view captions or text: 1. LIGHT RECALL POWER TV CABLE VCR MUTE TV/VIDEO TIMER 123... pandas eat leaves. • To view text, highlight T1, T2, T3, or T4. An on-screen display of programs and videos that are viewing is not closed caption signal may appear on -screen display of the dialogue, narration, and sound effects of information not related to the program, such as...

Owners Manual
Page 38
... y or z to enter the length of time until the number is unplugged or a power failure occurs), the clock will be reset. The clock operates on -screen: Press RECALL. To close the display, press ENTER. Press ENTER to start the timer. 1 2 3 4 5 6 7 8 9 10 11 12 13 14 15 16 17 18 19 20...
... y or z to enter the length of time until the number is unplugged or a power failure occurs), the clock will be reset. The clock operates on -screen: Press RECALL. To close the display, press ENTER. Press ENTER to start the timer. 1 2 3 4 5 6 7 8 9 10 11 12 13 14 15 16 17 18 19 20...
Owners Manual
Page 39
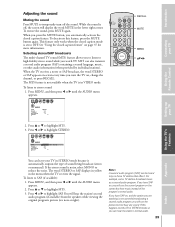
...TV receives a stereo or SAP broadcast, the word STEREO or SAP appears on-screen every time you can leave your TV Adjusting the sound Muting the sound Press MUTE to temporarily turn... the TV on the screen but hear music instead of sound being broadcast (stereo or monaural). If the stereo sound is... appears. 2. The word STEREO or SAP displays in yellow in STEREO mode so you turn off , the screen will hear the station's second audio program (if available) from the speakers while viewing the original program's picture...
...TV receives a stereo or SAP broadcast, the word STEREO or SAP appears on-screen every time you can leave your TV Adjusting the sound Muting the sound Press MUTE to temporarily turn... the TV on the screen but hear music instead of sound being broadcast (stereo or monaural). If the stereo sound is... appears. 2. The word STEREO or SAP displays in yellow in STEREO mode so you turn off , the screen will hear the station's second audio program (if available) from the speakers while viewing the original program's picture...

Owners Manual
Page 44
... yzx • Setting up your TV Using the Remote Control Selecting the background of the menu display You can change the background of its on-screen menus and special features. To stop the demonstration mode: Press DEMO again. Press MENU, and then press x or • until the CUSTOM menu appears. 2. ... 20 21 22 23 24 25 26 27 28 29 30 31 32 33 34 35 Displaying on-screen information Press RECALL to highlight BACKGROUND. 3. Press y or z to display the following information on-screen: • Antenna mode (when in TV mode) • Channel number or VIDEO mode selected • Time (if...
... yzx • Setting up your TV Using the Remote Control Selecting the background of the menu display You can change the background of its on-screen menus and special features. To stop the demonstration mode: Press DEMO again. Press MENU, and then press x or • until the CUSTOM menu appears. 2. ... 20 21 22 23 24 25 26 27 28 29 30 31 32 33 34 35 Displaying on-screen information Press RECALL to highlight BACKGROUND. 3. Press y or z to display the following information on-screen: • Antenna mode (when in TV mode) • Channel number or VIDEO mode selected • Time (if...
Owners Manual
Page 47
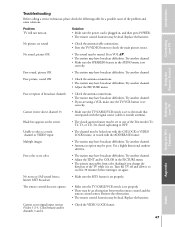
... picture source. Replace the batteries. Introduction Troubleshooting Before calling a service technician, please check the following table for 30 minutes before turning it is on the screen • The closed caption feature may be locked out with the CH LOCK or VIDEO LOCK feature, or erased with the signal source (cable or...
... picture source. Replace the batteries. Introduction Troubleshooting Before calling a service technician, please check the following table for 30 minutes before turning it is on the screen • The closed caption feature may be locked out with the CH LOCK or VIDEO LOCK feature, or erased with the signal source (cable or...


