
Service Manual
Page 2
... 1 GENERAL ADJUSTMENTS SAFETY INSTRUCTIONS ...3 CRT ASSEMBLY REPLACEMENT AND MOUNTING 4 PICTURE TUBE COMPONENTS ADJUSTMENT ...6 REPLACEMENT OF THE CRT ...8 SERVICE MODE ...9 ELECTRICAL ADJUSTMENT ...11 CONVERGENCE ADJUSTMENT ...13 SCREEN AND MIRROR ALIGNMENTS ...15 CIRCUIT CHECKS ...16 CHAPTER 2 SPECIFIC INFORMATIONS SETTING & ADJUSTING DATA ...17 LOCATION OF CONTROLS ...18 PROGRAMMING CHANNEL MEMORY ...20 CIRCUIT BLOCK DIAGRAM...
... 1 GENERAL ADJUSTMENTS SAFETY INSTRUCTIONS ...3 CRT ASSEMBLY REPLACEMENT AND MOUNTING 4 PICTURE TUBE COMPONENTS ADJUSTMENT ...6 REPLACEMENT OF THE CRT ...8 SERVICE MODE ...9 ELECTRICAL ADJUSTMENT ...11 CONVERGENCE ADJUSTMENT ...13 SCREEN AND MIRROR ALIGNMENTS ...15 CIRCUIT CHECKS ...16 CHAPTER 2 SPECIFIC INFORMATIONS SETTING & ADJUSTING DATA ...17 LOCATION OF CONTROLS ...18 PROGRAMMING CHANNEL MEMORY ...20 CIRCUIT BLOCK DIAGRAM...

Service Manual
Page 6
...Perform VCEN adjustment. (See page 11.) 5. a 6. CENTERING ADJUSTMENT 1. PREPARATION Operate the receiver for center convergence adjustment. Check whole quality of screen, this magnet. Press "7" button to 5 for Green and Blue colors. - 6 - Repeat steps 3 to display the built-in cross-... ADJUSTMENT 1. Adjust FOCUS VR "R" of picture center. 7. tern center comes to find best focusing point of FOCUS PACK to screen center. 6. LINEARITY adjustment. 8. GENERAL ADJUSTMENTS SPECIFIC INFORMATIONS WARNING : BEFORE SERVICING THIS CHASSIS, READ THE "X-RAY RADIATION PRECAUTION", ...
...Perform VCEN adjustment. (See page 11.) 5. a 6. CENTERING ADJUSTMENT 1. PREPARATION Operate the receiver for center convergence adjustment. Check whole quality of screen, this magnet. Press "7" button to 5 for Green and Blue colors. - 6 - Repeat steps 3 to display the built-in cross-... ADJUSTMENT 1. Adjust FOCUS VR "R" of picture center. 7. tern center comes to find best focusing point of FOCUS PACK to screen center. 6. LINEARITY adjustment. 8. GENERAL ADJUSTMENTS SPECIFIC INFORMATIONS WARNING : BEFORE SERVICING THIS CHASSIS, READ THE "X-RAY RADIATION PRECAUTION", ...

Service Manual
Page 7
GENERAL ADJUSTMENTS LOCATION OF SCREEN AND FOCUS VR'S SCREEN VR FOCUS VR RGB SPECIFIC INFORMATIONS Downloaded from www.Manualslib.com manuals search engine - 7 -
GENERAL ADJUSTMENTS LOCATION OF SCREEN AND FOCUS VR'S SCREEN VR FOCUS VR RGB SPECIFIC INFORMATIONS Downloaded from www.Manualslib.com manuals search engine - 7 -

Service Manual
Page 9
...) : Self diagnostic display : 1 button 2 button 3 button 4 button 5 button 6 button 7 button 8 button 9 button Downloaded from www.Manualslib.com manuals search engine - 9 - GENERAL ADJUSTMENTS SPECIFIC INFORMATIONS 1. MUTE 2. Screen adjustment mode ON/OFF: Selection of the adjustment items : Change of the data value : Adjustment menu mode ON/OFF : Initialization of the memory (QA02) : Initialization...
...) : Self diagnostic display : 1 button 2 button 3 button 4 button 5 button 6 button 7 button 8 button 9 button Downloaded from www.Manualslib.com manuals search engine - 9 - GENERAL ADJUSTMENTS SPECIFIC INFORMATIONS 1. MUTE 2. Screen adjustment mode ON/OFF: Selection of the adjustment items : Change of the data value : Adjustment menu mode ON/OFF : Initialization of the memory (QA02) : Initialization...
Service Manual
Page 11
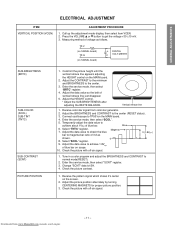
... to the minimum and BRIGHTNESS to get the voltage +30 ±10 mV. 3. Adjust the data value so the belt of blue bar on the screen. 2. Check the picture with off -air signal. 1. Change "SCNT" data to13H. 4. Press the VOLUME s or t button to the center. 3. Adjust the BRIGHTNESS and CONTRAST to...
... to the minimum and BRIGHTNESS to get the voltage +30 ±10 mV. 3. Adjust the data value so the belt of blue bar on the screen. 2. Check the picture with off -air signal. 1. Change "SCNT" data to13H. 4. Press the VOLUME s or t button to the center. 3. Adjust the BRIGHTNESS and CONTRAST to...

Service Manual
Page 12
... data of FOCUS PAC (page 7) clock- Note : Check the vertical picture position is correct. 1. Center WHITE BALANCE (RCUT) (GCUT) (BCUT) (RDRV) (BDRV) 1. Gradually rotate R, G and B SCREEN volume of items GDRV and BDRV Controls for low light area. 9. Exit from www.Manualslib.com manuals search engine - 12 - Press the VOLUME s or t button...
... data of FOCUS PAC (page 7) clock- Note : Check the vertical picture position is correct. 1. Center WHITE BALANCE (RCUT) (GCUT) (BCUT) (RDRV) (BDRV) 1. Gradually rotate R, G and B SCREEN volume of items GDRV and BDRV Controls for low light area. 9. Exit from www.Manualslib.com manuals search engine - 12 - Press the VOLUME s or t button...

Service Manual
Page 13
... of cursor ON/OFF: 5 button 2. HIT, WID ADJUSTMENT 5. This means that the Red color is about 1 second. 11. The cursor should be erased from the screen. 100 button to erase Red line 0 button to erase Green line RTN (ENT) button to be done. 3. Adjustment around cursor can be blinking in order...
... of cursor ON/OFF: 5 button 2. HIT, WID ADJUSTMENT 5. This means that the Red color is about 1 second. 11. The cursor should be erased from the screen. 100 button to erase Red line 0 button to erase Green line RTN (ENT) button to be done. 3. Adjustment around cursor can be blinking in order...

Service Manual
Page 14
...main deflection side to initial adjusting values. Adjust alignment of blue and red. (Refer Alignment adjustment for slight disparity of each screen picture finishes, replace green CRT. Adjust convergence of color and picture size. After convergence adjustment of green CRT data. REPLACING ...CONVERGENCE UNIT When replacing convergence unit, all picture screens require readjustment basically, but the following procedures. 1. Mount unit which has combination of old and new memories, on SET and ...
...main deflection side to initial adjusting values. Adjust alignment of blue and red. (Refer Alignment adjustment for slight disparity of each screen picture finishes, replace green CRT. Adjust convergence of color and picture size. After convergence adjustment of green CRT data. REPLACING ...CONVERGENCE UNIT When replacing convergence unit, all picture screens require readjustment basically, but the following procedures. 1. Mount unit which has combination of old and new memories, on SET and ...
Service Manual
Page 15
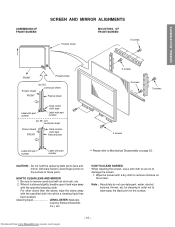
...the above, wipe the stains away with the specified cleaning cloth. Wipe the screen with a dry cloth to remove moisture on the surface of those parts. HOW TO CLEAN SCREEN When cleaning the screen, use detergent, water, alcohol, benzine, thinner, etc. When it is ...Label with part number * Please refer to Mechanical Disassembly on page 23. GENERAL ADJUSTMENTS ASSEMBLING OF FRONT SCREEN SCREEN AND MIRROR ALIGNMENTS Fresnel sheet MOUNTING OF FRONT SCREEN 5 screws SPECIFIC INFORMATIONS FRONT Protect shield (for 50") Lenticular sheet Protect shield FRONT Fresnel sheet Label ...
...the above, wipe the stains away with the specified cleaning cloth. Wipe the screen with a dry cloth to remove moisture on the surface of those parts. HOW TO CLEAN SCREEN When cleaning the screen, use detergent, water, alcohol, benzine, thinner, etc. When it is ...Label with part number * Please refer to Mechanical Disassembly on page 23. GENERAL ADJUSTMENTS ASSEMBLING OF FRONT SCREEN SCREEN AND MIRROR ALIGNMENTS Fresnel sheet MOUNTING OF FRONT SCREEN 5 screws SPECIFIC INFORMATIONS FRONT Protect shield (for 50") Lenticular sheet Protect shield FRONT Fresnel sheet Label ...

Service Manual
Page 20
... for some model, perform programming channels for other channels. Note: The CHANNEL t/s buttons on the TV function as the t/s buttons while a menu is on the screen. * Please refer to make sure the channel programming has been done properly. GENERAL ADJUSTMENTS SPECIFIC INFORMATIONS PROGRAMMING CHANNEL MEMORY The channel memory is the list...
... for some model, perform programming channels for other channels. Note: The CHANNEL t/s buttons on the TV function as the t/s buttons while a menu is on the screen. * Please refer to make sure the channel programming has been done properly. GENERAL ADJUSTMENTS SPECIFIC INFORMATIONS PROGRAMMING CHANNEL MEMORY The channel memory is the list...


