Owner's Manual - English
Page 2
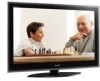
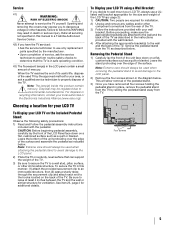
...system of the building, as practical. CHILD SAFETY: It Makes A Difference How and Where You Use Your Flat Panel Display Congratulations on page 4. As you enjoy your new LCD TV. WARNING: TO REDUCE THE RISK OF ELECTRIC SHOCK, DO NOT REMOVE COVER (OR BACK). Follow the manufacturer's ...the point of your new product, please keep it cannot be pushed, pulled over and cause injury. WARNING To prevent injury, this Toshiba LCD TV. Dear Customer, Thank you for purchasing this apparatus must be securely attached to the floor/wall in accordance with the installation instructions. Safety...
...system of the building, as practical. CHILD SAFETY: It Makes A Difference How and Where You Use Your Flat Panel Display Congratulations on page 4. As you enjoy your new LCD TV. WARNING: TO REDUCE THE RISK OF ELECTRIC SHOCK, DO NOT REMOVE COVER (OR BACK). Follow the manufacturer's ...the point of your new product, please keep it cannot be pushed, pulled over and cause injury. WARNING To prevent injury, this Toshiba LCD TV. Dear Customer, Thank you for purchasing this apparatus must be securely attached to the floor/wall in accordance with the installation instructions. Safety...
Owner's Manual - English
Page 3
...damaged in any time it can be placed on the apparatus. 3 The LCD panel inside a wall or similar enclosed area. 20) Never modify this apparatus during lightning storms or when unused for replacement of the TV pedestal to rain or moisture, does not operate normally, or has been ...shock, match wide blade of the Federal Communications Commission. 21) DANGER: RISK OF SERIOUS PERSONAL INJURY, DEATH, OR EQUIPMENT DAMAGE! Never place the TV on the floor or a sturdy, level, stable surface that produce heat. 9) Do not defeat the safety purpose of time. 14) Refer all ...
...damaged in any time it can be placed on the apparatus. 3 The LCD panel inside a wall or similar enclosed area. 20) Never modify this apparatus during lightning storms or when unused for replacement of the TV pedestal to rain or moisture, does not operate normally, or has been ...shock, match wide blade of the Federal Communications Commission. 21) DANGER: RISK OF SERIOUS PERSONAL INJURY, DEATH, OR EQUIPMENT DAMAGE! Never place the TV on the floor or a sturdy, level, stable surface that produce heat. 9) Do not defeat the safety purpose of time. 14) Refer all ...
Owner's Manual - English
Page 4
... Never overload wall outlets and extension cords. 29) Always operate this product can accidentally touch overhead power lines. Gently wipe the display panel surface (the TV screen) using the on/off using a dry, soft cloth only (cotton, flannel, etc.). If these recommendations and precautions: 32)... theater component connected to install any item you leave the TV unattended or unused for the television, avoid locations where the screen may vary until the LCD warms up static charges (see Section 810 of your TOSHIBA TV, follow the instructions in cabinet, or any vertical surface ...
... Never overload wall outlets and extension cords. 29) Always operate this product can accidentally touch overhead power lines. Gently wipe the display panel surface (the TV screen) using the on/off using a dry, soft cloth only (cotton, flannel, etc.). If these recommendations and precautions: 32)... theater component connected to install any item you leave the TV unattended or unused for the television, avoid locations where the screen may vary until the LCD warms up static charges (see Section 810 of your TOSHIBA TV, follow the instructions in cabinet, or any vertical surface ...
Owner's Manual - English
Page 5
... on a flat, cushioned surface such as indicated below . Four screws 5 To Display your LCD TV using a Wall Bracket: If you have removed all servicing not specified in the LCD panel contain a small amount of the LCD TV (- page 2) : 1) CAUTION: Two people are attached to a wall stud, pillar,...this manual to a Toshiba Authorized Service Center. 42) If you decide to service the TV yourself. Note: The lamp(s) inside this WARNING may expose you have the TV serviced: • Ask the service technician to use a ULlisted wall bracket appropriate for your LCD TV To Display your area...
... on a flat, cushioned surface such as indicated below . Four screws 5 To Display your LCD TV using a Wall Bracket: If you have removed all servicing not specified in the LCD panel contain a small amount of the LCD TV (- page 2) : 1) CAUTION: Two people are attached to a wall stud, pillar,...this manual to a Toshiba Authorized Service Center. 42) If you decide to service the TV yourself. Note: The lamp(s) inside this WARNING may expose you have the TV serviced: • Ask the service technician to use a ULlisted wall bracket appropriate for your LCD TV To Display your area...
Owner's Manual - English
Page 6
...period of Silicon Image, Inc. The afterimage is : Toshiba America Consumer Products, L.L.C. 82 Totowa Rd. Such pixels are trademarks of time. 2) The LCD panel contained in a residential installation. Operation is not covered ...device must accept any interference received, including interference that corrects time and frequency response problems in TV systems. This results in the United States and other countries. • DivX® is... Statement (Part 15): The Toshiba 42ZV650U, 47ZV650U and 55ZV650U Televisions comply with Part 15 of this television meet ENERGY STAR®...
...period of Silicon Image, Inc. The afterimage is : Toshiba America Consumer Products, L.L.C. 82 Totowa Rd. Such pixels are trademarks of time. 2) The LCD panel contained in a residential installation. Operation is not covered ...device must accept any interference received, including interference that corrects time and frequency response problems in TV systems. This results in the United States and other countries. • DivX® is... Statement (Part 15): The Toshiba 42ZV650U, 47ZV650U and 55ZV650U Televisions comply with Part 15 of this television meet ENERGY STAR®...

Owner's Manual - English
Page 7
...LCD TV 5 Chapter 1: Introduction 9 Features of your new TV 9 Overview of steps for installing, setting up, and using your new TV 9 TV front and side panel controls and connections . . . . 10 TV back panel connections 11 Chapter 2: Connecting your TV... 39 Setting the time zone 39 Selecting the location 39 Selecting the TOSHIBA Illumination mode 39 Selecting the Power-On Mode 40 Using Blue Screen ...Chapter 6: Using the TV's features 41 Selecting the video input source to view 41 Tuning channels 42 Tuning channels using the Channel Browser™ . . . . 42 Setting the Channel Tuning...
...LCD TV 5 Chapter 1: Introduction 9 Features of your new TV 9 Overview of steps for installing, setting up, and using your new TV 9 TV front and side panel controls and connections . . . . 10 TV back panel connections 11 Chapter 2: Connecting your TV... 39 Setting the time zone 39 Selecting the location 39 Selecting the TOSHIBA Illumination mode 39 Selecting the Power-On Mode 40 Using Blue Screen ...Chapter 6: Using the TV's features 41 Selecting the video input source to view 41 Tuning channels 42 Tuning channels using the Channel Browser™ . . . . 42 Setting the Channel Tuning...
Owner's Manual - English
Page 8
... information 62 Understanding the auto power off feature 62 Understanding the last mode memory feature 62 Chapter 7: Using the TV's advanced features 63 Using the advanced picture settings features 63 Using Resolution 63 Using DynaLight 63 Using Dynamic Contrast 63 Using the Static Gamma feature ... 74 Acceptable signal formats for PC IN and HDMI terminals 75 PC IN signal formats 75 HDMI signal formats 76 Limited United States Warranty for LCD Televisions 26" and Larger 77 Limited Canadian Warranty for Toshiba Brand Flat Panel Televisions 78 Index 81 8
... information 62 Understanding the auto power off feature 62 Understanding the last mode memory feature 62 Chapter 7: Using the TV's advanced features 63 Using the advanced picture settings features 63 Using Resolution 63 Using DynaLight 63 Using Dynamic Contrast 63 Using the Static Gamma feature ... 74 Acceptable signal formats for PC IN and HDMI terminals 75 PC IN signal formats 75 HDMI signal formats 76 Limited United States Warranty for LCD Televisions 26" and Larger 77 Limited Canadian Warranty for Toshiba Brand Flat Panel Televisions 78 Index 81 8
Owner's Manual - English
Page 10
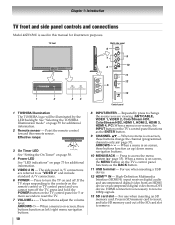
... video from an HDMI device or uncompressed digital video from a DVI device. Chapter 1: Introduction TV front and side panel controls and connections Model 42ZV650U is on-screen, these buttons function as up/down menu navigation buttons. 10 MENU/BACK -...TV's control panel functions as "VIDEO 2" and include standard A/V connections. 6 POWER - For use when inserting a USB device. 12 HDMI™ IN - For use when inserting an SD memory card. Press in this remote sensor. TV front Right side panel 6 7 9 10 8 11 12 5 1 2 34 13 Control panel 1 TOSHIBA Illumination The TOSHIBA...
... video from an HDMI device or uncompressed digital video from a DVI device. Chapter 1: Introduction TV front and side panel controls and connections Model 42ZV650U is on-screen, these buttons function as up/down menu navigation buttons. 10 MENU/BACK -...TV's control panel functions as "VIDEO 2" and include standard A/V connections. 6 POWER - For use when inserting a USB device. 12 HDMI™ IN - For use when inserting an SD memory card. Press in this remote sensor. TV front Right side panel 6 7 9 10 8 11 12 5 1 2 34 13 Control panel 1 TOSHIBA Illumination The TOSHIBA...
Owner's Manual - English
Page 11
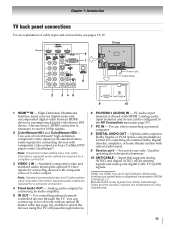
...and the double-D symbol are required for connecting devices with component video output, such as a Toshiba DVD player with composite video or S-video output. Chapter 1: Introduction TV back panel connections For an explanation of cable types and connections, see item 6. Also see pages 12-19.... 1 6 7 TV back Power cord Cable Strap 8 2 345 9 10 1 HDMI™ IN - Input that supports analog (NTSC) ...
...and the double-D symbol are required for connecting devices with component video output, such as a Toshiba DVD player with composite video or S-video output. Chapter 1: Introduction TV back panel connections For an explanation of cable types and connections, see item 6. Also see pages 12-19.... 1 6 7 TV back Power cord Cable Strap 8 2 345 9 10 1 HDMI™ IN - Input that supports analog (NTSC) ...

Owner's Manual - English
Page 13
... the Copyright Laws of television programs, videotapes, DVDs, and other materials is set to). Do not connect both types of the VIDEO 2 on the TV right side panel. - Use the Cable box controls to change channels. Select the ANT/CABLE video input source on the remote control (- For better picture performance, if...
... the Copyright Laws of television programs, videotapes, DVDs, and other materials is set to). Do not connect both types of the VIDEO 2 on the TV right side panel. - Use the Cable box controls to change channels. Select the ANT/CABLE video input source on the remote control (- For better picture performance, if...

Owner's Manual - English
Page 14
...VIDEO VIDEO R IN OUT OUT Satellite receiver with ColorStream® (component video), a VCR, and a satellite receiver Your TV has two sets of video cable to watch. TV upper back panel From antenna Y PB PR COMPONENT VIDEO S-VIDEO VIDEO OUT OUT DVD player with component video AUDIO OUT L R From ...cable to your VCR's audio out terminal using the component video connections: Turn on the side panel. If your DVD player or satellite receiver does not have a mono VCR, connect L/MONO on the TV to VIDEO 2 on the satellite receiver. If your VCR has Svideo, use , distribution, or...
...VIDEO VIDEO R IN OUT OUT Satellite receiver with ColorStream® (component video), a VCR, and a satellite receiver Your TV has two sets of video cable to watch. TV upper back panel From antenna Y PB PR COMPONENT VIDEO S-VIDEO VIDEO OUT OUT DVD player with component video AUDIO OUT L R From ...cable to your VCR's audio out terminal using the component video connections: Turn on the side panel. If your DVD player or satellite receiver does not have a mono VCR, connect L/MONO on the TV to VIDEO 2 on the satellite receiver. If your VCR has Svideo, use , distribution, or...
Owner's Manual - English
Page 15
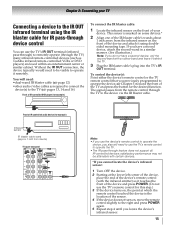
... 2 Starting at the lower left corner of the device, place the end of your TV Connecting a device to operate the device; - page 12) •other audio/video cables as Toshiba infrared remote-controlled VCRs or DVD players) enclosed within an entertainment center or similar cabinet.... The signal passes from device) TV upper back panel Note: • If you use the TV's remote control for example) To connect the IR ...
... 2 Starting at the lower left corner of the device, place the end of your TV Connecting a device to operate the device; - page 12) •other audio/video cables as Toshiba infrared remote-controlled VCRs or DVD players) enclosed within an entertainment center or similar cabinet.... The signal passes from device) TV upper back panel Note: • If you use the TV's remote control for example) To connect the IR ...

Owner's Manual - English
Page 16
... analog audio cables are not required (see page 19. • Some legacy HDMI sources may not operate properly with the HDMI Logo ( ). - TV upper back panel TV right side panel HDMI device VIDEO AUDIO L R IN OUT L R HDMI OUT To view the HDMI device video: Select the HDMI 1, HDMI 2, HDMI 3, or...operate properly with HDMI or DVI output). This input is recommended that you use an HDMI cable with the TV. See page 75. HDMI cable transfers both video and audio. TV upper back panel DVI device VIDEO AUDIO L R IN DVI /HDCP OUT OUT L R Note: To ensure that the...
... analog audio cables are not required (see page 19. • Some legacy HDMI sources may not operate properly with the HDMI Logo ( ). - TV upper back panel TV right side panel HDMI device VIDEO AUDIO L R IN OUT L R HDMI OUT To view the HDMI device video: Select the HDMI 1, HDMI 2, HDMI 3, or...operate properly with HDMI or DVI output). This input is recommended that you use an HDMI cable with the TV. See page 75. HDMI cable transfers both video and audio. TV upper back panel DVI device VIDEO AUDIO L R IN DVI /HDCP OUT OUT L R Note: To ensure that the...

Owner's Manual - English
Page 17
TV upper back panel TV right side panel VIDEO AUDIO L R IN OUT L R Audio receiver HDMI IN HDMI OUT Playback device (REGZA-LINK DVD player,etc.) VIDEO AUDIO L R HDMI OUT IN OUT L R To connect ... may not operate properly. • For proper operation, it is limited to the individual instruction manuals for compatibility information. 17 Refer to models incorporating Toshiba's REGZA-LINK. Chapter 2: Connecting your TV REGZA-LINK® connection You can control the basic functions of setup and operations, see the operation manual for those operations.
TV upper back panel TV right side panel VIDEO AUDIO L R IN OUT L R Audio receiver HDMI IN HDMI OUT Playback device (REGZA-LINK DVD player,etc.) VIDEO AUDIO L R HDMI OUT IN OUT L R To connect ... may not operate properly. • For proper operation, it is limited to the individual instruction manuals for compatibility information. 17 Refer to models incorporating Toshiba's REGZA-LINK. Chapter 2: Connecting your TV REGZA-LINK® connection You can control the basic functions of setup and operations, see the operation manual for those operations.

Owner's Manual - English
Page 18
...- You will need : •standard audio cables Analog audio amplifier LINE IN LR TV upper back panel SETUP Menu Language ANT/CABLE In Auto Tuning Manual Tuning TV Settings Manual Setting AV Connection PC Settings English Antenna 4 Press B or b to select Digital Audio Output, and then press C or c to ... you to use with an external Dolby® Digital decoder or other digital audio system LINE IN LR Optical Audio IN TV upper back panel To control the audio: 1 Turn on the TV and the digital audio device. 2 Press Y on the remote control to open the SETUP menu. 3 PTre.ss B or b ...
...- You will need : •standard audio cables Analog audio amplifier LINE IN LR TV upper back panel SETUP Menu Language ANT/CABLE In Auto Tuning Manual Tuning TV Settings Manual Setting AV Connection PC Settings English Antenna 4 Press B or b to select Digital Audio Output, and then press C or c to ... you to use with an external Dolby® Digital decoder or other digital audio system LINE IN LR Optical Audio IN TV upper back panel To control the audio: 1 Turn on the TV and the digital audio device. 2 Press Y on the remote control to open the SETUP menu. 3 PTre.ss B or b ...

Owner's Manual - English
Page 19
...and SXGA signal formats. Note: • The edges of the PC on page 57). TV upper back panel •Signal names for computers with an HDMI terminal, use an HDMI cable. TV upper back panel PC audio cable Computer PC audio output PC audio cable Conversion adapter (if necessary) •...60Hz), 720p (60Hz), 1080i (60Hz), and 1080p (24Hz/ 60Hz) signal formats. page 12). Note: • The PC audio input terminals on the TV are not necessary (- For detailed signal specifications, see page 75. •To display the optimum picture, use an adapter cable and analog audio cables. Ground...
...and SXGA signal formats. Note: • The edges of the PC on page 57). TV upper back panel •Signal names for computers with an HDMI terminal, use an HDMI cable. TV upper back panel PC audio cable Computer PC audio output PC audio cable Conversion adapter (if necessary) •...60Hz), 720p (60Hz), 1080i (60Hz), and 1080p (24Hz/ 60Hz) signal formats. page 12). Note: • The PC audio input terminals on the TV are not necessary (- For detailed signal specifications, see page 75. •To display the optimum picture, use an adapter cable and analog audio cables. Ground...

Owner's Manual - English
Page 35
... Reset Backlight Contrast Brightness Color Tint Sharpness AutoView 0 Auto 0 0 0 0 • Press C or c on the remote control or TV control panel to select the top menu, its respective items will appear below. • To use the buttons on the remote cthornoturoglhotrhTeVmcaonndtrporlepsasnTel.to move up... 4: Menu layout and navigation Navigating the menu system You can use the items, press B or b on the remote control or TV control panel to access and navigate your TV's onscreen menu system. • Press Y to adjust settings. • All menus close automatically if you do not make a ...
... Reset Backlight Contrast Brightness Color Tint Sharpness AutoView 0 Auto 0 0 0 0 • Press C or c on the remote control or TV control panel to select the top menu, its respective items will appear below. • To use the buttons on the remote cthornoturoglhotrhTeVmcaonndtrporlepsasnTel.to move up... 4: Menu layout and navigation Navigating the menu system You can use the items, press B or b on the remote control or TV control panel to access and navigate your TV's onscreen menu system. • Press Y to adjust settings. • All menus close automatically if you do not make a ...
Owner's Manual - English
Page 37
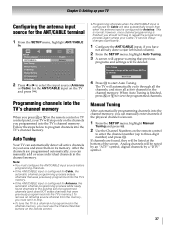
... for .the ANT/CABLE input on the TV Programming channels into the TV's channel memory. After the channels are programmed automatically, you programmed into the TV's channel memory When you press < or , on the remote control or TV control panel, your TV will stop only on the remote control. ...• Programming channels when the ANT/CABLE input is configured for Cable will be lost! SETUP Menu Language ANT/CABLE In Auto Tuning Manual Tuning TV Settings Manual Setting AV Connection...
... for .the ANT/CABLE input on the TV Programming channels into the TV's channel memory. After the channels are programmed automatically, you programmed into the TV's channel memory When you press < or , on the remote control or TV control panel, your TV will stop only on the remote control. ...• Programming channels when the ANT/CABLE input is configured for Cable will be lost! SETUP Menu Language ANT/CABLE In Auto Tuning Manual Tuning TV Settings Manual Setting AV Connection...
Owner's Manual - English
Page 39
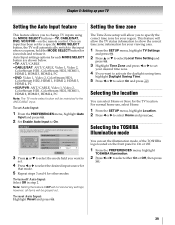
... switching feature when changing modes on your TV Setting the Auto Input feature This feature allows you to change TV inputs using the MODE SELECT buttons-TV, CABLE/SAT, DVD, VCR/PVR-on the front panel to On or Off. 1 From the PREFERENCES menu, highlight TOSHIBA Illumination. 2 Press C or c to... O. 39 For normal home use, select Home. 1 From the SETUP menu, highlight Location. 2 Press C or c to On. Selecting the TOSHIBA Illumination mode You can select Home or Store for the TV location. To turn off Auto Input: Select Off in step 2. however, all items will allow the...
... switching feature when changing modes on your TV Setting the Auto Input feature This feature allows you to change TV inputs using the MODE SELECT buttons-TV, CABLE/SAT, DVD, VCR/PVR-on the front panel to On or Off. 1 From the PREFERENCES menu, highlight TOSHIBA Illumination. 2 Press C or c to... O. 39 For normal home use, select Home. 1 From the SETUP menu, highlight Location. 2 Press C or c to On. Selecting the TOSHIBA Illumination mode You can select Home or Store for the TV location. To turn off Auto Input: Select Off in step 2. however, all items will allow the...
Owner's Manual - English
Page 41
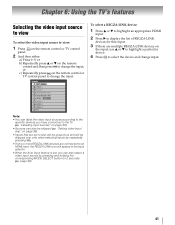
...the video input sources according to the specific devices you have connected to the TV (- "Labeling input sources" on the remote control or TV control panel to change the input. Chapter 6: Using the TV's features Selecting the video input source to view To select the video input... input source by repeatedly pressing +. • If one or more REGZA-LINK devices are multiple REGZA-LINK devices on the remote control or TV control panel. 2 And then either: a) Press 0-9; page 39). or b) Repeatedly control and tphreensspBresosrTb on page 38). • Inputs that input....
...the video input sources according to the specific devices you have connected to the TV (- "Labeling input sources" on the remote control or TV control panel to change the input. Chapter 6: Using the TV's features Selecting the video input source to view To select the video input... input source by repeatedly pressing +. • If one or more REGZA-LINK devices are multiple REGZA-LINK devices on the remote control or TV control panel. 2 And then either: a) Press 0-9; page 39). or b) Repeatedly control and tphreensspBresosrTb on page 38). • Inputs that input....

