Owner's Manual - English
Page 2
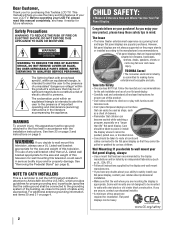
... RAIN OR MOISTURE. NO USER-SERVICEABLE PARTS INSIDE. WARNING To prevent injury, this Toshiba LCD TV. See "Removing the Pedestal Stand" (- However, flat panel display. Tune Into Safety • One size does NOT fit all instructions supplied by an independent laboratory (such as practical. NEC, which provides guidelines for the safe installation and use of the U.S. Some wall mounts are not always supported on furniture that children...
... RAIN OR MOISTURE. NO USER-SERVICEABLE PARTS INSIDE. WARNING To prevent injury, this Toshiba LCD TV. See "Removing the Pedestal Stand" (- However, flat panel display. Tune Into Safety • One size does NOT fit all instructions supplied by an independent laboratory (such as practical. NEC, which provides guidelines for the safe installation and use of the U.S. Some wall mounts are not always supported on furniture that children...
Owner's Manual - English
Page 4
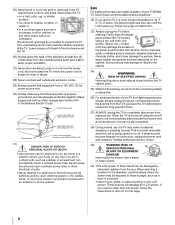
... kind into the TV cabinet slots. 35) While it is turned off using a dry, soft cloth only (cotton, flannel, etc.). If these recommendations and precautions: 32) If you need to install any other electrical circuits. • Never attempt to clean the LCD screen, follow these sounds become frequent or continuous, unplug the power cord and contact a Toshiba Authorized Service Center. 39) WARNING...
... kind into the TV cabinet slots. 35) While it is turned off using a dry, soft cloth only (cotton, flannel, etc.). If these recommendations and precautions: 32) If you need to install any other electrical circuits. • Never attempt to clean the LCD screen, follow these sounds become frequent or continuous, unplug the power cord and contact a Toshiba Authorized Service Center. 39) WARNING...
Owner's Manual - English
Page 5
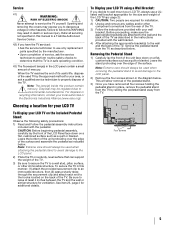
... to use a ULlisted wall bracket appropriate for installation. 2) Unplug and remove any cables and/or other hazards. Be sure to wall mount your area, or ask a qualified service technician to the wall and the back of the TV, remove the pedestal stand from the rear of the LCD TV (- page 2) : 1) CAUTION: Two people are attached to the wall and the back of the TV. CAUTION: Before beginning pedestal assembly...
... to use a ULlisted wall bracket appropriate for installation. 2) Unplug and remove any cables and/or other hazards. Be sure to wall mount your area, or ask a qualified service technician to the wall and the back of the TV, remove the pedestal stand from the rear of the LCD TV (- page 2) : 1) CAUTION: Two people are attached to the wall and the back of the TV. CAUTION: Before beginning pedestal assembly...
Owner's Manual - English
Page 6
... party responsible for a long period of time. 2) The LCD panel contained in a particular installation. Picture Settings, Auto Brightness Sensor, Power-On Mode) may appear on the screen if a fixed, non-moving image is displayed for compliance to calculate an equalization solution that interference will disappear in a short period of time. To ensure your television is operating at an on-screen target may cause harmful interference to comply...
... party responsible for a long period of time. 2) The LCD panel contained in a particular installation. Picture Settings, Auto Brightness Sensor, Power-On Mode) may appear on the screen if a fixed, non-moving image is displayed for compliance to calculate an equalization solution that interference will disappear in a short period of time. To ensure your television is operating at an on-screen target may cause harmful interference to comply...

Owner's Manual - English
Page 7
... Using the volume lock feature (8000 25 Operational feature reset (8900 25 Multi-brand remote control device codes 26 Chapter 4: Menu layout and navigation 34 Main menu layout 34 THINC™ menu 34 Navigating the menu system 35 Chapter 5: Setting up your TV 36 Initial Setup 36 Quick Setup from the SETUP menu 36 Selecting the menu language 36 Configuring the antenna input source for the ANT/CABLE terminal 37 Programming channels into the TV's channel memory 37 Auto...
... Using the volume lock feature (8000 25 Operational feature reset (8900 25 Multi-brand remote control device codes 26 Chapter 4: Menu layout and navigation 34 Main menu layout 34 THINC™ menu 34 Navigating the menu system 35 Chapter 5: Setting up your TV 36 Initial Setup 36 Quick Setup from the SETUP menu 36 Selecting the menu language 36 Configuring the antenna input source for the ANT/CABLE terminal 37 Programming channels into the TV's channel memory 37 Auto...
Owner's Manual - English
Page 9
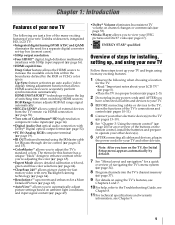
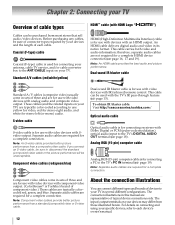
... automatically adjust picture settings based on channel changes or commercials (page 53). •Media Player allows you have connected all cables and devices, plug in most cases). •1080p output resolution. •Four HDMI™ digital, high-definition multimedia interfaces with new Backlight Scanning technology (- pages 2-5). 2 Do not plug in a proper location (- pages 13-19). 5 See "Chapter 3: Using the remote control" (- page 59). •Two sets of ColorStream® HD high-resolution component video inputs (- page...
... automatically adjust picture settings based on channel changes or commercials (page 53). •Media Player allows you have connected all cables and devices, plug in most cases). •1080p output resolution. •Four HDMI™ digital, high-definition multimedia interfaces with new Backlight Scanning technology (- pages 2-5). 2 Do not plug in a proper location (- pages 13-19). 5 See "Chapter 3: Using the remote control" (- page 59). •Two sets of ColorStream® HD high-resolution component video inputs (- page...
Owner's Manual - English
Page 10
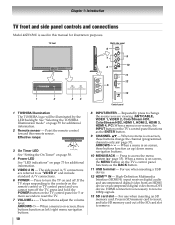
...13 Control panel 1 TOSHIBA Illumination The TOSHIBA logo will be illuminated by the LED backlight. Point the remote control toward this manual for additional information. 2 Remote sensor - The side panel A/V connections are viewing (ANT/CABLE, VIDEO 1, VIDEO 2, ColorStream HD1, ColorStream HD2, HDMI 1, HDMI 2, HDMI 3, HDMI 4, PC).When a menu is on-screen, the INPUT button on the TV control panel for additional information. 5 VIDEO 2 IN - Repeatedly press to change the channel (programmed channels only; - When no menu is on-screen, these buttons change the source you cannot turn...
...13 Control panel 1 TOSHIBA Illumination The TOSHIBA logo will be illuminated by the LED backlight. Point the remote control toward this manual for additional information. 2 Remote sensor - The side panel A/V connections are viewing (ANT/CABLE, VIDEO 1, VIDEO 2, ColorStream HD1, ColorStream HD2, HDMI 1, HDMI 2, HDMI 3, HDMI 4, PC).When a menu is on-screen, the INPUT button on the TV control panel for additional information. 5 VIDEO 2 IN - Repeatedly press to change the channel (programmed channels only; - When no menu is on-screen, these buttons change the source you cannot turn...
Owner's Manual - English
Page 11
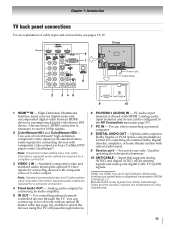
... with component video output, such as a Toshiba DVD player with composite video or S-video output. Optical audio output in the AV Connection menu (- HDMI connection is shared with HDMI 1 analog audio input terminal, and its use can connect up to receive 1080p signals. 2 ColorStream HD1 and ColorStream HD2 - Standard (composite) video and standard audio inputs plus optional S-video inputs for connecting an external Dolby Digital decoder, amplifier, or home theater system with an optical IR blaster cable (- page 12), and then control the devices using the TV...
... with component video output, such as a Toshiba DVD player with composite video or S-video output. Optical audio output in the AV Connection menu (- HDMI connection is shared with HDMI 1 analog audio input terminal, and its use can connect up to receive 1080p signals. 2 ColorStream HD1 and ColorStream HD2 - Standard (composite) video and standard audio inputs plus optional S-video inputs for connecting an external Dolby Digital decoder, amplifier, or home theater system with an optical IR blaster cable (- page 12), and then control the devices using the TV...
Owner's Manual - English
Page 12
... A/V cables (red/white/yellow) HDMI™ cable (with HDMI Logo " ") HDMI (High-Definition Multimedia Interface) cable is for use with video devices with IR (infrared) remote control. These cables (and the related inputs on your specific devices, refer to each cable. S-video cable S-video cable is Toshiba's brand of component video.) These cables are for use with devices with Dolby Digital or PCM (pulse-code modulation) optical audio input to the TV's PC IN terminal (- page 18). The connection illustrations in this manual...
... A/V cables (red/white/yellow) HDMI™ cable (with HDMI Logo " ") HDMI (High-Definition Multimedia Interface) cable is for use with video devices with IR (infrared) remote control. These cables (and the related inputs on your specific devices, refer to each cable. S-video cable S-video cable is Toshiba's brand of component video.) These cables are for use with devices with Dolby Digital or PCM (pulse-code modulation) optical audio input to the TV's PC IN terminal (- page 18). The connection illustrations in this manual...

Owner's Manual - English
Page 13
... the video input source, press INPUT on the TV.* To view basic and premium Cable channels: Turn OFF the VCR. page 41). Use the Cable box controls to your VCR's audio out terminal using the white audio cable only. •S-video cable (if your VCR or camcorder has Svideo) - To view the antenna or Cable signal: Select the ANT/CABLE video input source on the remote control (- For better picture performance, if your VCR has Svideo, use , distribution, or revision of television programs, videotapes, DVDs...
... the video input source, press INPUT on the TV.* To view basic and premium Cable channels: Turn OFF the VCR. page 41). Use the Cable box controls to your VCR's audio out terminal using the white audio cable only. •S-video cable (if your VCR or camcorder has Svideo) - To view the antenna or Cable signal: Select the ANT/CABLE video input source on the remote control (- For better picture performance, if your VCR has Svideo, use , distribution, or revision of television programs, videotapes, DVDs...

Owner's Manual - English
Page 18
... TV upper back panel SETUP Menu Language ANT/CABLE In Auto Tuning Manual Tuning TV Settings Manual Setting AV Connection PC Settings English Antenna 4 Press B or b to select Digital Audio Output, and then press C or c to a digital RF channel. * Manufactured under license from the TV's built- AV Connection PC/HDMI 1 Audio HDMI 1 Audio HDMI Settings Digital Audio Output PC Auto Auto To control the audio: 1 Turn on the TV and the stereo amplifier. 2 Minimize the sound volume from Dolby Laboratories. Dolby, and the double-D symbol are not compatible with optical audio input...
... TV upper back panel SETUP Menu Language ANT/CABLE In Auto Tuning Manual Tuning TV Settings Manual Setting AV Connection PC Settings English Antenna 4 Press B or b to select Digital Audio Output, and then press C or c to a digital RF channel. * Manufactured under license from the TV's built- AV Connection PC/HDMI 1 Audio HDMI 1 Audio HDMI Settings Digital Audio Output PC Auto Auto To control the audio: 1 Turn on the TV and the stereo amplifier. 2 Minimize the sound volume from Dolby Laboratories. Dolby, and the double-D symbol are not compatible with optical audio input...

Owner's Manual - English
Page 19
.../ 60Hz) signal formats. For detailed signal specifications, see page 75. •To display the optimum picture, use the PC settings feature (- Chapter 2: Connecting your computer's display on the TV and hear the sound from the TV's speakers. name No. 1 R 6 2 G 7 3 B 8 4 NC * 9 5 NC 10 *NC=Not connected Signal Pin name No. Separate analog cables are shared with the HDMI 1 analog audio input terminals. • Some PC models cannot be able to the TV. For detailed signal specifications, see...
.../ 60Hz) signal formats. For detailed signal specifications, see page 75. •To display the optimum picture, use the PC settings feature (- Chapter 2: Connecting your computer's display on the TV and hear the sound from the TV's speakers. name No. 1 R 6 2 G 7 3 B 8 4 NC * 9 5 NC 10 *NC=Not connected Signal Pin name No. Separate analog cables are shared with the HDMI 1 analog audio input terminals. • Some PC models cannot be able to the TV. For detailed signal specifications, see...
Owner's Manual - English
Page 21
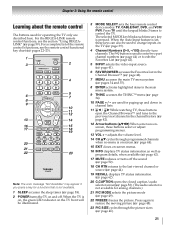
... picture mode (- The selected MODE key blinks each time any key is not available. 1 SLEEP accesses the sleep timer (- page 50). (The audio selector is on, the green LED indicator on -screen menus. 16 INFO displays TV status information as well as program details, when available (- page 48). 23 PIC SIZE cycles through programmed channels when no menu is set, these keys can also be illuminated. 3 MODE SELECT sets the four remote control device modes: TV, CABLE/SAT, DVD...
... picture mode (- The selected MODE key blinks each time any key is not available. 1 SLEEP accesses the sleep timer (- page 50). (The audio selector is on, the green LED indicator on -screen menus. 16 INFO displays TV status information as well as program details, when available (- page 48). 23 PIC SIZE cycles through programmed channels when no menu is set, these keys can also be illuminated. 3 MODE SELECT sets the four remote control device modes: TV, CABLE/SAT, DVD...
Owner's Manual - English
Page 56
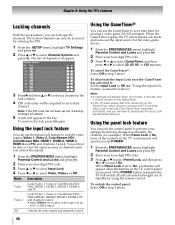
... standby by using the remote control. Note: If the PIN code has not been set locked channel. Video+ Locks Video 1, Video 2, ColorStream HD1/ HD2, HDMI 1, HDMI 2, HDMI 3, HDMI 4, PC and channels 3 and 4. • Select Video+ if you unlock the inputs. 1 From the Parental CPRonEtFrEoRl aEnNdCLEoSckmseannud, hpirgehslsigTht. 2 Enter your four-digit PIN code. 3 Press B or b to select Panel Lock, and then press C or c to select On. Using the panel lock feature You can only be able to view the input sources or channels...
... standby by using the remote control. Note: If the PIN code has not been set locked channel. Video+ Locks Video 1, Video 2, ColorStream HD1/ HD2, HDMI 1, HDMI 2, HDMI 3, HDMI 4, PC and channels 3 and 4. • Select Video+ if you unlock the inputs. 1 From the Parental CPRonEtFrEoRl aEnNdCLEoSckmseannud, hpirgehslsigTht. 2 Enter your four-digit PIN code. 3 Press B or b to select Panel Lock, and then press C or c to select On. Using the panel lock feature You can only be able to view the input sources or channels...
Owner's Manual - English
Page 71
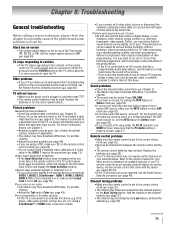
... Set the closed caption feature is connected to one or more seconds to a particular input on your external device. TV stops responding to controls • If the TV stops responding to the correct device mode (- Replace the batteries or try one of this chapter for your TV remote control does not operate a specific feature on • Make sure the power cord is set to the controls on the TV control panel for the program...
... Set the closed caption feature is connected to one or more seconds to a particular input on your external device. TV stops responding to controls • If the TV stops responding to the correct device mode (- Replace the batteries or try one of this chapter for your TV remote control does not operate a specific feature on • Make sure the power cord is set to the controls on the TV control panel for the program...
Owner's Manual - English
Page 77
... WARRANTY GIVES YOU SPECIFIC LEGAL RIGHTS AND YOU MAY ALSO HAVE OTHER RIGHTS WHICH MAY VARY FROM STATE TO STATE IN THE U.S.A. Depending on the type of repair required, the service will either be performed in your needs and help us to any LCD Television or parts that have been modified or had the serial number removed, altered, defaced, or rendered illegible. Owner's Manual and...
... WARRANTY GIVES YOU SPECIFIC LEGAL RIGHTS AND YOU MAY ALSO HAVE OTHER RIGHTS WHICH MAY VARY FROM STATE TO STATE IN THE U.S.A. Depending on the type of repair required, the service will either be performed in your needs and help us to any LCD Television or parts that have been modified or had the serial number removed, altered, defaced, or rendered illegible. Owner's Manual and...
Owner's Manual - English
Page 78
... set installation, setup, adjustment of customer controls, and installation or repair of antenna systems are not covered by failure to usage and/or storage. IF YOU ARE NOT WITHIN 100 KILOMETERS OF AN ASP, YOU MUST DELIVER THE ENTIRE TELEVISION TO AN ASP. Service on Parts and Labour Subject to the more limited warranty if the Television is (i) purchased as to follow the specifications, User manuals...
... set installation, setup, adjustment of customer controls, and installation or repair of antenna systems are not covered by failure to usage and/or storage. IF YOU ARE NOT WITHIN 100 KILOMETERS OF AN ASP, YOU MUST DELIVER THE ENTIRE TELEVISION TO AN ASP. Service on Parts and Labour Subject to the more limited warranty if the Television is (i) purchased as to follow the specifications, User manuals...

Owner's Manual - English
Page 79
... FOLLOW THE SET-UP AND USAGE INSTRUCTIONS. THIS WARRANTY DOES NOT APPLY AND SHALL BE VOID AND UNENFORCEABLE IF THE TELEVISION IS OPENED, SERVICED, OR REPAIRED BY PERSONS OTHER THAN THOSE AUTHORIZED BY TCL TO SERVICE OR REPAIR THE TELEVISION. TO THE EXTENT NOT PRECLUDED BY LAW, STATUTORY OR OTHERWISE, THIS WRITTEN WARRANTY SUPERCEDES AND SPECIFICALLY DISCLAIMS ANY OTHER WARRANTY, CONDITION OR...
... FOLLOW THE SET-UP AND USAGE INSTRUCTIONS. THIS WARRANTY DOES NOT APPLY AND SHALL BE VOID AND UNENFORCEABLE IF THE TELEVISION IS OPENED, SERVICED, OR REPAIRED BY PERSONS OTHER THAN THOSE AUTHORIZED BY TCL TO SERVICE OR REPAIR THE TELEVISION. TO THE EXTENT NOT PRECLUDED BY LAW, STATUTORY OR OTHERWISE, THIS WRITTEN WARRANTY SUPERCEDES AND SPECIFICALLY DISCLAIMS ANY OTHER WARRANTY, CONDITION OR...
Owner's Manual - English
Page 81
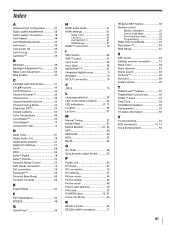
... Timer 58 Optical audio output format 53 P Panel Lock 56 PC Audio 57 PC connection 19 PC settings 57 Picture mode 49 Picture quality 49 Picture scroll 48 Picture size selection 46 PIN code 53 POWER button 10, 21 Power-On Mode 40 R RECALL button 62 REGZA-LINK® connection 17 REGZA-LINK® feature 59 Remote control Battery installation 20 Device code table 26 Functional key chart 22 Programming 24 Reset Factory Defaults 40 Resolution 63 RGB Range 61 S SAP sound 52 Satellite receiver connection ...........14 Sleep Timer...
... Timer 58 Optical audio output format 53 P Panel Lock 56 PC Audio 57 PC connection 19 PC settings 57 Picture mode 49 Picture quality 49 Picture scroll 48 Picture size selection 46 PIN code 53 POWER button 10, 21 Power-On Mode 40 R RECALL button 62 REGZA-LINK® connection 17 REGZA-LINK® feature 59 Remote control Battery installation 20 Device code table 26 Functional key chart 22 Programming 24 Reset Factory Defaults 40 Resolution 63 RGB Range 61 S SAP sound 52 Satellite receiver connection ...........14 Sleep Timer...
Printable Spec Sheet
Page 2
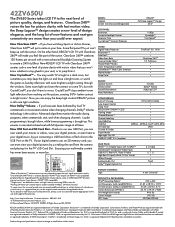
...-CEC compatible peripheral device. SERIES: Cabinet Screen Size (measured diagonally) REGZA® Full Deep LagoonTM Design 42.0" LCD PANEL: Resolution Dynamic Backlight Control Response Time CrystalCoatTM Contrast Enhancer 1080p DynaLightTM CineSpeedTM • VIDEO: Digital Video Processor Resolution+TM AutoViewTM Video Scan Rate Cinema Mode 24fps4 TheaterWide® Modes Color Temperature Control ColorMasterTM Wide Color Enhancer Native ModeTM Deep Color PixelPure® 5G 14 Bit • • ClearScan 240TM 5:5 Pull-Down AUDIO: Speaker System Volume Limiter Sound...
...-CEC compatible peripheral device. SERIES: Cabinet Screen Size (measured diagonally) REGZA® Full Deep LagoonTM Design 42.0" LCD PANEL: Resolution Dynamic Backlight Control Response Time CrystalCoatTM Contrast Enhancer 1080p DynaLightTM CineSpeedTM • VIDEO: Digital Video Processor Resolution+TM AutoViewTM Video Scan Rate Cinema Mode 24fps4 TheaterWide® Modes Color Temperature Control ColorMasterTM Wide Color Enhancer Native ModeTM Deep Color PixelPure® 5G 14 Bit • • ClearScan 240TM 5:5 Pull-Down AUDIO: Speaker System Volume Limiter Sound...


