Owner's Manual - English
Page 1
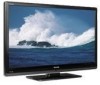
...LCD Television HIGH-DEFINITION TELEVISION 42XV540U 46XV540U 52XV540U For an overview of your TV. Record these numbers whenever you communicate with your new TV, see page 9. Refer to these numbers in the spaces below. For details, please contact your TV antenna installer, cable provider, or satellite provider. © 2008 TOSHIBA...number and serial number are on the back of steps for setting up your Toshiba dealer about this TV. Model number: Serial number: YC/M1 VX1A00098300 Note: To display a High Definition picture, the TV must be receiving a High Definition signal (such as an ...
...LCD Television HIGH-DEFINITION TELEVISION 42XV540U 46XV540U 52XV540U For an overview of your TV. Record these numbers whenever you communicate with your new TV, see page 9. Refer to these numbers in the spaces below. For details, please contact your TV antenna installer, cable provider, or satellite provider. © 2008 TOSHIBA...number and serial number are on the back of steps for setting up your Toshiba dealer about this TV. Model number: Serial number: YC/M1 VX1A00098300 Note: To display a High Definition picture, the TV must be receiving a High Definition signal (such as an ...
Owner's Manual - English
Page 2
...recommendations. • Flat panel displays that they cannot be used as steps, such as close to climb on or play with furniture and television sets. • Don't place flat panel displays on a "larger than a UL Listed wall bracket appropriate for the size and weight of this... display manufacturer and/or listed by an independent laboratory (such as practical. Wall Mounting: If you decide to the presence of this Toshiba LCD TV. The lightning flash with the installation instructions. page 5). NOTE TO CATV INSTALLERS This is committed to Article 820-40 of electric shock...
...recommendations. • Flat panel displays that they cannot be used as steps, such as close to climb on or play with furniture and television sets. • Don't place flat panel displays on a "larger than a UL Listed wall bracket appropriate for the size and weight of this... display manufacturer and/or listed by an independent laboratory (such as practical. Wall Mounting: If you decide to the presence of this Toshiba LCD TV. The lightning flash with the installation instructions. page 5). NOTE TO CATV INSTALLERS This is committed to Article 820-40 of electric shock...
Owner's Manual - English
Page 7
...navigation 33 Main menu layout 33 Setup/Installation menu layout 33 THINC™ menu 33 Navigating the menu system 34 Chapter 5: Setting up your TV 35 Setting the Demo Mode 35 Selecting the menu language 35 Configuring the input source for the ANT/CABLE terminal 36 Programming channels into... Mode 40 Selecting the Demo Mode 40 Chapter 6: Using the TV's features 41 Selecting the video input source to view 41 Labeling the video input sources 41 Tuning channels 42 Tuning channels using the Channel Browser 42 Setting the Channel Tuning Mode 44 Tuning to the next programmed channel...
...navigation 33 Main menu layout 33 Setup/Installation menu layout 33 THINC™ menu 33 Navigating the menu system 34 Chapter 5: Setting up your TV 35 Setting the Demo Mode 35 Selecting the menu language 35 Configuring the input source for the ANT/CABLE terminal 36 Programming channels into... Mode 40 Selecting the Demo Mode 40 Chapter 6: Using the TV's features 41 Selecting the video input source to view 41 Labeling the video input sources 41 Tuning channels 42 Tuning channels using the Channel Browser 42 Setting the Channel Tuning Mode 44 Tuning to the next programmed channel...

Owner's Manual - English
Page 8
Chapter 7: Using the TV's advanced features 61 Using the advanced picture settings features 61 Using dynamic contrast 61 Using the static gamma feature 61 ...8482; feature 63 Using x.v.Color Selection feature 64 Using the Game Mode feature 64 Using the advanced audio settings features 64 Using the surround sound features 64 Chapter 8: Troubleshooting 65 General troubleshooting 65 LED indications 67 ...PC IN and HDMI terminals 69 Limited United States Warranty for LCD Televisions 26" and Larger 70 Limited Canadian Warranty for Toshiba Brand Flat Panel Televisions 71 Index 73 8
Chapter 7: Using the TV's advanced features 61 Using the advanced picture settings features 61 Using dynamic contrast 61 Using the static gamma feature 61 ...8482; feature 63 Using x.v.Color Selection feature 64 Using the Game Mode feature 64 Using the advanced audio settings features 64 Using the surround sound features 64 Chapter 8: Troubleshooting 65 General troubleshooting 65 LED indications 67 ...PC IN and HDMI terminals 69 Limited United States Warranty for LCD Televisions 26" and Larger 70 Limited Canadian Warranty for Toshiba Brand Flat Panel Televisions 71 Index 73 8
Owner's Manual - English
Page 9
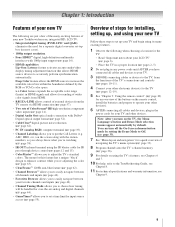
.... Deep Color feature allows the HDMI source to your TV and other devices. page 33). 8 Program channels into the TV's channel memory (- page 42). • Channel Tuning Mode allows you to the TV, learn the functions of the TV's connections and controls (- pages 2-5) 2 Do not...; allows you 're adjusting the color (- pages 10-11). 4 Connect your new Toshiba widescreen, integrated HD, LCD TV: • Integrated digital tuning (8VSB ATSC and QAM) eliminates the need for a separate digital converter set a time limit for input source access (- Chapter 1: Introduction Features of your new...
.... Deep Color feature allows the HDMI source to your TV and other devices. page 33). 8 Program channels into the TV's channel memory (- page 42). • Channel Tuning Mode allows you to the TV, learn the functions of the TV's connections and controls (- pages 2-5) 2 Do not...; allows you 're adjusting the color (- pages 10-11). 4 Connect your new Toshiba widescreen, integrated HD, LCD TV: • Integrated digital tuning (8VSB ATSC and QAM) eliminates the need for a separate digital converter set a time limit for input source access (- Chapter 1: Introduction Features of your new...

Owner's Manual - English
Page 11
... devices with an optical IR blaster cable (- For controlling infrared remote-controlled devices through features. 9 ANT/CABLE - Two sets of cable types and connections, see pages 12-19. 1 TV back 2 3 4 Power cord Cable Strap 5 67 8 1 DIGITAL AUDIO OUT - Note: Component video cables carry only...® high-definition component video inputs (with standard stereo audio inputs) for connecting devices with component video output, such as a Toshiba DVD player with ColorStream®. separate audio cables are trademarks of HDMI Licensing LLC. "Dolby" and the double-D symbol are required...
... devices with an optical IR blaster cable (- For controlling infrared remote-controlled devices through features. 9 ANT/CABLE - Two sets of cable types and connections, see pages 12-19. 1 TV back 2 3 4 Power cord Cable Strap 5 67 8 1 DIGITAL AUDIO OUT - Note: Component video cables carry only...® high-definition component video inputs (with standard stereo audio inputs) for connecting devices with component video output, such as a Toshiba DVD player with ColorStream®. separate audio cables are trademarks of HDMI Licensing LLC. "Dolby" and the double-D symbol are required...
Owner's Manual - English
Page 12
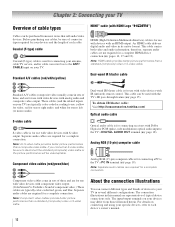
... provide better picture performance than a standard (composite) video or S-video cable. To obtain IR blaster cable: Visit http://ceaccessories.toshiba.com/ Optical audio cable Optical audio cable is for use with video devices with IR (infrared) remote control. The input/output terminals...device connections only. Dual-wand IR blaster cable Standard A/V cables (composite video) usually come in sets of three, and are required for a complete connection. Chapter 2: Connecting your TV Overview of cable types Cables can be used for use with video devices with component video output....
... provide better picture performance than a standard (composite) video or S-video cable. To obtain IR blaster cable: Visit http://ceaccessories.toshiba.com/ Optical audio cable Optical audio cable is for use with video devices with IR (infrared) remote control. The input/output terminals...device connections only. Dual-wand IR blaster cable Standard A/V cables (composite video) usually come in sets of three, and are required for a complete connection. Chapter 2: Connecting your TV Overview of cable types Cables can be used for use with video devices with component video output....

Owner's Manual - English
Page 13
... VCR or camcorder has S-video) Note: When you use the remote control to VIDEO 1 on the TV.* Tune the TV to channel 3 or 4 (whichever channel the Cable box output is set to change channels. Do not connect both types of the United States and other countries, and may subject...VCR. For better picture performance, if your camcorder has S-video, connect an S-video cable (plus the audio cables) instead of the VIDEO 2 on the TV. For better picture performance, if your VCR has S-video, use , distribution, or revision of television programs, videotapes, DVDs, and other devices, see ...
... VCR or camcorder has S-video) Note: When you use the remote control to VIDEO 1 on the TV.* Tune the TV to channel 3 or 4 (whichever channel the Cable box output is set to change channels. Do not connect both types of the United States and other countries, and may subject...VCR. For better picture performance, if your camcorder has S-video, connect an S-video cable (plus the audio cables) instead of the VIDEO 2 on the TV. For better picture performance, if your VCR has S-video, use , distribution, or revision of television programs, videotapes, DVDs, and other devices, see ...

Owner's Manual - English
Page 14
... and Interlaced (480i, 1080i). Please check the Owner's Manual of video cable to record. Select the ColorStream HD1 video input source on the TV.* 14 To view satellite programs using the white audio cable only. • standard audio cables • component video cables - Select the ColorStream...page 21). You can be unacceptable. - The unauthorized recording, use an S-video cable (plus audio cables) from ANT OUT to either set of the standard video cable. The ColorStream HD1 and HD2 terminals can connect the component video cables (plus the audio cables) instead of ...
... and Interlaced (480i, 1080i). Please check the Owner's Manual of video cable to record. Select the ColorStream HD1 video input source on the TV.* 14 To view satellite programs using the white audio cable only. • standard audio cables • component video cables - Select the ColorStream...page 21). You can be unacceptable. - The unauthorized recording, use an S-video cable (plus audio cables) from ANT OUT to either set of the standard video cable. The ColorStream HD1 and HD2 terminals can connect the component video cables (plus the audio cables) instead of ...

Owner's Manual - English
Page 16
... source device, or uncompressed digital video from EIA/CEA-861-D-compliant[1] consumer electronic devices (such as a set-top box or DVD player with your latest HDMI TV, due to new standard adoption. The recommended length is being standardized for reception of highdefinition video signals....PC to accept HDCP (High-Bandwidth Digital-Content Protection) program material in digital form from a DVI (Digital Visual Interface) source device. See "Setting the HDMI™ audio mode" (- This input is recommended that the HDMI or DVI device is reset properly, it is possible that you...
... source device, or uncompressed digital video from EIA/CEA-861-D-compliant[1] consumer electronic devices (such as a set-top box or DVD player with your latest HDMI TV, due to new standard adoption. The recommended length is being standardized for reception of highdefinition video signals....PC to accept HDCP (High-Bandwidth Digital-Content Protection) program material in digital form from a DVI (Digital Visual Interface) source device. See "Setting the HDMI™ audio mode" (- This input is recommended that the HDMI or DVI device is reset properly, it is possible that you...
Owner's Manual - English
Page 17
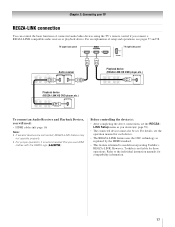
...or playback device. For details, see pages 57 and 58. Before controlling the device(s): • After completing the above connections, set . TV upper back panel TV right side panel VIDEO AUDIO L R IN OUT L R Audio receiver HDMI IN HDMI OUT Playback device (REGZA-LINK HD DVD ...use HDMI cables with the HDMI Logo ( ). For an explanation of connected audio/video devices using the TV's remote control if you desire (- Refer to models incorporating Toshiba's REGZA-LINK. However, Toshiba is recommended that you will need: • HDMI cables (- page 16) Note: • If...
...or playback device. For details, see pages 57 and 58. Before controlling the device(s): • After completing the above connections, set . TV upper back panel TV right side panel VIDEO AUDIO L R IN OUT L R Audio receiver HDMI IN HDMI OUT Playback device (REGZA-LINK HD DVD ...use HDMI cables with the HDMI Logo ( ). For an explanation of connected audio/video devices using the TV's remote control if you desire (- Refer to models incorporating Toshiba's REGZA-LINK. However, Toshiba is recommended that you will need: • HDMI cables (- page 16) Note: • If...

Owner's Manual - English
Page 18
...audio cables Analog audio amplifier To control the audio: 1 Turn on the TV and the digital audio device. 2 Press Y on page 52). LINE IN LR TV upper back panel Audio Digital Audio Selector Audio Settings Advanced Audio Settings Audio Setup 4 In the Optical Output Format field, select either Dolby ...Digital or PCM, depending on the TV and the stereo amplifier. 2 Minimize the sound volume from...
...audio cables Analog audio amplifier To control the audio: 1 Turn on the TV and the digital audio device. 2 Press Y on page 52). LINE IN LR TV upper back panel Audio Digital Audio Selector Audio Settings Advanced Audio Settings Audio Setup 4 In the Optical Output Format field, select either Dolby ...Digital or PCM, depending on the TV and the stereo amplifier. 2 Minimize the sound volume from...
Owner's Manual - English
Page 19
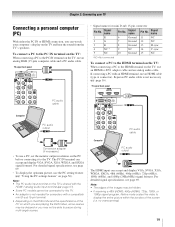
...=Not connected To connect a PC to the HDMI terminal on the TV: When connecting a PC to the HDMI terminal on the TV, use a PC, set the monitor output resolution on the TV, use the PC setting feature (- Signal name 1 R 2 G 3 B 4 NC * 5 NC Pin No. TV upper back panel PC audio cable Computer PC audio output PC audio...
...=Not connected To connect a PC to the HDMI terminal on the TV: When connecting a PC to the HDMI terminal on the TV, use a PC, set the monitor output resolution on the TV, use the PC setting feature (- Signal name 1 R 2 G 3 B 4 NC * 5 NC Pin No. TV upper back panel PC audio cable Computer PC audio output PC audio...

Owner's Manual - English
Page 21
...that is on -screen, these buttons select or adjust programming menus. (Also see the remote control functional key chart (- page 57). page 24). page 42). 5 INPUT selects the video input source (- pages 33 and 34). 8 ENTER activates highlighted items in the Channel Browser™ (- page 36). 15...The error message "Not Available" may appear if you press a key for analog channels.) (- When the TV is set, these buttons open the Channel Browser™ and tune to edit the Favorite List (- Press TV until the keypad blinks 3 times to the last viewed channel or source (- page 37). 4 Channel ...
...that is on -screen, these buttons select or adjust programming menus. (Also see the remote control functional key chart (- page 57). page 24). page 42). 5 INPUT selects the video input source (- pages 33 and 34). 8 ENTER activates highlighted items in the Channel Browser™ (- page 36). 15...The error message "Not Available" may appear if you press a key for analog channels.) (- When the TV is set, these buttons open the Channel Browser™ and tune to edit the Favorite List (- Press TV until the keypad blinks 3 times to the last viewed channel or source (- page 37). 4 Channel ...
Owner's Manual - English
Page 24
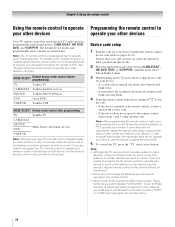
...or some or all of two codes. If some or all of switch and does not respond to the codes for your VCR brand, set the switch to the other devices Device code setup 1 Find the code for some of the features on that the remote control is entered,...not preprogrammed to operate, you want to control. MODE SELECT Default device mode control (before programming) TV Toshiba TV CABLE/SAT Toshiba Satellite receiver HD DVD Toshiba HD DVD Player DVD Orion DVD VCR/PVR Toshiba VCR MODE SELECT Device mode control after trying all necessary keys on certain devices you will need to...
...or some or all of two codes. If some or all of switch and does not respond to the codes for your VCR brand, set the switch to the other devices Device code setup 1 Find the code for some of the features on that the remote control is entered,...not preprogrammed to operate, you want to control. MODE SELECT Default device mode control (before programming) TV Toshiba TV CABLE/SAT Toshiba Satellite receiver HD DVD Toshiba HD DVD Player DVD Orion DVD VCR/PVR Toshiba VCR MODE SELECT Device mode control after trying all necessary keys on certain devices you will need to...
Owner's Manual - English
Page 25
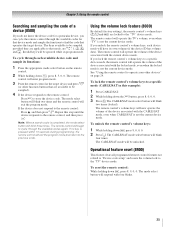
Chapter 3: Using the remote control Searching and sampling the code of a device (8500) If you do not know the device code for a particular device, you can cycle the remote control through the available codes for that device mode and sample the functions to find the code that mode, are applicable to be sampled, provided they are p, 1, z, The keys available to that operates the target device.
Chapter 3: Using the remote control Searching and sampling the code of a device (8500) If you do not know the device code for a particular device, you can cycle the remote control through the available codes for that device mode and sample the functions to find the code that mode, are applicable to be sampled, provided they are p, 1, z, The keys available to that operates the target device.
Owner's Manual - English
Page 33
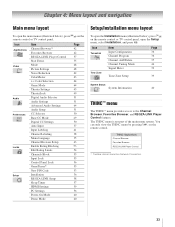
... Limits Channels Block Input Lock Control Panel Lock GameTimer® New PIN Code Installation REGZA-LINK Setup Sleep Timer HDMI Settings PC Settings Power-On Mode Demo Mode Page 42 42 57 35 48 48 62 63 64 64 45 49 51 51 64 51 50 49 50 37 41 38 35... Installation menu (illustrated below ), press Y on the remote control or TV control panel, open the main menus (illustrated below ), press Y on the remote control or TV control panel. THINC Applications Channel Browser Favorites Browser REGZA-LINK Player Control * Toshiba Home Interactive Network Connection. 33 The THINC menu is not part of...
... Limits Channels Block Input Lock Control Panel Lock GameTimer® New PIN Code Installation REGZA-LINK Setup Sleep Timer HDMI Settings PC Settings Power-On Mode Demo Mode Page 42 42 57 35 48 48 62 63 64 64 45 49 51 51 64 51 50 49 50 37 41 38 35... Installation menu (illustrated below ), press Y on the remote control or TV control panel, open the main menus (illustrated below ), press Y on the remote control or TV control panel. THINC Applications Channel Browser Favorites Browser REGZA-LINK Player Control * Toshiba Home Interactive Network Connection. 33 The THINC menu is not part of...

Owner's Manual - English
Page 35
...in the Setup menu (- To change the demo mode setting: Press the MENU and VOLUMEC buttons on the TV, menu language selection and Demo Mode selection windows will appear by default. Chapter 5: Setting up your TV Setting the Demo Mode When you do not make a selection ...2 Highlight Menu Language and press c. 3 Press B or b to close the Preferences menu. 35 The TV will automatically disappear. For normal TV usage, please select [Normal (Off)]. To select settings: 1 From the menu language selection window, select your preferred menu language and press T. If you first ...
...in the Setup menu (- To change the demo mode setting: Press the MENU and VOLUMEC buttons on the TV, menu language selection and Demo Mode selection windows will appear by default. Chapter 5: Setting up your TV Setting the Demo Mode When you do not make a selection ...2 Highlight Menu Language and press c. 3 Press B or b to close the Preferences menu. 35 The TV will automatically disappear. For normal TV usage, please select [Normal (Off)]. To select settings: 1 From the menu language selection window, select your preferred menu language and press T. If you first ...

Owner's Manual - English
Page 36
...channel programming process adds newly found channels to the existing set of programmed channels (and does NOT erase channels that were previously programmed into the TV's channel memory. Chapter 5: Setting up your TV Configuring the input source for Antenna. After the channels ...shown below to repeat the programming process again unless your new settings, highlight Done and press T. Input Configuration ANT/CABLE In Cancel Cable Done 5 To save your Cable TV service lineup changes significantly. Installation Terrestrial Input Configuration Channel Program Channel...
...channel programming process adds newly found channels to the existing set of programmed channels (and does NOT erase channels that were previously programmed into the TV's channel memory. Chapter 5: Setting up your TV Configuring the input source for Antenna. After the channels ...shown below to repeat the programming process again unless your new settings, highlight Done and press T. Input Configuration ANT/CABLE In Cancel Cable Done 5 To save your Cable TV service lineup changes significantly. Installation Terrestrial Input Configuration Channel Program Channel...

Owner's Manual - English
Page 37
... channels from the channel memory: Highlight Reset and press T, and then highlight Done and press T. To set of Channels Found - 52 Scanning Analog Channels Found Channel - 55 Cancel The TV will appear. 2 Open the Terrestrial menu, highlight Channel Add/ Delete, and then press T. When channel...When you to uncheck the box. To revert to begin channel programming. Chapter 5: Setting up your TV 3 Open the Terrestrial menu, highlight Channel Program to bring up the Start, and press T again to your new settings: Highlight Done and press T. ANT/CABLE Cable Scanning channels, please wait ... 5%...
... channels from the channel memory: Highlight Reset and press T, and then highlight Done and press T. To set of Channels Found - 52 Scanning Analog Channels Found Channel - 55 Cancel The TV will appear. 2 Open the Terrestrial menu, highlight Channel Add/ Delete, and then press T. When channel...When you to uncheck the box. To revert to begin channel programming. Chapter 5: Setting up your TV 3 Open the Terrestrial menu, highlight Channel Program to bring up the Start, and press T again to your new settings: Highlight Done and press T. ANT/CABLE Cable Scanning channels, please wait ... 5%...


