Owner's Manual - English
Page 3
...Make sure the strap is dropped and the cabinet or enclosure surface has been damaged or the TV does not operate normally, take the following precautions: • ALWAYS turn off the TV and unplug the power cord to avoid possible electric shock or fire. • NEVER allow your doctor. •... openings are provided for your outlet, consult an electrician for long periods of the unit. The LCD panel inside the TV contains glass and a toxic liquid. Hooks Securement Securement Clip Clip TV side TV top 21) The apparatus shall not be exposed to operate this equipment. Never place the...
...Make sure the strap is dropped and the cabinet or enclosure surface has been damaged or the TV does not operate normally, take the following precautions: • ALWAYS turn off the TV and unplug the power cord to avoid possible electric shock or fire. • NEVER allow your doctor. •... openings are provided for your outlet, consult an electrician for long periods of the unit. The LCD panel inside the TV contains glass and a toxic liquid. Hooks Securement Securement Clip Clip TV side TV top 21) The apparatus shall not be exposed to operate this equipment. Never place the...

Owner's Manual - English
Page 4
... LCD screen of this product can accidentally touch overhead power lines. These actions will damage the LCD screen. Failure to follow these sounds become frequent or continuous, unplug the power cord and contact a Toshiba ...Authorized Service Center. 35) WARNING: RISK OF SERIOUS PERSONAL INJURY OR EQUIPMENT DAMAGE! or b) cables, wires, or any of the following during lightning activity: a) an antenna system; A hard cloth may damage the surface. When the TV...
... LCD screen of this product can accidentally touch overhead power lines. These actions will damage the LCD screen. Failure to follow these sounds become frequent or continuous, unplug the power cord and contact a Toshiba ...Authorized Service Center. 35) WARNING: RISK OF SERIOUS PERSONAL INJURY OR EQUIPMENT DAMAGE! or b) cables, wires, or any of the following during lightning activity: a) an antenna system; A hard cloth may damage the surface. When the TV...
Owner's Manual - English
Page 6
... there may be determined by removing and applying power to the equipment, the user is encouraged to try to correct the interference by Toshiba could void the user's authority to this equipment...to provide reasonable protection against harmful interference in this equipment. Trademark Information • Manufactured under your LCD TV The following measures: • Reorient or relocate the receiving antenna. • Increase the separation... (Part 15): The Toshiba 32RV530U, 37RV530U, 42RV530U, 46RV530U, and 52RV530U Televisions comply with Part 15 of precision technology;
... there may be determined by removing and applying power to the equipment, the user is encouraged to try to correct the interference by Toshiba could void the user's authority to this equipment...to provide reasonable protection against harmful interference in this equipment. Trademark Information • Manufactured under your LCD TV The following measures: • Reorient or relocate the receiving antenna. • Increase the separation... (Part 15): The Toshiba 32RV530U, 37RV530U, 42RV530U, 46RV530U, and 52RV530U Televisions comply with Part 15 of precision technology;
Owner's Manual - English
Page 7
... mode 32 Viewing the digital signal meter 33 Setting the time zone 33 Viewing the system status 34 Selecting the Power-On Mode 34 Chapter 6: Using the TV's features 35 Selecting the video input source to view 35 Labeling the video input sources 35 Tuning channels 36 Tuning...41 Using the auto aspect ratio feature 41 Selecting the cinema mode (480i and 1080i signals 42 Using the FREEZE feature 42 Adjusting the picture 42 Selecting the picture mode 42 Adjusting the picture quality 42 Using the TheaterLock™ feature 43 Using the closed caption mode 43 Base closed captions 43...
... mode 32 Viewing the digital signal meter 33 Setting the time zone 33 Viewing the system status 34 Selecting the Power-On Mode 34 Chapter 6: Using the TV's features 35 Selecting the video input source to view 35 Labeling the video input sources 35 Tuning channels 36 Tuning...41 Using the auto aspect ratio feature 41 Selecting the cinema mode (480i and 1080i signals 42 Using the FREEZE feature 42 Adjusting the picture 42 Selecting the picture mode 42 Adjusting the picture quality 42 Using the TheaterLock™ feature 43 Using the closed caption mode 43 Base closed captions 43...

Owner's Manual - English
Page 9
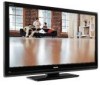
... colors. Overview of steps for installing, setting up, and using your new TV Follow these steps to set up your TV and begin using its many exciting features of your new Toshiba widescreen, integrated HD, LCD TV: • Integrated digital tuning (8VSB ATSC and QAM) eliminates the need for a ...what you have connected all cables and devices, plug in the power cords for your TV and other electronic device(s) to the TV (- The menu for the TV: • Read "Important notes about your LCD TV" (- page 27). 8 Program channels into the TV's channel memory (- page 31). • IR OUT infrared ...
... colors. Overview of steps for installing, setting up, and using your new TV Follow these steps to set up your TV and begin using its many exciting features of your new Toshiba widescreen, integrated HD, LCD TV: • Integrated digital tuning (8VSB ATSC and QAM) eliminates the need for a ...what you have connected all cables and devices, plug in the power cords for your TV and other electronic device(s) to the TV (- The menu for the TV: • Read "Important notes about your LCD TV" (- page 27). 8 Program channels into the TV's channel memory (- page 31). • IR OUT infrared ...

Owner's Manual - English
Page 10
... use only. Effective range: 16.4 ft (5m) 2 Green and Yellow LEDs Green = Power indicator Yellow = Power-On Mode indicator (- "Selecting the Power-On Mode" on page 34) See "LED indications" on the TV's control panel functions as the ENTER button. 7 EXIT - Press to turn off . page...to the controls on -screen menu. 8 CHANNEL Bb - page 27). TV front Right side panel 4 8 5 9 6 7 10 3 11 1 2 1 Remote sensor - Chapter 1: Introduction TV front and side panel controls and connections Model 42RV530U is used in this remote sensor. Point the remote control toward this ...
... use only. Effective range: 16.4 ft (5m) 2 Green and Yellow LEDs Green = Power indicator Yellow = Power-On Mode indicator (- "Selecting the Power-On Mode" on page 34) See "LED indications" on the TV's control panel functions as the ENTER button. 7 EXIT - Press to turn off . page...to the controls on -screen menu. 8 CHANNEL Bb - page 27). TV front Right side panel 4 8 5 9 6 7 10 3 11 1 2 1 Remote sensor - Chapter 1: Introduction TV front and side panel controls and connections Model 42RV530U is used in this remote sensor. Point the remote control toward this ...
Owner's Manual - English
Page 11
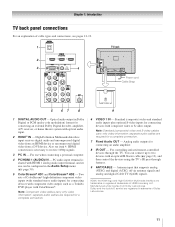
... audio and uncompressed digital video from an HDMI device or uncompressed digital video from Dolby Laboratories. Also see pages 12-19. 1 TV back 2 3 4 Power cord Cable Strap 5 67 8 9 1 DIGITAL AUDIO OUT - Dolby and the double-D symbol are required for connecting devices with... ANT/CABLE - HDMI, the HDMI logo and High-Definition Multimedia Interface are required for connecting devices with component video output, such as a Toshiba DVD player with optical audio input. 2 HDMI™ IN - HDMI connection is shared with standard stereo audio inputs) for a complete connection...
... audio and uncompressed digital video from an HDMI device or uncompressed digital video from Dolby Laboratories. Also see pages 12-19. 1 TV back 2 3 4 Power cord Cable Strap 5 67 8 9 1 DIGITAL AUDIO OUT - Dolby and the double-D symbol are required for connecting devices with... ANT/CABLE - HDMI, the HDMI logo and High-Definition Multimedia Interface are required for connecting devices with component video output, such as a Toshiba DVD player with optical audio input. 2 HDMI™ IN - HDMI connection is shared with standard stereo audio inputs) for a complete connection...
Owner's Manual - English
Page 15
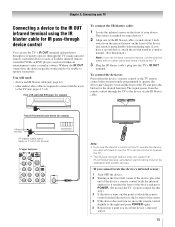
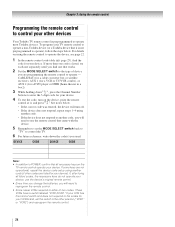
... remote control slightly to the right and press POWER again. 5 Repeat step 4 until you previously programmed to the IR OUT infrared terminal using double-sided mounting tape. page 12) • other audio/video cables as Toshiba infrared remotecontrolled VCRs or DVD players) enclosed within... an entertainment center or similar cabinet. Chapter 3) toward the front of your TV Connecting a device to operate the device; - Front of the device and...
... remote control slightly to the right and press POWER again. 5 Repeat step 4 until you previously programmed to the IR OUT infrared terminal using double-sided mounting tape. page 12) • other audio/video cables as Toshiba infrared remotecontrolled VCRs or DVD players) enclosed within... an entertainment center or similar cabinet. Chapter 3) toward the front of your TV Connecting a device to operate the device; - Front of the device and...

Owner's Manual - English
Page 21
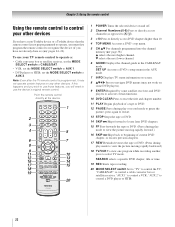
... channels when no menu is on, the green LED indicator on the TV front will be illuminated. 2 FREEZE freezes the picture. page 36). 10 RECALL displays TV status information (- page 42). 3 SLEEP accesses the sleep timer (- When the TV is on and off the sound (- page 39). 12 MUTE reduces..., and Dot by Dot (- Chapter 3: Using the remote control Learning about the remote control The buttons used to tune digital channels (- page 23). 1 POWER turns the TV on -screen (- The = button is used for a function that is on -screen menus. 19 MODE SELECT switch switches between...
... channels when no menu is on, the green LED indicator on the TV front will be illuminated. 2 FREEZE freezes the picture. page 36). 10 RECALL displays TV status information (- page 42). 3 SLEEP accesses the sleep timer (- When the TV is on and off the sound (- page 39). 12 MUTE reduces..., and Dot by Dot (- Chapter 3: Using the remote control Learning about the remote control The buttons used to tune digital channels (- page 23). 1 POWER turns the TV on -screen (- The = button is used for a function that is on -screen menus. 19 MODE SELECT switch switches between...
Owner's Manual - English
Page 22
...this happens and you wish to use those features, you have a non-Toshiba device or a Toshiba device that the remote control is programmed, it may not work on ...picture moving rapidly backward.) 18 TV/VCR To view one program while recording another, press to select TV mode. Point the remote control directly at the device. 16 17 18 19 1 POWER Turns the selected device on ... b selects the next lower channel. 6 GUIDE Displays the channel guide in the AUX mode. 7 INFO Displays TV status information on-screen. 8 BbC c Press to navigate DVD menus (may not operate certain features on and ...
...this happens and you wish to use those features, you have a non-Toshiba device or a Toshiba device that the remote control is programmed, it may not work on ...picture moving rapidly backward.) 18 TV/VCR To view one program while recording another, press to select TV mode. Point the remote control directly at the device. 16 17 18 19 1 POWER Turns the selected device on ... b selects the next lower channel. 6 GUIDE Displays the channel guide in the AUX mode. 7 INFO Displays TV status information on-screen. 8 BbC c Press to navigate DVD menus (may not operate certain features on and ...
Owner's Manual - English
Page 23
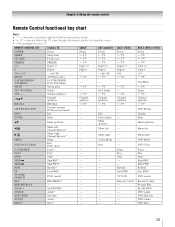
.../down Channel up/down RECALL --s TV Channel up/down s TV SAT Guide s TV Channel up /down --- REW Rewind* --- --- REMOTE CONTROL KEY Toshiba TV CABLE SAT (satellite) POWER SLEEP PIC SIZE FREEZE Power Sleep timer Picture size FREEZE Power s TV s TV s TV Power s TV s TV s TV 1-9 Digit 1-9 Digit 1-9 Digit 1-9 0 Digit 0 Digit 0 Digit 0 100/-/+10 INPUT - (sub CH) TV/Video select --s TV - (sub CH) s TV FAV BROWSER/ TOP MENU MUTE...
.../down Channel up/down RECALL --s TV Channel up/down s TV SAT Guide s TV Channel up /down --- REW Rewind* --- --- REMOTE CONTROL KEY Toshiba TV CABLE SAT (satellite) POWER SLEEP PIC SIZE FREEZE Power Sleep timer Picture size FREEZE Power s TV s TV s TV Power s TV s TV s TV 1-9 Digit 1-9 Digit 1-9 Digit 1-9 0 Digit 0 Digit 0 Digit 0 100/-/+10 INPUT - (sub CH) TV/Video select --s TV - (sub CH) s TV FAV BROWSER/ TOP MENU MUTE...
Owner's Manual - English
Page 24
... player or HTIB [home theater in a box]). 3 While holding down the code(s) you used: DEVICE CODE DEVICE CODE Note: • In addition to POWER, confirm that all listed codes, the necessary keys do not operate your device, use the remote control that it , and press p. These VCRs have a switch... to use the device's original remote control. • Every time you change the batteries, you are listed for your other devices Your Toshiba TV remote control is listed, try each one separately until you find the code for your device. If some keys are not operational, repeat the...
... player or HTIB [home theater in a box]). 3 While holding down the code(s) you used: DEVICE CODE DEVICE CODE Note: • In addition to POWER, confirm that all listed codes, the necessary keys do not operate your device, use the remote control that it , and press p. These VCRs have a switch... to use the device's original remote control. • Every time you change the batteries, you are listed for your other devices Your Toshiba TV remote control is listed, try each one separately until you find the code for your device. If some keys are not operational, repeat the...
Owner's Manual - English
Page 27
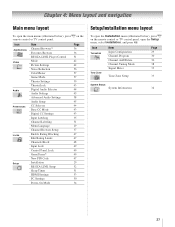
... Channels Block Input Lock Control Panel Lock GameTimer® New PIN Code Installation REGZA-LINK Setup Sleep Timer HDMI Settings PC Settings Power-On Mode Page 36 36 51 42 42 56 57 57 39 43 44 45 58 45 44 43 43 35 31 29 37 47 47 48 49 49 49... 34 Setup/Installation menu layout To open the Installation menu (illustrated below ), press Y on the remote control or TV control panel, open the main menus (illustrated below ), press Y on the remote control or TV control panel. Chapter 4: Menu layout and navigation Main menu layout To open the Setup menu, select Installation, and...
... Channels Block Input Lock Control Panel Lock GameTimer® New PIN Code Installation REGZA-LINK Setup Sleep Timer HDMI Settings PC Settings Power-On Mode Page 36 36 51 42 42 56 57 57 39 43 44 45 58 45 44 43 43 35 31 29 37 47 47 48 49 49 49... 34 Setup/Installation menu layout To open the Installation menu (illustrated below ), press Y on the remote control or TV control panel, open the main menus (illustrated below ), press Y on the remote control or TV control panel. Chapter 4: Menu layout and navigation Main menu layout To open the Setup menu, select Installation, and...

Owner's Manual - English
Page 29
Setup Installation REGZA-LINK Setup Sleep Timer HDMI Settings PC Settings Power-On Mode Power-Saving 3 (A new set of menus and messages. Input Configuration ANT/CABLE In Cancel Cable Done 5 To save your new settings, highlight Done and press T. To ... your preferred menu language and press T. To select the menu language: 1 Press Y and open the Setup menu. 2 Highlight Installation and press T. Chapter 5: Setting up your TV Selecting the menu language You can choose from three different languages (English, French and Spanish) for the on the...
Setup Installation REGZA-LINK Setup Sleep Timer HDMI Settings PC Settings Power-On Mode Power-Saving 3 (A new set of menus and messages. Input Configuration ANT/CABLE In Cancel Cable Done 5 To save your new settings, highlight Done and press T. To ... your preferred menu language and press T. To select the menu language: 1 Press Y and open the Setup menu. 2 Highlight Installation and press T. Chapter 5: Setting up your TV Selecting the menu language You can choose from three different languages (English, French and Spanish) for the on the...
Owner's Manual - English
Page 34
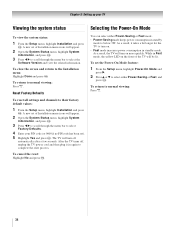
...Status menu, highlight System Information, and press T. 3 Press C c to scroll through the menu bar to select Factory Defaults. 4 Enter your TV Viewing the system status Selecting the Power-On Mode To view the system status: 1 From the Setup menu, highlight Installation and press T. While in again to their factory default...As a result, it in Fast mode, the yellow LED on more quickly. To return to turn off , unplug the TV power cord and then plug it takes a bit longer for the TV to normal viewing: Press O. 34 Chapter 5: Setting up your PIN code (or 0000 if no PIN code has been ...
...Status menu, highlight System Information, and press T. 3 Press C c to scroll through the menu bar to select Factory Defaults. 4 Enter your TV Viewing the system status Selecting the Power-On Mode To view the system status: 1 From the Setup menu, highlight Installation and press T. While in again to their factory default...As a result, it in Fast mode, the yellow LED on more quickly. To return to turn off , unplug the TV power cord and then plug it takes a bit longer for the TV to normal viewing: Press O. 34 Chapter 5: Setting up your PIN code (or 0000 if no PIN code has been ...

Owner's Manual - English
Page 37
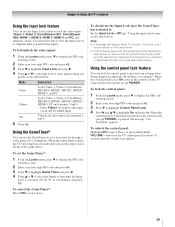
Chapter 6: Using the TV's features To set to Off when Enable REGZA-LINK is powered off. 4 Press b to highlight ANT/CABLE List, and then press C or c to select...currently highlighted in the browser 5 Channels stored in the Channel Browser™, it will be highlighted and the TV will automatically tune to the channel or input. 2 Press O to close the Channel Browser™. Once ... the next item in the Channel Browser™. To tune to a channel or input in Select mode: 1 While watching TV, press 3 C or # c to open the Channel Browser™ and surf back to a previous item or surf...
Chapter 6: Using the TV's features To set to Off when Enable REGZA-LINK is powered off. 4 Press b to highlight ANT/CABLE List, and then press C or c to select...currently highlighted in the browser 5 Channels stored in the Channel Browser™, it will be highlighted and the TV will automatically tune to the channel or input. 2 Press O to close the Channel Browser™. Once ... the next item in the Channel Browser™. To tune to a channel or input in Select mode: 1 While watching TV, press 3 C or # c to open the Channel Browser™ and surf back to a previous item or surf...
Owner's Manual - English
Page 49
..." as described below. To set a time limit for about 10 seconds until the volume icon appears. 49 button on the GameTimer, when power is restored the TV will enter Input Lock mode (as described above ). Mode Video Video+ Off 5 Press T. Using the control panel lock feature You can ...and you unlock the inputs. You will appear when 10 minutes, 3 minutes, and 1 minute remain on the GameTimer. • If the TV loses power with time remaining on the TV control panel for playing a video game (30-120 minutes). To lock/unlock the video inputs: 1 From the Locks menu, press b to...
..." as described below. To set a time limit for about 10 seconds until the volume icon appears. 49 button on the GameTimer, when power is restored the TV will enter Input Lock mode (as described above ). Mode Video Video+ Off 5 Press T. Using the control panel lock feature You can ...and you unlock the inputs. You will appear when 10 minutes, 3 minutes, and 1 minute remain on the GameTimer. • If the TV loses power with time remaining on the TV control panel for playing a video game (30-120 minutes). To lock/unlock the video inputs: 1 From the Locks menu, press b to...
Owner's Manual - English
Page 51
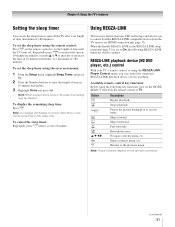
... Using REGZA-LINK This is set to On, the following key functions, first set to control Toshiba REGZA-LINK compatible devices from the TV remote via HDMI connection (- Rewinds/reverses. page 52) is a new feature that uses CEC ...of time until it is one minute remaining on the devices connected. (continued) 51 Chapter 6: Using the TV's features Setting the sleep timer You can control the connected REGZA-LINK playback device you are watching. Repeatedly... menu. To set the length of 180 minutes. Note: When a power failure occurs, the sleep timer setting may be enabled.
... Using REGZA-LINK This is set to On, the following key functions, first set to control Toshiba REGZA-LINK compatible devices from the TV remote via HDMI connection (- Rewinds/reverses. page 52) is a new feature that uses CEC ...of time until it is one minute remaining on the devices connected. (continued) 51 Chapter 6: Using the TV's features Setting the sleep timer You can control the connected REGZA-LINK playback device you are watching. Repeatedly... menu. To set the length of 180 minutes. Note: When a power failure occurs, the sleep timer setting may be enabled.
Owner's Manual - English
Page 52
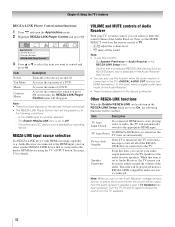
...adjust or mute the volume of the Audio Receiver. TV Auto Power If a REGZA-LINK device is turned off and on again to Off. - Device Auto Standby If the TV is turned on, the TV turns on and off. Turn the TV off the TV will automatically switch to On, the following conditions: ... to the master HDMI device using the TV's INPUT button. Item Description TV Auto Input Switch If a connected HDMI device starts playing video or audio, the TV will send a message to turn on the remote control to control and press T. Item Power Top Menu Menu Contents Menu Description Turns ...
...adjust or mute the volume of the Audio Receiver. TV Auto Power If a REGZA-LINK device is turned off and on again to Off. - Device Auto Standby If the TV is turned on, the TV turns on and off. Turn the TV off the TV will automatically switch to On, the following conditions: ... to the master HDMI device using the TV's INPUT button. Item Description TV Auto Input Switch If a connected HDMI device starts playing video or audio, the TV will send a message to turn on the remote control to control and press T. Item Power Top Menu Menu Contents Menu Description Turns ...
Owner's Manual - English
Page 53
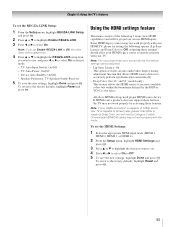
... supports Deep Color, you want to set. 4 Press C or c to select On or desired mode. • TV Auto Input Switch: On/Off • TV Auto Power: On/Off • Device Auto Standby: On/Off • Speaker Preference: TV Speakers/Audio Receiver 5 To save the new settings, highlight Done and press T. Adjusting these features. Conventional...
... supports Deep Color, you want to set. 4 Press C or c to select On or desired mode. • TV Auto Input Switch: On/Off • TV Auto Power: On/Off • Device Auto Standby: On/Off • Speaker Preference: TV Speakers/Audio Receiver 5 To save the new settings, highlight Done and press T. Adjusting these features. Conventional...


