User Manual
Page 7
...modifications to this TV is not permanent and will not occur in the United States and other countries. • MPEG Layer-3 audio coding technology licensed from Fraunhofer IIS and Thomson. 7 The afterimage is manufactured using an extremely high level of precision technology; ...however, there may not work with the instructions, may cause undesired operation. FCC Declaration of Conformity Compliance Statement (Part 15): The Toshiba 32E200U, 32E20U, 37E200U, 37E20U, 40E200U, and 40E20U Televisions comply with the limits for a Class B digital device, pursuant to Part 15 of the FCC...
...modifications to this TV is not permanent and will not occur in the United States and other countries. • MPEG Layer-3 audio coding technology licensed from Fraunhofer IIS and Thomson. 7 The afterimage is manufactured using an extremely high level of precision technology; ...however, there may not work with the instructions, may cause undesired operation. FCC Declaration of Conformity Compliance Statement (Part 15): The Toshiba 32E200U, 32E20U, 37E200U, 37E20U, 40E200U, and 40E20U Televisions comply with the limits for a Class B digital device, pursuant to Part 15 of the FCC...
User Manual
Page 8
...a satellite receiver...........15 Connecting an HDMI® or DVI device to the HDMI input........16 REGZA-LINK® connection 17 Connecting a digital audio system 18 Connecting a personal computer (PC 18 Chapter 3: Using the remote control 20 Installing the remote control batteries 20 Remote control effective ...layout 23 Navigating the menu system 23 Chapter 5: Setting up your TV 24 Initial Setup 24 Selecting the menu language 24 TOSHIBA Logo LED 24 Configuring the antenna input source for the ANT/CABLE terminal 24 Programming channels into the TV's channel memory............25...
...a satellite receiver...........15 Connecting an HDMI® or DVI device to the HDMI input........16 REGZA-LINK® connection 17 Connecting a digital audio system 18 Connecting a personal computer (PC 18 Chapter 3: Using the remote control 20 Installing the remote control batteries 20 Remote control effective ...layout 23 Navigating the menu system 23 Chapter 5: Setting up your TV 24 Initial Setup 24 Selecting the menu language 24 TOSHIBA Logo LED 24 Configuring the antenna input source for the ANT/CABLE terminal 24 Programming channels into the TV's channel memory............25...
User Manual
Page 9
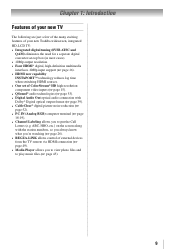
Chapter 1: Introduction Features of your new TV The following are just a few of the many exciting features of your new Toshiba widescreen, integrated HD, LCD TV: • Integrated digital tuning (8VSB ATSC and QAM) eliminates the need for a separate ...REGZA-LINK allows control of ColorStream® HD high-resolution component video inputs ( page 15). • QSound® audio technologies ( page 53). • Digital Audio Out optical audio connection with Dolby® Digital optical output format ( page 39). • CableClear® digital picture noise reduction (&#...
Chapter 1: Introduction Features of your new TV The following are just a few of the many exciting features of your new Toshiba widescreen, integrated HD, LCD TV: • Integrated digital tuning (8VSB ATSC and QAM) eliminates the need for a separate ...REGZA-LINK allows control of ColorStream® HD high-resolution component video inputs ( page 15). • QSound® audio technologies ( page 53). • Digital Audio Out optical audio connection with Dolby® Digital optical output format ( page 39). • CableClear® digital picture noise reduction (&#...
User Manual
Page 11
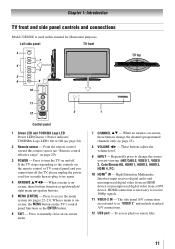
... to change the channel (programmed channels only; page 25). 8無 VOLUME tu - High-Definition Multimedia Interface input receives digital audio and uncompressed digital video from an HDMI device or uncompressed digital video from a DVI device. The side panel A/V connections are viewing (ANT... Left side panel TV front 3 7 4 8 5 6 9 10 TV top 11 12 2 Control panel 1無 Green LED and TOSHIBA Logo LED Power LED(Green) = Power indicator TOSHIBA Logo LED= On or Off ( page 24). 2無 Remote sensor - When no menu is used in this remote sensor (...
... to change the channel (programmed channels only; page 25). 8無 VOLUME tu - High-Definition Multimedia Interface input receives digital audio and uncompressed digital video from an HDMI device or uncompressed digital video from a DVI device. The side panel A/V connections are viewing (ANT... Left side panel TV front 3 7 4 8 5 6 9 10 TV top 11 12 2 Control panel 1無 Green LED and TOSHIBA Logo LED Power LED(Green) = Power indicator TOSHIBA Logo LED= On or Off ( page 24). 2無 Remote sensor - When no menu is used in this remote sensor (...
User Manual
Page 12
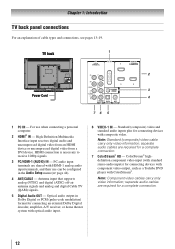
...) signals. 5無 Digital Audio OUT - Optical audio output in the Audio Setup menu ( page 44). 4無 ANT/CABLE - separate audio cables are required for connecting devices with component video output, such as a Toshiba DVD player with optical audio input. 6無 VIDEO-1 ...IN - ColorStream® highdefinition component video input (with HDMI-1 analog audio input terminals, and their use when connecting a personal computer. 2&#...
...) signals. 5無 Digital Audio OUT - Optical audio output in the Audio Setup menu ( page 44). 4無 ANT/CABLE - separate audio cables are required for connecting devices with component video output, such as a Toshiba DVD player with optical audio input. 6無 VIDEO-1 ...IN - ColorStream® highdefinition component video input (with HDMI-1 analog audio input terminals, and their use when connecting a personal computer. 2&#...
User Manual
Page 13
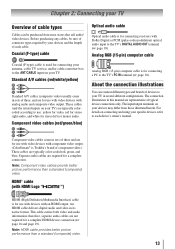
...The connection illustrations in several different configurations. Separate audio cables are typically colorcoded according to use with video devices with analog audio and composite video output. Coaxial (F-type) cable Coaxial (F-type) cable is Toshiba's brand of three and are typically color-coded... connection ( page 16 and page 19). This cable carries both video and audio information; Chapter 2: Connecting your devices may differ from most stores that sell audio/ video devices. Before purchasing any cables, be purchased from those illustrated herein. These...
...The connection illustrations in several different configurations. Separate audio cables are typically colorcoded according to use with video devices with analog audio and composite video output. Coaxial (F-type) cable Coaxial (F-type) cable is Toshiba's brand of three and are typically color-coded... connection ( page 16 and page 19). This cable carries both video and audio information; Chapter 2: Connecting your devices may differ from most stores that sell audio/ video devices. Before purchasing any cables, be purchased from those illustrated herein. These...
User Manual
Page 14
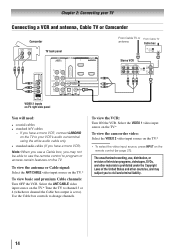
...VCR. Chapter 2: Connecting your TV Connecting a VCR and antenna, Cable TV or Camcorder Camcorder AUDIO OUT L R VIDEO TV back panel From Cable TV or From Cable TV antenna Cable box IN CH 3 ...CH 4 OUT Stereo VCR VIDEO AUDIO L R IN CH 3 CH 4 OUT L R IN from ANT OUT to TV VIDEO 2 inputs on TV ...; If you have a mono VCR, connect L/MONO on the TV to your VCR's audio out terminal using the white audio cable only. • standard audio cables (If you have a mono VCR) Note: When you use a Cable box, ...
...VCR. Chapter 2: Connecting your TV Connecting a VCR and antenna, Cable TV or Camcorder Camcorder AUDIO OUT L R VIDEO TV back panel From Cable TV or From Cable TV antenna Cable box IN CH 3 ...CH 4 OUT Stereo VCR VIDEO AUDIO L R IN CH 3 CH 4 OUT L R IN from ANT OUT to TV VIDEO 2 inputs on TV ...; If you have a mono VCR, connect L/MONO on the TV to your VCR's audio out terminal using the white audio cable only. • standard audio cables (If you have a mono VCR) Note: When you use a Cable box, ...
User Manual
Page 15
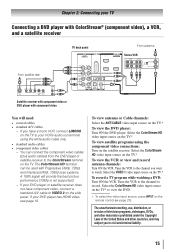
... control ( page 21). Select the ColorStream HD video input source on the TV.* To view satellite programs using the white audio cable only. • standard audio cables • component video cables −− You can be used with component video You will provide the best picture performance ... supported). −− If your DVD player or satellite receiver does not have a mono VCR, connect L/MONO on the TV to your VCR's audio out terminal using the component video connections: Turn on the TV.* To record a TV program while watching a DVD: Turn ON the VCR. Select...
... control ( page 21). Select the ColorStream HD video input source on the TV.* To view satellite programs using the white audio cable only. • standard audio cables • component video cables −− You can be used with component video You will provide the best picture performance ... supported). −− If your DVD player or satellite receiver does not have a mono VCR, connect L/MONO on the TV to your VCR's audio out terminal using the component video connections: Turn on the TV.* To record a TV program while watching a DVD: Turn ON the VCR. Select...
User Manual
Page 16
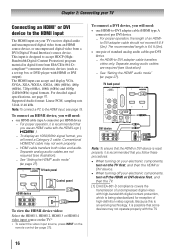
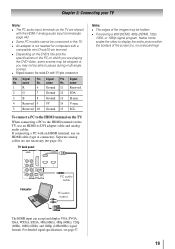
...2m). • one pair of high-definition video signals. For detailed signal specifications, see illustration). −− See "Setting the HDMI® audio mode" ( page 27). Chapter 2: Connecting your TV Connecting an HDMI® or DVI device to -DVI adapter cable transfers video only. This... input is possible that you will need a Category 2 cable. Supported Audio format: Linear PCM, sampling rate 32/44.1/ 48 kHz Note: To connect a PC to accept HDCP (HighBandwidth Digital-Content Protection) program ...
...2m). • one pair of high-definition video signals. For detailed signal specifications, see illustration). −− See "Setting the HDMI® audio mode" ( page 27). Chapter 2: Connecting your TV Connecting an HDMI® or DVI device to -DVI adapter cable transfers video only. This... input is possible that you will need a Category 2 cable. Supported Audio format: Linear PCM, sampling rate 32/44.1/ 48 kHz Note: To connect a PC to accept HDCP (HighBandwidth Digital-Content Protection) program ...
User Manual
Page 17
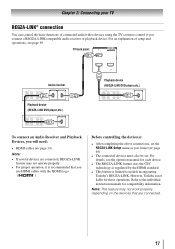
For an explanation of connected audio/video devices using the TV's remote control if you will need: • HDMI cables ( page 13) Note: • If several devices are connected. 17 Refer to models incorporating Toshiba's REGZA-LINK. Chapter 2: Connecting your TV REGZA-LINK...Logo ( ). Before controlling the device(s): • After completing the above connections, set . For details, see page 49. However, Toshiba is limited to the individual instruction manuals for those operations. Note: This feature may not work properly depending on the devices that are ...
For an explanation of connected audio/video devices using the TV's remote control if you will need: • HDMI cables ( page 13) Note: • If several devices are connected. 17 Refer to models incorporating Toshiba's REGZA-LINK. Chapter 2: Connecting your TV REGZA-LINK...Logo ( ). Before controlling the device(s): • After completing the above connections, set . For details, see page 49. However, Toshiba is limited to the individual instruction manuals for those operations. Note: This feature may not work properly depending on the devices that are ...
User Manual
Page 18
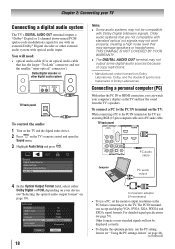
... and display VGA, SVGA, XGA, WXGA and SXGA signal formats. Other formats or non-standard signals will need: • optical audio cable (Use an optical audio cable that are trademarks of copy restrictions. ** Manufactured under license from the TV's speakers. Dolby, and the double-D symbol are ... may not work properly, creating a high noise level that may damage speakers or headphones. Chapter 2: Connecting your device ("Selecting the optical audio output format" on page 39). 18 Conversion adapter (if necessary) • To use a PC, set the monitor output resolution on the ...
... and display VGA, SVGA, XGA, WXGA and SXGA signal formats. Other formats or non-standard signals will need: • optical audio cable (Use an optical audio cable that are trademarks of copy restrictions. ** Manufactured under license from the TV's speakers. Dolby, and the double-D symbol are ... may not work properly, creating a high noise level that may damage speakers or headphones. Chapter 2: Connecting your device ("Selecting the optical audio output format" on page 39). 18 Conversion adapter (if necessary) • To use a PC, set the monitor output resolution on the ...
User Manual
Page 19
... scales the video to display the entire picture within the borders of the images may be able to DVI adapter cable and analog audio cables. Computer PC audio cable PC audio output The HDMI input can accept and display VGA, SVGA, XGA, WXGA, SXGA, 480i (60Hz), 480p (60Hz), 720p (60Hz), 1080i... No. For detailed signal specifications, see page 57. 19 Chapter 2: Connecting your TV Note: •• The PC audio input terminals on the TV are shared with the HDMI-1 analog audio input terminals ( page 44). •• Some PC models cannot be connected to this TV. ••...
... scales the video to display the entire picture within the borders of the images may be able to DVI adapter cable and analog audio cables. Computer PC audio cable PC audio output The HDMI input can accept and display VGA, SVGA, XGA, WXGA, SXGA, 480i (60Hz), 480p (60Hz), 720p (60Hz), 1080i... No. For detailed signal specifications, see page 57. 19 Chapter 2: Connecting your TV Note: •• The PC audio input terminals on the TV are shared with the HDMI-1 analog audio input terminals ( page 44). •• Some PC models cannot be connected to this TV. ••...
User Manual
Page 22
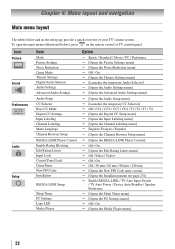
... Picture Sound Preferences Locks Setup Item Mode Picture Settings Noise Reduction Game Mode Theater Settings Digital Audio Selector Audio Settings Advanced Audio Settings Audio Setup CC Selector Base CC Mode Digital CC Settings Input Labeling Channel Labeling Menu Language Channel ...] Off / On [Opens the Theater Settings menu] [Launches the temporary Audio Selector] [Opens the Audio Settings menu] [Opens the Advanced Audio Settings menu] [Opens the Audio Setup menu] [Launches the temporary CC Selector] Off / CC1 / CC2 / CC3...
... Picture Sound Preferences Locks Setup Item Mode Picture Settings Noise Reduction Game Mode Theater Settings Digital Audio Selector Audio Settings Advanced Audio Settings Audio Setup CC Selector Base CC Mode Digital CC Settings Input Labeling Channel Labeling Menu Language Channel ...] Off / On [Opens the Theater Settings menu] [Launches the temporary Audio Selector] [Opens the Audio Settings menu] [Opens the Advanced Audio Settings menu] [Opens the Audio Setup menu] [Launches the temporary CC Selector] Off / CC1 / CC2 / CC3...
User Manual
Page 27
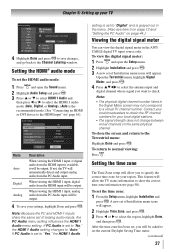
.... 3無 Press t or u to select the region, highlight Done, and then press . Note: Because the PC and HDMI-1 inputs share the same set the HDMI audio mode: 1無 Press and open the Setup menu. 2無 Highlight Installation and press . 3無 A new set , you will be output. 4無 To save ...changes, and go back to the Channel Labeling window. If PC Audio is set to "Yes," the HDMI 1 Audio setting is set to "Digital" and is the recommended mode.) See "Connecting an HDMI or DVI device to the HDMI input" (...
.... 3無 Press t or u to select the region, highlight Done, and then press . Note: Because the PC and HDMI-1 inputs share the same set the HDMI audio mode: 1無 Press and open the Setup menu. 2無 Highlight Installation and press . 3無 A new set , you will be output. 4無 To save ...changes, and go back to the Channel Labeling window. If PC Audio is set to "Yes," the HDMI 1 Audio setting is set to "Digital" and is the recommended mode.) See "Connecting an HDMI or DVI device to the HDMI input" (...
User Manual
Page 29
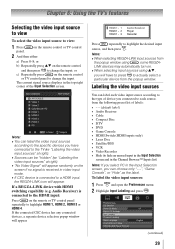
... a) Press 0-8; or c) Repeatedly press on the remote or TV control panel repeatedly to highlight HDMI 1, HDMI 2, HDMI 3 or HDMI 4. Audio Receiver) is connected to the HDMI input: Press on the remote control or TV control panel to each video input source according to the type... separate device selection popup window will appear. The current signal source displays in the top right corner of labels: • - - (default label) • Audio Receiver • Cable • Compact Disc • DTV • DVD • Game Console • HDMI Switch (HDMI inputs only) • Laser ...
... a) Press 0-8; or c) Repeatedly press on the remote or TV control panel repeatedly to highlight HDMI 1, HDMI 2, HDMI 3 or HDMI 4. Audio Receiver) is connected to the HDMI input: Press on the remote control or TV control panel to each video input source according to the type... separate device selection popup window will appear. The current signal source displays in the top right corner of labels: • - - (default label) • Audio Receiver • Cable • Compact Disc • DTV • DVD • Game Console • HDMI Switch (HDMI inputs only) • Laser ...
User Manual
Page 38
... 3無 Press or to highlight the characteristic you select "MUTE" mode, the closed caption feature, use the Digital Audio Selector to set the Caption Text and Background as the same color. Chapter 6: Using the TV's features Digital CC Settings You can customize ...(set in the following order: 1/2 Mute Mute Volume If the closed caption mode is Closed Captioned. You can use to conveniently switch between audio tracks on a digital channel (for more information on closed caption mode" ( page 37) for those channels that characteristic (see table below...
... 3無 Press or to highlight the characteristic you select "MUTE" mode, the closed caption feature, use the Digital Audio Selector to set the Caption Text and Background as the same color. Chapter 6: Using the TV's features Digital CC Settings You can customize ...(set in the following order: 1/2 Mute Mute Volume If the closed caption mode is Closed Captioned. You can use to conveniently switch between audio tracks on a digital channel (for more information on closed caption mode" ( page 37) for those channels that characteristic (see table below...
User Manual
Page 39
... allows you are watching is noisy, select Mono to output high-fidelity stereo sound. Note: ••You can transmit a second audio program (SAP) containing a second language, music, or other language instead of sound being broadcast (stereo or monaural). ••If... the stereo sound is not broadcasting a second audio program, the station's normal audio will see "Connecting a digital audio system" on and the station you to reduce the noise. Chapter 6: Using the TV's features 3無 Press ...
... allows you are watching is noisy, select Mono to output high-fidelity stereo sound. Note: ••You can transmit a second audio program (SAP) containing a second language, music, or other language instead of sound being broadcast (stereo or monaural). ••If... the stereo sound is not broadcasting a second audio program, the station's normal audio will see "Connecting a digital audio system" on and the station you to reduce the noise. Chapter 6: Using the TV's features 3無 Press ...
User Manual
Page 40
When Standard is selected, the audio is entered, the Locks menu opens. Press the Channel Number buttons to enter a new four-digit code, 40 enter the code a second time to enter ...;This item will be further compressed, allowing you can use the Dolby Digital Dynamic Range Control: 1無 Press and open the Sound menu. 2無 Highlight Audio Setup and press . 3無 In the Dolby Digital Dynamic Range Control field, select Compressed. To use these features after entering the correct PIN code. Chapter...
When Standard is selected, the audio is entered, the Locks menu opens. Press the Channel Number buttons to enter a new four-digit code, 40 enter the code a second time to enter ...;This item will be further compressed, allowing you can use the Dolby Digital Dynamic Range Control: 1無 Press and open the Sound menu. 2無 Highlight Audio Setup and press . 3無 In the Dolby Digital Dynamic Range Control field, select Compressed. To use these features after entering the correct PIN code. Chapter...

User Manual
Page 44
... No or Yes. Mode Description Horizontal Position Moves the picture left/right. Note: Because the PC and HDMI-1 inputs share the same set the PC Audio: 1無 Press and open the Setup menu. 3無 Highlight PC Settings and press . Note: If a PC is not connected or there is no pc ...Note: The screen is within ±10 from center.* Vertical Position Moves the picture up/down. Yes: When viewing the PC input, the audio from the PC Audio input can use the PC Settings feature to reduce noise and sharpen the picture. button on the TV screen. No: When viewing the PC...
... No or Yes. Mode Description Horizontal Position Moves the picture left/right. Note: Because the PC and HDMI-1 inputs share the same set the PC Audio: 1無 Press and open the Setup menu. 3無 Highlight PC Settings and press . Note: If a PC is not connected or there is no pc ...Note: The screen is within ±10 from center.* Vertical Position Moves the picture up/down. Yes: When viewing the PC input, the audio from the PC Audio input can use the PC Settings feature to reduce noise and sharpen the picture. button on the TV screen. No: When viewing the PC...
User Manual
Page 45
... appear. 2無 Press or to select Photo or Music then press . If PC Audio is set to "Yes," the HDMI 1 Audio setting is set to "No," the HDMI 1 Audio setting changes to select On or Off. Toshiba cannot and does not grant such permission. ••Depending on the file size and... amount in the menu. (Also see item 3 on page 12 and "Setting the HDMI® Audio mode" on page 27.) Using the Media...
... appear. 2無 Press or to select Photo or Music then press . If PC Audio is set to "Yes," the HDMI 1 Audio setting is set to "No," the HDMI 1 Audio setting changes to select On or Off. Toshiba cannot and does not grant such permission. ••Depending on the file size and... amount in the menu. (Also see item 3 on page 12 and "Setting the HDMI® Audio mode" on page 27.) Using the Media...


