User Manual
Page 8
...menu layout 23 Navigating the menu system 23 Chapter 5: Setting up your TV 24 Initial Setup 24 Selecting the menu language 24 TOSHIBA Logo LED 24 Configuring the antenna input source for the ANT/CABLE terminal 24 Programming channels into the TV's channel memory............25 ...captions 37 Digital CC Settings 38 CC Selector 38 8 Adjusting the audio 38 Muting the sound 38 Using the digital audio selector 38 Selecting stereo/SAP broadcasts 39 Adjusting the audio quality 39 Selecting the optical audio output format 39 Using the Dolby® Digital Dynamic Range Control feature...40...
...menu layout 23 Navigating the menu system 23 Chapter 5: Setting up your TV 24 Initial Setup 24 Selecting the menu language 24 TOSHIBA Logo LED 24 Configuring the antenna input source for the ANT/CABLE terminal 24 Programming channels into the TV's channel memory............25 ...captions 37 Digital CC Settings 38 CC Selector 38 8 Adjusting the audio 38 Muting the sound 38 Using the digital audio selector 38 Selecting stereo/SAP broadcasts 39 Adjusting the audio quality 39 Selecting the optical audio output format 39 Using the Dolby® Digital Dynamic Range Control feature...40...
User Manual
Page 9
...the many exciting features of your new Toshiba widescreen, integrated HD, LCD TV: • Integrated digital tuning (8VSB ATSC and QAM) eliminates the need for a separate digital converter set-top box (in most cases). • 1080p output resolution. • Four HDMI®...® HD high-resolution component video inputs ( page 15). • QSound® audio technologies ( page 53). • Digital Audio Out optical audio connection with Dolby® Digital optical output format ( page 39). • CableClear® digital picture noise reduction ( page...
...the many exciting features of your new Toshiba widescreen, integrated HD, LCD TV: • Integrated digital tuning (8VSB ATSC and QAM) eliminates the need for a separate digital converter set-top box (in most cases). • 1080p output resolution. • Four HDMI®...® HD high-resolution component video inputs ( page 15). • QSound® audio technologies ( page 53). • Digital Audio Out optical audio connection with Dolby® Digital optical output format ( page 39). • CableClear® digital picture noise reduction ( page...
User Manual
Page 12
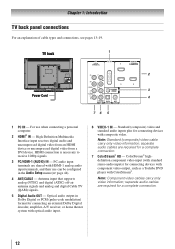
... (QAM) signals. 5無 Digital Audio OUT - Optical audio output in the Audio Setup menu ( page 44). 4無 ANT/CABLE - HDMI connection is necessary to receive 1080p signals. 3無 PC/HDMI-1 (AUDIO) IN - ColorStream® highdefinition component video input (with standard stereo audio inputs) for connecting devices with component video output, such as a Toshiba DVD player with HDMI...
... (QAM) signals. 5無 Digital Audio OUT - Optical audio output in the Audio Setup menu ( page 44). 4無 ANT/CABLE - HDMI connection is necessary to receive 1080p signals. 3無 PC/HDMI-1 (AUDIO) IN - ColorStream® highdefinition component video input (with standard stereo audio inputs) for connecting devices with component video output, such as a Toshiba DVD player with HDMI...
User Manual
Page 13
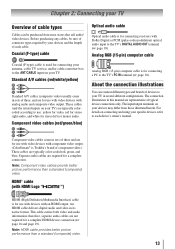
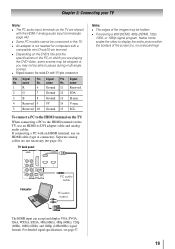
... are for use with video devices with component video output. (ColorStream® is Toshiba's brand of component video.) These cables are for use with video devices with analog audio and composite video output. HDMI® cable (with an HDMI output. Coaxial (F-type) cable Coaxial (F-type) cable is... : yellow for video, red for stereo right audio, and white for a complete HDMI device connection ( page 16 and page 19). Note: HDMI cable provides better picture performance than a standard (composite) video. The input/output terminals on your specific devices, refer to the...
... are for use with video devices with component video output. (ColorStream® is Toshiba's brand of component video.) These cables are for use with video devices with analog audio and composite video output. HDMI® cable (with an HDMI output. Coaxial (F-type) cable Coaxial (F-type) cable is... : yellow for video, red for stereo right audio, and white for a complete HDMI device connection ( page 16 and page 19). Note: HDMI cable provides better picture performance than a standard (composite) video. The input/output terminals on your specific devices, refer to the...
User Manual
Page 14
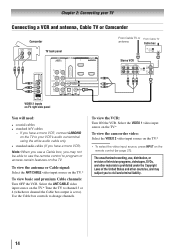
...on the TV. Select the ANT/CABLE video input source on the TV.* Tune the TV to channel 3 or 4 (whichever channel the Cable box output is prohibited under the Copyright Laws of television programs, videotapes, DVDs, and other countries, and may not be able to use the remote control to...• coaxial cables • standard A/V cables −− If you have a mono VCR, connect L/MONO on the TV to your VCR's audio out terminal using the white audio cable only. • standard audio cables (If you have a mono VCR) Note: When you use a Cable box, you may subject you to change channels.
...on the TV. Select the ANT/CABLE video input source on the TV.* Tune the TV to channel 3 or 4 (whichever channel the Cable box output is prohibited under the Copyright Laws of television programs, videotapes, DVDs, and other countries, and may not be able to use the remote control to...• coaxial cables • standard A/V cables −− If you have a mono VCR, connect L/MONO on the TV to your VCR's audio out terminal using the white audio cable only. • standard audio cables (If you have a mono VCR) Note: When you use a Cable box, you may subject you to change channels.
User Manual
Page 16
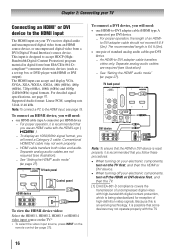
...to-DVI adapter cable (HDMI type A connector) per DVI device −− For proper operation, the length of standard analog audio cables per HDMI device −− For proper operation, it is designed to accept HDCP (HighBandwidth Digital-Content Protection) program material ...(Digital Visual Interface) source device. Separate analog audio cables are required (see illustration). −− See "Setting the HDMI® audio mode" ( page 27). Conventional HDMI/DVI cable may not operate properly with HDMI or DVI output). To connect an HDMI device, you will need...
...to-DVI adapter cable (HDMI type A connector) per DVI device −− For proper operation, the length of standard analog audio cables per HDMI device −− For proper operation, it is designed to accept HDCP (HighBandwidth Digital-Content Protection) program material ...(Digital Visual Interface) source device. Separate analog audio cables are required (see illustration). −− See "Setting the HDMI® audio mode" ( page 27). Conventional HDMI/DVI cable may not operate properly with HDMI or DVI output). To connect an HDMI device, you will need...
User Manual
Page 18
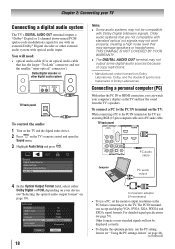
...PC settings feature" on page 44). (continued) Dolby, and the double-D symbol are not compatible with optical audio input. The PC IN terminal can watch your device ("Selecting the optical audio output format" on page 39). 18 Conversion adapter (if necessary) • To use a PC, set the...TV and hear the sound from Dolby Laboratories. For detailed signal specifications ( page 57). TV back panel PC audio cable Computer PC audio output 4無 In the Optical Output Format field, select either the PC IN or HDMI connection, you can accept and display VGA, SVGA, XGA,...
...PC settings feature" on page 44). (continued) Dolby, and the double-D symbol are not compatible with optical audio input. The PC IN terminal can watch your device ("Selecting the optical audio output format" on page 39). 18 Conversion adapter (if necessary) • To use a PC, set the...TV and hear the sound from Dolby Laboratories. For detailed signal specifications ( page 57). TV back panel PC audio cable Computer PC audio output 4無 In the Optical Output Format field, select either the PC IN or HDMI connection, you can accept and display VGA, SVGA, XGA,...
User Manual
Page 19
...), 720p, 1080i, or 1080p signal program, Native mode scales the video to display the entire picture within the borders of the screen (i.e. Computer PC audio cable PC audio output The HDMI input can accept and display VGA, SVGA, XGA, WXGA, SXGA, 480i (60Hz), 480p (60Hz), 720p (60Hz), 1080i (60Hz), and ... for mini D-sub 15-pin connector Pin Signal No. Chapter 2: Connecting your TV Note: •• The PC audio input terminals on the TV are shared with the HDMI-1 analog audio input terminals ( page 44). •• Some PC models cannot be connected to this TV. ••...
...), 720p, 1080i, or 1080p signal program, Native mode scales the video to display the entire picture within the borders of the screen (i.e. Computer PC audio cable PC audio output The HDMI input can accept and display VGA, SVGA, XGA, WXGA, SXGA, 480i (60Hz), 480p (60Hz), 720p (60Hz), 1080i (60Hz), and ... for mini D-sub 15-pin connector Pin Signal No. Chapter 2: Connecting your TV Note: •• The PC audio input terminals on the TV are shared with the HDMI-1 analog audio input terminals ( page 44). •• Some PC models cannot be connected to this TV. ••...
User Manual
Page 27
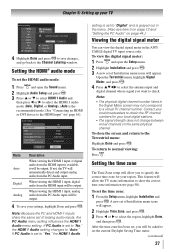
... Setting up your settings, highlight Done and press . Mode Auto Digital Analog Description When viewing the HDMI 1 input, if digital audio from the PC Audio input will be output. 4無 To save your TV 4無 Highlight Done and press to save changes, and go back to "Yes," the ...HDMI 1 Audio setting is available, it will be output. When viewing the HDMI 1 input, analog audio from the HDMI input is set the HDMI audio mode: 1無 Press and open the Setup menu. 2無 Highlight Installation and press...
... Setting up your settings, highlight Done and press . Mode Auto Digital Analog Description When viewing the HDMI 1 input, if digital audio from the PC Audio input will be output. 4無 To save your TV 4無 Highlight Done and press to save changes, and go back to "Yes," the ...HDMI 1 Audio setting is available, it will be output. When viewing the HDMI 1 input, analog audio from the HDMI input is set the HDMI audio mode: 1無 Press and open the Setup menu. 2無 Highlight Installation and press...
User Manual
Page 39
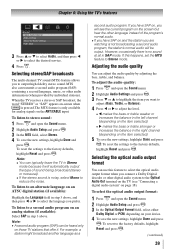
...the settings to the factory defaults, highlight Reset and press . (continued) 39 Selecting the optical audio output format You can use this happens, set the MTS feature to output high-fidelity stereo sound. However, occasionally there is noisy, select Mono to highlight the item you...settings, highlight Done and press . Note: ••A second audio program (SAP) can typically leave the TV in step 3 above . To select the optical audio output format: 1無 Press and open the Sound menu. 2無 Highlight Audio Setup and press . 3無 In the MTS field, select Stereo...
...the settings to the factory defaults, highlight Reset and press . (continued) 39 Selecting the optical audio output format You can use this happens, set the MTS feature to output high-fidelity stereo sound. However, occasionally there is noisy, select Mono to highlight the item you...settings, highlight Done and press . Note: ••A second audio program (SAP) can typically leave the TV in step 3 above . To select the optical audio output format: 1無 Press and open the Sound menu. 2無 Highlight Audio Setup and press . 3無 In the MTS field, select Stereo...
User Manual
Page 40
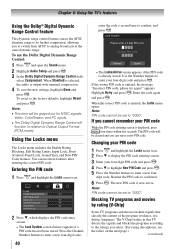
...2無 Press to display the PIN code entering screen. 3無 Enter your four-digit code and press . When the correct PIN code is output with minimal compression. 4無 To save the new settings, highlight Done and press . To use these features after entering the correct PIN code. appears. ... to be cleared and you can use the Dolby Digital Dynamic Range Control: 1無 Press and open the Sound menu. 2無 Highlight Audio Setup and press . 3無 In the Dolby Digital Dynamic Range Control field, select Compressed. When Standard is selected, the...
...2無 Press to display the PIN code entering screen. 3無 Enter your four-digit code and press . When the correct PIN code is output with minimal compression. 4無 To save the new settings, highlight Done and press . To use these features after entering the correct PIN code. appears. ... to be cleared and you can use the Dolby Digital Dynamic Range Control: 1無 Press and open the Sound menu. 2無 Highlight Audio Setup and press . 3無 In the Dolby Digital Dynamic Range Control field, select Compressed. When Standard is selected, the...

User Manual
Page 44
... 10 seconds until the volume icon appears. To unlock the control panel: Select Off in the Setup menu. 4無 Press or to output or mute the sound from your PC when connecting using the PC IN terminal and an analog RGB cable. ( page 18) To set of... Yes. The adjustment range is disrupted momentarily when adjusting the PC settings. Note: Because the PC and HDMI-1 inputs share the same set the PC Audio: 1無 Press and open the Setup menu. 3無 Highlight PC Settings and press . Mode Description Horizontal Position Moves the picture left/right. The ...
... 10 seconds until the volume icon appears. To unlock the control panel: Select Off in the Setup menu. 4無 Press or to output or mute the sound from your PC when connecting using the PC IN terminal and an analog RGB cable. ( page 18) To set of... Yes. The adjustment range is disrupted momentarily when adjusting the PC settings. Note: Because the PC and HDMI-1 inputs share the same set the PC Audio: 1無 Press and open the Setup menu. 3無 Highlight PC Settings and press . Mode Description Horizontal Position Moves the picture left/right. The ...
User Manual
Page 49
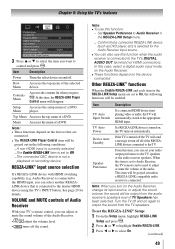
... TV. Device Auto Standby If the TV is connected to the TV's DIGITAL AUDIO OUT terminal (not HDMI connection). Note: • These functions depend on again to output the sound from the audio receiver's speakers even if TV Speakers has been selected. Speaker Preference From this ... t or u to select On. (continued) 49 See page 29 for the Audio Receiver input source. ••You can also use this function when the audio receiver is turned off all of Audio Receiver With your audio output preference to the appropriate HDMI input. Chapter 6: Using the TV's features 3無...
... TV. Device Auto Standby If the TV is connected to the TV's DIGITAL AUDIO OUT terminal (not HDMI connection). Note: • These functions depend on again to output the sound from the audio receiver's speakers even if TV Speakers has been selected. Speaker Preference From this ... t or u to select On. (continued) 49 See page 29 for the Audio Receiver input source. ••You can also use this function when the audio receiver is turned off all of Audio Receiver With your audio output preference to the appropriate HDMI input. Chapter 6: Using the TV's features 3無...
User Manual
Page 53
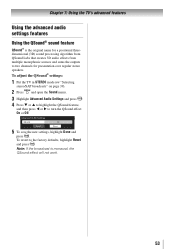
... TV in STEREO mode ( "Selecting stereo/SAP broadcasts" on page 39). 2無 Press and open the Sound menu. 3無 Highlight Advanced Audio Settings and press . 4無 Press or to highlight the QSound feature, and then press or to the...broadcast is the original name for a positional threedimensional (3D) sound processing algorithm from QSound Labs that creates 3D audio effects from multiple monophonic sources and sums the outputs to two channels for presentation over regular stereo speakers. To revert to turn the QSound effect On or Off...
... TV in STEREO mode ( "Selecting stereo/SAP broadcasts" on page 39). 2無 Press and open the Sound menu. 3無 Highlight Advanced Audio Settings and press . 4無 Press or to highlight the QSound feature, and then press or to the...broadcast is the original name for a positional threedimensional (3D) sound processing algorithm from QSound Labs that creates 3D audio effects from multiple monophonic sources and sums the outputs to two channels for presentation over regular stereo speakers. To revert to turn the QSound effect On or Off...
User Manual
Page 56
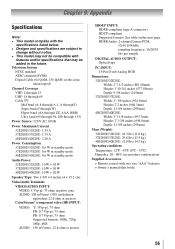
...48 kHz sampling frequency; 16/20/24 bits per sample DIGITAL AUDIO OUTPUT: Optical type PC INPUT: 15-Pin D-sub Analog RGB Dimensions 32E200U/32E20U: Width: 2'7-1/2 inches (801.68mm) Height: 1'10-3/4 inches (577.05mm) Depth: 9-5/8 inches (245mm) 37E200U/37E20U: Width: 3'-3/8 inches (924.5mm) Height: 2'2 ... and/or specifications that may be added in standby mode Audio Power: 32E200U/32E20U: 10 W + 10 W 37E200U/37E20U: 10 W + 10 W 40E200U/40E20U: 10 W + 10 W Speaker Type: Two 1-5/8 × 6 inches (4 × 15.2 cm) Video/Audio Terminals VIDEO/AUDIO INPUT: VIDEO: 1 V(p-p), 75 ohm, negative sync. ...
...48 kHz sampling frequency; 16/20/24 bits per sample DIGITAL AUDIO OUTPUT: Optical type PC INPUT: 15-Pin D-sub Analog RGB Dimensions 32E200U/32E20U: Width: 2'7-1/2 inches (801.68mm) Height: 1'10-3/4 inches (577.05mm) Depth: 9-5/8 inches (245mm) 37E200U/37E20U: Width: 3'-3/8 inches (924.5mm) Height: 2'2 ... and/or specifications that may be added in standby mode Audio Power: 32E200U/32E20U: 10 W + 10 W 37E200U/37E20U: 10 W + 10 W 40E200U/40E20U: 10 W + 10 W Speaker Type: Two 1-5/8 × 6 inches (4 × 15.2 cm) Video/Audio Terminals VIDEO/AUDIO INPUT: VIDEO: 1 V(p-p), 75 ohm, negative sync. ...
Brochure
Page 2
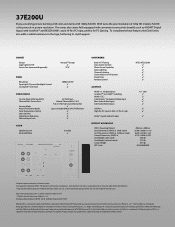
...Side Audio/Video Inputs USB Port High Res PC Input (S-XGA, 15 Pin, D-sub) Dolby® Digital Optical Output 4 (1 side) 3 3 3 3 3 3 3 3 PRODUCT & PACKAGING VESA® Mounting Pattern3 Unit Dimensions (WHD) in. (with 1080p Full HD. Dolby and the double-D symbol are trademarks of Toshiba Corporation....) Carton Dimensions (WHD) in. Channel Browser, CineSpeed, DynaLight, Horizon, and Native Mode are registered trademarks of Toshiba America Consumer Products, L.L.C. 37E200U Enjoy a stunning picture bursting with color and clarity with stand) Unit Dimensions (WHD) in. (without notice.
...Side Audio/Video Inputs USB Port High Res PC Input (S-XGA, 15 Pin, D-sub) Dolby® Digital Optical Output 4 (1 side) 3 3 3 3 3 3 3 3 PRODUCT & PACKAGING VESA® Mounting Pattern3 Unit Dimensions (WHD) in. (with 1080p Full HD. Dolby and the double-D symbol are trademarks of Toshiba Corporation....) Carton Dimensions (WHD) in. Channel Browser, CineSpeed, DynaLight, Horizon, and Native Mode are registered trademarks of Toshiba America Consumer Products, L.L.C. 37E200U Enjoy a stunning picture bursting with color and clarity with stand) Unit Dimensions (WHD) in. (without notice.


