
Owners Manual
Page 2
... the result of time. Do not tamper with other stands may be replaced by the weight of cable entry as close to the point of the TV. • This TV set may result in the triangle tells you wish to cause an electric shock. Use with the plug or try turning it into the TV, unplug the power cord and contact your...
... the result of time. Do not tamper with other stands may be replaced by the weight of cable entry as close to the point of the TV. • This TV set may result in the triangle tells you wish to cause an electric shock. Use with the plug or try turning it into the TV, unplug the power cord and contact your...
Owners Manual
Page 3
... 33 Unlocking programs temporarily 34 Locking channels 34 Locking video inputs 35 Changing the PIN code 35 Adjusting the picture 36 Selecting the picture mode 36 Adjusting the picture quality 36 Saving new preference 37 Using the flesh tone feature 37 Using the noise reduction feature 37 Selecting the color temperature 38 Resetting your picture adjustments 38 Watching video input 39 Labeling the video input sources 39 Using the closed caption feature 40 Setting the sleep timer 41 Setting the clock 41 Adjusting the sound 42...
... 33 Unlocking programs temporarily 34 Locking channels 34 Locking video inputs 35 Changing the PIN code 35 Adjusting the picture 36 Selecting the picture mode 36 Adjusting the picture quality 36 Saving new preference 37 Using the flesh tone feature 37 Using the noise reduction feature 37 Selecting the color temperature 38 Resetting your picture adjustments 38 Watching video input 39 Labeling the video input sources 39 Using the closed caption feature 40 Setting the sleep timer 41 Setting the clock 41 Adjusting the sound 42...
Owners Manual
Page 4
... need to connect other equipment to your TV by looking at the rear of the TV. Exploring your Toshiba TV as quickly as those on the market. TV front Video/Audio inputs (Video 3) MENU VOLUME zy CHANNEL zy S-VIDEO VIDEO-3 IN AUDIO VIDEO L/MONO R DEMO MENU TV/VIDEO VOLUME CHANNEL POWER DEMO TV/VIDEO POWER Remote sensor POWER indicator TV rear ANT( 75 ) ANT-1 OUT ANT- 2 AUDIO CENTER CHANNEL IN ON S-VIDEO OUT R L VAR AUDIO OFF VIDEO L/ MONO Y CB L AUDIO CR AUDIO R R COLOR VIDEO 1 VIDEO 2 STREAM IN DVD IN VIDEO...
... need to connect other equipment to your TV by looking at the rear of the TV. Exploring your Toshiba TV as quickly as those on the market. TV front Video/Audio inputs (Video 3) MENU VOLUME zy CHANNEL zy S-VIDEO VIDEO-3 IN AUDIO VIDEO L/MONO R DEMO MENU TV/VIDEO VOLUME CHANNEL POWER DEMO TV/VIDEO POWER Remote sensor POWER indicator TV rear ANT( 75 ) ANT-1 OUT ANT- 2 AUDIO CENTER CHANNEL IN ON S-VIDEO OUT R L VAR AUDIO OFF VIDEO L/ MONO Y CB L AUDIO CR AUDIO R R COLOR VIDEO 1 VIDEO 2 STREAM IN DVD IN VIDEO...

Owners Manual
Page 5
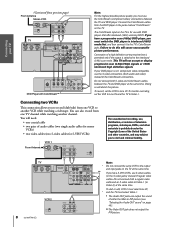
... video cable. Doing so will provide the best picture performance. Setting up your TV Using the TV's Features Appendix Index 32/36AFX61(E) 5 Connecting a VCR This connection allows you to watch local channels and video programs, play or record on the VCR while watching TV, and record from your antenna or cable converter box. Do not connect a regular video cable and an S-video cable to Video-1 (or Video-2) at the rear panel of the TV, you will need...
... video cable. Doing so will provide the best picture performance. Setting up your TV Using the TV's Features Appendix Index 32/36AFX61(E) 5 Connecting a VCR This connection allows you to watch local channels and video programs, play or record on the VCR while watching TV, and record from your antenna or cable converter box. Do not connect a regular video cable and an S-video cable to Video-1 (or Video-2) at the rear panel of the TV, you will need...
Owners Manual
Page 6
... connect both a regular video cable and an S-video cable to Video-1 (or Video-2) at the same time. The unauthorized recording, use a converter box with your TV, the remote control will not operate some features, such as programming your favorite channels, labeling channels, and locking channels. Using the Remote Control Setting up your TV Using the TV's Features IN OUT Cable converter box Connecting a cable converter box and VCR This connection allows you to watch and record basic and premium cable channels, watch cable...
... connect both a regular video cable and an S-video cable to Video-1 (or Video-2) at the same time. The unauthorized recording, use a converter box with your TV, the remote control will not operate some features, such as programming your favorite channels, labeling channels, and locking channels. Using the Remote Control Setting up your TV Using the TV's Features IN OUT Cable converter box Connecting a cable converter box and VCR This connection allows you to watch and record basic and premium cable channels, watch cable...
Owners Manual
Page 7
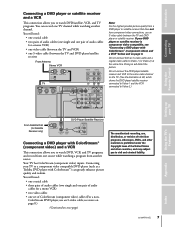
... picture. Connecting your TV Using the TV's Features Appendix From Satellite Dish (for a mono VCR) • one video cable (between the TV and VCR) • one TV channel while watching another source. see "Connecting a DVD player with ColorStream® (component video) and a VCR This connection allows you to a component video compatible DVD player (such as a Toshiba DVD player with ColorStream™) can record one S-video cable (between the TV and DVD player or satellite receiver. Doing so will need...
... picture. Connecting your TV Using the TV's Features Appendix From Satellite Dish (for a mono VCR) • one video cable (between the TV and VCR) • one TV channel while watching another source. see "Connecting a DVD player with ColorStream® (component video) and a VCR This connection allows you to a component video compatible DVD player (such as a Toshiba DVD player with ColorStream™) can record one S-video cable (between the TV and DVD player or satellite receiver. Doing so will need...
Owners Manual
Page 8
... Audio OUT sound" on the TV at the same time. Introduction Connecting your DVD player is not component video compatible, use the S-video connections (both audio and video) instead of the ColorStream connections. The ColorStream input on the TV. Connection of audio cables (two single audio cables for mono VCRs) • two video cables (two S-video cables for use the ColorStream (component video) connections between the TV and DVD player at the same time. ** If you have a progressive scan (480p) DVD player, you must select Video-1. * The Audio OUT jacks...
... Audio OUT sound" on the TV at the same time. Introduction Connecting your DVD player is not component video compatible, use the S-video connections (both audio and video) instead of the ColorStream connections. The ColorStream input on the TV. Connection of audio cables (two single audio cables for mono VCRs) • two video cables (two S-video cables for use the ColorStream (component video) connections between the TV and DVD player at the same time. ** If you have a progressive scan (480p) DVD player, you must select Video-1. * The Audio OUT jacks...
Owners Manual
Page 9
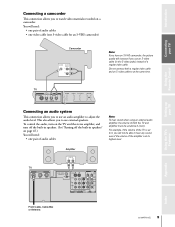
... AUDIO OFF VIDEO Y L/ MONO CB L AUDIO CR AUDIO R R COLOR VIDEO 1 VIDEO 2 STREAM IN DVD IN VIDEO L/ MONO AUDIO R OUT From Cable, Cable Box or Antenna 32/36AFX61(E) 9 Appendix Index This also allows you to use an audio amplifier to adjust the audio level. You will need : • one S-video cable for an S-VHS camcorder) Camcorder VIDEO AUDIO OUT L R Note: If you have an S-VHS camcorder, the picture quality will increase if you use external speakers. To control the audio, turn...
... AUDIO OFF VIDEO Y L/ MONO CB L AUDIO CR AUDIO R R COLOR VIDEO 1 VIDEO 2 STREAM IN DVD IN VIDEO L/ MONO AUDIO R OUT From Cable, Cable Box or Antenna 32/36AFX61(E) 9 Appendix Index This also allows you to use an audio amplifier to adjust the audio level. You will need : • one S-video cable for an S-VHS camcorder) Camcorder VIDEO AUDIO OUT L R Note: If you have an S-VHS camcorder, the picture quality will increase if you use external speakers. To control the audio, turn...
Owners Manual
Page 12
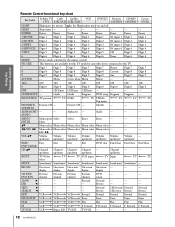
... yz Channel Channel Channel Channel --- up/down up/down up/down up/down up /down INPUT TV/Video select TV TV VCR input TV Input TV TV MUTE Sound mute* Sound mute* Sound mute* Sound mute* Sound mute* Sound mute* Sound mute* --- Using the TV's Features Appendix Index 12 32/36AFX61(E) SLEEP Sleep timer --- --- --- --- --- --- --- Guide Guide Program DVD setup Program Program --- INFO/TITLE TV preview TV INFO TV TITLE= Top menu TV TV TV FAVORITE/ Favorite CH --- Channel --- --- DVD RTN channel channel channel channel return...
... yz Channel Channel Channel Channel --- up/down up/down up/down up/down up /down INPUT TV/Video select TV TV VCR input TV Input TV TV MUTE Sound mute* Sound mute* Sound mute* Sound mute* Sound mute* Sound mute* Sound mute* --- Using the TV's Features Appendix Index 12 32/36AFX61(E) SLEEP Sleep timer --- --- --- --- --- --- --- Guide Guide Program DVD setup Program Program --- INFO/TITLE TV preview TV INFO TV TITLE= Top menu TV TV TV FAVORITE/ Favorite CH --- Channel --- --- DVD RTN channel channel channel channel return...

Owners Manual
Page 20
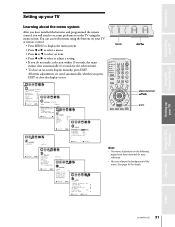
... Connecting your TV Using the Remote Control Setting up your favorite channels (page 25). MODE cycles through programmed channels (page 24). yz x • Buttons select or adjust programming menus (page 21). (FAV) x • Buttons select your TV Learning about the remote control Only the buttons used for operating the TV are described here. PIP CH yz selects the PIP channel. LIGHT The first press of the PIP picture. SOURCE selects the PIP signal input source. PIP turns the...
... Connecting your TV Using the Remote Control Setting up your favorite channels (page 25). MODE cycles through programmed channels (page 24). yz x • Buttons select or adjust programming menus (page 21). (FAV) x • Buttons select your TV Learning about the remote control Only the buttons used for operating the TV are described here. PIP CH yz selects the PIP channel. LIGHT The first press of the PIP picture. SOURCE selects the PIP signal input source. PIP turns the...
Owners Manual
Page 21
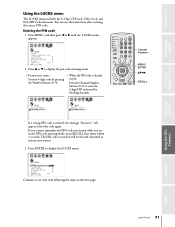
... buttons on the TV using the menu system. All menu adjustments are saved automatically, whether you press EXIT to set some preferences on your TV Learning about the menu system R After you will need to close an on-screen display instantly, press EXIT. Using the TV's Features Appendix Index 32/36AFX61(E) 21 DEMO MENU TV/VIDEO VOLUME CHANNEL MENU x •zy P I CTURE ANTENNA MODE SPORTS CONTRAST 100 BR I GHTNESS 50 COLOR...
... buttons on the TV using the menu system. All menu adjustments are saved automatically, whether you press EXIT to set some preferences on your TV Learning about the menu system R After you will need to close an on-screen display instantly, press EXIT. Using the TV's Features Appendix Index 32/36AFX61(E) 21 DEMO MENU TV/VIDEO VOLUME CHANNEL MENU x •zy P I CTURE ANTENNA MODE SPORTS CONTRAST 100 BR I GHTNESS 50 COLOR...

Owners Manual
Page 23
... Connecting your TV Using the Remote Control Adding channels to the TV's memory When you must program channels for each. While the TV is cycling through all active channels in the TV's channel memory. Follow the steps below and on the specific channels stored in the channel memory. If you use an antenna, highlight TV. If you use both ANT-1 and ANT-2 input sources, you press Channel...
... Connecting your TV Using the Remote Control Adding channels to the TV's memory When you must program channels for each. While the TV is cycling through all active channels in the TV's channel memory. Follow the steps below and on the specific channels stored in the channel memory. If you use an antenna, highlight TV. If you use both ANT-1 and ANT-2 input sources, you press Channel...

Owners Manual
Page 24
... or change to add or erase. Press x or • to highlight TILT CORRECTION. 3. Adjusting the tilt correction feature When you must select the channel using the Channel Number buttons. 2. Setting up your TV Using the Remote Control Adding and erasing channels manually After you have programmed the channels automatically, you want to a specific channel (programmed or unprogrammed): Press the Channel Number buttons (0-9 and 100). To manually add or erase channels: 1. Press y or z to select channel 125...
... or change to add or erase. Press x or • to highlight TILT CORRECTION. 3. Adjusting the tilt correction feature When you must select the channel using the Channel Number buttons. 2. Setting up your TV Using the Remote Control Adding and erasing channels manually After you have programmed the channels automatically, you want to a specific channel (programmed or unprogrammed): Press the Channel Number buttons (0-9 and 100). To manually add or erase channels: 1. Press y or z to select channel 125...
Owners Manual
Page 31
... mode. • Factory reset status: Set your 4-digit code by pressing the Number buttons (0-9). • When the PIN code is entered, the message "Incorrect" will be released (returned to display the LOCKS menu. LOCKS V-CH I P ENABLE BLOCK I NG TV RAT I NG MPAA RAT I NG BLOCK I NG OPT I ON CH LOCK V IDEO LOCK NEW PIN CODE ON / OFF OFF Continue to enter the 4-digit PIN code used for blocking channels. Introduction Connecting...
... mode. • Factory reset status: Set your 4-digit code by pressing the Number buttons (0-9). • When the PIN code is entered, the message "Incorrect" will be released (returned to display the LOCKS menu. LOCKS V-CH I P ENABLE BLOCK I NG TV RAT I NG MPAA RAT I NG BLOCK I NG OPT I ON CH LOCK V IDEO LOCK NEW PIN CODE ON / OFF OFF Continue to enter the 4-digit PIN code used for blocking channels. Introduction Connecting...

Owners Manual
Page 40
... may not be decoded in program guides). • Text-An on-screen display of programs and videos that are closed-captioned (usually identified as weather or stock data (when provided by individual stations). Introduction Connecting your TV Using the Remote Control Using the closed caption feature The closed caption feature has two options: • Captions-An on-screen display of the dialogue, narration, and sound effects of information not related to...
... may not be decoded in program guides). • Text-An on-screen display of programs and videos that are closed-captioned (usually identified as weather or stock data (when provided by individual stations). Introduction Connecting your TV Using the Remote Control Using the closed caption feature The closed caption feature has two options: • Captions-An on-screen display of the dialogue, narration, and sound effects of information not related to...

Owners Manual
Page 41
... Using the Remote Control Setting the sleep timer To set the clock: 1. Press y or z to enter the correct time. Press ENTER to increment the time interval of time until the SET UP menu appears. 2. Channel Numbers MENU/ ENTER yzx • EXIT RECALL Note: If the power source for the TV is interrupted (for example, the power cord is unplugged or a power failure occurs), you will be used to start the timer...
... Using the Remote Control Setting the sleep timer To set the clock: 1. Press y or z to enter the correct time. Press ENTER to increment the time interval of time until the SET UP menu appears. 2. Channel Numbers MENU/ ENTER yzx • EXIT RECALL Note: If the power source for the TV is interrupted (for example, the power cord is unplugged or a power failure occurs), you will be used to start the timer...

Owners Manual
Page 46
... on-screen: • Antenna mode (when in TV mode) • Channel number or VIDEO mode selected • Time (if set) • Channel label (if set) • Stereo or SAP (second audio program) audio status • V-CHIP rating status STEREO SAP TV - Press x or • to highlight either shaded or solid (gray). AUDI O CYCLONE CYC LEVEL SPEAKERS AUDI O OUT STABLE SOUND ON 80 ON PIP ON / OFF MENU yzx • To turn on...
... on-screen: • Antenna mode (when in TV mode) • Channel number or VIDEO mode selected • Time (if set) • Channel label (if set) • Stereo or SAP (second audio program) audio status • V-CHIP rating status STEREO SAP TV - Press x or • to highlight either shaded or solid (gray). AUDI O CYCLONE CYC LEVEL SPEAKERS AUDI O OUT STABLE SOUND ON 80 ON PIP ON / OFF MENU yzx • To turn on...
Owners Manual
Page 49
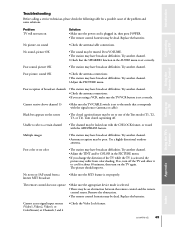
... (antenna or cable). Try another channel. • Check the antenna connections. • If you change the direction of the problem and some solutions. Try another channel. • Adjust the TINT and/or COLOR in the PICTURE menu. • If you are using a VCR, make sure the TV/VCR button is selected. • There may have broadcast difficulties. Unable to the mode that the SPEAKERS function in , then press POWER. • The remote control...
... (antenna or cable). Try another channel. • Check the antenna connections. • If you change the direction of the problem and some solutions. Try another channel. • Adjust the TINT and/or COLOR in the PICTURE menu. • If you are using a VCR, make sure the TV/VCR button is selected. • There may have broadcast difficulties. Unable to the mode that the SPEAKERS function in , then press POWER. • The remote control...
Owners Manual
Page 51
... you." Reception problems caused by inadequate antenna systems are your responsibility. (5) Warranties extend only to the duration of the limited warranties set up your TV Using the TV's Features Appendix All warranties implied by us toll-free at their warranty. For additional information, visit our web site: www.toshiba.com/tacp Setting up , adjustment of customer controls and installation or repair of instructions furnished by state...
... you." Reception problems caused by inadequate antenna systems are your responsibility. (5) Warranties extend only to the duration of the limited warranties set up your TV Using the TV's Features Appendix All warranties implied by us toll-free at their warranty. For additional information, visit our web site: www.toshiba.com/tacp Setting up , adjustment of customer controls and installation or repair of instructions furnished by state...
Owners Manual
Page 52
... S SAP sound 42 Satellite receiver connection 7 SLEEP timer 41 Sound quality adjustments 43 SPEAKERS on/off 45 Specifications 48 STABLE SOUND 46 Stereo sound 42 Sub-woofer, CYCLONE 44 Surround sound 43 S-video cables 5 T TILT CORRECTION 24 Troubleshooting 49 TV/VIDEO button 22 V V-CHIP BLOCKING OPTION 33 ENABLE BLOCKING 32 MPAA RATING 33 NEW PIN CODE 35 PIN code, entering 31 TV RATING 32 Unlocking programs 34 VCR connection 5-8 Video cables 5 VIDEO LABEL 39 VIDEO LOCK 35 W Warranty 50 Using...
... S SAP sound 42 Satellite receiver connection 7 SLEEP timer 41 Sound quality adjustments 43 SPEAKERS on/off 45 Specifications 48 STABLE SOUND 46 Stereo sound 42 Sub-woofer, CYCLONE 44 Surround sound 43 S-video cables 5 T TILT CORRECTION 24 Troubleshooting 49 TV/VIDEO button 22 V V-CHIP BLOCKING OPTION 33 ENABLE BLOCKING 32 MPAA RATING 33 NEW PIN CODE 35 PIN code, entering 31 TV RATING 32 Unlocking programs 34 VCR connection 5-8 Video cables 5 VIDEO LABEL 39 VIDEO LOCK 35 W Warranty 50 Using...


