
Owners Manual
Page 5
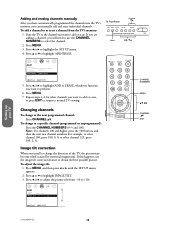
... and programs 23 Blocking channels 24 Locking video inputs 25 Channel labels 26 Video labels 27 Adjusting the picture 28 Adjusting the picture quality 28 Selecting the color temperature 28 Adjusting the picture preference 29 Displaying on-screen information 29 Setting the off timer 29 Auto power off 29 Using the closed caption feature 30 Adjusting the sound 31 Muting the sound 31 Selecting stereo/SAP broadcasts 31 Adjusting the sound quality 32 Using the surround sound feature 32 Selecting variable audio OUT 33 Turning off...
... and programs 23 Blocking channels 24 Locking video inputs 25 Channel labels 26 Video labels 27 Adjusting the picture 28 Adjusting the picture quality 28 Selecting the color temperature 28 Adjusting the picture preference 29 Displaying on-screen information 29 Setting the off timer 29 Auto power off 29 Using the closed caption feature 30 Adjusting the sound 31 Muting the sound 31 Selecting stereo/SAP broadcasts 31 Adjusting the sound quality 32 Using the surround sound feature 32 Selecting variable audio OUT 33 Turning off...

Owners Manual
Page 6
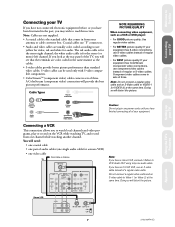
... VIDEO L/MONO R AUDIO VIDEO-3 IN DEMO MENU TV/VIDEO VOLUME CHANNEL POWER VIDEO L/MONO R AUDIO VIDEO-3 IN Video 3 (behind door) DEMO MENU TV/VIDEO VOLUME CHANNEL POWER Menu Remote Sensor Note: Model 27AF41 does not have received the following items: TV, remote control, batteries, owner's manual, registration card, and extended service plan literature. Inadequate ventilation may cause overheating, which may need to connect other and will need to purchase other stands may result in this TV with your TV. Welcome to Toshiba Connecting...
... VIDEO L/MONO R AUDIO VIDEO-3 IN DEMO MENU TV/VIDEO VOLUME CHANNEL POWER VIDEO L/MONO R AUDIO VIDEO-3 IN Video 3 (behind door) DEMO MENU TV/VIDEO VOLUME CHANNEL POWER Menu Remote Sensor Note: Model 27AF41 does not have received the following items: TV, remote control, batteries, owner's manual, registration card, and extended service plan literature. Inadequate ventilation may cause overheating, which may need to connect other and will need to purchase other stands may result in this TV with your TV. Welcome to Toshiba Connecting...
Owners Manual
Page 7
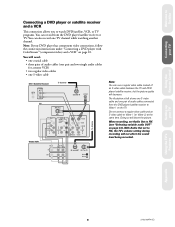
... S-VHS VCR, use S-video cables instead of regular video cables. • For BEST picture quality: If your antenna or cable converter box. The red audio cable is for audio. If you will see that comes in sets of three. A ColorStream (component video) connection will distort the picture. Doing so will need: • one coaxial cable • one video cable From Cable or Antenna TV ANT (75Ω) OUT VIDEO L/MONO AUDIO R ANT-1 DVD IN COLOR STREAM INPUT Y L Pb AUDIO Pr R IN S-VIDEO VIDEO L/MONO AUDIO R VIDEO 2 VIDEO...
... S-VHS VCR, use S-video cables instead of regular video cables. • For BEST picture quality: If your antenna or cable converter box. The red audio cable is for audio. If you will see that comes in sets of three. A ColorStream (component video) connection will distort the picture. Doing so will need: • one coaxial cable • one video cable From Cable or Antenna TV ANT (75Ω) OUT VIDEO L/MONO AUDIO R ANT-1 DVD IN COLOR STREAM INPUT Y L Pb AUDIO Pr R IN S-VIDEO VIDEO L/MONO AUDIO R VIDEO 2 VIDEO...
Owners Manual
Page 9
... FIX, the TV's volume setting during recording will need: • one coaxial cable • three pairs of audio cables (one pair and two single audio cables for a mono VCR) • two regular video cables • one TV channel while watching another channel. With Audio Out set Audio Out to FIX (see "Selecting variable audio OUT" on page 33). You will not affect the sound level being recorded. Setting up your TV Using the Remote Control Connecting a DVD player...
... FIX, the TV's volume setting during recording will need: • one coaxial cable • three pairs of audio cables (one pair and two single audio cables for a mono VCR) • two regular video cables • one TV channel while watching another channel. With Audio Out set Audio Out to FIX (see "Selecting variable audio OUT" on page 33). You will not affect the sound level being recorded. Setting up your TV Using the Remote Control Connecting a DVD player...
Owners Manual
Page 10
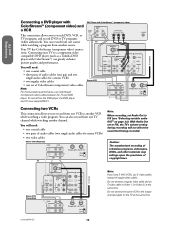
... ColorStream (component video) connections. To record from one set to the output and input jacks on page 33). With Audio Out set of regular video cables. Connecting your TV To Antenna Connecting a DVD player with ColorStream™) can greatly enhance picture quality and performance. You can record from the DVD player, the DVD player and TV must select VIDEO 1. Do not connect the same VCR to FIX, the TV's volume setting during recording will need : • one coaxial cable •...
... ColorStream (component video) connections. To record from one set to the output and input jacks on page 33). With Audio Out set of regular video cables. Connecting your TV To Antenna Connecting a DVD player with ColorStream™) can greatly enhance picture quality and performance. You can record from the DVD player, the DVD player and TV must select VIDEO 1. Do not connect the same VCR to FIX, the TV's volume setting during recording will need : • one coaxial cable •...
Owners Manual
Page 13
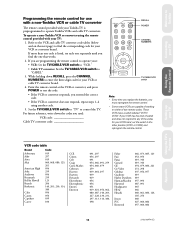
.../VIDEO RECALL POWER CHANNEL NUMBERS TV/CABLE/VCR switch Note: • Every time you replace the batteries, you entered the correct code. • If the VCR or converter does not respond, repeat steps 1-4 using the remote control provided with your VCR or cable TV converter brand. 4. Set the TV/CABLE/VCR switch to "TV" to control the TV. Welcome to Toshiba Connecting your TV Using the Remote Control Programming the remote control for use with a non-Toshiba VCR or cable TV converter The remote control...
.../VIDEO RECALL POWER CHANNEL NUMBERS TV/CABLE/VCR switch Note: • Every time you replace the batteries, you entered the correct code. • If the VCR or converter does not respond, repeat steps 1-4 using the remote control provided with your VCR or cable TV converter brand. 4. Set the TV/CABLE/VCR switch to "TV" to control the TV. Welcome to Toshiba Connecting your TV Using the Remote Control Programming the remote control for use with a non-Toshiba VCR or cable TV converter The remote control...
Owners Manual
Page 15
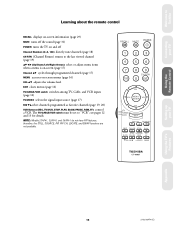
... adjust menu items when a menu is on-screen (page 17) Channel yz cycles through programmed channels (page 17) MENU accesses on-screen menus (page 16) VOL yz adjusts the volume level EXIT closes menus (page 16) TV/CABLE/VCR switch switches among TV, Cable, and VCR inputs (page 12) TV/VIDEO selects the signal input source (page 17) FAV zy select channels programmed as favorite channels (page 19, 20) VCR Buttons (REC, TV/VCR, STOP, PLAY, SLOW, PAUSE, REW, FF) control a VCR. Welcome to Toshiba Connecting...
... adjust menu items when a menu is on-screen (page 17) Channel yz cycles through programmed channels (page 17) MENU accesses on-screen menus (page 16) VOL yz adjusts the volume level EXIT closes menus (page 16) TV/CABLE/VCR switch switches among TV, Cable, and VCR inputs (page 12) TV/VIDEO selects the signal input source (page 17) FAV zy select channels programmed as favorite channels (page 19, 20) VCR Buttons (REC, TV/VCR, STOP, PLAY, SLOW, PAUSE, REW, FF) control a VCR. Welcome to Toshiba Connecting...
Owners Manual
Page 16
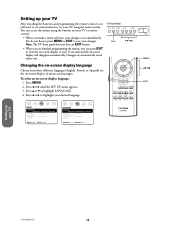
... TV using the buttons on your changes. TV Front Panel DEMO MENU TV/VIDEO VOLUME CHANNEL Menu CH VOL MENU/ VOL ENTER TV CABLE VCR CH EXIT FAV CH TV/VIDEO A REC TV/VCR STOP PLAY STILL SOURCE PIP SLOW PAUSE REW FF PIP CH LOCATE SWAP SET UP LANGUAGE: [ENGLISH] FRANCAIS ESPANOL TV/CABLE: CH PROGRAM ADD/ERASE: MORE [TV] CABLE [ADD] ERASE MOVE [ ] SELECT [ ] CONFIGURE LANGUE: ENGLISH [FRANCAIS] ESPANOL TV/CABLE: [TV] CABLE...
... TV using the buttons on your changes. TV Front Panel DEMO MENU TV/VIDEO VOLUME CHANNEL Menu CH VOL MENU/ VOL ENTER TV CABLE VCR CH EXIT FAV CH TV/VIDEO A REC TV/VCR STOP PLAY STILL SOURCE PIP SLOW PAUSE REW FF PIP CH LOCATE SWAP SET UP LANGUAGE: [ENGLISH] FRANCAIS ESPANOL TV/CABLE: CH PROGRAM ADD/ERASE: MORE [TV] CABLE [ADD] ERASE MOVE [ ] SELECT [ ] CONFIGURE LANGUE: ENGLISH [FRANCAIS] ESPANOL TV/CABLE: [TV] CABLE...
Owners Manual
Page 17
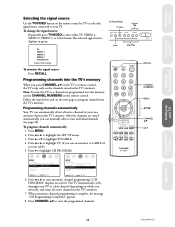
... signal source Use the TV/VIDEO button on -screen). Press y or z to a channel not programmed into the TV's memory. Note: To tune the TV to highlight TV/CABLE. 4. The TV automatically cycles through every TV or cable channel (depending on which you press CHANNEL LM on the TV or remote control, the TV stops only on the remote control. TV Front Panel TV/Video Channel DEMO MENU TV/VIDEO VOLUME CHANNEL Menu RECALL MUTE o POWER...
... signal source Use the TV/VIDEO button on -screen). Press y or z to a channel not programmed into the TV's memory. Note: To tune the TV to highlight TV/CABLE. 4. The TV automatically cycles through every TV or cable channel (depending on which you press CHANNEL LM on the TV or remote control, the TV stops only on the remote control. TV Front Panel TV/Video Channel DEMO MENU TV/VIDEO VOLUME CHANNEL Menu RECALL MUTE o POWER...
Owners Manual
Page 18
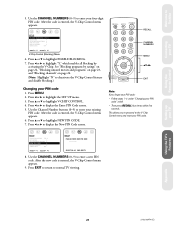
.... 6. DEMO MENU TV/VIDEO VOLUME CHANNEL To add a channel to or erase a channel from -10 to highlight ADD or ERASE, whichever function you can manually add and erase individual channels. Press x or • to +10). To change to highlight IMAGE TILT. 3. To adjust the image tilt: 1. Press y or z to a specific channel (programmed or unprogrammed): Press the CHANNEL NUMBERS (0-9 and 100). Note: For channels 100 and higher, press the 100 button...
.... 6. DEMO MENU TV/VIDEO VOLUME CHANNEL To add a channel to or erase a channel from -10 to highlight ADD or ERASE, whichever function you can manually add and erase individual channels. Press x or • to +10). To change to highlight IMAGE TILT. 3. To adjust the image tilt: 1. Press y or z to a specific channel (programmed or unprogrammed): Press the CHANNEL NUMBERS (0-9 and 100). Note: For channels 100 and higher, press the 100 button...
Owners Manual
Page 19
... DEMO: START [STOP] MOVE [ ] START [ ] 5. Press x or • to 12 channels. (Continued on page 17). Select the first channel you want to program as a favorite channel. 2. The previous channel will be highlighted. 6. Press EXIT. To switch between two channels without entering an actual channel number each time. Press x or • to view. 2. Press y or z to highlight FAVORITE CH. Welcome to Toshiba Connecting your TV Using the Remote Control Setting...
... DEMO: START [STOP] MOVE [ ] START [ ] 5. Press x or • to 12 channels. (Continued on page 17). Select the first channel you want to program as a favorite channel. 2. The previous channel will be highlighted. 6. Press EXIT. To switch between two channels without entering an actual channel number each time. Press x or • to view. 2. Press y or z to highlight FAVORITE CH. Welcome to Toshiba Connecting your TV Using the Remote Control Setting...
Owners Manual
Page 21
... movies and programs" on page 23, and "Blocking channels" on page 24. (Note: Highlight "N" to deactivate the V-Chip Control feature and disable blocking.) RECALL MUTE o POWER 1 23 4 56 7 89 CH RTN 100 0 ENT CH VOL MENU/ VOL ENTER TV CABLE VCR CH EXIT RECALL CHANNEL NUMBERS MENU yz x • EXIT Changing your PIN code" at left. • Then press RECALL four times within...
... movies and programs" on page 23, and "Blocking channels" on page 24. (Note: Highlight "N" to deactivate the V-Chip Control feature and disable blocking.) RECALL MUTE o POWER 1 23 4 56 7 89 CH RTN 100 0 ENT CH VOL MENU/ VOL ENTER TV CABLE VCR CH EXIT RECALL CHANNEL NUMBERS MENU yz x • EXIT Changing your PIN code" at left. • Then press RECALL four times within...

Owners Manual
Page 22
... [Y] N SET RATING SET BLOCKING OPTIONS NEW PIN CODE BLOCK CHANNEL VIDEO LOCK OFF MOVE [ ] SELECT [ ] RECALL MUTE o POWER 1 23 4 56 7 89 CH RTN 100 0 ENT CH VOL MENU/ VOL ENTER TV CABLE VCR CH EXIT RECALL CHANNEL NUMBERS MENU yz x • Using the TV's Features 27/32/36AF41(E) 22 MPAA Ratings X For adults only. NC17 Not intended for children. This program is entered, the V-Chip Control menu appears...
... [Y] N SET RATING SET BLOCKING OPTIONS NEW PIN CODE BLOCK CHANNEL VIDEO LOCK OFF MOVE [ ] SELECT [ ] RECALL MUTE o POWER 1 23 4 56 7 89 CH RTN 100 0 ENT CH VOL MENU/ VOL ENTER TV CABLE VCR CH EXIT RECALL CHANNEL NUMBERS MENU yz x • Using the TV's Features 27/32/36AF41(E) 22 MPAA Ratings X For adults only. NC17 Not intended for children. This program is entered, the V-Chip Control menu appears...

Owners Manual
Page 24
... channels cannot be highlighted. 11. Press MENU. 3. Press y or z to display the Enter PIN Code screen. 6. Press x or • to highlight V-CHIP CONTROL. 5. Use the CHANNEL NUMBERS (0-9) to highlight ENABLE BLOCKING. 8. Press y or z to enter your four-digit PIN code. Press x or • to a channel that is not blocked before turning the TV off. SET/CLEAR will display. SET UP BLOCK CHANNEL [SET ] CLEAR 0006 Caution: Blocking unrated television programs...
... channels cannot be highlighted. 11. Press MENU. 3. Press y or z to display the Enter PIN Code screen. 6. Press x or • to highlight V-CHIP CONTROL. 5. Use the CHANNEL NUMBERS (0-9) to highlight ENABLE BLOCKING. 8. Press y or z to enter your four-digit PIN code. Press x or • to a channel that is not blocked before turning the TV off. SET/CLEAR will display. SET UP BLOCK CHANNEL [SET ] CLEAR 0006 Caution: Blocking unrated television programs...
Owners Manual
Page 29
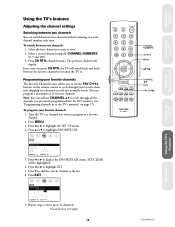
... Adjusting the picture quality" on -screen: • Channel number or video mode • Channel label (if set) • Audio status (stereo or SAP) • Rating of current program (if rated) TV Front Panel DEMO MENU TV/VIDEO VOLUME CHANNEL Menu RECALL MUTE o POWER 1 23 4 56 7 89 CH RTN 100 0 ENT CH VOL MENU/ VOL ENTER TV CABLE VCR CH EXIT Setting the off timer The off timer turns the TV off automatically. Press EXIT to exit the menu...
... Adjusting the picture quality" on -screen: • Channel number or video mode • Channel label (if set) • Audio status (stereo or SAP) • Rating of current program (if rated) TV Front Panel DEMO MENU TV/VIDEO VOLUME CHANNEL Menu RECALL MUTE o POWER 1 23 4 56 7 89 CH RTN 100 0 ENT CH VOL MENU/ VOL ENTER TV CABLE VCR CH EXIT Setting the off timer The off timer turns the TV off automatically. Press EXIT to exit the menu...

Owners Manual
Page 31
... a second audio program (SAP): 1. Selecting stereo/SAP broadcasts The multi-channel TV sound (MTS) feature provides high-fidelity stereo sound. Press MENU. 2. Press x or • to highlight the AUDIO menu. 3. Welcome to Toshiba Connecting your TV Using the Remote Control Adjusting the sound Muting the sound Press MUTE to temporarily turn the TV on, change the channel, or press RECALL. While the sound is automatically activated. In general, you can transmit a second audio program (SAP) containing...
... a second audio program (SAP): 1. Selecting stereo/SAP broadcasts The multi-channel TV sound (MTS) feature provides high-fidelity stereo sound. Press MENU. 2. Press x or • to highlight the AUDIO menu. 3. Welcome to Toshiba Connecting your TV Using the Remote Control Adjusting the sound Muting the sound Press MUTE to temporarily turn the TV on, change the channel, or press RECALL. While the sound is automatically activated. In general, you can transmit a second audio program (SAP) containing...
Owners Manual
Page 32
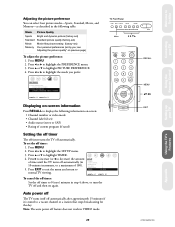
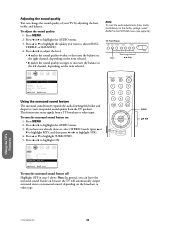
... the factory settings, select RESET in the PICTURE menu (see page 28). Using the TV's Features 27/32/36AF41(E) 32 Adjusting the sound quality You can leave the surround sound feature on because the TV will automatically output surround stereo or monaural sound, depending on : 1. Note: To reset the audio adjustments (bass, treble, and balance) to highlight SURROUND. 5. TV Front Panel DEMO MENU TV/VIDEO VOLUME CHANNEL Menu POWER AUDIO MTS: [STR] SAP MONO BASS...
... the factory settings, select RESET in the PICTURE menu (see page 28). Using the TV's Features 27/32/36AF41(E) 32 Adjusting the sound quality You can leave the surround sound feature on because the TV will automatically output surround stereo or monaural sound, depending on : 1. Note: To reset the audio adjustments (bass, treble, and balance) to highlight SURROUND. 5. TV Front Panel DEMO MENU TV/VIDEO VOLUME CHANNEL Menu POWER AUDIO MTS: [STR] SAP MONO BASS...
Owners Manual
Page 34
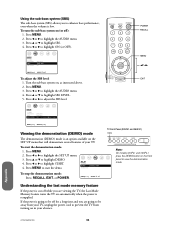
Press MENU. 2. Press y or z to adjust the SBS level. Press x or • to highlight SBS LEVEL. 5. Press MENU. 2. Press x or • to highlight the AUDIO menu. 3. To start the demo. TV Front Panel (32AF41 and 36AF41) Demo DEMO MENU TV/VIDEO VOLUME CHANNEL POWER Note: On models 32AF41 and 36AF41, press the DEMO button on (or off ): 1. To turn the sub-bass system on the front panel to view the demonstration mode. Press x or...
Press MENU. 2. Press y or z to adjust the SBS level. Press x or • to highlight SBS LEVEL. 5. Press MENU. 2. Press x or • to highlight the AUDIO menu. 3. To start the demo. TV Front Panel (32AF41 and 36AF41) Demo DEMO MENU TV/VIDEO VOLUME CHANNEL POWER Note: On models 32AF41 and 36AF41, press the DEMO button on (or off ): 1. To turn the sub-bass system on the front panel to view the demonstration mode. Press x or...
Owners Manual
Page 35
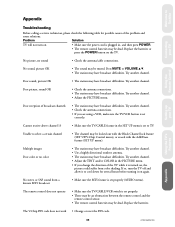
... (AUDIO menu). Using the Remote Control Setting up your TV Troubleshooting Before calling a service technician, please check the following table for several hours before turning it on , the picture could suffer from a known MTS broadcast • Make sure the MTS feature is set correctly. No stereo or SAP sound from color shading. The V-Chip PIN code does not work • Change or reset the PIN code. Welcome to Toshiba Appendix Connecting...
... (AUDIO menu). Using the Remote Control Setting up your TV Troubleshooting Before calling a service technician, please check the following table for several hours before turning it on , the picture could suffer from a known MTS broadcast • Make sure the MTS feature is set correctly. No stereo or SAP sound from color shading. The V-Chip PIN code does not work • Change or reset the PIN code. Welcome to Toshiba Appendix Connecting...
Owners Manual
Page 37
... your home when warranty service is required. No person, agent, distributor, dealer or company is authorized to change, modify or extend the terms of these warranties. Welcome to Toshiba Connecting your TV Using the Remote Control Limited United States warranty Toshiba America Consumer Products, Inc. ("TACP") and Toshiba Hawaii Inc. ("THI") make the following all of the operating instructions in this manual and checking the "Troubleshooting" section...
... your home when warranty service is required. No person, agent, distributor, dealer or company is authorized to change, modify or extend the terms of these warranties. Welcome to Toshiba Connecting your TV Using the Remote Control Limited United States warranty Toshiba America Consumer Products, Inc. ("TACP") and Toshiba Hawaii Inc. ("THI") make the following all of the operating instructions in this manual and checking the "Troubleshooting" section...


