

Owners Manual
Page 9
... 5.7.7 Labeling Disks 13 5.7.8 Disk Insertion 13 5.7.9 Disk Removal 14 5.7.10 Connecting AC Adaptor 14 PART 6 OPERATION 6.1 Before You Begin 1 6.2 Turning Power ON 2 6.3 Power -on Self -test 3 6.4 Setup Execution 5 6.5 Loading MS-DOS 11 6.5.1 Loading MS-DOS from Floppy Disk Drive 11 6.5.2 Loading MS-DOS from Hard Disk Drive 13 6.6 Set Up Gray...
... 5.7.7 Labeling Disks 13 5.7.8 Disk Insertion 13 5.7.9 Disk Removal 14 5.7.10 Connecting AC Adaptor 14 PART 6 OPERATION 6.1 Before You Begin 1 6.2 Turning Power ON 2 6.3 Power -on Self -test 3 6.4 Setup Execution 5 6.5 Loading MS-DOS 11 6.5.1 Loading MS-DOS from Floppy Disk Drive 11 6.5.2 Loading MS-DOS from Hard Disk Drive 13 6.6 Set Up Gray...

Owners Manual
Page 11
7.8 Device Error Message 46 7.9 Turning OFF System 48 7.10 Establishing National MS-DOS Disks 49 7.11 Using Hard Disk 52 7.11.1 Preparation 53 PART 8 TROUBLESHOOTING 8.1 Directions 1 8.2 Before the Troubleshooting 2 8.3 Power -on Self -test 2 8.4 Diagnostic Test 10 8.4.1 Loading Diagnostic Test 10 8.4.2 Diagnostic Test 18 PART 9 OPTIONS 9.1 General 1 9.2 System Kit 2 9.3 Keyboard 3 9.4 Memory Expansion Option 11 9.5 PC Floppy Link 11
7.8 Device Error Message 46 7.9 Turning OFF System 48 7.10 Establishing National MS-DOS Disks 49 7.11 Using Hard Disk 52 7.11.1 Preparation 53 PART 8 TROUBLESHOOTING 8.1 Directions 1 8.2 Before the Troubleshooting 2 8.3 Power -on Self -test 2 8.4 Diagnostic Test 10 8.4.1 Loading Diagnostic Test 10 8.4.2 Diagnostic Test 18 PART 9 OPTIONS 9.1 General 1 9.2 System Kit 2 9.3 Keyboard 3 9.4 Memory Expansion Option 11 9.5 PC Floppy Link 11

Owners Manual
Page 28
... unit from drive -C. (7) If necessary, answer the date and time questions. PART 3 QUICK START (5) Locate drive -A. It's the 3.5-inch internal floppy disk drive on self -test. If your dealer prepared the fixed disk drive for you (and you may need to type the date and time if they are ready to...
... unit from drive -C. (7) If necessary, answer the date and time questions. PART 3 QUICK START (5) Locate drive -A. It's the 3.5-inch internal floppy disk drive on self -test. If your dealer prepared the fixed disk drive for you (and you may need to type the date and time if they are ready to...
Owners Manual
Page 66
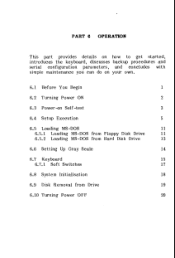
... procedures and serial configuration parameters, and concludes with simple maintenance you can do on your own. 6.1 Before You Begin 1 6.2 Turning Power ON 2 6.3 Power -on Self -test 3 6.4 Setup Execution 5 6.5 Loading MS-DOS 11 6.5.1 Loading MS-DOS from Floppy Disk Drive 11 6.5.2 Loading MS-DOS from Hard Disk Drive 13 6.6 Setting Up Gray...
... procedures and serial configuration parameters, and concludes with simple maintenance you can do on your own. 6.1 Before You Begin 1 6.2 Turning Power ON 2 6.3 Power -on Self -test 3 6.4 Setup Execution 5 6.5 Loading MS-DOS 11 6.5.1 Loading MS-DOS from Floppy Disk Drive 11 6.5.2 Loading MS-DOS from Hard Disk Drive 13 6.6 Setting Up Gray...

Owners Manual
Page 69
PART 6 OPERATION 6.3 Power-on Self-test A few seconds as a sign. When the diagnostics has been successfully completed, you have a memory extension option installed. Pressing any key when ready.... 6-3 ilInsert system disk ... computer is usually 640 kilobytes but can be more if you get one short beep and the following messages on self-test of its internal components. This amount is tested. I MEMORY TEST XXXKB The message remains on the screen for a few seconds after turning the power ON, the T3200 automatically does a power-on...
PART 6 OPERATION 6.3 Power-on Self-test A few seconds as a sign. When the diagnostics has been successfully completed, you have a memory extension option installed. Pressing any key when ready.... 6-3 ilInsert system disk ... computer is usually 640 kilobytes but can be more if you get one short beep and the following messages on self-test of its internal components. This amount is tested. I MEMORY TEST XXXKB The message remains on the screen for a few seconds after turning the power ON, the T3200 automatically does a power-on...
Owners Manual
Page 71
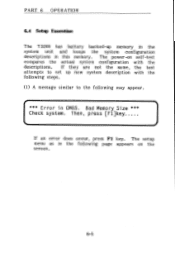
The power -on the screen. 6-5 If they are not the same, the test attempts to the following may appear. (*** Error in the following page appears on self -test compares the actual system configuration with the descriptions. Bad Memory Size * * * Check system. The setup menu as in CMOS. Then, press [F1]key If an...
The power -on the screen. 6-5 If they are not the same, the test attempts to the following may appear. (*** Error in the following page appears on self -test compares the actual system configuration with the descriptions. Bad Memory Size * * * Check system. The setup menu as in CMOS. Then, press [F1]key If an...

Owners Manual
Page 72
... properly reflect the actual system configuration, or 2 if you want to step (2). 6-6 Typing 1 passes through the setup and restarts execution of the power -on self -test. No drive 2.Hard disk drives =1 Drive#1 type = 4 - PART 6 OPERATION [[ System setup ]] 1.Floppy disk drives = 1 Drive#1 type = 2 - 720KB/1.2MB Drive#2 type = 0 - Typing 2 forwards the setup operation...
... properly reflect the actual system configuration, or 2 if you want to step (2). 6-6 Typing 1 passes through the setup and restarts execution of the power -on self -test. No drive 2.Hard disk drives =1 Drive#1 type = 4 - PART 6 OPERATION [[ System setup ]] 1.Floppy disk drives = 1 Drive#1 type = 2 - 720KB/1.2MB Drive#2 type = 0 - Typing 2 forwards the setup operation...

Owners Manual
Page 76
PART 6 OPERATION (6) After display setup is complete, the screen returns to continue execution of the Power-on Self-test. 6-10 Confirm the descriptions and when the descriptions properly reflect the latest system configuration, type n to the system setup menu as in step (1).
PART 6 OPERATION (6) After display setup is complete, the screen returns to continue execution of the Power-on Self-test. 6-10 Confirm the descriptions and when the descriptions properly reflect the latest system configuration, type n to the system setup menu as in step (1).

Owners Manual
Page 78
... read from the disk. PART 6 OPERATION After inserting the disk, depress any key when ready.... And the "Disk in drive Press any key on self-test. If you may insert the disk into the drive before the message Insert system disk in Use" LED lights while MS-DOS is ON. Otherwise...
... read from the disk. PART 6 OPERATION After inserting the disk, depress any key when ready.... And the "Disk in drive Press any key on self-test. If you may insert the disk into the drive before the message Insert system disk in Use" LED lights while MS-DOS is ON. Otherwise...

Owners Manual
Page 148
to rectify an the power-on This part 8.1 Directions 1 8.2 Before the Troubleshooting 2 8.3 Power -on how operational or system failure with self -test and/or the diagnostic test. PART 8 TROUBLESHOOTING This part provides instructions on Self -test 2 8.4 Diagnostic Test 10 8.4.1 Loading Diagnostic Test 10 8.4.2 Diagnostic Test 18 contains the following four sections.
to rectify an the power-on This part 8.1 Directions 1 8.2 Before the Troubleshooting 2 8.3 Power -on how operational or system failure with self -test and/or the diagnostic test. PART 8 TROUBLESHOOTING This part provides instructions on Self -test 2 8.4 Diagnostic Test 10 8.4.1 Loading Diagnostic Test 10 8.4.2 Diagnostic Test 18 contains the following four sections.

Owners Manual
Page 149
...and loading an operating system such as floppy disk format, the program itself, or specific operations in the program. By using the Diagnostic Test, problems in the T3200 System Unit, Display, or Printer can be due to run , the problem that occurs here, it may not... before entering a command, follow Section 8.3 Power -on Self -test. when a new program is running and : If something wrong in Section 8.3 Power -on Self -test. If the problem persists, start at the troubleshooting Section 8.3 Power -on Self -test. o When a program is run another does not, there is...
...and loading an operating system such as floppy disk format, the program itself, or specific operations in the program. By using the Diagnostic Test, problems in the T3200 System Unit, Display, or Printer can be due to run , the problem that occurs here, it may not... before entering a command, follow Section 8.3 Power -on Self -test. when a new program is running and : If something wrong in Section 8.3 Power -on Self -test. If the problem persists, start at the troubleshooting Section 8.3 Power -on Self -test. o When a program is run another does not, there is...

Owners Manual
Page 150
The test shows diagnostic messages on the display screen to help locate the source of any problem encountered. 8-2 If a disk is inserted, remove the disk from rear ... side. (4) Confirm that a floppy disk is turned ON, the system automatically checks to see whether the unit itself functions properly with the power-on self -test. PART 8 TROUBLESHOOTING 8.2 Before the Troubleshooting Set up the system to standard for checking. (1) Turn OFF the power switch of the system unit. (2) Disconnect all connectors...
The test shows diagnostic messages on the display screen to help locate the source of any problem encountered. 8-2 If a disk is inserted, remove the disk from rear ... side. (4) Confirm that a floppy disk is turned ON, the system automatically checks to see whether the unit itself functions properly with the power-on self -test. PART 8 TROUBLESHOOTING 8.2 Before the Troubleshooting Set up the system to standard for checking. (1) Turn OFF the power switch of the system unit. (2) Disconnect all connectors...

Owners Manual
Page 154
... faulty, consult your dealer. PART 8 TROUBLESHOOTING (6) Confirm that the following items. o Is the display power cord properly connected to step (7) on the display screen. ( MEMORY TEST XXXKB Does the above items, turn OFF the system unit, then check for the following message appears on the next page. Yes Go to a wall...
... faulty, consult your dealer. PART 8 TROUBLESHOOTING (6) Confirm that the following items. o Is the display power cord properly connected to step (7) on the display screen. ( MEMORY TEST XXXKB Does the above items, turn OFF the system unit, then check for the following message appears on the next page. Yes Go to a wall...

Owners Manual
Page 155
Yes : Go to step (8) on the screen. Press any key when ready... No : Go to Section 8.4 Diagnostic Test. Place system disk in drive. PART 8 TROUBLESHOOTING (7) Confirm that the following message appears. ***HDD LOAD ERROR OR BAD SYSTEM DISK*** ) Is the above message displayed ? If the partition of hard disk drive is not set, the following message is displayed on the next page. 8-7
Yes : Go to step (8) on the screen. Press any key when ready... No : Go to Section 8.4 Diagnostic Test. Place system disk in drive. PART 8 TROUBLESHOOTING (7) Confirm that the following message appears. ***HDD LOAD ERROR OR BAD SYSTEM DISK*** ) Is the above message displayed ? If the partition of hard disk drive is not set, the following message is displayed on the next page. 8-7

Owners Manual
Page 156
Choose the appropriate one of the error messages such as; Probable cause depends upon the symptom. Failed PM (size proc) KBC self test error PE=1 (start) [I appears on the screen, the system unit is not displayed on the screen following to the message MEMORY TEST XXX KB, the system unit is probably faulty, consult your dealer. 8-8 PART 8 TROUBLESHOOTING (8) You are here because the startup message is probably faulty, consult your dealer. (b) If one from the following four categories and take the appropriate action. (a) If nothing appears on the screen.
Choose the appropriate one of the error messages such as; Probable cause depends upon the symptom. Failed PM (size proc) KBC self test error PE=1 (start) [I appears on the screen, the system unit is not displayed on the screen following to the message MEMORY TEST XXX KB, the system unit is probably faulty, consult your dealer. 8-8 PART 8 TROUBLESHOOTING (8) You are here because the startup message is probably faulty, consult your dealer. (b) If one from the following four categories and take the appropriate action. (a) If nothing appears on the screen.

Owners Manual
Page 158
... can not be determined, use the diagnostic test. If you want to stop the test execution, press any key on the keyboard while the message MEMORY TEST XXX KB is provided as a program on the MS-DOS system disk. The diagnostic test program is on self-test starts. You need one work disk for... diagnostic test. 8.4.1 Loading Diagnostic Test (1) Turn OFF the power switch of the system unit. (2) Insert the MS-DOS system disk into an internal F DD. (3) Turn ON the ...
... can not be determined, use the diagnostic test. If you want to stop the test execution, press any key on the keyboard while the message MEMORY TEST XXX KB is provided as a program on the MS-DOS system disk. The diagnostic test program is on self-test starts. You need one work disk for... diagnostic test. 8.4.1 Loading Diagnostic Test (1) Turn OFF the power switch of the system unit. (2) Insert the MS-DOS system disk into an internal F DD. (3) Turn ON the ...

Owners Manual
Page 161
If any problem occurs, try another copy of the diagnostic test program. If the same problem occurs, the system unit is the file name of the MS-DOS system disk. A>test3 TEST3 is probably faulty, so consult your dealer. 8-13 By typing this name the diagnostic test program is loaded, and the DIAGNOSTIC MENU appears on the next page. PART 8 TROUBLESHOOTING (7) Type TEST3 then press the Enter key. When the menu appears, go to step (7) on the screen.
If any problem occurs, try another copy of the diagnostic test program. If the same problem occurs, the system unit is the file name of the MS-DOS system disk. A>test3 TEST3 is probably faulty, so consult your dealer. 8-13 By typing this name the diagnostic test program is loaded, and the DIAGNOSTIC MENU appears on the next page. PART 8 TROUBLESHOOTING (7) Type TEST3 then press the Enter key. When the menu appears, go to step (7) on the screen.

Owners Manual
Page 162
... above menu, go to the MS-DOS prompt. PART 8 TROUBLESHOOTING (8) After loading diagnostic test successfully, the following DIAGNOSTICS MENU is designed to test basic components in the system unit, display and printer. TOSHIBA personal computer T3200 DIAGNOSTICS version X.XX(c) Copyright TOSHIBA corp 1987 DIAGNOSTICS MENU: 1 - SYSTEM CONFIGURATION checks and displays the system configuration on...
... above menu, go to the MS-DOS prompt. PART 8 TROUBLESHOOTING (8) After loading diagnostic test successfully, the following DIAGNOSTICS MENU is designed to test basic components in the system unit, display and printer. TOSHIBA personal computer T3200 DIAGNOSTICS version X.XX(c) Copyright TOSHIBA corp 1987 DIAGNOSTICS MENU: 1 - SYSTEM CONFIGURATION checks and displays the system configuration on...

Owners Manual
Page 164
Cy1=614,h=8,s/t=17 3.Memory size System memory Extended memory Expanded memory = 640KB = 0MB = 384KB+ 0MB 4.External display card = None Select setup change (1:No/2:Yes) ? 1/ Note that the above setup description is an example for SETUP, the test displays the system setup description as follows. .1k [[ System setup ]] 1.Floppy disk drives = 1 Drive#1 type = 2 - 720KB/1.2MB Drive#2 type = 0 - No drive 2.Hard disk drives =1 Drive#1 type = 4 - PART 8 TROUBLESHOOTING (9-1) Type 0 and press the Enter key for a T3200 with one floppy disk drive and one hard disk drive. 8-16
Cy1=614,h=8,s/t=17 3.Memory size System memory Extended memory Expanded memory = 640KB = 0MB = 384KB+ 0MB 4.External display card = None Select setup change (1:No/2:Yes) ? 1/ Note that the above setup description is an example for SETUP, the test displays the system setup description as follows. .1k [[ System setup ]] 1.Floppy disk drives = 1 Drive#1 type = 2 - 720KB/1.2MB Drive#2 type = 0 - No drive 2.Hard disk drives =1 Drive#1 type = 4 - PART 8 TROUBLESHOOTING (9-1) Type 0 and press the Enter key for a T3200 with one floppy disk drive and one hard disk drive. 8-16

Owners Manual
Page 165
The screen will be displayed. 8-17 The MS-DOS prompt will change to select EXIT TO MS-DOS, then press the Enter key. PART 8 TROUBLESHOOTING (10) To interrupt the diagnostic test, hold the Ctrl key down and depress the Scroll Lock (or Break ) key. Type 9 to DIAGNOSTICS MENU.
The screen will be displayed. 8-17 The MS-DOS prompt will change to select EXIT TO MS-DOS, then press the Enter key. PART 8 TROUBLESHOOTING (10) To interrupt the diagnostic test, hold the Ctrl key down and depress the Scroll Lock (or Break ) key. Type 9 to DIAGNOSTICS MENU.
