

Owners Manual
Page 8
... Switches and Connectors 4 4.4 Plugging-in AC Power Cord 8 4.5 Setting Up Keyboard and Display 10 4.5.1 Use of Plasma Display and External Keyboard 10 4.5.2 Use of CRT and External Keyboard 11 4.5.3 Use of Plasma Display and Internal Keyboard 11 4.6 A-B-PRT Switch Setting 12 4.6.1 No Printer, No External Drive 12 4.6.2 Printer, No External Drive 12 4.6.3 External Drive, No Printer 13 4.6.4 Both a Printer and an External Drive 13 4.7 Setting DIP Switch 14 4.8 Colour CRT Display Connection 16 4.9 Printer Connection 17 4.10 External Floppy Disk Drive Connection 18 PART...
... Switches and Connectors 4 4.4 Plugging-in AC Power Cord 8 4.5 Setting Up Keyboard and Display 10 4.5.1 Use of Plasma Display and External Keyboard 10 4.5.2 Use of CRT and External Keyboard 11 4.5.3 Use of Plasma Display and Internal Keyboard 11 4.6 A-B-PRT Switch Setting 12 4.6.1 No Printer, No External Drive 12 4.6.2 Printer, No External Drive 12 4.6.3 External Drive, No Printer 13 4.6.4 Both a Printer and an External Drive 13 4.7 Setting DIP Switch 14 4.8 Colour CRT Display Connection 16 4.9 Printer Connection 17 4.10 External Floppy Disk Drive Connection 18 PART...

Owners Manual
Page 9
... 5.7.5 Disk Handling Precautions 12 5.7.6 Disk Write Protection 12 5.7.7 Labeling Disks 13 5.7.8 Disk Insertion 13 5.7.9 Disk Removal 14 5.7.10 Connecting AC Adaptor 14 PART 6 OPERATION 6.1 Before You Begin 1 6.2 Turning Power ON 2 6.3 Power -on Self -test 3 6.4 Setup Execution 5 6.5 Loading MS-DOS 11 6.5.1 Loading MS-DOS from Floppy Disk Drive 11 6.5.2 Loading MS-DOS from Hard Disk Drive 13 6.6 Set Up Gray Scale 14 6.7 Keyboard 15 6.7.1 Soft Switches 17 6.8 System Initialisation 18 6.9 Disk Removal from Drive 19 6.10 Turning Power...
... 5.7.5 Disk Handling Precautions 12 5.7.6 Disk Write Protection 12 5.7.7 Labeling Disks 13 5.7.8 Disk Insertion 13 5.7.9 Disk Removal 14 5.7.10 Connecting AC Adaptor 14 PART 6 OPERATION 6.1 Before You Begin 1 6.2 Turning Power ON 2 6.3 Power -on Self -test 3 6.4 Setup Execution 5 6.5 Loading MS-DOS 11 6.5.1 Loading MS-DOS from Floppy Disk Drive 11 6.5.2 Loading MS-DOS from Hard Disk Drive 13 6.6 Set Up Gray Scale 14 6.7 Keyboard 15 6.7.1 Soft Switches 17 6.8 System Initialisation 18 6.9 Disk Removal from Drive 19 6.10 Turning Power...

Owners Manual
Page 10
PART 7 USING MS-DOS 7.1 Starting MS-DOS 1 7.2 Entering Date and Time 3 7.2.1 Entering Date 3 7.2.2 Entering Time 5 7.3 Setting Up Gray Scale for Plasma Display 7 7.3.1 To Change Gray Scale 7 7.3.2 To Use XCHAD Menu 8 7.3.3 Command Mode 11 7.4 Changing Current Disk Drive 14 7.5 Using Keyboard 15 7.5.1 Data Keys 15 7.5.2 Correction of a Typing Mistake 17 7.5.3 Entering Command 17 7.5.4 Stopping Command Execution 18 7.5.5 Suspending Screen Output 18 7.5.6 Making Hard Copy of Screen Information 19 7.5.7 Restarting MS-DOS 19 7.6 Disk Files 20 7.6.1 Definition of...
PART 7 USING MS-DOS 7.1 Starting MS-DOS 1 7.2 Entering Date and Time 3 7.2.1 Entering Date 3 7.2.2 Entering Time 5 7.3 Setting Up Gray Scale for Plasma Display 7 7.3.1 To Change Gray Scale 7 7.3.2 To Use XCHAD Menu 8 7.3.3 Command Mode 11 7.4 Changing Current Disk Drive 14 7.5 Using Keyboard 15 7.5.1 Data Keys 15 7.5.2 Correction of a Typing Mistake 17 7.5.3 Entering Command 17 7.5.4 Stopping Command Execution 18 7.5.5 Suspending Screen Output 18 7.5.6 Making Hard Copy of Screen Information 19 7.5.7 Restarting MS-DOS 19 7.6 Disk Files 20 7.6.1 Definition of...

Owners Manual
Page 14
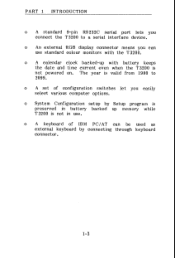
... floppy disk drive accommodates floppy disks that hold 720 kilobytes of the system unit and some other internal and/or external option boards and devices. o A parallel interface port serves two purposes. PART 1 INTRODUCTION 1.2 Computer Capabilities The T3200 is composed of information. o A keyboard with pixels of 12 megahertz. Alternatively, you can connect an external 5.25-inch floppy disk drive through this port. 1-2 o A powerful 80286-12 microprocessor chip operates at...
... floppy disk drive accommodates floppy disks that hold 720 kilobytes of the system unit and some other internal and/or external option boards and devices. o A parallel interface port serves two purposes. PART 1 INTRODUCTION 1.2 Computer Capabilities The T3200 is composed of information. o A keyboard with pixels of 12 megahertz. Alternatively, you can connect an external 5.25-inch floppy disk drive through this port. 1-2 o A powerful 80286-12 microprocessor chip operates at...
Owners Manual
Page 15
... connecting through keyboard connector. 1-3 o A keyboard of configuration switches let you easily select various computer options. o An external RGB display connector means you can be used as external keyboard by Setup program is preserved in use standard colour monitors with battery keeps the date and time current even when the T3200 is not in battery backed up with the T3200. o A set of IBM PC/AT can use . o A calendar clock backed-up memory...
... connecting through keyboard connector. 1-3 o A keyboard of configuration switches let you easily select various computer options. o An external RGB display connector means you can be used as external keyboard by Setup program is preserved in use standard colour monitors with battery keeps the date and time current even when the T3200 is not in battery backed up with the T3200. o A set of IBM PC/AT can use . o A calendar clock backed-up memory...

Owners Manual
Page 16
... the expansion board slot. 1-4 o An ac powered external 5.25-inch floppy disk drive allows the T3200 to reflect the corresponding system kit used. A set of USA, Germany, France, Spain, Scandinavia, Italy and Switzerland. o A 3 megabytes memory expansion card increases the T3200's RAM size to 4 megabytes. PART 1 INTRODUCTION 1.3 Options The T3200 offers various options for expanding its capability and for each of key caps needs to be replaced in...
... the expansion board slot. 1-4 o An ac powered external 5.25-inch floppy disk drive allows the T3200 to reflect the corresponding system kit used. A set of USA, Germany, France, Spain, Scandinavia, Italy and Switzerland. o A 3 megabytes memory expansion card increases the T3200's RAM size to 4 megabytes. PART 1 INTRODUCTION 1.3 Options The T3200 offers various options for expanding its capability and for each of key caps needs to be replaced in...
Owners Manual
Page 30
... and Internal Keyboard 11 4.6 A-B-PRT Switch Setting 12 4.6.1 No Printer, No External Drive 12 4.6.2 Printer, No External Drive 12 4.6.3 External Drive, No Printer 13 4.6.4 Both a Printer and an External Drive 13 4.7 Setting DIP Switch 14 4.8 Colour CRT Display Connection 16 4.9 Printer Connection 17 4.10 External Floppy Disk Drive Connection 18 This part contains: 4.1 System Unit 1 4.2 System Unit Components 2 4.3 Switches and Connectors 4 4.4 Plugging-in AC Power Cord 8 4.5 Setting Up Keyboard and Display 10 4.5.1 Use of Plasma Display and External Keyboard 10...
... and Internal Keyboard 11 4.6 A-B-PRT Switch Setting 12 4.6.1 No Printer, No External Drive 12 4.6.2 Printer, No External Drive 12 4.6.3 External Drive, No Printer 13 4.6.4 Both a Printer and an External Drive 13 4.7 Setting DIP Switch 14 4.8 Colour CRT Display Connection 16 4.9 Printer Connection 17 4.10 External Floppy Disk Drive Connection 18 This part contains: 4.1 System Unit 1 4.2 System Unit Components 2 4.3 Switches and Connectors 4 4.4 Plugging-in AC Power Cord 8 4.5 Setting Up Keyboard and Display 10 4.5.1 Use of Plasma Display and External Keyboard 10...

Owners Manual
Page 33
... Lock LEDs : An LED lights when the key corresponding to carry. Release latch by 400 vertical pixels. (2) Keyboard : Has 85 keys including typewriter key area, the function keys and numeric keypad. (3) Power LED : When lit, ac power is being supplied to the system unit. (4) "Disk in Use" LEDs : An LED lights when a corresponding built-in floppy disk drive or hard disk drive is closed and ready to the LED is activated. (7) Plasma Display Latch...
... Lock LEDs : An LED lights when the key corresponding to carry. Release latch by 400 vertical pixels. (2) Keyboard : Has 85 keys including typewriter key area, the function keys and numeric keypad. (3) Power LED : When lit, ac power is being supplied to the system unit. (4) "Disk in Use" LEDs : An LED lights when a corresponding built-in floppy disk drive or hard disk drive is closed and ready to the LED is activated. (7) Plasma Display Latch...

Owners Manual
Page 35
... 4.7 Setting DIP Switch provides a summary. (4) A--B-PRT Switch : changes over the addresses (-A or -B) of the floppy disk drives. The colour display from an IBM PC can be used . (6) AC IN Change Switch : is provided to adapt the power supply to the computer. Normally this port general I /O device having the same pin configuration and capabilities as the printer. (3) DIP Switch : allows you to ON makes this switch is blanked off and access by a user...
... 4.7 Setting DIP Switch provides a summary. (4) A--B-PRT Switch : changes over the addresses (-A or -B) of the floppy disk drives. The colour display from an IBM PC can be used . (6) AC IN Change Switch : is provided to adapt the power supply to the computer. Normally this port general I /O device having the same pin configuration and capabilities as the printer. (3) DIP Switch : allows you to ON makes this switch is blanked off and access by a user...

Owners Manual
Page 37
PART 4 SETTING-UP (3) Keyboard Connector : Is used to connect an external keyboard. (4) Plasma Contrast/Brightness Dial : Controls the contrast or brightness of the expansion options. Figure 4-5 Left Side Panel to your satisfaction. Slot : is protected by a cover that can be removed to allow installation of the Plasma Display screen. Adjust the angle of the screen first, then use the Plasma Display contrast/brightness dial to fine tune the display to .el ( ) 4-7 Left Side (1) EXP.
PART 4 SETTING-UP (3) Keyboard Connector : Is used to connect an external keyboard. (4) Plasma Contrast/Brightness Dial : Controls the contrast or brightness of the expansion options. Figure 4-5 Left Side Panel to your satisfaction. Slot : is protected by a cover that can be removed to allow installation of the Plasma Display screen. Adjust the angle of the screen first, then use the Plasma Display contrast/brightness dial to fine tune the display to .el ( ) 4-7 Left Side (1) EXP.

Owners Manual
Page 72
... -test. Typing 2 forwards the setup operation to change (1:No/2:Yes) ? Cy1=614,h=8,s/t=17 3.Memory size System memory Extended memory Expanded memory = 640KB = 0MB = 384KB+ 0MB 4.External display card = None Select setup change the descriptions. Type 1 if the descriptions properly reflect the actual system configuration, or 2 if you want to step (2). 6-6 PART 6 OPERATION [[ System setup ]] 1.Floppy disk drives = 1 Drive#1 type = 2 - 720KB/1.2MB Drive#2 type = 0 - The descriptions in this menu show the system configuration stored in the battery backed-up memory...
... -test. Typing 2 forwards the setup operation to change (1:No/2:Yes) ? Cy1=614,h=8,s/t=17 3.Memory size System memory Extended memory Expanded memory = 640KB = 0MB = 384KB+ 0MB 4.External display card = None Select setup change the descriptions. Type 1 if the descriptions properly reflect the actual system configuration, or 2 if you want to step (2). 6-6 PART 6 OPERATION [[ System setup ]] 1.Floppy disk drives = 1 Drive#1 type = 2 - 720KB/1.2MB Drive#2 type = 0 - The descriptions in this menu show the system configuration stored in the battery backed-up memory...

Owners Manual
Page 89
... 7.7.2 Internal and External Commands 28 7.7.3 I)IR : Listing File Names 29 7.7.4 FORMAT : Initialising Disks 31 7.7.5 I)ISKCOPY : Making Backup Copies of Your Disks 36 7.7.6 COPY : Copying Files 40 7.7.6.1 Copying Files to Same Disk 40 7.7.6.2 Copying Files to Another Disk 42 7.7.7 RENAME : Changing File Name 44 7.7.8 TYPE : Displaying Contents of File 45 7.8 Device Error Message 46 7.9 Turning OFF System 48 7.10 Establishing National MS-DOS Disks 49 7.11 Using Hard Disk...
... 7.7.2 Internal and External Commands 28 7.7.3 I)IR : Listing File Names 29 7.7.4 FORMAT : Initialising Disks 31 7.7.5 I)ISKCOPY : Making Backup Copies of Your Disks 36 7.7.6 COPY : Copying Files 40 7.7.6.1 Copying Files to Same Disk 40 7.7.6.2 Copying Files to Another Disk 42 7.7.7 RENAME : Changing File Name 44 7.7.8 TYPE : Displaying Contents of File 45 7.8 Device Error Message 46 7.9 Turning OFF System 48 7.10 Establishing National MS-DOS Disks 49 7.11 Using Hard Disk...

Owners Manual
Page 91
...) appears. Startup Message From MS-DOS When MS-DOS is XXX X-XX-19XX Enter new date (mm-dd-yy): _ The cursor indicates where the character you type will appear. 7-2 PART 7 USING MS-DOS If your T3200 is already running: To start or restart MS-DOS, follow the procedure below. (1) Insert your MS-DOS system disk into the disk drive, if it...
...) appears. Startup Message From MS-DOS When MS-DOS is XXX X-XX-19XX Enter new date (mm-dd-yy): _ The cursor indicates where the character you type will appear. 7-2 PART 7 USING MS-DOS If your T3200 is already running: To start or restart MS-DOS, follow the procedure below. (1) Insert your MS-DOS system disk into the disk drive, if it...

Owners Manual
Page 92
... having already been displayed is incorrect, type today's date as the form of month. mm : is backed up with an appropriate Ni-Cd battery. 7.2.1 Entering Date When the message or prompt ( Enter new date (mm-dd-yy): _ appears, you are expected to 12 representing month. or two-digit number from 1 to 31...a one - PART 7 USING MS-DOS 7.2 Entering Date and Time The Real Time Clock (RTC) is assumed), or a four-digit number from 1980 to 99 (the 19- or two-digit number from 80 to 2099 representing year. 7-3 yy : is a one - This unit works all the time and MS-DOS displays the date and...
... having already been displayed is incorrect, type today's date as the form of month. mm : is backed up with an appropriate Ni-Cd battery. 7.2.1 Entering Date When the message or prompt ( Enter new date (mm-dd-yy): _ appears, you are expected to 12 representing month. or two-digit number from 1 to 31...a one - PART 7 USING MS-DOS 7.2 Entering Date and Time The Real Time Clock (RTC) is assumed), or a four-digit number from 1980 to 99 (the 19- or two-digit number from 80 to 2099 representing year. 7-3 yy : is a one - This unit works all the time and MS-DOS displays the date and...

Owners Manual
Page 93
... keying recovery : If you with Invalid date Enter new date (mm-dd-yy):_ Format retriction : The format in the date, press the Enter key to remove one character for the prompt. 7-4 You may also press Esc key. You may then type a new entry for each keystroke. Invalid input : If you enter an invalid form of MS-DOS. Then make a mistake while typing, use 4- (backspace) key...
... keying recovery : If you with Invalid date Enter new date (mm-dd-yy):_ Format retriction : The format in the date, press the Enter key to remove one character for the prompt. 7-4 You may also press Esc key. You may then type a new entry for each keystroke. Invalid input : If you enter an invalid form of MS-DOS. Then make a mistake while typing, use 4- (backspace) key...

Owners Manual
Page 108
... the printer power switch is currently on the printer. Then holding the Ctrl and the Alt keys down and press the PrtSc key. Then release all of Screen Information If your T3200 has a printer, first make sure that , each time you want to the printer, hold the Ctrl key down and press the Del key. PART 7 USING MS-DOS 7.5.6 Making Hard Copy...
... the printer power switch is currently on the printer. Then holding the Ctrl and the Alt keys down and press the PrtSc key. Then release all of Screen Information If your T3200 has a printer, first make sure that , each time you want to the printer, hold the Ctrl key down and press the Del key. PART 7 USING MS-DOS 7.5.6 Making Hard Copy...

Owners Manual
Page 140
... system disk that you can use for your everyday operation. (7) Hold the Ctrl and Alt keys down and press the Del key. Select KB(keyboard) (5) Choose keyboard code (e.g., US for United States) from the menu on the screen and press the Enter key. PART 7 USING MS-DOS (4) Choose country code (e.g., 001 for United States) from the menu on screen and press the Enter key. Create CONFIG.SYS in current drive A: (Y/N) ?_ (6) Type...
... system disk that you can use for your everyday operation. (7) Hold the Ctrl and Alt keys down and press the Del key. Select KB(keyboard) (5) Choose keyboard code (e.g., US for United States) from the menu on the screen and press the Enter key. PART 7 USING MS-DOS (4) Choose country code (e.g., 001 for United States) from the menu on screen and press the Enter key. Create CONFIG.SYS in current drive A: (Y/N) ?_ (6) Type...

Owners Manual
Page 147
PART 7 USING MS-DOS Note that were previously backed up with the BACKUP command. MS-DOS reserves the drive letter -C for single -disk operation. Even if the T3200 has only one floppy disk drive, MS-DOS sets aside -A and -B for the hard disk drive. To avoid the risk, you to the MS-DOS Reference Manual for this purpose. The RESTORE command restores these commands. 7-58...
PART 7 USING MS-DOS Note that were previously backed up with the BACKUP command. MS-DOS reserves the drive letter -C for single -disk operation. Even if the T3200 has only one floppy disk drive, MS-DOS sets aside -A and -B for the hard disk drive. To avoid the risk, you to the MS-DOS Reference Manual for this purpose. The RESTORE command restores these commands. 7-58...

Owners Manual
Page 159
A Insert system disk in drive Press any key when ready.... [B Toshiba Personal Computer MS-DOS Version 3.20/RXX (C) Copyright Toshiba Corporation 1983,1987 (C) Copyright Microsoft Corporation 1981,1986 Current date is XXX X-XX-19XX Enter new date (mm-dd-yy): _ I If the message A is set to the PRT side. 8-11 PART 8 TROUBLESHOOTING (5) Confirm which of the system unit is displayed: o Confirm that the A-B-PRT Switch at the rear of the following messages are displayed. o Confirm that the MS-DOS system disk has been correctly inserted into the disk drive.
A Insert system disk in drive Press any key when ready.... [B Toshiba Personal Computer MS-DOS Version 3.20/RXX (C) Copyright Toshiba Corporation 1983,1987 (C) Copyright Microsoft Corporation 1981,1986 Current date is XXX X-XX-19XX Enter new date (mm-dd-yy): _ I If the message A is set to the PRT side. 8-11 PART 8 TROUBLESHOOTING (5) Confirm which of the system unit is displayed: o Confirm that the A-B-PRT Switch at the rear of the following messages are displayed. o Confirm that the MS-DOS system disk has been correctly inserted into the disk drive.
Owners Manual
Page 189
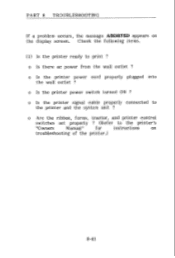
... printer signal cable properly connected to the printer's "Owners Manual" for instructions on the display screen. PART 8 TROUBLESHOOTING If a problem occurs, the message ABORTED appears on troubleshooting of the printer.) 8-41 o Are the ribbon, forms, tractor, and printer control switches set properly ? (Refer to the printer and the system unit ? Check the following items. (1) Is the printer ready to print ? o Is the printer power switch turned ON...
... printer signal cable properly connected to the printer's "Owners Manual" for instructions on the display screen. PART 8 TROUBLESHOOTING If a problem occurs, the message ABORTED appears on troubleshooting of the printer.) 8-41 o Are the ribbon, forms, tractor, and printer control switches set properly ? (Refer to the printer and the system unit ? Check the following items. (1) Is the printer ready to print ? o Is the printer power switch turned ON...


