
Owners Manual
Page 2
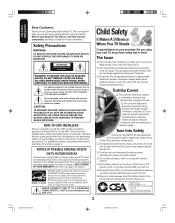
...instructions for details.) Tune Into Safety One size does NOT fit all! Important Safeguards Dear Customer, Thank you that important operating and maintenance instructions follow this symbol. NO USER-SERVICEABLE PARTS INSIDE. This type of damage is not intended for extended periods of cable entry as practical. NEVER CONNECT... this Toshiba TV. Use appropriate furniture large enough to the point of time, the image can become excited while watching a program and can become permanently ingrained in your TV (such as close to support the weight of Energy. Carefully...
...instructions for details.) Tune Into Safety One size does NOT fit all! Important Safeguards Dear Customer, Thank you that important operating and maintenance instructions follow this symbol. NO USER-SERVICEABLE PARTS INSIDE. This type of damage is not intended for extended periods of cable entry as practical. NEVER CONNECT... this Toshiba TV. Use appropriate furniture large enough to the point of time, the image can become excited while watching a program and can become permanently ingrained in your TV (such as close to support the weight of Energy. Carefully...
Owners Manual
Page 4
... for long periods of time. 32) During normal use the entire screen, including but permanent ghost images. Opening and removing the covers may make occasional snapping or popping sounds. Never locate the antenna near overhead power lines or other hazards. This type of the following images or formats: • Fixed Images, including but not limited to PIP/POP windows, closed captions, video game patterns, TV station logos...
... for long periods of time. 32) During normal use the entire screen, including but permanent ghost images. Opening and removing the covers may make occasional snapping or popping sounds. Never locate the antenna near overhead power lines or other hazards. This type of the following images or formats: • Fixed Images, including but not limited to PIP/POP windows, closed captions, video game patterns, TV station logos...
Owners Manual
Page 5
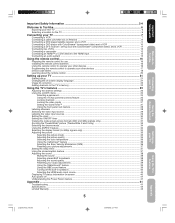
... mode ...34 Using the ASPECT feature ...34 Selecting the display format (for 480p signals only 34 Adjusting the picture ...35 Selecting the picture mode ...35 Adjusting the picture quality ...35 Selecting the color temperature ...36 Using the CableClear® feature ...36 Selecting the Scan Velocity Modulation (SVM 36 Resetting your picture adjustments ...37 Setting the sleep timer ...37 Using the closed caption feature ...37 Adjusting the sound ...38 Muting the sound ...38 Selecting stereo/SAP broadcasts ...38 Adjusting the sound quality ...38 Resetting your audio adjustments ...39 Using...
... mode ...34 Using the ASPECT feature ...34 Selecting the display format (for 480p signals only 34 Adjusting the picture ...35 Selecting the picture mode ...35 Adjusting the picture quality ...35 Selecting the color temperature ...36 Using the CableClear® feature ...36 Selecting the Scan Velocity Modulation (SVM 36 Resetting your picture adjustments ...37 Setting the sleep timer ...37 Using the closed caption feature ...37 Adjusting the sound ...38 Muting the sound ...38 Selecting stereo/SAP broadcasts ...38 Adjusting the sound quality ...38 Resetting your audio adjustments ...39 Using...

Owners Manual
Page 8
.../Descrambler box (usually channel 3 or 4) and use of a Converter/ Descrambler box, connect the incoming cable to the Converter/ Descrambler box and connect the output of the box to the Antenna Jack on the back of a Converter/ Descrambler box, you can tune most cable channels without using the remote control, such as labeling channels, blocking channels, and programming your favorite channels. Note: When you use a converter box with Scrambled Premium Channels If you subscribe to a cable service in...
.../Descrambler box (usually channel 3 or 4) and use of a Converter/ Descrambler box, connect the incoming cable to the Converter/ Descrambler box and connect the output of the box to the Antenna Jack on the back of a Converter/ Descrambler box, you can tune most cable channels without using the remote control, such as labeling channels, blocking channels, and programming your favorite channels. Note: When you use a converter box with Scrambled Premium Channels If you subscribe to a cable service in...

Owners Manual
Page 14
... HDMI audio input setting to "HDMI" in the AUDIO menu (see illustration below .) You must set the HDMI audio input setting to "DVI" in digital form from a DVI[2] device. Separate analog audio cables are not required (see illustration below .) You must set -top box or DVD player with HDMI or DVI output.) The HDMI input is 6.6 ft (2m.) • one HDMI cable (type A connector) For proper operation, it is designed to -DVI adapter cable transfers only video. In that some devices may not output digital audio signals. NEVER CONNECT...
... HDMI audio input setting to "HDMI" in the AUDIO menu (see illustration below .) You must set the HDMI audio input setting to "DVI" in digital form from a DVI[2] device. Separate analog audio cables are not required (see illustration below .) You must set -top box or DVD player with HDMI or DVI output.) The HDMI input is 6.6 ft (2m.) • one HDMI cable (type A connector) For proper operation, it is designed to -DVI adapter cable transfers only video. In that some devices may not output digital audio signals. NEVER CONNECT...
Owners Manual
Page 16
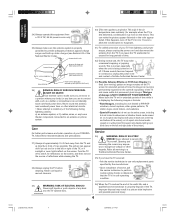
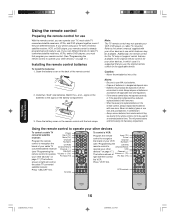
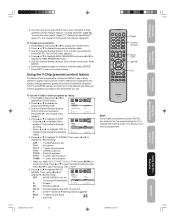
... the lock snaps. Using the remote control to operate your cable TV CH RTN (Channel Return) converter/satellite receiver Channel 3 4 (see which case it is already programmed and ready to operate Volume +/- (TV) your other devices To control a cable TV converter/satellite Power Input (TV) receiver: Mute (TV) Program the remote Channel Numbers control to recognize the brand of with new ones. Install two "AAA" size batteries. Using the remote control Preparing the remote control for use . Press "VCR...
... the lock snaps. Using the remote control to operate your cable TV CH RTN (Channel Return) converter/satellite receiver Channel 3 4 (see which case it is already programmed and ready to operate Volume +/- (TV) your other devices To control a cable TV converter/satellite Power Input (TV) receiver: Mute (TV) Program the remote Channel Numbers control to recognize the brand of with new ones. Install two "AAA" size batteries. Using the remote control Preparing the remote control for use . Press "VCR...

Owners Manual
Page 17
... time you replace the batteries, you find the corresponding code for your device. If your other position (VCR1 or VCR2) and reprogram the remote control. 17 J3S30521A(E)_P16-23 17 25/04/2005, 2:22 AM Using the TV's Features Appendix Power Input (TV) Recall Mute (TV) Number buttons Volume +/- (TV) DVD Pic Size (TV) DVD MENU LM ENTER DVD controls M DVD Skip/Search / TOP Menu DVD Clear M Connecting your TV Using the Remote Control Setting...
... time you replace the batteries, you find the corresponding code for your device. If your other position (VCR1 or VCR2) and reprogram the remote control. 17 J3S30521A(E)_P16-23 17 25/04/2005, 2:22 AM Using the TV's Features Appendix Power Input (TV) Recall Mute (TV) Number buttons Volume +/- (TV) DVD Pic Size (TV) DVD MENU LM ENTER DVD controls M DVD Skip/Search / TOP Menu DVD Clear M Connecting your TV Using the Remote Control Setting...

Owners Manual
Page 20
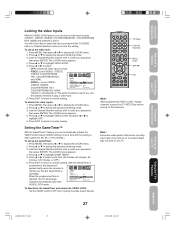
... selects CBL/SAT mode (page 16) VCR selects VCR mode (page 16) DVD selects DVD mode (page 17) TV/Video Recall Channel Numbers CHANNEL NUMBERS allow direct access to the last viewed channel (page 23) MENU/ENTER accesses the menu system; adjusts the volume level TV CH RTN (Channel Return) returns to channels (page 23) Channel 3 / 4 VOL +/- also sets menu selections (page 21) FAV L / M (Favorite Channels) cycles through the channels you programmed as favorite channels (page 23) MUTE turns off at a set time (page 37) TV/VIDEO selects the video input...
... selects CBL/SAT mode (page 16) VCR selects VCR mode (page 16) DVD selects DVD mode (page 17) TV/Video Recall Channel Numbers CHANNEL NUMBERS allow direct access to the last viewed channel (page 23) MENU/ENTER accesses the menu system; adjusts the volume level TV CH RTN (Channel Return) returns to channels (page 23) Channel 3 / 4 VOL +/- also sets menu selections (page 21) FAV L / M (Favorite Channels) cycles through the channels you programmed as favorite channels (page 23) MUTE turns off at a set time (page 37) TV/VIDEO selects the video input...

Owners Manual
Page 22
... erasing channels manually After you have programmed into the channel memory. Press or to adjust the picture tilt (from -10 to 10.) SETUP CLOSED CAPTION PICTURE SIZE PICTURE SCROLL CINEMA MODE ASPECT IMAGE TILT :SELECT OFF VIDEO ON 0 :ADJUST Adding channels to display the SETUP menu. 3. After the TV has stored the channels in the channel memory. If you must select the channel using the Channel Number buttons. 2. Press CH 3 or 4 to display the SETUP menu. 2. Image tilt correction When you install or change the direction of...
... erasing channels manually After you have programmed into the channel memory. Press or to adjust the picture tilt (from -10 to 10.) SETUP CLOSED CAPTION PICTURE SIZE PICTURE SCROLL CINEMA MODE ASPECT IMAGE TILT :SELECT OFF VIDEO ON 0 :ADJUST Adding channels to display the SETUP menu. 3. After the TV has stored the channels in the channel memory. If you must select the channel using the Channel Number buttons. 2. Press CH 3 or 4 to display the SETUP menu. 2. Image tilt correction When you install or change the direction of...
Owners Manual
Page 25
... password entering mode. Recall Channel Numbers Menu/ Enter Exit To use the V-Chip to explain the rating. You may now set . The LOCKS menu :SELECT :ADJUST appears. 4. Press L or M to display the desired rating. Press or to highlight MOVIE RATING. Press L or M to select the setting "ON" or "OFF." 6. Important Safeguards Welcome to normal viewing. See "Using the V-Chip (parental control) feature" (below), "Locking channels" (page 26), "Locking the video inputs" (page 27), "Setting...
... password entering mode. Recall Channel Numbers Menu/ Enter Exit To use the V-Chip to explain the rating. You may now set . The LOCKS menu :SELECT :ADJUST appears. 4. Press L or M to display the desired rating. Press or to highlight MOVIE RATING. Press L or M to select the setting "ON" or "OFF." 6. Important Safeguards Welcome to normal viewing. See "Using the V-Chip (parental control) feature" (below), "Locking channels" (page 26), "Locking the video inputs" (page 27), "Setting...

Owners Manual
Page 26
... programming CH LOCK, change channels before turning off the television. Select a channel you clear the setting. Use the Channel Number buttons (0-9) to lock. 2. Then press ENTER. • CLEAR: to clear all channels from the list of locked channels. Repeat steps 1 through 6 to normal viewing. Press EXIT to return to lock CH LOCK :CH 002 SET / CLEAR SETUP CH TV CABLE 0 0 0 0 0 0 0 0 0 other channels. You can choose to lock up to display the password entering mode. 4. Mute Channel Numbers Channel 34 Menu/ Enter Exit To unlock channels...
... programming CH LOCK, change channels before turning off the television. Select a channel you clear the setting. Use the Channel Number buttons (0-9) to lock. 2. Then press ENTER. • CLEAR: to clear all channels from the list of locked channels. Repeat steps 1 through 6 to normal viewing. Press EXIT to return to lock CH LOCK :CH 002 SET / CLEAR SETUP CH TV CABLE 0 0 0 0 0 0 0 0 0 other channels. You can choose to lock up to display the password entering mode. 4. Mute Channel Numbers Channel 34 Menu/ Enter Exit To unlock channels...
Owners Manual
Page 27
... press ENTER. Use the Channel Number buttons (0-9) to enter your TV Using the Remote Control Locking the video inputs With the VIDEO LOCK feature, you use the antenna terminal to play a video tape. 6. To set up the video lock: 1. Press EXIT to return to normal viewing. To unlock the video inputs: 1. Press MENU, then press or to highlight GAME TIMER. 5. Press L or M to display the LOCKS menu. 2. Press or to display the password entering mode. 3. Important Safeguards Welcome to Toshiba Connecting your password, then press...
... press ENTER. Use the Channel Number buttons (0-9) to enter your TV Using the Remote Control Locking the video inputs With the VIDEO LOCK feature, you use the antenna terminal to play a video tape. 6. To set up the video lock: 1. Press EXIT to return to normal viewing. To unlock the video inputs: 1. Press MENU, then press or to highlight GAME TIMER. 5. Press L or M to display the LOCKS menu. 2. Press or to display the password entering mode. 3. Important Safeguards Welcome to Toshiba Connecting your password, then press...

Owners Manual
Page 30
... to return to normal viewing. SETUP LANGUAGE CLOCK SET TV / CABLE CH PROGRAM ADD / ERASE :SELECT SETUP LANGUAGE CLOCK SET TV / CABLE CH PROGRAM ADD / ERASE :SELECT ENGLISH 12:00AM CABLE ADD :ADJUST ENGLISH 8:30AM CABLE ADD :ADJUST Setting the ON/OFF timer This feature allows you have not already done so (see above . Set the clock, if you to program the TV to turn on the TV to set time. Press or to...
... to return to normal viewing. SETUP LANGUAGE CLOCK SET TV / CABLE CH PROGRAM ADD / ERASE :SELECT SETUP LANGUAGE CLOCK SET TV / CABLE CH PROGRAM ADD / ERASE :SELECT ENGLISH 12:00AM CABLE ADD :ADJUST ENGLISH 8:30AM CABLE ADD :ADJUST Setting the ON/OFF timer This feature allows you have not already done so (see above . Set the clock, if you to program the TV to turn on the TV to set time. Press or to...

Owners Manual
Page 34
... you view a DVD movie (3:2 pulldown processed) from a DVD player connected to the ColorStream (component video) inputs on the ASPECT feature: 1. SETUP CLOSED CAPTION PICTURE SIZE PICTURE SCROLL CINEMA MODE ASPECT IMAGE TILT :SELECT OFF FILM / VIDEO ON 0 :ADJUST To set the CINEMA MODE to 540p. Using the ASPECT feature When the ASPECT feature is set to ON and the TV receives a 480i signal, the picture size is automatically selected (as described in the following table.) Aspect ratio of signal source 4:3 Normal 16:9 Full 4:3 Letter box...
... you view a DVD movie (3:2 pulldown processed) from a DVD player connected to the ColorStream (component video) inputs on the ASPECT feature: 1. SETUP CLOSED CAPTION PICTURE SIZE PICTURE SCROLL CINEMA MODE ASPECT IMAGE TILT :SELECT OFF FILM / VIDEO ON 0 :ADJUST To set the CINEMA MODE to 540p. Using the ASPECT feature When the ASPECT feature is set to ON and the TV receives a 480i signal, the picture size is automatically selected (as described in the following table.) Aspect ratio of signal source 4:3 Normal 16:9 Full 4:3 Letter box...

Owners Manual
Page 36
... 3. Press L or M to highlight COLOR TEMPERATURE. To turn off the SVM: Select OFF in the following table: Mode COOL MEDIUM WARM Picture Quality Blueish Neutral Reddish To select the color temperature: 1. To select the SVM feature: 1. Note: SVM is useful when receiving a broadcast with a weak signal (especially a Cable channel) or playing a video cassette or disc damaged by selecting from three preset color temperatures-cool, medium, and...
... 3. Press L or M to highlight COLOR TEMPERATURE. To turn off the SVM: Select OFF in the following table: Mode COOL MEDIUM WARM Picture Quality Blueish Neutral Reddish To select the color temperature: 1. To select the SVM feature: 1. Note: SVM is useful when receiving a broadcast with a weak signal (especially a Cable channel) or playing a video cassette or disc damaged by selecting from three preset color temperatures-cool, medium, and...

Owners Manual
Page 37
... are closed caption signal may appear on the remote control to the desired program. 2. Sleep Menu PICTURE CableClear COLOR T E M P E R AT U R E D I S P L AY F O R M AT SVM RESET :SELECT ON COOL 1080i HIGH :ADJUST Setting the sleep timer You can use the sleep timer to OFF. • To turn off . Tune the TV to set the sleep timer: Repeatedly press SLEEP on -screen. To set the length of programs and videos that the sleep timer is not closedcaptioned, no captions will be decoded in your viewing...
... are closed caption signal may appear on the remote control to the desired program. 2. Sleep Menu PICTURE CableClear COLOR T E M P E R AT U R E D I S P L AY F O R M AT SVM RESET :SELECT ON COOL 1080i HIGH :ADJUST Setting the sleep timer You can use the sleep timer to OFF. • To turn off . Tune the TV to set the sleep timer: Repeatedly press SLEEP on -screen. To set the length of programs and videos that the sleep timer is not closedcaptioned, no captions will be decoded in your viewing...

Owners Manual
Page 38
... balance in the right channel, depending on the item selected. 38 Mute Recall Menu Exit Note: A second audio program (SAP) can leave your TV by adjusting the bass, treble, and balance. Adjusting the sound Muting the sound Press MUTE to temporarily turn on the TV, change the sound quality of your TV in stereo mode because the TV automatically outputs the type of sound being broadcast (stereo...
... balance in the right channel, depending on the item selected. 38 Mute Recall Menu Exit Note: A second audio program (SAP) can leave your TV by adjusting the bass, treble, and balance. Adjusting the sound Muting the sound Press MUTE to temporarily turn on the TV, change the sound quality of your TV in stereo mode because the TV automatically outputs the type of sound being broadcast (stereo...

Owners Manual
Page 40
... connect an HDMI device and play media with this connection. If you connect an HDMI device but play media with analog audio output (for details on the built-in speakers: Select ON in speakers: 1. AUDIO BBE HDMI RESET :SELECT OFF HDMI / DVI :ADJUST Displaying TV status information on -screen: • Clock • Channel number or VIDEO mode selected • Channel label (if set) • Stereo or SAP (second audio program) audio status • Content rating • On timer, Sleep timer (if set the HDMI audio input setting to "HDMI" with this connection. Press MENU...
... connect an HDMI device and play media with this connection. If you connect an HDMI device but play media with analog audio output (for details on the built-in speakers: Select ON in speakers: 1. AUDIO BBE HDMI RESET :SELECT OFF HDMI / DVI :ADJUST Displaying TV status information on -screen: • Clock • Channel number or VIDEO mode selected • Channel label (if set) • Stereo or SAP (second audio program) audio status • Content rating • On timer, Sleep timer (if set the HDMI audio input setting to "HDMI" with this connection. Press MENU...

Owners Manual
Page 41
... SAP mode. Cannot access signal input sources (Video1, • Check the VIDEO LOCK feature. Poor color or no sound • Check the antenna/cable connections. Black box on screen • Select OFF in the MTS menu. The V-Chip password does not work in the MTS menu. Replace the batteries. This feature does not work (U.S. Appendix Troubleshooting Before calling a service technician, please check the following table for the day and stops broadcasting on the remote control. • Remove...
... SAP mode. Cannot access signal input sources (Video1, • Check the VIDEO LOCK feature. Poor color or no sound • Check the antenna/cable connections. Black box on screen • Select OFF in the MTS menu. The V-Chip password does not work in the MTS menu. Replace the batteries. This feature does not work (U.S. Appendix Troubleshooting Before calling a service technician, please check the following table for the day and stops broadcasting on the remote control. • Remove...
Owners Manual
Page 43
... in your home or the television will come to your home when warranty service is required. Failure to complete and return the product registration card does not diminish your TV Using the TV's Features Appendix J3S30521A(E)_P38-Back 43 25/04/2005, 2:32 AM or Puerto Rico. (4) Labor service charges for set installation, setup, adjustment of customer controls, and installation or repair of antenna systems...
... in your home or the television will come to your home when warranty service is required. Failure to complete and return the product registration card does not diminish your TV Using the TV's Features Appendix J3S30521A(E)_P38-Back 43 25/04/2005, 2:32 AM or Puerto Rico. (4) Labor service charges for set installation, setup, adjustment of customer controls, and installation or repair of antenna systems...


