
User Manual
Page 1
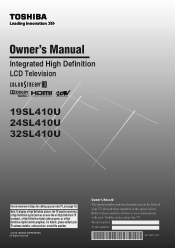
...numbers whenever you communicate with your Toshiba dealer about this TV. Refer to these numbers in the spaces below. Note: To display a High Definition picture, the TV must be receiving a High Definition signal (such as an over-the-air High Definition TV broadcast, a High Definition digital ... Definition digital satellite program). Model number: Serial number: 49.18S01.001 For details, please contact your TV antenna installer, cable provider, or satellite provider. 2010 TOSHIBA CORPORATION All Rights Reserved Owner's Record The model number and serial number are on the back of steps...
...numbers whenever you communicate with your Toshiba dealer about this TV. Refer to these numbers in the spaces below. Note: To display a High Definition picture, the TV must be receiving a High Definition signal (such as an over-the-air High Definition TV broadcast, a High Definition digital ... Definition digital satellite program). Model number: Serial number: 49.18S01.001 For details, please contact your TV antenna installer, cable provider, or satellite provider. 2010 TOSHIBA CORPORATION All Rights Reserved Owner's Record The model number and serial number are on the back of steps...
User Manual
Page 2
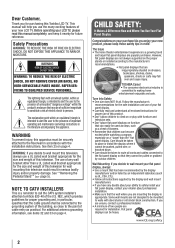
...• If you have any wall bracket other than life" flat panel display. Wall Mounting: If you decide to constitute a risk of this Toshiba LCD TV. If you are unsure, contact a professional installer. • A minimum of two people are mounting the display is a growing trend and larger ...UL Listed wall bracket appropriate for wall mounting this manual completely, and keep these safety tips in serious bodily injury and/or property damage. TOSHIBA Cares! • The consumer electronics industry is a reminder to call the CATV system installer's attention to Article 820-40 of any ...
...• If you have any wall bracket other than life" flat panel display. Wall Mounting: If you decide to constitute a risk of this Toshiba LCD TV. If you are unsure, contact a professional installer. • A minimum of two people are mounting the display is a growing trend and larger ...UL Listed wall bracket appropriate for wall mounting this manual completely, and keep these safety tips in serious bodily injury and/or property damage. TOSHIBA Cares! • The consumer electronics industry is a reminder to call the CATV system installer's attention to Article 820-40 of any ...
User Manual
Page 3
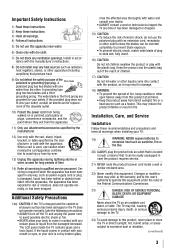
...source such as a heater. Important Safety Instructions 1) Read these instructions. 2) Keep these recommendations and precautions and heed all warnings when installing your TV: 19) WARNING: NEVER expose batteries to excessive heat such as sunshine, fire or the like. 20) ALWAYS plug the product into the ... has been exposed to rain or moisture, does not operate normally, or has been dropped. Additional Safety Precautions 14a) CAUTION: If the TV is used, use attachments/accessories specified by the manufacturer. 12) Use only with the cart, stand, tripod, bracket, or table specified...
...source such as a heater. Important Safety Instructions 1) Read these instructions. 2) Keep these recommendations and precautions and heed all warnings when installing your TV: 19) WARNING: NEVER expose batteries to excessive heat such as sunshine, fire or the like. 20) ALWAYS plug the product into the ... has been exposed to rain or moisture, does not operate normally, or has been dropped. Additional Safety Precautions 14a) CAUTION: If the TV is used, use attachments/accessories specified by the manufacturer. 12) Use only with the cart, stand, tripod, bracket, or table specified...
User Manual
Page 4
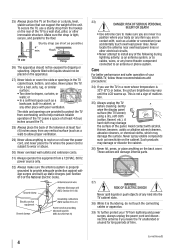
...following during lightning activity: a) an antenna system; Sturdy strap (as short as insecticide on or roll over the power cord, and never place the TV where the power cord is subject to provide adequate protection against voltage surges and built-up . or • In a confined space such as ... inches away from any vertical surface (such as a bookcase, built-in cabinet, or any item you are never in a position where your TOSHIBA TV, follow these recommendations and precautions: 34) If you are in the TV cabinet back, bottom, and sides. Such products may damage the surface.
...following during lightning activity: a) an antenna system; Sturdy strap (as short as insecticide on or roll over the power cord, and never place the TV where the power cord is subject to provide adequate protection against voltage surges and built-up . or • In a confined space such as ... inches away from any vertical surface (such as a bookcase, built-in cabinet, or any item you are never in a position where your TOSHIBA TV, follow these recommendations and precautions: 34) If you are in the TV cabinet back, bottom, and sides. Such products may damage the surface.
User Manual
Page 5
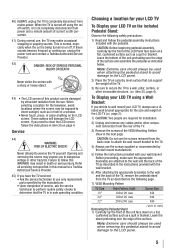
... Mounting Pattern show in safe operating condition. To Display your LCD TV on page 4. Before proceeding, make occasional snapping or popping sounds. If these sounds become frequent or continuous, unplug the power cord and contact a Toshiba Authorized Service Provider. 42) DANGER: RISK OF SERIOUS PERSONAL INJURY OR... DEATH! Failure to clean the LCD screen, follow this manual to a Toshiba Authorized Service Provider. 45) If you to completely disconnect from the sun. Leave the bottom of the unit protruding over the ...
... Mounting Pattern show in safe operating condition. To Display your LCD TV on page 4. Before proceeding, make occasional snapping or popping sounds. If these sounds become frequent or continuous, unplug the power cord and contact a Toshiba Authorized Service Provider. 42) DANGER: RISK OF SERIOUS PERSONAL INJURY OR... DEATH! Failure to clean the LCD screen, follow this manual to a Toshiba Authorized Service Provider. 45) If you to completely disconnect from the sun. Leave the bottom of the unit protruding over the ...
User Manual
Page 6
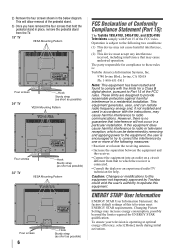
..., select [Home] mode during initial activation. To ensure your television is connected. • Consult the dealer or an experienced radio/TV technician for help. These limits are designed to the following measures: • Reorient or relocate the receiving antenna. • Increase ... Information ENERGY STAR User Information Statement: the factory default settings of Conformity Compliance Statement (Part 15): The Toshiba 19SL410U, 24SL410U, and 32SL410U Televisions comply with the limits for ENERGY STAR qualification. 2) Remove the four screws shown in the below diagram.
..., select [Home] mode during initial activation. To ensure your television is connected. • Consult the dealer or an experienced radio/TV technician for help. These limits are designed to the following measures: • Reorient or relocate the receiving antenna. • Increase ... Information ENERGY STAR User Information Statement: the factory default settings of Conformity Compliance Statement (Part 15): The Toshiba 19SL410U, 24SL410U, and 32SL410U Televisions comply with the limits for ENERGY STAR qualification. 2) Remove the four screws shown in the below diagram.
User Manual
Page 7
...sign of malfunction, and is manufactured using an extremely high level of precision technology; Trademark Information • Manufactured under your LCD TV The following symptoms are technical limitations of LCD Display technology and are not visible when the picture is displayed for a long ...symbol are trademarks of Dolby Laboratories. • HDMI, the HDMI logo, and High-Definition Multimedia Interface are registered U.S. therefore, Toshiba is recommended for normal home use. ENERGY STAR and the ENERGY STAR mark are trademarks or registered trademarks of HDMI Licensing LLC in...
...sign of malfunction, and is manufactured using an extremely high level of precision technology; Trademark Information • Manufactured under your LCD TV The following symptoms are technical limitations of LCD Display technology and are not visible when the picture is displayed for a long ...symbol are trademarks of Dolby Laboratories. • HDMI, the HDMI logo, and High-Definition Multimedia Interface are registered U.S. therefore, Toshiba is recommended for normal home use. ENERGY STAR and the ENERGY STAR mark are trademarks or registered trademarks of HDMI Licensing LLC in...
User Manual
Page 8
... Main menu layout 22 Setup/Installation menu layout 23 Navigating the menu system 23 Chapter 5: Setting up your TV 24 Initial Setup 24 Selecting the menu language 24 Configuring the antenna input source for the ANT/CABLE terminal 24...meter 28 Setting the time zone 28 Viewing the system status 28 Reset Factory Defaults 28 Chapter 6: Using the TV's features 29 Selecting the video input source to view 29 Labeling the video input sources 29 To clear the ... 56 Limited United States Warranty for LCD Televisions .. 57 Limited Canadian Warranty for Toshiba Brand Flat Panel Televisions 58
... Main menu layout 22 Setup/Installation menu layout 23 Navigating the menu system 23 Chapter 5: Setting up your TV 24 Initial Setup 24 Selecting the menu language 24 Configuring the antenna input source for the ANT/CABLE terminal 24...meter 28 Setting the time zone 28 Viewing the system status 28 Reset Factory Defaults 28 Chapter 6: Using the TV's features 29 Selecting the video input source to view 29 Labeling the video input sources 29 To clear the ... 56 Limited United States Warranty for LCD Televisions .. 57 Limited Canadian Warranty for Toshiba Brand Flat Panel Televisions 58
User Manual
Page 9
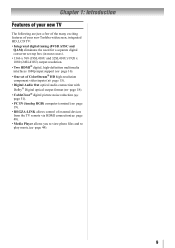
...few of the many exciting features of your new Toshiba widescreen, integrated HD, LCD TV: • Integrated digital tuning (8VSB ATSC and QAM) eliminates the need for a separate digital converter set-top box (in most cases). • 1366 x 768 (19SL410U and 32SL410U)/1920 x 1080 (24SL410U) output resolution. • Two HDMI® ... reduction ( page 51). • PC IN (Analog RGB) computer terminal ( page 19). • REGZA-LINK allows control of external devices from the TV remote via HDMI connection( page 48). • Media Player allows you to view photo files and to play music.( page 44). 9
...few of the many exciting features of your new Toshiba widescreen, integrated HD, LCD TV: • Integrated digital tuning (8VSB ATSC and QAM) eliminates the need for a separate digital converter set-top box (in most cases). • 1366 x 768 (19SL410U and 32SL410U)/1920 x 1080 (24SL410U) output resolution. • Two HDMI® ... reduction ( page 51). • PC IN (Analog RGB) computer terminal ( page 19). • REGZA-LINK allows control of external devices from the TV remote via HDMI connection( page 48). • Media Player allows you to view photo files and to play music.( page 44). 9
User Manual
Page 10
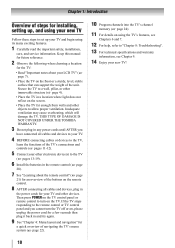
... DAMAGE IS NOT COVERED UNDER THE TOSHIBA WARRANTY. 3 Do not plug in any power cords until AFTER you cannot turn on the floor or a sturdy, level, stable surface that can support the weight of the unit. Then press POWER on the TV control panel or remote control to ... Carefully read the important safety, installation, care, and service information. Keep this manual for future reference. 2 Observe the following when choosing a location for the TV: • Read "Important notes about the remote control" ( page 21) for an overview of the buttons on the remote control. 8 AFTER connecting all ...
... DAMAGE IS NOT COVERED UNDER THE TOSHIBA WARRANTY. 3 Do not plug in any power cords until AFTER you cannot turn on the floor or a sturdy, level, stable surface that can support the weight of the unit. Then press POWER on the TV control panel or remote control to ... Carefully read the important safety, installation, care, and service information. Keep this manual for future reference. 2 Observe the following when choosing a location for the TV: • Read "Important notes about the remote control" ( page 21) for an overview of the buttons on the remote control. 8 AFTER connecting all ...
User Manual
Page 11
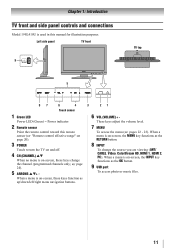
...menu is on-screen, these keys change the source you are viewing (ANT/ CABLE, Video, ColorStream HD, HDMI 1, HDMI 2, PC). Left side panel TV front TV top Touch sensor 1 Green LED Power LED (Green) = Power indicator 2 Remote sensor Point the remote control toward this manual for illustration purposes. Chapter 1:... controls and connections Model 19SL410U is used in this remote sensor ( "Remote control effective range" on page 20). 3 POWER Touch to turn the TV on and off. 4 CH (CHANNEL) ST When no menu is on-screen, these keys function as up/down/left/right menu navigation buttons. ...
...menu is on-screen, these keys change the source you are viewing (ANT/ CABLE, Video, ColorStream HD, HDMI 1, HDMI 2, PC). Left side panel TV front TV top Touch sensor 1 Green LED Power LED (Green) = Power indicator 2 Remote sensor Point the remote control toward this manual for illustration purposes. Chapter 1:... controls and connections Model 19SL410U is used in this remote sensor ( "Remote control effective range" on page 20). 3 POWER Touch to turn the TV on and off. 4 CH (CHANNEL) ST When no menu is on-screen, these keys function as up/down/left/right menu navigation buttons. ...
User Manual
Page 12
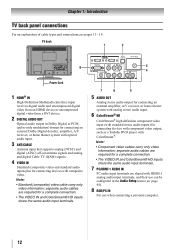
TV back Power Cord 1 HDMI® IN High-Definition Multimedia Interface input receives digital audio and uncompressed digital video from an HDMI device or uncompressed digital ... digital (ATSC) off-air antenna signals and analog and digital Cable TV (QAM) signals. 4 VIDEO IN Standard (composite) video and standard audio inputs plus for connecting devices with component video output, such as a Toshiba DVD player with composite video. Chapter 1: Introduction TV back panel connections For an explanation of cable types and connections...
TV back Power Cord 1 HDMI® IN High-Definition Multimedia Interface input receives digital audio and uncompressed digital video from an HDMI device or uncompressed digital ... digital (ATSC) off-air antenna signals and analog and digital Cable TV (QAM) signals. 4 VIDEO IN Standard (composite) video and standard audio inputs plus for connecting devices with component video output, such as a Toshiba DVD player with composite video. Chapter 1: Introduction TV back panel connections For an explanation of cable types and connections...
User Manual
Page 13
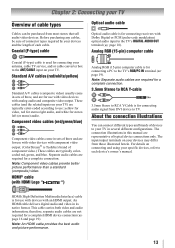
..." ") Analog RGB (15-pin) computer cable is for a complete connection. Analog RGB (15-pin) computer cable Coaxial (F-type) cable is Toshiba's brand of component video.) These cables are for use with video devices with Dolby Digital or PCM (pulse-code modulation) optical audio input to ... audio and picture performance. 13 Separate audio cables are not required for connecting audio signal from those illustrated herein. For details on your TV. HDMI (High-Definition Multimedia Interface) cable is for a complete HDMI device connection ( page 16 and page 19). Note: Separate audio...
..." ") Analog RGB (15-pin) computer cable is for a complete connection. Analog RGB (15-pin) computer cable Coaxial (F-type) cable is Toshiba's brand of component video.) These cables are for use with video devices with Dolby Digital or PCM (pulse-code modulation) optical audio input to ... audio and picture performance. 13 Separate audio cables are not required for connecting audio signal from those illustrated herein. For details on your TV. HDMI (High-Definition Multimedia Interface) cable is for a complete HDMI device connection ( page 16 and page 19). Note: Separate audio...
User Manual
Page 14
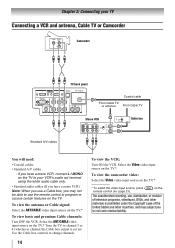
... 2: Connecting your VCR's audio out terminal using the white audio cable only. • Standard audio cables (If you have a mono VCR, connect L / MONO on the TV. If you have a mono VCR) Note: When you use the remote control to change channels. 14 To view the VCR: Turn ON the VCR. To... view the antenna or Cable signal: Select the ANT/CABLE video input source on the TV.* * To select the video input source, press remote control ( page 21). Use the Cable box controls to program or access certain features on the...
... 2: Connecting your VCR's audio out terminal using the white audio cable only. • Standard audio cables (If you have a mono VCR, connect L / MONO on the TV. If you have a mono VCR) Note: When you use the remote control to change channels. 14 To view the VCR: Turn ON the VCR. To... view the antenna or Cable signal: Select the ANT/CABLE video input source on the TV.* * To select the video input source, press remote control ( page 21). Use the Cable box controls to program or access certain features on the...
User Manual
Page 15
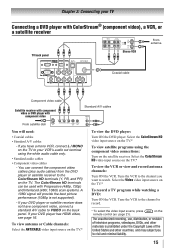
... to the channel you have component video, connect a standard A/V cable to the ColorStream HD terminals (Y, PB, and PR) on the back panel. on the TV.* To view the DVD player: Turn ON the DVD player. The ColorStream HD terminals can connect the component video cables (plus audio cables) from the...States and other materials is not supported). - Select the ColorStream HD video input source on the TV.* To record a TV program while watching a DVD: Turn ON the VCR. Select the Video video input source on the TV.* To view the VCR or view and record antenna channels: Turn ON the VCR. If ...
... to the channel you have component video, connect a standard A/V cable to the ColorStream HD terminals (Y, PB, and PR) on the back panel. on the TV.* To view the DVD player: Turn ON the DVD player. The ColorStream HD terminals can connect the component video cables (plus audio cables) from the...States and other materials is not supported). - Select the ColorStream HD video input source on the TV.* To record a TV program while watching a DVD: Turn ON the VCR. Select the Video video input source on the TV.* To view the VCR or view and record antenna channels: Turn ON the VCR. If ...
User Manual
Page 16
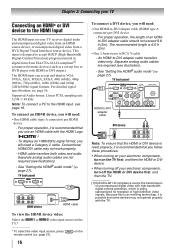
...then the HDMI or DVI device. • When turning off your electronic components, turn off the HDMI or DVI device first, and then the TV. [1] EIA/CEA-861-D compliance covers the transmission of uncompressed digital video with the HDMI Logo ( ). - Conventional HDMI/DVI cable may not...connect a DVI device, you will need a Category 2 cable. See "Setting the HDMI® audio mode" ( page 27). Chapter 2: Connecting your TV Connecting an HDMI® or DVI device to accept HDCP (High-Bandwidth Digital-Content Protection) program material in digital form from a DVI (Digital Visual Interface...
...then the HDMI or DVI device. • When turning off your electronic components, turn off the HDMI or DVI device first, and then the TV. [1] EIA/CEA-861-D compliance covers the transmission of uncompressed digital video with the HDMI Logo ( ). - Conventional HDMI/DVI cable may not...connect a DVI device, you will need a Category 2 cable. See "Setting the HDMI® audio mode" ( page 27). Chapter 2: Connecting your TV Connecting an HDMI® or DVI device to accept HDCP (High-Bandwidth Digital-Content Protection) program material in digital form from a DVI (Digital Visual Interface...
User Manual
Page 17
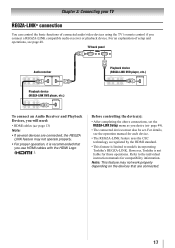
Before controlling the device(s): • After completing the above connections, set . Refer to models incorporating Toshiba's REGZA-LINK. For an explanation of connected audio/video devices using the TV's remote control if you desire ( page 49). • The connected devices must also be set the ...REGZA-LINK DVD player, etc.) To connect an Audio Receiver and Playback Devices, you use HDMI cables with the HDMI Logo ( ). However, Toshiba is recommended that are connected. 17 Note: This feature may not work properly depending on the devices that you will need: • HDMI ...
Before controlling the device(s): • After completing the above connections, set . Refer to models incorporating Toshiba's REGZA-LINK. For an explanation of connected audio/video devices using the TV's remote control if you desire ( page 49). • The connected devices must also be set the ...REGZA-LINK DVD player, etc.) To connect an Audio Receiver and Playback Devices, you use HDMI cables with the HDMI Logo ( ). However, Toshiba is recommended that are connected. 17 Note: This feature may not work properly depending on the devices that you will need: • HDMI ...
User Manual
Page 18
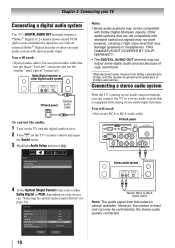
...external audio system with analog stereo audio input terminals. Chapter 2: Connecting your device ( "Selecting the optical audio output format" on the TV's remote control and open the Sound menu. 3 Highlight Audio Setup and press . Older audio systems that may not be controlled by the...Audio Setup Stereo audio system 4 In the Optical Output Format field, select either Dolby Digital or PCM, depending on your TV Connecting a digital audio system The TV's DIGITAL AUDIO OUT terminal outputs a *Dolby® Digital or 2-channel down-mixed PCM (pulse-code modulation) signal for...
...external audio system with analog stereo audio input terminals. Chapter 2: Connecting your device ( "Selecting the optical audio output format" on the TV's remote control and open the Sound menu. 3 Highlight Audio Setup and press . Older audio systems that may not be controlled by the...Audio Setup Stereo audio system 4 In the Optical Output Format field, select either Dolby Digital or PCM, depending on your TV Connecting a digital audio system The TV's DIGITAL AUDIO OUT terminal outputs a *Dolby® Digital or 2-channel down-mixed PCM (pulse-code modulation) signal for...
User Manual
Page 19
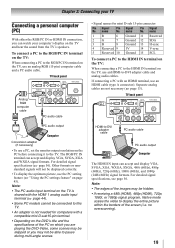
...nonstandard signals will not be displayed correctly. • To display the optimum picture, use the PC setting feature ( "Using the PC settings feature" on the TV, use an HDMI cable (type A connector). name Pin Signal No. Note: • The edges of the screen (i.e. Chapter 2: Connecting your computer's display... 8 Ground 13 H-sync 4 Reserved 9 5V 14 V-sync 5 Reserved 10 Ground 15 SCL To connect a PC to the HDMI IN terminal on the TV: When connecting a PC to -DVI adapter cable and analog audio cables. Separate analog cables are playing the DVD-Video, some scenes may be hidden. ...
...nonstandard signals will not be displayed correctly. • To display the optimum picture, use the PC setting feature ( "Using the PC settings feature" on the TV, use an HDMI cable (type A connector). name Pin Signal No. Note: • The edges of the screen (i.e. Chapter 2: Connecting your computer's display... 8 Ground 13 H-sync 4 Reserved 9 5V 14 V-sync 5 Reserved 10 Ground 15 SCL To connect a PC to the HDMI IN terminal on the TV: When connecting a PC to -DVI adapter cable and analog audio cables. Separate analog cables are playing the DVD-Video, some scenes may be hidden. ...
User Manual
Page 20
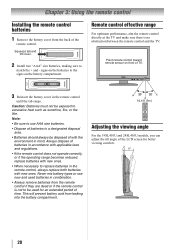
... make sure there is not to be used batteries in combination. • Always remove batteries from the back of TV. 3 Reinsert the battery cover in the remote control until the tab snaps. Caution: Batteries must not be disposed of with new ones. Point remote control... the remote control if they are dead or if the remote control is no obstruction between the remote control and the TV. Adjusting the viewing angle For the 19SL410U and 24SL410U models, you can adjust the tilt angle of batteries in a designated disposal area. • Batteries should always be exposed to ...
... make sure there is not to be used batteries in combination. • Always remove batteries from the back of TV. 3 Reinsert the battery cover in the remote control until the tab snaps. Caution: Batteries must not be disposed of with new ones. Point remote control... the remote control if they are dead or if the remote control is no obstruction between the remote control and the TV. Adjusting the viewing angle For the 19SL410U and 24SL410U models, you can adjust the tilt angle of batteries in a designated disposal area. • Batteries should always be exposed to ...


