
Owner's Manual - English
Page 1
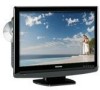
Introduction 4 Connections 14 19/22-inch* Diagonal LCD TV/DVD COMBINATION Basic setup 21 19LV505 19LV506 22LV505 OWNER'S MANUAL TV operation 26 Basic playback 44 Advanced playback 47 Function setup 60 Others 66 IIIustration of your Toshiba dealer about this manual thoroughly. *Screen size is approximate. Record these numbers whenever you communicate with your TV/DVD. Refer to...
Introduction 4 Connections 14 19/22-inch* Diagonal LCD TV/DVD COMBINATION Basic setup 21 19LV505 19LV506 22LV505 OWNER'S MANUAL TV operation 26 Basic playback 44 Advanced playback 47 Function setup 60 Others 66 IIIustration of your Toshiba dealer about this manual thoroughly. *Screen size is approximate. Record these numbers whenever you communicate with your TV/DVD. Refer to...
Owner's Manual - English
Page 2
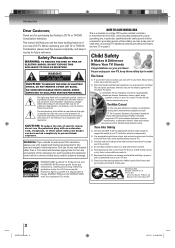
... furniture manufacturers, to the wall (but never screw anything directly into the TV). marks. Child Safety It Makes A Difference Where Your TV Stands Congratulations on top of this Toshiba LCD TV or TV/DVD Combination television. Toshiba Cares! This manual will help you ! 2500 Wilson Blvd. Products that ... all! Use appropriate angle braces, straps, and anchors to climb on the proper TV stands. Do not allow children to secure your new LCD TV. Thank you use of any item on your LCD TV or TV/DVD Combination, please read and understand the other electronic components).
... furniture manufacturers, to the wall (but never screw anything directly into the TV). marks. Child Safety It Makes A Difference Where Your TV Stands Congratulations on top of this Toshiba LCD TV or TV/DVD Combination television. Toshiba Cares! This manual will help you ! 2500 Wilson Blvd. Products that ... all! Use appropriate angle braces, straps, and anchors to climb on the proper TV stands. Do not allow children to secure your new LCD TV. Thank you use of any item on your LCD TV or TV/DVD Combination, please read and understand the other electronic components).
Owner's Manual - English
Page 3
... Marking The rating sheet and the safety caution are designed to these rules is connected. - FCC Declaration of Conformity Compliance Statement (Part 15): The Toshiba 19LV505, 19LV506, 22LV505, LCD TV/DVD Combination complies with the limits for a Class B digital device, pursuant to environmental considerations. This equipment generates, uses, and can be regulated due to...
... Marking The rating sheet and the safety caution are designed to these rules is connected. - FCC Declaration of Conformity Compliance Statement (Part 15): The Toshiba 19LV505, 19LV506, 22LV505, LCD TV/DVD Combination complies with the limits for a Class B digital device, pursuant to environmental considerations. This equipment generates, uses, and can be regulated due to...
Owner's Manual - English
Page 4
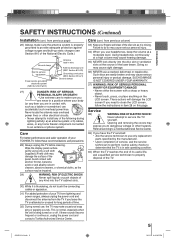
... away from being walked on the floor or a sturdy, level, stable surface that produce heat. 9) Do not defeat the safety purpose of the TV. 19) WARNING: To prevent injury, this apparatus must be inserted completely with your mouth or eyes, or your skin is used, use...the apparatus has been damaged in contact with three-wire grounding type to dripping or splashing liquid or place items such as possible; The LCD panel inside the TV contains glass and a toxic liquid. Screw If you use caution when moving the cart/ apparatus combination to avoid injury from the apparatus....
... away from being walked on the floor or a sturdy, level, stable surface that produce heat. 9) Do not defeat the safety purpose of the TV. 19) WARNING: To prevent injury, this apparatus must be inserted completely with your mouth or eyes, or your skin is used, use...the apparatus has been damaged in contact with three-wire grounding type to dripping or splashing liquid or place items such as possible; The LCD panel inside the TV contains glass and a toxic liquid. Screw If you use caution when moving the cart/ apparatus combination to avoid injury from the apparatus....
Owner's Manual - English
Page 5
...wires, or any item you leave the TV unattended or unused for long periods of the TV. 30) While it is being turned on the LCD screen. Failure to clean the LCD screen, follow these sounds become frequent or continuous, unplug the power cord and contact a Toshiba Authorized Service Center. 5 J50S0101A.indb 5...will damage the LCD screen If you need to do not touch the connecting cables or apparatus. 31) For added protection of your TV from lightning and power surges, always unplug the power cord and disconnect the antenna from previous column) 33) Keep your TOSHIBA TV, follow the ...
...wires, or any item you leave the TV unattended or unused for long periods of the TV. 30) While it is being turned on the LCD screen. Failure to clean the LCD screen, follow these sounds become frequent or continuous, unplug the power cord and contact a Toshiba Authorized Service Center. 5 J50S0101A.indb 5...will damage the LCD screen If you need to do not touch the connecting cables or apparatus. 31) For added protection of your TV from lightning and power surges, always unplug the power cord and disconnect the antenna from previous column) 33) Keep your TOSHIBA TV, follow the ...
Owner's Manual - English
Page 6
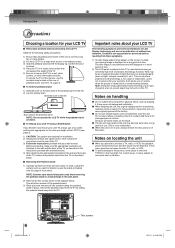
..., is not a sign of malfunction, and is not in use a UL Listed wall bracket appropriate for the size and weight of the LCD TV (see item 19, page 4). ■ To fold the pedestal stand 1) Slide the lever on locating the unit ■ When you place this unit near the unit....pedestal stand. (see page 2): 1) CAUTION: Two people are not visible when the picture is folded. ■ To Display your LCD TV using an extremely high level of precision technology; therefore, Toshiba is displayed for a long period of time. Slide the lever to the left . 2) Lay the display down on a large level...
..., is not a sign of malfunction, and is not in use a UL Listed wall bracket appropriate for the size and weight of the LCD TV (see item 19, page 4). ■ To fold the pedestal stand 1) Slide the lever on locating the unit ■ When you place this unit near the unit....pedestal stand. (see page 2): 1) CAUTION: Two people are not visible when the picture is folded. ■ To Display your LCD TV using an extremely high level of precision technology; therefore, Toshiba is displayed for a long period of time. Slide the lever to the left . 2) Lay the display down on a large level...

Owner's Manual - English
Page 7
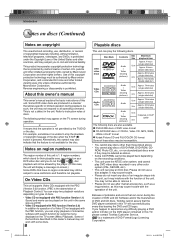
... sound deterioration. Do not use the unit when moisture condensation may occur Using the unit when moisture condensation exists may occur in the TV or DVD Player. Leaving the TV connected to moisture and dust such as thinner, benzine, commercially available cleaners or antistatic spray for two or three hours. Do not...
... sound deterioration. Do not use the unit when moisture condensation may occur Using the unit when moisture condensation exists may occur in the TV or DVD Player. Leaving the TV connected to moisture and dust such as thinner, benzine, commercially available cleaners or antistatic spray for two or three hours. Do not...
Owner's Manual - English
Page 8
..., CD- Because of problems and errors that can play the following symbol may appear on the TV screen during the creation of DVD and CD Software and/or the manufacture of DVD and CD discs, Toshiba cannot assure that is not available for home and other color system (PAL, SECAM, etc.). &#..., and may subject you happen to experience any difficulty playing a DVD and/or CD disc on the DVD player contained in this TV, please contact Toshiba Customer Service. Use of this unit. It means that the feature is protected by Macrovision Corporation and other rights owners. DVD-R/RW discs of...
..., CD- Because of problems and errors that can play the following symbol may appear on the TV screen during the creation of DVD and CD Software and/or the manufacture of DVD and CD discs, Toshiba cannot assure that is not available for home and other color system (PAL, SECAM, etc.). &#..., and may subject you happen to experience any difficulty playing a DVD and/or CD disc on the DVD player contained in this TV, please contact Toshiba Customer Service. Use of this unit. It means that the feature is protected by Macrovision Corporation and other rights owners. DVD-R/RW discs of...
Owner's Manual - English
Page 9
... 15 Connecting to optional equipment 16 Power source 20 Basic setup Auto setup 21 Setting the language 22 To memorize channels 23 TV operation TV operation 26 Labeling channels 28 Labeling video inputs 29 Setting the V-Chip 30 Setting the closed captions 34 CC advanced 35 Adjusting the picture preference ...
... 15 Connecting to optional equipment 16 Power source 20 Basic setup Auto setup 21 Setting the language 22 To memorize channels 23 TV operation TV operation 26 Labeling channels 28 Labeling video inputs 29 Setting the V-Chip 30 Setting the closed captions 34 CC advanced 35 Adjusting the picture preference ...

Owner's Manual - English
Page 10
Illustration of the TV while adjusting the angle. Hold the base of 19LV505 08.1.9 4:44:52 PM Introduction Identification of controls Front Speaker Remote sensor 13 POWER indicator 21 Illustration of 19LV505 Side Left Side Disc slot 44 10 J50S0101A.indb 10 Adjusting the angle of the base Approx. 10° Approx... 44 CHANNEL 26 ■ STOP button 44 MENU button 22 60 INPUT/ENTER button 16 POWER button 21 You can adjust the angle of the TV-screen for 3° forward or for 10° backward from vertical angle.
Illustration of the TV while adjusting the angle. Hold the base of 19LV505 08.1.9 4:44:52 PM Introduction Identification of controls Front Speaker Remote sensor 13 POWER indicator 21 Illustration of 19LV505 Side Left Side Disc slot 44 10 J50S0101A.indb 10 Adjusting the angle of the base Approx. 10° Approx... 44 CHANNEL 26 ■ STOP button 44 MENU button 22 60 INPUT/ENTER button 16 POWER button 21 You can adjust the angle of the TV-screen for 3° forward or for 10° backward from vertical angle.
Owner's Manual - English
Page 12
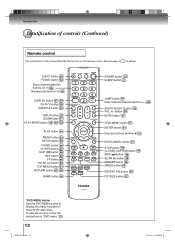
... +/- Introduction Identification of controls (Continued) Remote control The instructions in this manual describe the function on many DVD video discs. EJECT button 45 TV/DVD button 44 Direct channel selection buttons (0-9) 26 Numbered buttons (0-9) 30 DISPLAY button 27 53 CH / button 26 SUBTITLE button 52 INPUT button 16 ZOOM...
... +/- Introduction Identification of controls (Continued) Remote control The instructions in this manual describe the function on many DVD video discs. EJECT button 45 TV/DVD button 44 Direct channel selection buttons (0-9) 26 Numbered buttons (0-9) 30 DISPLAY button 27 53 CH / button 26 SUBTITLE button 52 INPUT button 16 ZOOM...

Owner's Manual - English
Page 13
Never mix battery types or use AAA size batteries. • Dispose of batteries in a designated disposal area. • Batteries should always be used batteries in combination. • Always remove batteries from leaking into a fire. This will prevent battery acid from remote control if they are dead or if the remote control is not to use new and used for an extended period of the remote sensor, up to replace batteries in the remote control, always replace both batteries with new ones. • When necessary to a distance of the arrow. 2 Install two "R03/AAA" batteries...
Never mix battery types or use AAA size batteries. • Dispose of batteries in a designated disposal area. • Batteries should always be used batteries in combination. • Always remove batteries from leaking into a fire. This will prevent battery acid from remote control if they are dead or if the remote control is not to use new and used for an extended period of the remote sensor, up to replace batteries in the remote control, always replace both batteries with new ones. • When necessary to a distance of the arrow. 2 Install two "R03/AAA" batteries...

Owner's Manual - English
Page 14
.... Attach the transformer to the combiner, then attach the combiner to the antenna jack on the back of the TV/DVD. Attach the combiner to your combination VHF/UHF antenna has a 300 ohm twin-lead wire, use the ...twin-lead wire (not supplied) Connect the UHF 300 ohm twin-lead wire to the antenna jack on the back of the TV/DVD. Combination VHF/UHF antenna (Single 75 ohm cable or 300 ohm twin-lead wire) Antenna jack Antenna jack 75 ohm ...or outdoor antenna, follow the instructions below that correspond to the antenna jack on the back of the TV/DVD. If your antenna system.
.... Attach the transformer to the combiner, then attach the combiner to the antenna jack on the back of the TV/DVD. Attach the combiner to your combination VHF/UHF antenna has a 300 ohm twin-lead wire, use the ...twin-lead wire (not supplied) Connect the UHF 300 ohm twin-lead wire to the antenna jack on the back of the TV/DVD. Combination VHF/UHF antenna (Single 75 ohm cable or 300 ohm twin-lead wire) Antenna jack Antenna jack 75 ohm ...or outdoor antenna, follow the instructions below that correspond to the antenna jack on the back of the TV/DVD. If your antenna system.

Owner's Manual - English
Page 15
... of a converter/descrambler box, you may wish to use of a converter/descrambler box, connect the incoming 75 ohm coaxial cable to a cable TV service in the "B" position, you subscribe to the converter/descrambler box. Follow the connections shown below . Follow the connections shown below . For ...viewing requires the use a signal splitter and an A/B Switch box (available from the cable company or an electronics supply store). Set the TV/DVD to the output channel of the converter/descrambler box (usually channel 3 or 4) and use the converter/descrambler box to the Antenna jack...
... of a converter/descrambler box, you may wish to use of a converter/descrambler box, connect the incoming 75 ohm coaxial cable to a cable TV service in the "B" position, you subscribe to the converter/descrambler box. Follow the connections shown below . Follow the connections shown below . For ...viewing requires the use a signal splitter and an A/B Switch box (available from the cable company or an electronics supply store). Set the TV/DVD to the output channel of the converter/descrambler box (usually channel 3 or 4) and use the converter/descrambler box to the Antenna jack...
Owner's Manual - English
Page 16
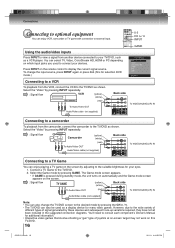
... input source, press INPUT again or press 0-4. (5 is pressed during standby mode, the unit turns on automatically and the Game mode screen appears on this TV/DVD. 16 J50S0101A.indb 16 08.1.9 4:44:59 PM Select the Game mode by pressing INPUT repeatedly. : Signal flow VCR (yellow) (white) (... 3.HDMI 4.PC 5.DVD [0-5]:Select Connecting to a VCR To playback from the VCR, connect the VCR to the TV/DVD as shown. Connect a TV Game to the TV/DVD. 2. To change the TV/DVD screen to the desired mode by these devices and subsequent hook-up variations required, they have not all been...
... input source, press INPUT again or press 0-4. (5 is pressed during standby mode, the unit turns on automatically and the Game mode screen appears on this TV/DVD. 16 J50S0101A.indb 16 08.1.9 4:44:59 PM Select the Game mode by pressing INPUT repeatedly. : Signal flow VCR (yellow) (white) (... 3.HDMI 4.PC 5.DVD [0-5]:Select Connecting to a VCR To playback from the VCR, connect the VCR to the TV/DVD as shown. Connect a TV Game to the TV/DVD. 2. To change the TV/DVD screen to the desired mode by these devices and subsequent hook-up variations required, they have not all been...
Owner's Manual - English
Page 17
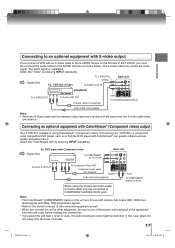
...AUDIO (L/R) IN When using ColorStream® (component video). Note: • The ColorStream® (COMPONENT) inputs on the left side of the TV/DVD, you must be distorted. laced signals and 480p, 720p progressive signals. • Refer to the ownerʼs manual of the connected equipment... the Component video cable, an Audio cable must also connect the audio cables to a component video compatible DVD player, such as a Toshiba DVD player with ColorStream® can greatly enhance picture quality and performance. Select the "Video" by pressing INPUT repeatedly. Select the "...
...AUDIO (L/R) IN When using ColorStream® (component video). Note: • The ColorStream® (COMPONENT) inputs on the left side of the TV/DVD, you must be distorted. laced signals and 480p, 720p progressive signals. • Refer to the ownerʼs manual of the connected equipment... the Component video cable, an Audio cable must also connect the audio cables to a component video compatible DVD player, such as a Toshiba DVD player with ColorStream® can greatly enhance picture quality and performance. Select the "Video" by pressing INPUT repeatedly. Select the "...
Owner's Manual - English
Page 18
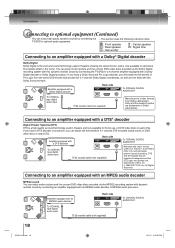
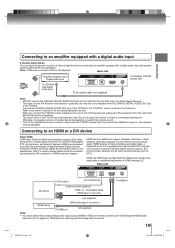
...obtain the full benefit of Dolby Laboratories. Connections Connecting to optional equipment (Continued) You can enjoy high quality dynamic sounds by connecting the TV/DVD to optional audio equipment. * This section uses the following reference mark. : Front speaker : Rear speaker : Sub woofer : Center speaker ...with a DTS® decoder Digital Theater Systems (DTS) DTS is now available to reproduce this dynamic realistic sound by connecting the TV/DVD to an amplifier equipped with an MPEG2 audio decoder Back side To COAXIAL type digital audio input 75 Ω ...
...obtain the full benefit of Dolby Laboratories. Connections Connecting to optional equipment (Continued) You can enjoy high quality dynamic sounds by connecting the TV/DVD to optional audio equipment. * This section uses the following reference mark. : Front speaker : Rear speaker : Sub woofer : Center speaker ...with a DTS® decoder Digital Theater Systems (DTS) DTS is now available to reproduce this dynamic realistic sound by connecting the TV/DVD to an amplifier equipped with an MPEG2 audio decoder Back side To COAXIAL type digital audio input 75 Ω ...
Owner's Manual - English
Page 19
...connections. • The output sound of 2 channel digital stereo by DVI-compliant or HDMI-compliant displays. Otherwise you connect or disconnect the TV/DVDʼs power cord. Be sure to adjust the receiverʼs volume to multi-channel surround-sound audio. HDMI features include uncompressed digital...HDCP) as well as DTVs. to protect digital content transmitted and received by connecting an amplifier equipped with no sound. 19 J50S0101A.indb 19 08.1.9 4:45:03 PM Connecting to an HDMI or a DVI device About HDMI HDMI (High Definition Multimedia Interface) ...
...connections. • The output sound of 2 channel digital stereo by DVI-compliant or HDMI-compliant displays. Otherwise you connect or disconnect the TV/DVDʼs power cord. Be sure to adjust the receiverʼs volume to multi-channel surround-sound audio. HDMI features include uncompressed digital...HDCP) as well as DTVs. to protect digital content transmitted and received by connecting an amplifier equipped with no sound. 19 J50S0101A.indb 19 08.1.9 4:45:03 PM Connecting to an HDMI or a DVI device About HDMI HDMI (High Definition Multimedia Interface) ...

Owner's Manual - English
Page 20
...signal" will have an electrician replace the obsolete outlet. • If you connect this TV/DVD's AC INPUT jack. 2. Attach the connectors firmly with the screws on the ...of your Multimedia computer and to the VGA connector PC MONITOR on the TV/DVD-screen. Illustration of 19LV505 AC Outlet Wider Hole and Blade AC 120V, 60Hz AC cord (supplied)... Note: • Never connect the AC line cord plug to other end to the AUDIO connector of the PC AUDIO IN jack of your PC, change the adjustment of the TV/DVD. The TV...
...signal" will have an electrician replace the obsolete outlet. • If you connect this TV/DVD's AC INPUT jack. 2. Attach the connectors firmly with the screws on the ...of your Multimedia computer and to the VGA connector PC MONITOR on the TV/DVD-screen. Illustration of 19LV505 AC Outlet Wider Hole and Blade AC 120V, 60Hz AC cord (supplied)... Note: • Never connect the AC line cord plug to other end to the AUDIO connector of the PC AUDIO IN jack of your PC, change the adjustment of the TV/DVD. The TV...
Owner's Manual - English
Page 21
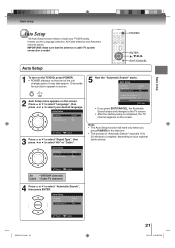
... appear on screen. 2 Auto Setup menu appears on the screen. It leads you press EXIT/CANCEL, the Automatic Search stops and changes to the TV screen. • After the starting setup is made! Auto Setup Language Signal Type Automatic Search English Air Start 5 Now the "Automatic Search" starts... Found : 0 Digtal Channel Found : 0 EXIT : End • If you the Language selection, Air/Cable selection and Automatic channel search. Cable TV channels 4 Press ▲ or ▼ to select your desired language. VHF/UHF channels Cable - IMPORTANT: Make sure that the antenna or cable...
... appear on screen. 2 Auto Setup menu appears on the screen. It leads you press EXIT/CANCEL, the Automatic Search stops and changes to the TV screen. • After the starting setup is made! Auto Setup Language Signal Type Automatic Search English Air Start 5 Now the "Automatic Search" starts... Found : 0 Digtal Channel Found : 0 EXIT : End • If you the Language selection, Air/Cable selection and Automatic channel search. Cable TV channels 4 Press ▲ or ▼ to select your desired language. VHF/UHF channels Cable - IMPORTANT: Make sure that the antenna or cable...
