

Owner's Manual
Page 6
... the dipstick into the oil fill tube secure1> Important: Change the engine oil after the first 5 operating hours; Refer to Charging the Battery in the Maintenance section. Ignition key (electric-start models only) Oil fill/dipstick 12. Washout port (not shown) 13. Important: Do not overfill the crankcase oil and run the engine... the oil level on -demand lever 5. Blade control bar 3. Handle 2. Cutting height lever (4) 9. Handle knob (2) 6. Product Overview 1 2 3 4 5 6 7 8 11 10 9 Figure 5 G009503 1. Fuel tank cap 11. Battery charger (electric-start 8.
... the dipstick into the oil fill tube secure1> Important: Change the engine oil after the first 5 operating hours; Refer to Charging the Battery in the Maintenance section. Ignition key (electric-start models only) Oil fill/dipstick 12. Washout port (not shown) 13. Important: Do not overfill the crankcase oil and run the engine... the oil level on -demand lever 5. Blade control bar 3. Handle 2. Cutting height lever (4) 9. Handle knob (2) 6. Product Overview 1 2 3 4 5 6 7 8 11 10 9 Figure 5 G009503 1. Fuel tank cap 11. Battery charger (electric-start 8.

Owner's Manual
Page 14
... the engine oil. • Replace the blade or have it sharpened (more frequently in dusty operating conditions. • Charge the battery for any maintenance procedure. clean it more frequently if the edge dulls quickly). • Clean the air cooling system; Preparing for ... manual for 24 hours (electric-start models only). • Empty the fuel tank before repairs as directed and before performing any additional yearly maintenance procedures. Important: Refer to your engine operator's manual for Maintenance 1. Tipping Gasoline personal the mower may cause the fuel to...
... the engine oil. • Replace the blade or have it sharpened (more frequently in dusty operating conditions. • Charge the battery for any maintenance procedure. clean it more frequently if the edge dulls quickly). • Clean the air cooling system; Preparing for ... manual for 24 hours (electric-start models only). • Empty the fuel tank before repairs as directed and before performing any additional yearly maintenance procedures. Important: Refer to your engine operator's manual for Maintenance 1. Tipping Gasoline personal the mower may cause the fuel to...

Owner's Manual
Page 16
...indicates the following states of the lead-acid battery according to the mower wire harness located below the ignition key (Figure 22). Charge the battery for 24 hours initial1); Connect the charger to local codes. Raise the rear deflector and locate the battery compartment (Figure 23). Plug the charger ...into a wall outlet. and locate the fuse (Figure 24. 16 Charging the Battery Service Interval: Every 25 hours Electric-start models only If the battery does not charge or the engine does not run with a 40-amp plug-in type fuse. 1. This state lasts ...
...indicates the following states of the lead-acid battery according to the mower wire harness located below the ignition key (Figure 22). Charge the battery for 24 hours initial1); Connect the charger to local codes. Raise the rear deflector and locate the battery compartment (Figure 23). Plug the charger ...into a wall outlet. and locate the fuse (Figure 24. 16 Charging the Battery Service Interval: Every 25 hours Electric-start models only If the battery does not charge or the engine does not run with a 40-amp plug-in type fuse. 1. This state lasts ...

Owner's Manual
Page 19
... spark plug. 9. Charge the battery for 24 hours (electric-start models only). Folding or unfolding the handle improperly can move the upper handle fred> 3. Loosen the handle M_obs until you can damage the cables, causing an unsafe operating condition. To unfold the handle, reverse the steps above. Removing the Mower from Storage 1. Charge the...
... spark plug. 9. Charge the battery for 24 hours (electric-start models only). Folding or unfolding the handle improperly can move the upper handle fred> 3. Loosen the handle M_obs until you can damage the cables, causing an unsafe operating condition. To unfold the handle, reverse the steps above. Removing the Mower from Storage 1. Charge the...
Parts Catalog
Page 10
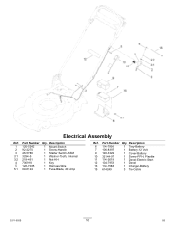
Description 1 120-5242 1 Mount-Switch 2 92-2270 1 Screw-Handle 3 46-5780 1 Starter Switch ASM 3:1 3254-5 1 Washer-Tooth, Internal 3:2 218-461 1 Nut-HH 4 700918 1 Key 5 120-7035 1 Harness-Wire 5:1 99-6124 1 Fuse-Blade, 40 Amp Ref. Part Number Qty. Description 6 114-7936 1 Tray-Battery 7 106-8397 1 Battery-12 Volt 9 120-3329 1 Cover-Battery 10 32144-97 1 Screw-PPH, Plastite 11 114-2619 1 Decal-Electric Start 12 104-7953 1 Decal 13 114-1588 1 Charger-Battery 15 614249 3 Tie-Cable 3371-850B 10 D5 Part Number Qty. Electrical Assembly Ref.
Description 1 120-5242 1 Mount-Switch 2 92-2270 1 Screw-Handle 3 46-5780 1 Starter Switch ASM 3:1 3254-5 1 Washer-Tooth, Internal 3:2 218-461 1 Nut-HH 4 700918 1 Key 5 120-7035 1 Harness-Wire 5:1 99-6124 1 Fuse-Blade, 40 Amp Ref. Part Number Qty. Description 6 114-7936 1 Tray-Battery 7 106-8397 1 Battery-12 Volt 9 120-3329 1 Cover-Battery 10 32144-97 1 Screw-PPH, Plastite 11 114-2619 1 Decal-Electric Start 12 104-7953 1 Decal 13 114-1588 1 Charger-Battery 15 614249 3 Tie-Cable 3371-850B 10 D5 Part Number Qty. Electrical Assembly Ref.


