
Owner's Manual
Page 1
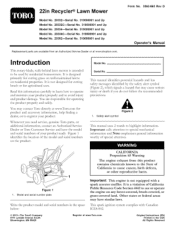
...or operate the engine on residential properties. Introduction This rotary-blade, walk-behind lawn mower is not equipped with Canadian ICES-002. © 2011--The Toro® Company 8111 Lyndale Avenue South Bloomington, MN 55420 Register at www.Toro.com. It is designed primarily for cutting grass on well...manual uses 2 words to avoid injury and product damage. 22in Recycler Lawn Mower Form No. 3363-863 Rev D Model No. 20332mSerial No. 310000001 and Up Model No. 20332CmSerial No. 310000001 and Up Model No. 20334--Serial No. 310000001 and Up Model No. 20334C--Serial No. 310000001 ...
...or operate the engine on residential properties. Introduction This rotary-blade, walk-behind lawn mower is not equipped with Canadian ICES-002. © 2011--The Toro® Company 8111 Lyndale Avenue South Bloomington, MN 55420 Register at www.Toro.com. It is designed primarily for cutting grass on well...manual uses 2 words to avoid injury and product damage. 22in Recycler Lawn Mower Form No. 3363-863 Rev D Model No. 20332mSerial No. 310000001 and Up Model No. 20332CmSerial No. 310000001 and Up Model No. 20334--Serial No. 310000001 and Up Model No. 20334C--Serial No. 310000001 ...

Owner's Manual
Page 2
...lower. The enclosed Engine Owner's ManuM is used to alert you to potential personal injury hazards. of this mower could result in injury or death. Improperly using or maintaining this manual The ... Stop the blade when crossing gravel surfaces. • Do not operate machine without the entire grass catcher, discharge guard, rear guard, or other hidden objects. If you start to operate ...; As configured to slip and fall accident. Safety This lawn mower meets or exceeds the CPSC blade safety requirements for walk-behind the handle when the engine is running machine unattended. ...
...lower. The enclosed Engine Owner's ManuM is used to alert you to potential personal injury hazards. of this mower could result in injury or death. Improperly using or maintaining this manual The ... Stop the blade when crossing gravel surfaces. • Do not operate machine without the entire grass catcher, discharge guard, rear guard, or other hidden objects. If you start to operate ...; As configured to slip and fall accident. Safety This lawn mower meets or exceeds the CPSC blade safety requirements for walk-behind the handle when the engine is running machine unattended. ...
Owner's Manual
Page 3
...mower... and inspect the machine. Never allow children to prevent unintended starting . Use extra care when approaching blind corners, shrubs, trees... Never tamper with manufacturer's recommended parts, when necessar): Mower blades are explosive. Disconnect the spark plug wire and ground against... if the operator is not alert to cool before starting . Allow machine to be sure the equipment is... sharp. Service Safe Handling of Gasoline To avoid personal injury or property damage, use extreme care in contact.... Wrap the blade or wear gloves, and use a nozzle lock-open ...
...mower... and inspect the machine. Never allow children to prevent unintended starting . Use extra care when approaching blind corners, shrubs, trees... Never tamper with manufacturer's recommended parts, when necessar): Mower blades are explosive. Disconnect the spark plug wire and ground against... if the operator is not alert to cool before starting . Allow machine to be sure the equipment is... sharp. Service Safe Handling of Gasoline To avoid personal injury or property damage, use extreme care in contact.... Wrap the blade or wear gloves, and use a nozzle lock-open ...
Owner's Manual
Page 4
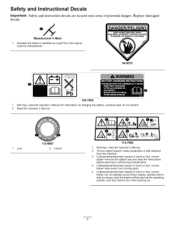
... Decals Important: decals. Warning--read the Operator's Manual for information on slopes; Cutting/dismemberment hazard of hand or foot, mower blade--stay away from moving parts. 5. Replace damaged Manufacturer's Mark 1. contains lead; Lock 112-8867 2. operate side to side... a safe distance from the original machine manufacturer. 94-8072 0 81 104-7953 1. Cutting/dismemberment hazard of hand or foot, mower blade--remove the ignition key and read the instructions before leaving the operating position; Safety and instruction decals are located near areas of hand...
... Decals Important: decals. Warning--read the Operator's Manual for information on slopes; Cutting/dismemberment hazard of hand or foot, mower blade--stay away from moving parts. 5. Replace damaged Manufacturer's Mark 1. contains lead; Lock 112-8867 2. operate side to side... a safe distance from the original machine manufacturer. 94-8072 0 81 104-7953 1. Cutting/dismemberment hazard of hand or foot, mower blade--remove the ignition key and read the instructions before leaving the operating position; Safety and instruction decals are located near areas of hand...

Owner's Manual
Page 6
...: Do not overfill the crankcase oil and run the engine. Blade control bar 3. Ignition key (electric-start models only Refer to Changing the Engine Oil. [3 Charging the Battery No Parts Required Procedure Electric-start 8. Recoil start models only) Grass bag 2. Washout port (not shown) 13. Battery charger (electric-start handle 7. Handle 2. Install the dipstick into the oil fill...
...: Do not overfill the crankcase oil and run the engine. Blade control bar 3. Ignition key (electric-start models only Refer to Changing the Engine Oil. [3 Charging the Battery No Parts Required Procedure Electric-start 8. Recoil start models only) Grass bag 2. Washout port (not shown) 13. Battery charger (electric-start handle 7. Handle 2. Install the dipstick into the oil fill...
Owner's Manual
Page 8
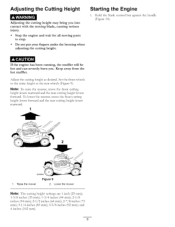
... height may bring contact with the moving parts to the same height as desired. Hold the blade control bar against the handle (Figure 10). To lower the mower, move the front cutting height levers rearward and the rear cutting height levers forward. Keep away... from the hot muffler. and 4 inches (102 ram). Starting the Engine 1. Adjust the cutting height as the rear wheels (Figure 9). Raise the mower Figure 9 2. you . Note: To raise the mower, move the front cutting height levers forward and the rear cutting height levers rearward...
... height may bring contact with the moving parts to the same height as desired. Hold the blade control bar against the handle (Figure 10). To lower the mower, move the front cutting height levers rearward and the rear cutting height levers forward. Keep away... from the hot muffler. and 4 inches (102 ram). Starting the Engine 1. Adjust the cutting height as the rear wheels (Figure 9). Raise the mower Figure 9 2. you . Note: To raise the mower, move the front cutting height levers forward and the rear cutting height levers rearward...

Owner's Manual
Page 9
...Blade control bar 7 _/_'G009546 Figure 10 , Turn the ignition key (Figure 11) (electric-start models only) or pul the recoil start handle, pull it lightly until you (Figure 13). 1. Figure 11 G009547 G009548 Figure 12 s/ Note: If the mower does not start after self-propelling, stop walking, hold your sides, and the mower will automatically keep pace...attempts, contact an Authorized Service Dealer. You can also try reaching just under the personal pace handle to the metal handle and push the mower forward a couple of inches (centimeters) forward to roll a couple of inches (...
...Blade control bar 7 _/_'G009546 Figure 10 , Turn the ignition key (Figure 11) (electric-start models only) or pul the recoil start handle, pull it lightly until you (Figure 13). 1. Figure 11 G009547 G009548 Figure 12 s/ Note: If the mower does not start after self-propelling, stop walking, hold your sides, and the mower will automatically keep pace...attempts, contact an Authorized Service Dealer. You can also try reaching just under the personal pace handle to the metal handle and push the mower forward a couple of inches (centimeters) forward to roll a couple of inches (...

Owner's Manual
Page 10
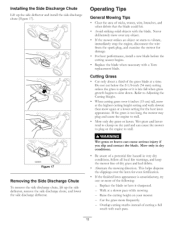
...Toro replacement bag. Installing the Grass Bag 1. Removing the Grass Bag To remove the bag, reverse the steps above. Stopping the Engine To stop using your mower immediately Service Dealer. If they do not stop properly, stop the engine, release the blade...personal injury. If it to the bagging position (refer to the operator or bystanders. Note: Remove the ignition key when you release the blade control bar, both the engine and blade...mower, remove it (refer to Removing the Side Discharge Chute) before recycling the clippings. Important: When you leave the mower (electric-start...
...Toro replacement bag. Installing the Grass Bag 1. Removing the Grass Bag To remove the bag, reverse the steps above. Stopping the Engine To stop using your mower immediately Service Dealer. If they do not stop properly, stop the engine, release the blade...personal injury. If it to the bagging position (refer to the operator or bystanders. Note: Remove the ignition key when you release the blade control bar, both the engine and blade...mower, remove it (refer to Removing the Side Discharge Chute) before recycling the clippings. Important: When you leave the mower (electric-start...
Owner's Manual
Page 11
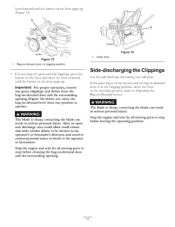
...engine and wait for cutting very tall grass. If the grass bag is on the mower and the bag-on the lever pops up . Bag-on-demand lever (in serious personal injury. contacting the blade can result in the bagging position, move the lever to the recycling position (refer to... Use the side discharge for all moving stop before cleaning the bag-on -Demand Lever). The blade is sharp; Important: For proper operation, remove any grass clippings and debris from one position to The blade is in serious personal injury. lever forward until the button on -demand another.
...engine and wait for cutting very tall grass. If the grass bag is on the mower and the bag-on the lever pops up . Bag-on-demand lever (in serious personal injury. contacting the blade can result in the bagging position, move the lever to the recycling position (refer to... Use the side discharge for all moving stop before cleaning the bag-on -Demand Lever). The blade is sharp; Important: For proper operation, remove any grass clippings and debris from one position to The blade is in serious personal injury. lever forward until the button on -demand another.
Owner's Manual
Page 12
... at a slower pace while mowing. - then mow again at a time. Wet grass or leaves can cause the mower to plug or...mower for damage. • For best performance, install a new blade before the cutting season begins. • Replace the blade when necessary with the blade. Walk at the highest cutting height setting and walk... over aW object. • If the mower strikes an object or starts to stall. Never deliberately mow over the ...mower free of sticks, stones, wire, branches, and other debris that the blade could hit. • Avoid striking solid objects with a Toro replacement blade...
... at a slower pace while mowing. - then mow again at a time. Wet grass or leaves can cause the mower to plug or...mower for damage. • For best performance, install a new blade before the cutting season begins. • Replace the blade when necessary with the blade. Walk at the highest cutting height setting and walk... over aW object. • If the mower strikes an object or starts to stall. Never deliberately mow over the ...mower free of sticks, stones, wire, branches, and other debris that the blade could hit. • Avoid striking solid objects with a Toro replacement blade...

Owner's Manual
Page 14
Refer to your engine operator's manual. • Refer to your engine operator's manual for 24 hours (electric-start models only). • Empty the fuel tank before repairs as directed and before performing any additional yearly maintenance procedures. Figure 18 G009500 . ...Figure 18) before annual storage. • Change the engine oil. • Replace the blade or have it more frequently if the edge dulls quickly). • Clean the air cooling system; Tipping Gasoline personal the mower may cause the fuel to remove the fuel. Run the engine dry or remove the gasoline...
Refer to your engine operator's manual. • Refer to your engine operator's manual for 24 hours (electric-start models only). • Empty the fuel tank before repairs as directed and before performing any additional yearly maintenance procedures. Figure 18 G009500 . ...Figure 18) before annual storage. • Change the engine oil. • Replace the blade or have it more frequently if the edge dulls quickly). • Clean the air cooling system; Tipping Gasoline personal the mower may cause the fuel to remove the fuel. Run the engine dry or remove the gasoline...
Owner's Manual
Page 17
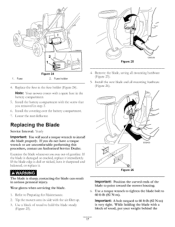
... result in the fuse holder (Figure 24)• Note: Your mower comes with the screw that 6. Tip the mower onto its side with a block of the blade to point toward the mower housing. , Use a torque wrench to tighten the blade bolt to 60 ft-lb (82 N-m) is damaged or cracked, ... the curved ends of wood, put your weight behind the 17 The blade is du_ or nicked, have a torque wrench or are uncomfortable performing this procedure, contact an Authorized Service Dealer. Wear gloves when servicing the blade. 1. Fuse holder 4• Replace the fuse in serious personal injury.
... result in the fuse holder (Figure 24)• Note: Your mower comes with the screw that 6. Tip the mower onto its side with a block of the blade to point toward the mower housing. , Use a torque wrench to tighten the blade bolt to 60 ft-lb (82 N-m) is damaged or cracked, ... the curved ends of wood, put your weight behind the 17 The blade is du_ or nicked, have a torque wrench or are uncomfortable performing this procedure, contact an Authorized Service Dealer. Wear gloves when servicing the blade. 1. Fuse holder 4• Replace the fuse in serious personal injury.

Owner's Manual
Page 20
...mower blade striking an object - The transmission is defined as your product's engine in materials or workmanship. The following : - year full warranty Limited Warranty for Commercial Use* Gas-powered Toro Products used for commercial, institutional, or rental use pending completion of non-use over one month Special operational conditions where starting...only. if it is defective in Mulcher/Bagger Walk Power Mowers Conditions and Products Covered Items and Conditions Not Covered The Toro Company and its affiliate, Toro Warranty Company, pursuant to an agreement between them,...
...mower blade striking an object - The transmission is defined as your product's engine in materials or workmanship. The following : - year full warranty Limited Warranty for Commercial Use* Gas-powered Toro Products used for commercial, institutional, or rental use pending completion of non-use over one month Special operational conditions where starting...only. if it is defective in Mulcher/Bagger Walk Power Mowers Conditions and Products Covered Items and Conditions Not Covered The Toro Company and its affiliate, Toro Warranty Company, pursuant to an agreement between them,...
Parts Catalog
Page 2
...appear in illustration and in the parts list, along with other information about the part. List of Abbreviations AR: as required ASM: assembly BBC: blade brake control BHTF: button head thread forming CARR: carriage CCW: counter clockwise CW: clockwise DEG: degrees DPA: Dual Point Adjustment ECM: electronic ... PFH: phillips flat head PPH: phillips pan head PPHTF: phillips pan head thread forming PRH: phillips round head PTH: phillips truss head PTO: power-take-off RH: right hand ROPS: roll-over protection system RRB: rear roller brush SFH: slotted fillister head SHH: slotted hex head SHWH:...
...appear in illustration and in the parts list, along with other information about the part. List of Abbreviations AR: as required ASM: assembly BBC: blade brake control BHTF: button head thread forming CARR: carriage CCW: counter clockwise CW: clockwise DEG: degrees DPA: Dual Point Adjustment ECM: electronic ... PFH: phillips flat head PPH: phillips pan head PPHTF: phillips pan head thread forming PRH: phillips round head PTH: phillips truss head PTO: power-take-off RH: right hand ROPS: roll-over protection system RRB: rear roller brush SFH: slotted fillister head SHH: slotted hex head SHWH:...

Parts Catalog
Page 3
Contents Deck, Side Chute and Rear Door Assembly 4 Rear Bag Assembly 5 Engine and Blade Assembly 6 Front Wheel and Height-of-Cut Assembly 7 Transmission and Rear Wheel Drive Assembly 8 Handle Assembly 9 Electrical Assembly 10 Attachments and Accessories 11 © 2012-The Toro® Company Contact us at www.Toro.com. 8111 Lyndale Avenue South Bloomington, MN 55420 3 Printed in the USA. All Rights Reserved
Contents Deck, Side Chute and Rear Door Assembly 4 Rear Bag Assembly 5 Engine and Blade Assembly 6 Front Wheel and Height-of-Cut Assembly 7 Transmission and Rear Wheel Drive Assembly 8 Handle Assembly 9 Electrical Assembly 10 Attachments and Accessories 11 © 2012-The Toro® Company Contact us at www.Toro.com. 8111 Lyndale Avenue South Bloomington, MN 55420 3 Printed in the USA. All Rights Reserved
Parts Catalog
Page 6
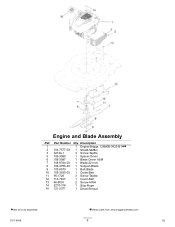
Part Number Qty. Engine and Blade Assembly Ref. Description 1 1 Engine-Briggs, 128M05-3423-B1 ● ■ 2 104-7577-03 1 Shield-Muffler 3 32144-1 3 Screw-Taptite 5 106-3999 1 Spacer-Driver 6 106-3987 1 Blade Driver ASM 7 108-9764-03 1 Blade-22 Inch 8 108-3766-03 1 Support-Blade 9 105-8579 1 Bolt-Blade 10 105-3030-03 1 Guide-Belt 11 95-1726 3 Screw-Taptite 12 114-7937 1 Cover-Belt 13 46-8091 2 Screw-HWH 14 2210-316 1 Stop-Rope 16 121-2371 1 Decal-Shroud ● Not serviced separately 3371-850B ■ Obtain parts from www.briggsandstratton.com 6 B2
Part Number Qty. Engine and Blade Assembly Ref. Description 1 1 Engine-Briggs, 128M05-3423-B1 ● ■ 2 104-7577-03 1 Shield-Muffler 3 32144-1 3 Screw-Taptite 5 106-3999 1 Spacer-Driver 6 106-3987 1 Blade Driver ASM 7 108-9764-03 1 Blade-22 Inch 8 108-3766-03 1 Support-Blade 9 105-8579 1 Bolt-Blade 10 105-3030-03 1 Guide-Belt 11 95-1726 3 Screw-Taptite 12 114-7937 1 Cover-Belt 13 46-8091 2 Screw-HWH 14 2210-316 1 Stop-Rope 16 121-2371 1 Decal-Shroud ● Not serviced separately 3371-850B ■ Obtain parts from www.briggsandstratton.com 6 B2
Parts Catalog
Page 10
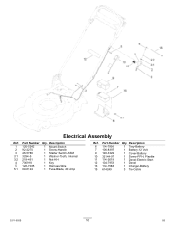
Description 1 120-5242 1 Mount-Switch 2 92-2270 1 Screw-Handle 3 46-5780 1 Starter Switch ASM 3:1 3254-5 1 Washer-Tooth, Internal 3:2 218-461 1 Nut-HH 4 700918 1 Key 5 120-7035 1 Harness-Wire 5:1 99-6124 1 Fuse-Blade, 40 Amp Ref. Part Number Qty. Description 6 114-7936 1 Tray-Battery 7 106-8397 1 Battery-12 Volt 9 120-3329 1 Cover-Battery 10 32144-97 1 Screw-PPH, Plastite 11 114-2619 1 Decal-Electric Start 12 104-7953 1 Decal 13 114-1588 1 Charger-Battery 15 614249 3 Tie-Cable 3371-850B 10 D5 Electrical Assembly Ref. Part Number Qty.
Description 1 120-5242 1 Mount-Switch 2 92-2270 1 Screw-Handle 3 46-5780 1 Starter Switch ASM 3:1 3254-5 1 Washer-Tooth, Internal 3:2 218-461 1 Nut-HH 4 700918 1 Key 5 120-7035 1 Harness-Wire 5:1 99-6124 1 Fuse-Blade, 40 Amp Ref. Part Number Qty. Description 6 114-7936 1 Tray-Battery 7 106-8397 1 Battery-12 Volt 9 120-3329 1 Cover-Battery 10 32144-97 1 Screw-PPH, Plastite 11 114-2619 1 Decal-Electric Start 12 104-7953 1 Decal 13 114-1588 1 Charger-Battery 15 614249 3 Tie-Cable 3371-850B 10 D5 Electrical Assembly Ref. Part Number Qty.


