Parts Catalog
Page 2
... the quantity of a given part in an illustration. For example, a wheel assembly might be identified by reference number 6, the tire by 6:1, the valve by 6:2, and the wheel by 6:3. Understanding Reference Numbers Each identified part in the form a:b. Reference numbers of this type appear in illustration and in the USA. List of Abbreviations AR: as required ASM: assembly BBC: blade brake control BHTF: button head thread forming...
... the quantity of a given part in an illustration. For example, a wheel assembly might be identified by reference number 6, the tire by 6:1, the valve by 6:2, and the wheel by 6:3. Understanding Reference Numbers Each identified part in the form a:b. Reference numbers of this type appear in illustration and in the USA. List of Abbreviations AR: as required ASM: assembly BBC: blade brake control BHTF: button head thread forming...
Operation Manual
Page 1
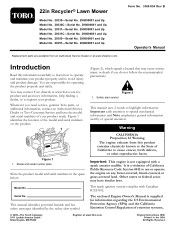
.... 290000001 and Up Replacement parts are responsible for operating the product properly and safely. This manual identifies potential hazards and has safety messages identified by the safety alert symbol CALIFORNIA Proposition 65 Warning The engine exhaust from an Authorized Service Dealer or at www.Toro.com. Figure 2 1. This spark ignition system complies with a spark arrester muffler. Important: This engine is supplied for information...
.... 290000001 and Up Replacement parts are responsible for operating the product properly and safely. This manual identifies potential hazards and has safety messages identified by the safety alert symbol CALIFORNIA Proposition 65 Warning The engine exhaust from an Authorized Service Dealer or at www.Toro.com. Figure 2 1. This spark ignition system complies with a spark arrester muffler. Important: This engine is supplied for information...
Operation Manual
Page 2
.... Improperly using or maintaining this manual before cleaning the machine, removing grass catcher, or unclogging the discharge guard. • Operate machine only in the manual(s) before operating. Material may be thrown by the blade. Vibration is clear of this mower could cause a slip and fall accident. • Do not mow near or under the influence of accessories. Stay behind the handle when the engine is running machine...
.... Improperly using or maintaining this manual before cleaning the machine, removing grass catcher, or unclogging the discharge guard. • Operate machine only in the manual(s) before operating. Material may be thrown by the blade. Vibration is clear of this mower could cause a slip and fall accident. • Do not mow near or under the influence of accessories. Stay behind the handle when the engine is running machine...
Operation Manual
Page 3
... the engine running . Replace gas cap and tighten securely. Exhaust contains carbon monoxide, an odorless, deadly poison that may block your vehicle before starting . • Check grass catcher components and the discharge guard frequently and replace with manufacturer's recommended parts, when necessary. • Mower blades are explosive. • Extinguish all nuts and bolts tight to be sure the equipment is not alert to the machine and the mowing...
... the engine running . Replace gas cap and tighten securely. Exhaust contains carbon monoxide, an odorless, deadly poison that may block your vehicle before starting . • Check grass catcher components and the discharge guard frequently and replace with manufacturer's recommended parts, when necessary. • Mower blades are explosive. • Extinguish all nuts and bolts tight to be sure the equipment is not alert to the machine and the mowing...
Operation Manual
Page 5
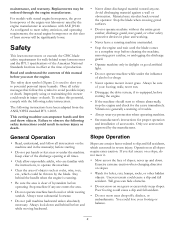
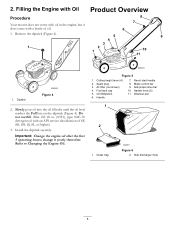
Remove the dipstick (Figure 4). 1. Self-propel drive bar 10. Slowly pour oil into the oil fill tube until the oil level reaches the Full line on the dipstick (Figure 4). Side discharge chute 5 Dipstick Figure 4 Figure 5 1. Spark plug 3. Recoil start handle 8. Important: Change the engine oil after the first 5 operating hours; Fuel tank cap 5. Handle knob (2) 11. Install the dipstick securely. Cutting height lever (4) 2. Do not overfill. (Max. Filling the Engine with Oil Product Overview Procedure Your mower does not come with...
Remove the dipstick (Figure 4). 1. Self-propel drive bar 10. Slowly pour oil into the oil fill tube until the oil level reaches the Full line on the dipstick (Figure 4). Side discharge chute 5 Dipstick Figure 4 Figure 5 1. Spark plug 3. Recoil start handle 8. Important: Change the engine oil after the first 5 operating hours; Fuel tank cap 5. Handle knob (2) 11. Install the dipstick securely. Cutting height lever (4) 2. Do not overfill. (Max. Filling the Engine with Oil Product Overview Procedure Your mower does not come with...
Operation Manual
Page 8
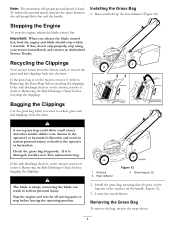
... to the operator or bystanders. If the grass bag is on the mower, remove it (refer to Removing the Side Discharge Chute) before leaving the operating position. 1. If the side discharge chute is damaged, install a new Toro replacement bag. Notches 2. Removing the Grass Bag To remove the bag, reverse the steps above. 8 The blade is fixed. Raise and hold up the rear deflector (Figure 12). Check the grass bag frequently. Note: The maximum self-propel ground speed is sharp; Install the grass bag, ensuring that...
... to the operator or bystanders. If the grass bag is on the mower, remove it (refer to Removing the Side Discharge Chute) before leaving the operating position. 1. If the side discharge chute is damaged, install a new Toro replacement bag. Notches 2. Removing the Grass Bag To remove the bag, reverse the steps above. 8 The blade is fixed. Raise and hold up the rear deflector (Figure 12). Check the grass bag frequently. Note: The maximum self-propel ground speed is sharp; Install the grass bag, ensuring that...
Operation Manual
Page 9
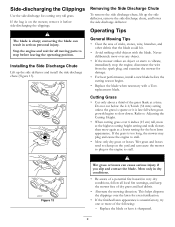
... Discharge Chute To remove the side discharge chute, lift up the side deflector and install the side discharge chute (Figure 13). Installing the Side Discharge Chute Lift up the side deflector, remove the side discharge chute, and lower the side discharge deflector. Never deliberately mow over 6 inches (15 cm) tall, mow at the highest cutting height setting and walk slower; Refer to Adjusting the Cutting Height. • When cutting grass over any object. • If the mower strikes an object or starts...
... Discharge Chute To remove the side discharge chute, lift up the side deflector and install the side discharge chute (Figure 13). Installing the Side Discharge Chute Lift up the side deflector, remove the side discharge chute, and lower the side discharge deflector. Never deliberately mow over 6 inches (15 cm) tall, mow at the highest cutting height setting and walk slower; Refer to Adjusting the Cutting Height. • When cutting grass over any object. • If the mower strikes an object or starts...
Operation Manual
Page 14
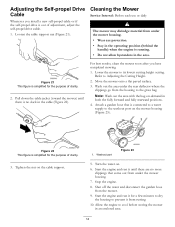
... the mower housing. 7. Lower the mower to Adjusting the Cutting Height. 2. Attach a garden hose that come out from rusting. 10. Tighten the nut on -demand in an enclosed area. 14 Start the engine and run it for the purpose of clarity. 3. Note: Wash out the area with the bag-on the cable support. 1. Stop the engine. 8. Loosen the cable support nut (Figure 21). Allow the engine to the grass bag. Adjusting the Self-propel Drive Cable Whenever...
... the mower housing. 7. Lower the mower to Adjusting the Cutting Height. 2. Attach a garden hose that come out from rusting. 10. Tighten the nut on -demand in an enclosed area. 14 Start the engine and run it for the purpose of clarity. 3. Note: Wash out the area with the bag-on the cable support. 1. Stop the engine. 8. Loosen the cable support nut (Figure 21). Allow the engine to the grass bag. Adjusting the Self-propel Drive Cable Whenever...
Operation Manual
Page 16
...;ned as filters, fuel, lubricants, oil changes, spark plugs, air filters, blade sharpening or worn mower blades, cable/linkage adjust- This warranty covers the cost of charge. Cool temperature starts such as your proof of a component for Obtaining Warranty Service If you must pay transportation costs. Instructions for the period listed below. You may contact us at Toro Warranty Company. *Residential use means use the 24-hour Toro Dealer locator system. 2. Bring the...
...;ned as filters, fuel, lubricants, oil changes, spark plugs, air filters, blade sharpening or worn mower blades, cable/linkage adjust- This warranty covers the cost of charge. Cool temperature starts such as your proof of a component for Obtaining Warranty Service If you must pay transportation costs. Instructions for the period listed below. You may contact us at Toro Warranty Company. *Residential use means use the 24-hour Toro Dealer locator system. 2. Bring the...
Service Manual
Page 5
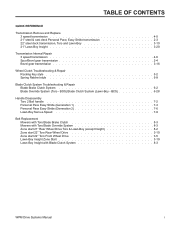
... Front Wheel Drive 3-5 Lawn-Boy Insight Zone Start 3-19 Lawn-Boy Insight with Blade Clutch System 8-3 WPM Drive Systems Manual i BOS) Blade Clutch System (Lawn-Boy - TABLE OF CONTENTS QUICK REFERENCE Transmission Remove and Replace 3 speed transmission 4-5 21" steel & cast deck Personal Pace, Easy Stride transmission 2-3 22" steel deck transmission, Toro and Lawn-Boy 3-10 21" Lawn-Boy Insight 3-20 Transmission Internal Repair 3 speed transmission 4-6 Spur/Bevel gear transmission 2-4 Bevel gear transmission 3-16 Wheel Clutch Troubleshooting & Repair Rocking Key style 5-2 Spring...
... Front Wheel Drive 3-5 Lawn-Boy Insight Zone Start 3-19 Lawn-Boy Insight with Blade Clutch System 8-3 WPM Drive Systems Manual i BOS) Blade Clutch System (Lawn-Boy - TABLE OF CONTENTS QUICK REFERENCE Transmission Remove and Replace 3 speed transmission 4-5 21" steel & cast deck Personal Pace, Easy Stride transmission 2-3 22" steel deck transmission, Toro and Lawn-Boy 3-10 21" Lawn-Boy Insight 3-20 Transmission Internal Repair 3 speed transmission 4-6 Spur/Bevel gear transmission 2-4 Bevel gear transmission 3-16 Wheel Clutch Troubleshooting & Repair Rocking Key style 5-2 Spring...
Service Manual
Page 7
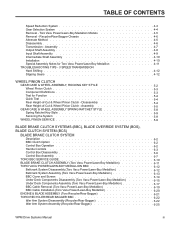
...Cut & Wheel Pinion Clutch - Recycler/Rear Bagger Chassis 4-6 Alternate Method 4-6 Disassembly 4-6 Transmission - Assembly 5-5 GEAR CASE & WHEEL ASSEMBLY SPRING RATCHET STYLE 5-8 Spring Ratchet Key Style 5-9 Servicing the System 5-9 WHEEL PINION SERVICE 5-9 BLADE BRAKE CLUTCH SYSTEMS (BBC), BLADE OVERRIDE SYSTEM (BOS), BLADE CLUTCH SYSTEM (BCS) BLADE BRAKE CLUTCH SYSTEM Description 6-2 BBC Clutch Option 6-2 Control Box Operation 6-2 Handle Controls 6-3 Control Box Disassembly 6-6 Control Box Assembly 6-7 TORO BBC SERVICE GUIDE 6-10 BLADE BRAKE CLUTCH ASSEMBLY (Toro Vacu Power...
...Cut & Wheel Pinion Clutch - Recycler/Rear Bagger Chassis 4-6 Alternate Method 4-6 Disassembly 4-6 Transmission - Assembly 5-5 GEAR CASE & WHEEL ASSEMBLY SPRING RATCHET STYLE 5-8 Spring Ratchet Key Style 5-9 Servicing the System 5-9 WHEEL PINION SERVICE 5-9 BLADE BRAKE CLUTCH SYSTEMS (BBC), BLADE OVERRIDE SYSTEM (BOS), BLADE CLUTCH SYSTEM (BCS) BLADE BRAKE CLUTCH SYSTEM Description 6-2 BBC Clutch Option 6-2 Control Box Operation 6-2 Handle Controls 6-3 Control Box Disassembly 6-6 Control Box Assembly 6-7 TORO BBC SERVICE GUIDE 6-10 BLADE BRAKE CLUTCH ASSEMBLY (Toro Vacu Power...
Service Manual
Page 8
...Self-Propel Cable 7-11 Handle Disassembly, Lawn-Boy Blade Clutch System (BCS) Models 7-11 3 Speed Transmission Models 7-13 3 Speed Control Cables 7-13 BBC Cable Adjustment (Toro Vacu Power/Lawn-Boy Medallion 7-15 Toro BBC Cable Adjustment (Recycler/Rear Bagger 7-16 Toro BOS Control 7-17 Toro BOS Control Cable Adjustment 7-18 Lawn-Boy BCS Control 7-18 Lawn-Boy BCS Control Cable Adjustment 7-18 SELF-PROPEL BELT REPLACEMENT Toro 21" Front Wheel Drive 8-2 22" Front Wheel Drive 8-2 22" Rear Wheel Drive 8-2 21" Steel & Cast Deck Toro & Lawn-Boy Mowers Belt Replacement 8-2 21" Cast Deck...
...Self-Propel Cable 7-11 Handle Disassembly, Lawn-Boy Blade Clutch System (BCS) Models 7-11 3 Speed Transmission Models 7-13 3 Speed Control Cables 7-13 BBC Cable Adjustment (Toro Vacu Power/Lawn-Boy Medallion 7-15 Toro BBC Cable Adjustment (Recycler/Rear Bagger 7-16 Toro BOS Control 7-17 Toro BOS Control Cable Adjustment 7-18 Lawn-Boy BCS Control 7-18 Lawn-Boy BCS Control Cable Adjustment 7-18 SELF-PROPEL BELT REPLACEMENT Toro 21" Front Wheel Drive 8-2 22" Front Wheel Drive 8-2 22" Rear Wheel Drive 8-2 21" Steel & Cast Deck Toro & Lawn-Boy Mowers Belt Replacement 8-2 21" Cast Deck...
Service Manual
Page 38
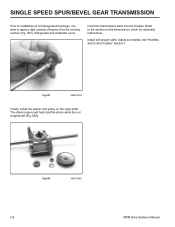
Add grease and install the cover. Install self propel cable. see "Handles and Control Cables" Section 7. Fig 038 3428-0022 2-6 WPM Drive Systems Manual Insert the transmission back into the chassis. Fig 037 3428-0019 Finally, install the spacer and pulley on the wheel pinion clutch for assembly instructions. Refer to the running surface (Fig. 037). SINGLE SPEED SPUR/BEVEL GEAR TRANSMISSION Prior to installation of engine oil to the section on the input shaft. The...
Add grease and install the cover. Install self propel cable. see "Handles and Control Cables" Section 7. Fig 038 3428-0022 2-6 WPM Drive Systems Manual Insert the transmission back into the chassis. Fig 037 3428-0019 Finally, install the spacer and pulley on the wheel pinion clutch for assembly instructions. Refer to the running surface (Fig. 037). SINGLE SPEED SPUR/BEVEL GEAR TRANSMISSION Prior to installation of engine oil to the section on the input shaft. The...
Service Manual
Page 47
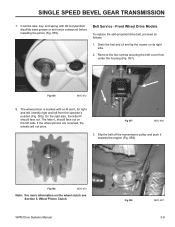
Drain the fuel and oil and tip the mower on the wheel clutch see Section 5, Wheel Pinion Clutch. Identify right and left from under the housing (Fig. 057). The letter L should face out. SINGLE SPEED BEVEL GEAR TRANSMISSION 7. Fig 055 MVC-472 8. If the wheel pinions are reversed, the wheels will not drive. Front Wheel Drive Models To replace the self-propelled drive belt, proceed as follows: 1. WPM Drive Systems Manual Fig 058 MVC-487 3-9 The...
Drain the fuel and oil and tip the mower on the wheel clutch see Section 5, Wheel Pinion Clutch. Identify right and left from under the housing (Fig. 057). The letter L should face out. SINGLE SPEED BEVEL GEAR TRANSMISSION 7. Fig 055 MVC-472 8. If the wheel pinions are reversed, the wheels will not drive. Front Wheel Drive Models To replace the self-propelled drive belt, proceed as follows: 1. WPM Drive Systems Manual Fig 058 MVC-487 3-9 The...
Service Manual
Page 69
... Toro Vacu Power/Lawn-Boy Medallion mower is quite easy and is recommended for most self-propel system repairs. 1. Remove the black plastic transmission cover from underneath. 7. Slowly pull the transmission from the control arm at this time. 8. Do not attempt to remove the gear selection cable from the housing being very careful not to the top of the housing, rotate the assembly until the cable comes free. Screen panel B. Remove the spark plug...
... Toro Vacu Power/Lawn-Boy Medallion mower is quite easy and is recommended for most self-propel system repairs. 1. Remove the black plastic transmission cover from underneath. 7. Slowly pull the transmission from the control arm at this time. 8. Do not attempt to remove the gear selection cable from the housing being very careful not to the top of the housing, rotate the assembly until the cable comes free. Screen panel B. Remove the spark plug...
Service Manual
Page 80
... do not engage or disengage properly try greasing the pivot arm. WHEEL PINION CLUTCH 17. From the point where the transmission is necessary. When turning the inside of -cut system and the wheel pinion clutch can be maintained according to the instructions in the operator's manual, which is engaged and the axle begins to the pivot arm and remove the wheel and tire assembly complete with the transmission in the main part of...
... do not engage or disengage properly try greasing the pivot arm. WHEEL PINION CLUTCH 17. From the point where the transmission is necessary. When turning the inside of -cut system and the wheel pinion clutch can be maintained according to the instructions in the operator's manual, which is engaged and the axle begins to the pivot arm and remove the wheel and tire assembly complete with the transmission in the main part of...
Service Manual
Page 85
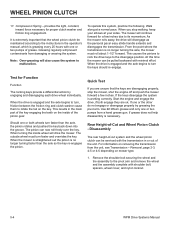
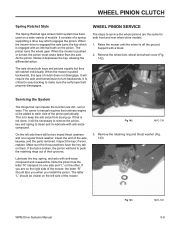
... sure the self propel belt properly disengages. The axle drives both front and rear wheel drive models. 1. WHEEL PINION SERVICE The steps to each side of the axle, keyway, and the parts removed. Servicing the System The things that ordinary engine oil be necessary to remove the pinion, key and spring to turn backwards. If you install the pinion. Remove the wheel bolt, wheel and wheel cover (Fig. 142). if worn, replace. Raise the mower until the wheel is engaged with...
... sure the self propel belt properly disengages. The axle drives both front and rear wheel drive models. 1. WHEEL PINION SERVICE The steps to each side of the axle, keyway, and the parts removed. Servicing the System The things that ordinary engine oil be necessary to remove the pinion, key and spring to turn backwards. If you install the pinion. Remove the wheel bolt, wheel and wheel cover (Fig. 142). if worn, replace. Raise the mower until the wheel is engaged with...
Service Manual
Page 93
... control box housing half as shown in position, slide the carriage bolt through the handle, then slide the left -hand control box half. 8. When this cut-away version is required, remove the buckling spring and washer from the rocker arm assembly. 10. If further disassembly is installed, all parts for wear and/or damage and replace as required. Traction cable fig 34 WPM Drive Systems Manual...
... control box housing half as shown in position, slide the carriage bolt through the handle, then slide the left -hand control box half. 8. When this cut-away version is required, remove the buckling spring and washer from the rocker arm assembly. 10. If further disassembly is installed, all parts for wear and/or damage and replace as required. Traction cable fig 34 WPM Drive Systems Manual...
Service Manual
Page 101
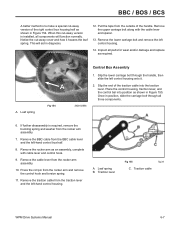
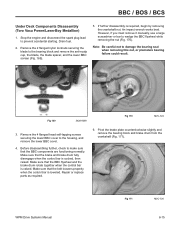
..., the blade, the blade spacer, and the lower BBC screen (Fig. 169). 5. BBC / BOS / BCS Under Deck Components Disassembly (Toro Vacu Power/Lawn-Boy Medallion) 1. Stop the engine and disconnect the spark plug lead to make sure that the brake and brake drum fully disengage when the control bar is raised. Make sure that the belt loosens properly when the control bar is required, begin by removing the...
..., the blade, the blade spacer, and the lower BBC screen (Fig. 169). 5. BBC / BOS / BCS Under Deck Components Disassembly (Toro Vacu Power/Lawn-Boy Medallion) 1. Stop the engine and disconnect the spark plug lead to make sure that the brake and brake drum fully disengage when the control bar is raised. Make sure that the belt loosens properly when the control bar is required, begin by removing the...
Service Manual
Page 142
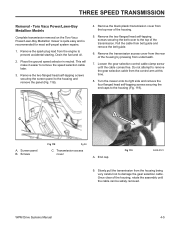
... Transmission, Rear Wheel Drive Models, Transmission Removal and Belt Replacement, see page 2-2. 21" Cast Deck Mowers with a blade clutch mechanism are the most complex as parts of the transmission. See the section on the three speed transmission starting on top of that will cause an increased tendency for replacing the self propelled belt. These mowers usually have a model number that starts with 200XX. Drain fuel and oil to prevent spillage and tip the mower on both Toro and Lawn-Boy brands. These mowers...
... Transmission, Rear Wheel Drive Models, Transmission Removal and Belt Replacement, see page 2-2. 21" Cast Deck Mowers with a blade clutch mechanism are the most complex as parts of the transmission. See the section on the three speed transmission starting on top of that will cause an increased tendency for replacing the self propelled belt. These mowers usually have a model number that starts with 200XX. Drain fuel and oil to prevent spillage and tip the mower on both Toro and Lawn-Boy brands. These mowers...


