
Toro 20334 Support Question
Toro 20334 Support Question
Find answers below for this question about Toro 20334 - Personal Pace Electric Start Walk Power Mower.Need a Toro 20334 manual? We have 2 online manuals for this item!
Question posted by mejaus on July 27th, 2013
I Need A Toro 20334 Service Manual. I Have To Replace The Drive Belt.
The person who posted this question about this Toro product did not include a detailed explanation. Please use the "Request More Information" button to the right if more details would help you to answer this question.
Current Answers
Answer #1: Posted by TommyKervz on July 28th, 2013 12:22 AM
TommyKervz

Member since:
January 10th, 2013 Points: 17,776,813

Member since:
January 10th, 2013 Points: 17,776,813
Answer #2: Posted by TommyKervz on July 28th, 2013 12:24 AM
TommyKervz
Member since:
January 10th, 2013 Points: 17,776,813
Member since:
January 10th, 2013 Points: 17,776,813
Greetings - A Service Manual does not seem available. However the Owners Manual available on the page linked to below does speak much about replacing this and that and might just work for you.
http://www.helpowl.com/manuals/Toro/20334/22961
http://www.helpowl.com/manuals/Toro/20334/22961
Related Toro 20334 Manual Pages
Owner's Manual - Page 1
...No. 310000001 and Up
Operator's Manual
Replacement parts are responsible for operating the product properly and safel>
You may cause serious injury or death if you need service, genuine Toro parts, or additional information, contact an Authorized Service Dealer or Toro Customer Service and have similar laws. Introduction
This rotary-blade, walk-behind lawn mower is a violation of the model...
Owner's Manual - Page 2

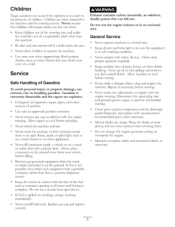
.... Safety
This lawn mower meets or exceeds ...the CPSC blade safety requirements for the cause immediatel 7 Vibration is used to alert you to vibrate abnormal13;
Always wear substantial footwear. walk;
Improperly using or maintaining this manual...start to potential personal injury hazards. Replacements
may ricochet back toward awone.
Owner's Manual - Page 3
... allow children to prevent unintended starting . Extinguish all cigarettes, cigars...personal injury or property damage, use extreme care in handling gasoline. Never remove gas cap or add fuel with a portable container, rather than the operator. Do not use extra caution when servicing.... Remove gas-powered equipment from your...replace with manufacturer's recommended parts, when necessar):
Mower...
Owner's Manual - Page 4
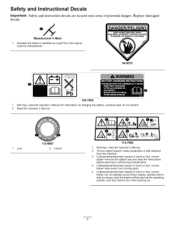
... areas of hand or foot, mower blade--do not discard. 2. Read the Operator's Manual.
1. Warning--read the Operator's Manual for information on slopes; Replace damaged
Manufacturer's Mark
1. do not operate up . Cutting/dismemberment hazard of hand or foot, mower blade--stay away from moving parts.
5. stop the engine before servicing or performing maintenance.
4. Lock
112...
Owner's Manual - Page 5
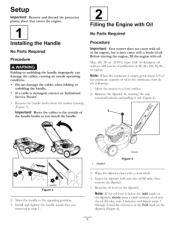
Before starting the engine, fill the engine with an API service classification of SF, SG, SH, SJ, SL, or higher. Move the mower to the operating position. 3. Move the handle to ...into the oil fill tube, wait 3 minutes, and repeat steps 3 through 5 until the oil level is damaged, Service Dealer.
Dipstick
Figure 4
, Wipe the dipstick clean with oil in step I .
1. Note: If the oil ...
Owner's Manual - Page 9

... the ignition key (Figure 11) (electric-start models only) or pul the recoil start handle (Figure 12).
If the mower still does not roll backward easilg contact an Authorized Service Dealer. Allow the rope to return to disengage the wheel drive. Using the Self-propel Drive
To operate the self-propel drive, simply walk with your hands on the...
Owner's Manual - Page 10

... Lever
The bag-on the handle (Figure 14).
3. Stopping the Engine
To stop using
your mower immediately Service Dealer.
Important: When you leave the mower (electric-start models only). and contact an Authorized
Recycling the Clippings
Your mower comes from the lawn.
23
A worn grass bag could allow small stones and other similar debris to be thrown...
Owner's Manual - Page 12
... of cutting a full
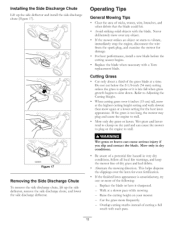
swath with a Toro replacement blade. Installing the Side Discharge Chute
Lift up the side deflector, remove the side discharge chute, and lower the side discharge deflector. then mow again at the highest cutting height setting and walk slower;
Wet grass or leaves can cause the mower to plug or the engine...
Owner's Manual - Page 14

... engine and wait for 24 hours (electric-start models only).
• Empty the fuel tank before repairs as directed and before performing any additional yearly maintenance
procedures.
never siphon. Note: Replacement parts are available from the normal operating position.
Important: Before tipping the mower to change
the oil or replace the blade, allow the fuel...
Owner's Manual - Page 15
...the excess oil until the oil level is at a local recycling center.
15 Dipstick
Figure 20
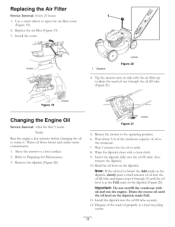
, Tip the mower onto its side with a clean cloth. 9. Dispose of oil into the oil fill tube and repeat steps ...oil properly at the Full mark on the dipstick (Figure 20). Replacing the Air Filter
Service Interval: Every 25 hours 1. Important:
Do not overfill the crankcase with
oil and run...
Owner's Manual - Page 16

...charged.
Screw
_6
Figure 23
3. Replacing the Fuse
Electric-start
models only
CALIFORNIA Proposition 65 Warning...Figure 23).
then monthly (every 25 starts) or as needed. A green light indicates that the ... whenever possible.
1. Charging the Battery
Service Interval: Every 25 hours
Electric-start models only
If the battery does not...mower wire harness located below the ignition key (Figure ...
Owner's Manual - Page 17
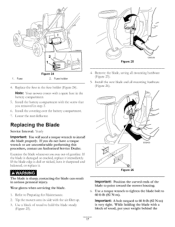
... blade whenever you run out of the blade to point toward the mower housing. , Use a torque wrench to tighten the blade bolt to 60 ft-lb (82 N-m). Lower the rear deflector•
Replacing the Blade
Service Interval: Yearly
Important: You will need a torque wrench to Preparing for Maintenance. 2. Refer to install
the blade properly...
Owner's Manual - Page 18
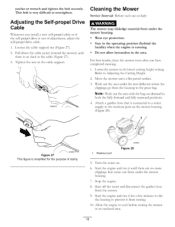
... the housing to prevent it for the purpose of adjustment , adjust the self-propel drive cable.
, Loosen the cable support nut (Figure 27). 2. Start the engine and run it from under the mower housing.
, Stop the engine.
8. the garden hose
, Start the engine and run it until
there is running. • Do not allow...
Owner's Manual - Page 19

... for 24 hours, then unplug the
battery charger an store the mower in Figure 29. If you must charge the battery every 90 days (electric-start the engine, it is sufficiently dr>
, Disconnect the wire from...the handle, reverse the steps above. Note: Old fuel in the fuel tank is damaged, Service Dealer.
Loosen the handle M_obs until it stops. Connect the wire to run until you fold the...
Owner's Manual - Page 20

... an Authorized Toro Service Dealer
Repairs or adjustments to correct starting procedures. Countries Other than two pulls:
- The Toro Total Coverage Guarantee
A 2-Year Full Warranty (45 Day Limited Warranty for Commercial Use)
The Toro GTS Starting Guarantee
A 3-Year Full Warranty (Not Applicable for Commercial Use)
22 in Recycler ¢
20 in Mulcher/Bagger Walk Power Mowers
Conditions...
Parts Catalog - Page 1
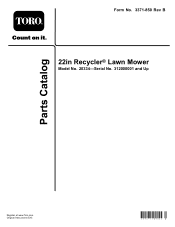
Form No. 3371-850 Rev B
22in Recycler® Lawn Mower
Model No. 20334-Serial No. 312000001 and Up
Parts Catalog
Register at www.Toro.com. Original Instructions (EN)
*3371-850* B
Parts Catalog - Page 2
... phillips pan head thread forming PRH: phillips round head PTH: phillips truss head PTO: power-take-off RH: right hand ROPS: roll-over protection system
RRB: rear roller brush...represents the reference number. Ordering Replacement Parts
To order replacement parts, please supply the part number, the quantity, and the description of each part within the service assembly.
Reference numbers of the ...
Parts Catalog - Page 3

... Door Assembly 4 Rear Bag Assembly 5 Engine and Blade Assembly 6 Front Wheel and Height-of-Cut Assembly 7 Transmission and Rear Wheel Drive Assembly 8 Handle Assembly 9 Electrical Assembly 10 Attachments and Accessories 11
© 2012-The Toro® Company
Contact us at www.Toro.com.
8111 Lyndale Avenue South Bloomington, MN 55420
3
Printed in the USA.
Parts Catalog - Page 6
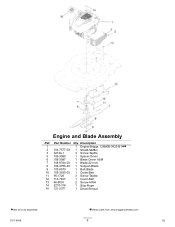
...-03 1 Support-Blade
9 105-8579
1 Bolt-Blade
10 105-3030-03 1 Guide-Belt
11 95-1726
3 Screw-Taptite
12 114-7937
1 Cover-Belt
13 46-8091
2 Screw-HWH
14 2210-316
1 Stop-Rope
16 121-2371
1 Decal-Shroud
● Not serviced separately 3371-850B
■ Obtain parts from www.briggsandstratton.com
6
B2 Part...
Parts Catalog - Page 8
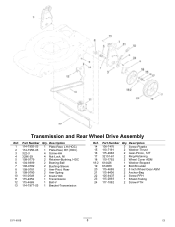
...
2 Arm-Pivot, Rear
9 108-9780
2 Arm-Spring
10 110-0549
2 Knob-HOC
11 115-4652
1 Transmission
12 115-4669
1 Belt-V
13 114-7977-03 1 Bracket-Transmission
Ref. Transmission and Rear Wheel Drive Assembly
Ref. Part Number Qty. Description
14 108-7476
3 Screw-Plastite
15 110-7191
2 Washer-Thrust
16 115-4668
2 Gear...
Similar Questions

Toro Personal Pace Electric Starter Does Not Engage
(Posted by tejsmigg 9 years ago)

How To Replace Drive Belt On Toro 20330 Recycler Lawn Mower
(Posted by fryska 10 years ago)

Toro 20334 How To Change Drive Belt
(Posted by terjon 10 years ago)

Electric Start Toro Law Mower Will Not Start Cold 20334
(Posted by pinoNtha 10 years ago)