User Guide
Page 3
..." Battery Backup Installation Maintenance Controls and Indicators ...7 Clock Display ...8 Setting the Clock Time ...9 Listening to Compact Discs...9-10 Playing Compact Discs Skipping to a CD Track Using the Repeat Function Using the Random Function Programming and Playing CD Tracks High-Speed Music Search Listening to the Radio ...11 Operating the Radio Antenna Information and Adjustment Operating the Alarms...
..." Battery Backup Installation Maintenance Controls and Indicators ...7 Clock Display ...8 Setting the Clock Time ...9 Listening to Compact Discs...9-10 Playing Compact Discs Skipping to a CD Track Using the Repeat Function Using the Random Function Programming and Playing CD Tracks High-Speed Music Search Listening to the Radio ...11 Operating the Radio Antenna Information and Adjustment Operating the Alarms...
User Guide
Page 5
... or longer, the power cord should be referred to qualified service personnel. The unit should be left unattended and unused for an extended period of time, such as this or other products, please call our toll-free number: 1-800-888-4491. 4 the unit exhibits a marked change in the .... the unit has been exposed to the unit. 14. Attachments - This will prevent damage to the product due to Product Safety 8. Periods of time. A Consumer Guide to lightning and power-line surges. 11. objects have fallen into or liquid has been spilled into any openings or vents located ...
... or longer, the power cord should be referred to qualified service personnel. The unit should be left unattended and unused for an extended period of time, such as this or other products, please call our toll-free number: 1-800-888-4491. 4 the unit exhibits a marked change in the .... the unit has been exposed to the unit. 14. Attachments - This will prevent damage to the product due to Product Safety 8. Periods of time. A Consumer Guide to lightning and power-line surges. 11. objects have fallen into or liquid has been spilled into any openings or vents located ...

User Guide
Page 7
... longer, remove the batteries to prevent possible corrosion. Place the unit on a stable, level surface, close to the power supply the time and alarm settings will sound when power is disconnected or a power failure or other protective material should save the materials, please dispose of.... You should be used for the life of the terminal harness. 3. A cloth or other interruption occurs, the Battery Backup will maintain clock and alarm settings for a prolonged period, such as they may damage the surface of excessive heat. 2. Should the battery compartment become corroded...
... longer, remove the batteries to prevent possible corrosion. Place the unit on a stable, level surface, close to the power supply the time and alarm settings will sound when power is disconnected or a power failure or other protective material should save the materials, please dispose of.... You should be used for the life of the terminal harness. 3. A cloth or other interruption occurs, the Battery Backup will maintain clock and alarm settings for a prolonged period, such as they may damage the surface of excessive heat. 2. Should the battery compartment become corroded...
User Guide
Page 10
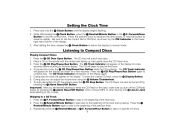
...finished listening to set the correct AM or PM time, as shown by pressing the ¶ Alarm Reset/Off Button. Forward/Hour Button to either the CD Player or the radio, make sure you can also be turned off the CD/Radio power by the PM Indicator in the lowerright-... beginning of the previous track. 3. After setting the time, release the ¾ Clock Button to return the display to a specific CD track. 9 Press the ´ CD Play/Pause/Aux Button. Press the ´ CD Play/Pause/Aux Button again to advance rapidly. The CD Track Indicator will unlock and open. 2. During play ...
...finished listening to set the correct AM or PM time, as shown by pressing the ¶ Alarm Reset/Off Button. Forward/Hour Button to either the CD Player or the radio, make sure you can also be turned off the CD/Radio power by the PM Indicator in the lowerright-... beginning of the previous track. 3. After setting the time, release the ¾ Clock Button to return the display to a specific CD track. 9 Press the ´ CD Play/Pause/Aux Button. Press the ´ CD Play/Pause/Aux Button again to advance rapidly. The CD Track Indicator will unlock and open. 2. During play ...
User Guide
Page 13
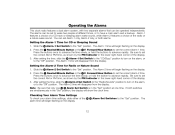
...-1 time. Checking Your Alarm Time Settings To check your alarm time settings, slide either of the radio or a nature wake sound. Setting the Alarm-2 Time for CD or Beeping Sound 1. The Alarm-2 time will disappear from the display. The Alarm-2 time will show the clock time. Slide the ƹ Alarm-1 Set Switch to advance rapidly. Operating the Alarms This clock radio features...
...-1 time. Checking Your Alarm Time Settings To check your alarm time settings, slide either of the radio or a nature wake sound. Setting the Alarm-2 Time for CD or Beeping Sound 1. The Alarm-2 time will disappear from the display. The Alarm-2 time will show the clock time. Slide the ƹ Alarm-1 Set Switch to advance rapidly. Operating the Alarms This clock radio features...
User Guide
Page 14
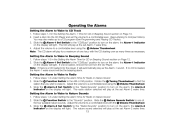
...to Beeping Sound 1. Setting the Alarm to Wake to a CD program (See Programming and Playing CD Tracks). 3. Follow steps 1-3 under Setting the Alarm Time for Radio or Nature Sound. 2. Slide the ƺ Alarm-2 Set Switch to the "Radio/Sounds" position to turn on the alarm; Operating the Alarms ...Setting the Alarm to Wake to Radio 1. Slide the ƹ Alarm-1 Set Switch to the "CD/Buzz" position to Compact Discs). The radio station selected will play at the set Alarm-2 wake time. Note: The CD alarm will be the beeping alarm. If one is ...
...to Beeping Sound 1. Setting the Alarm to Wake to a CD program (See Programming and Playing CD Tracks). 3. Follow steps 1-3 under Setting the Alarm Time for Radio or Nature Sound. 2. Slide the ƺ Alarm-2 Set Switch to the "Radio/Sounds" position to turn on the alarm; Operating the Alarms ...Setting the Alarm to Wake to Radio 1. Slide the ƹ Alarm-1 Set Switch to the "CD/Buzz" position to Compact Discs). The radio station selected will play at the set Alarm-2 wake time. Note: The CD alarm will be the beeping alarm. If one is ...
User Guide
Page 15
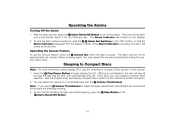
...resetting it for the following morning. 3. The alarm will turn off the alarm. Sleeping to Compact Discs Note: For more information about playing CD's, see the Listening to Compact Discs section of the alarm the following day. You can program a shorter track selection. Note: If you ...Reset/Off Button. 14 Without any interference, the disc will affect the volume level of this process several times during the onehour alarm cycle. The Alarm Indicator will sound at the set time. Operating the Snooze Feature To use the ƻ Volume Thumbwheel to a comfortable level with the &#...
...resetting it for the following morning. 3. The alarm will turn off the alarm. Sleeping to Compact Discs Note: For more information about playing CD's, see the Listening to Compact Discs section of the alarm the following day. You can program a shorter track selection. Note: If you ...Reset/Off Button. 14 Without any interference, the disc will affect the volume level of this process several times during the onehour alarm cycle. The Alarm Indicator will sound at the set time. Operating the Snooze Feature To use the ƻ Volume Thumbwheel to a comfortable level with the &#...
User Guide
Page 16
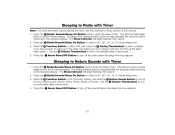
... to will begin flashing, then stay lit. 2. If you have chosen to wake up to the radio, the station you set to sleep to select a 90-, 60-, 30-, or 15-minute sleep time. 3. Press the ¶ Alarm Reset/Off Button to select a station. Slide the ƽ...sleep volume level. 4. The setting remains active for approximately ten seconds before the sleep time has elapsed. 15 Sleeping to Radio with Timer 1. The Sleep Indicator will also function as the alarm radio station. Press the º Radio/ Sounds/Sleep On Button twice to find a comfortable sleep volume level. 4. Use ...
... to will begin flashing, then stay lit. 2. If you have chosen to wake up to the radio, the station you set to sleep to select a 90-, 60-, 30-, or 15-minute sleep time. 3. Press the ¶ Alarm Reset/Off Button to select a station. Slide the ƽ...sleep volume level. 4. The setting remains active for approximately ten seconds before the sleep time has elapsed. 15 Sleeping to Radio with Timer 1. The Sleep Indicator will also function as the alarm radio station. Press the º Radio/ Sounds/Sleep On Button twice to find a comfortable sleep volume level. 4. Use ...
User Guide
Page 17
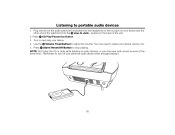
Press ´ CD Play/Pause/Aux Button. 3. You may hear both sound sources at the same time. Use the ƻ Volume Thumbwheel to stop playing. Plug one end of the audio patchcord (included) into the headphone or line-out jack on your ... audio device when through playing it. 16 Turn on the back of the patchcord into the ƿ Line-In Jack , located on and play the CD or radio while listening to portable audio devices 1. Press ¶ Alarm Reset/Off Button to adjust the volume. Listening to audio devices, or you may need...
Press ´ CD Play/Pause/Aux Button. 3. You may hear both sound sources at the same time. Use the ƻ Volume Thumbwheel to stop playing. Plug one end of the audio patchcord (included) into the headphone or line-out jack on your ... audio device when through playing it. 16 Turn on the back of the patchcord into the ƿ Line-In Jack , located on and play the CD or radio while listening to portable audio devices 1. Press ¶ Alarm Reset/Off Button to adjust the volume. Listening to audio devices, or you may need...
User Guide
Page 18
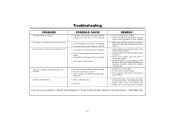
Timex Audio Products Division Customer Service, 1-800-888-4491 17 Troubleshooting PROBLEM The alarm does ... was on the display • The alarm was not set correctly for AM/PM REMEDY • Check the alarm time setting • Press the Alarm Mode Button until the Alarm icon appears on the display • Make sure the ...time Buzzer alarm is heard when waking to CD • A CD was not inserted into the CD player • The CD was inserted incorrectly into the player • Compartment CD player door is not closed • There was a power failure There is no display and the CD/radio...
Timex Audio Products Division Customer Service, 1-800-888-4491 17 Troubleshooting PROBLEM The alarm does ... was on the display • The alarm was not set correctly for AM/PM REMEDY • Check the alarm time setting • Press the Alarm Mode Button until the Alarm icon appears on the display • Make sure the ...time Buzzer alarm is heard when waking to CD • A CD was not inserted into the CD player • The CD was inserted incorrectly into the player • Compartment CD player door is not closed • There was a power failure There is no display and the CD/radio...
User Guide
Page 19
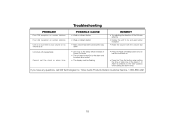
Timex Audio Products Division Customer Service, 1-800-888-4491 18 Troubleshooting PROBLEM Poor FM reception on ...was in the Sleep Mode instead of Power On Mode • The unit was turned On by the alarm and the alarm time ended • The display must be flashing REMEDY • Try adjusting the direction of the FM wire antenna • ...Raise the volume with the volume dial • Press the Radio On/Sleep button once to turn the unit back on Cannot set the clock or alarm time • Press the Time Set button when setting the time or slide one of the Alarm-1 or Alarm-2 switches to...
Timex Audio Products Division Customer Service, 1-800-888-4491 18 Troubleshooting PROBLEM Poor FM reception on ...was in the Sleep Mode instead of Power On Mode • The unit was turned On by the alarm and the alarm time ended • The display must be flashing REMEDY • Try adjusting the direction of the FM wire antenna • ...Raise the volume with the volume dial • Press the Radio On/Sleep button once to turn the unit back on Cannot set the clock or alarm time • Press the Time Set button when setting the time or slide one of the Alarm-1 or Alarm-2 switches to...


