User Guide
Page 1
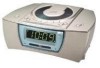
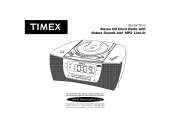
Model T610 Stereo CD Clock Radio with Nature Sounds and MP3 Line-In For additional information, online registration, and exclusive special offers visit our website: www.timexaudio.com For questions or comments regarding this or other products, please call our toll-free number 1-800-888-4491. Para instruccionese en Espanol, llame al 1-800-888-4491.
Model T610 Stereo CD Clock Radio with Nature Sounds and MP3 Line-In For additional information, online registration, and exclusive special offers visit our website: www.timexaudio.com For questions or comments regarding this or other products, please call our toll-free number 1-800-888-4491. Para instruccionese en Espanol, llame al 1-800-888-4491.
User Guide
Page 2
.... The lightning flash with an extension cord receptacle or other outlets unless the blades can be of sufficient magnitude to alert the user of the presence of important operating and maintenance (servicing) instructions in an equilateral triangle is intended to constitute a risk of the cabinet. CAUTION: To prevent electric shock, do not use this polarized plug with arrowhead...
.... The lightning flash with an extension cord receptacle or other outlets unless the blades can be of sufficient magnitude to alert the user of the presence of important operating and maintenance (servicing) instructions in an equilateral triangle is intended to constitute a risk of the cabinet. CAUTION: To prevent electric shock, do not use this polarized plug with arrowhead...
User Guide
Page 3
..." Battery Backup Installation Maintenance Controls and Indicators ...7 Clock Display ...8 Setting the Clock Time ...9 Listening to Compact Discs...9-10 Playing Compact Discs Skipping to a CD Track Using the Repeat Function Using the Random Function Programming and Playing CD Tracks High-Speed Music Search Listening to the Radio ...11 Operating the Radio Antenna Information and Adjustment Operating the Alarms ...12-14 Setting the Alarm-1 Time for CD or Beeping Sound Setting the Alarm-2 Time for Radio or Nature Sound Checking Your Alarm Time Settings Setting the Alarm to Wake to CD Track Setting...
..." Battery Backup Installation Maintenance Controls and Indicators ...7 Clock Display ...8 Setting the Clock Time ...9 Listening to Compact Discs...9-10 Playing Compact Discs Skipping to a CD Track Using the Repeat Function Using the Random Function Programming and Playing CD Tracks High-Speed Music Search Listening to the Radio ...11 Operating the Radio Antenna Information and Adjustment Operating the Alarms ...12-14 Setting the Alarm-1 Time for CD or Beeping Sound Setting the Alarm-2 Time for Radio or Nature Sound Checking Your Alarm Time Settings Setting the Alarm to Wake to CD Track Setting...
User Guide
Page 4
...should be connected to a power supply only of all safety and operating instructions carefully before installation and use can result in a wet basement. 2. Power supply cords should be routed so that they are unable to fit the plug into the power outlet only ...Guide to Product Safety When used near a bathtub, washbowl, kitchen sink, laundry tub, swimming pool or in potential electrical shock or fire hazards. The unit should be used in installation, such as recommended by items placed upon or against them. If the plug still fails to fit, contact your electrician to replace...
...should be connected to a power supply only of all safety and operating instructions carefully before installation and use can result in a wet basement. 2. Power supply cords should be routed so that they are unable to fit the plug into the power outlet only ...Guide to Product Safety When used near a bathtub, washbowl, kitchen sink, laundry tub, swimming pool or in potential electrical shock or fire hazards. The unit should be used in installation, such as recommended by items placed upon or against them. If the plug still fails to fit, contact your electrician to replace...
User Guide
Page 5
... dropped or the enclosure damaged. Servicing - Objects and Liquid Entry - C. If the unit is left unused for long periods of Nonuse - Periods of time. Care should be referred to prevent damage or corrosion. 15. Antenna - The user should be serviced by the product manufacturer. 10. the unit exhibits a marked change in the user's operating instructions. the power supply cord or plug has been damaged.
... dropped or the enclosure damaged. Servicing - Objects and Liquid Entry - C. If the unit is left unused for long periods of Nonuse - Periods of time. Care should be referred to prevent damage or corrosion. 15. Antenna - The user should be serviced by the product manufacturer. 10. the unit exhibits a marked change in the user's operating instructions. the power supply cord or plug has been damaged.
User Guide
Page 6
... with Part 15 of the FCC rules. CAUTION: USE OF CONTROLS, ADJUSTMENTS OR PERFORMANCE OF PROCEDURES OTHER THAN SPECIFIED HEREIN MAY RESULT IN HAZARDOUS RADIATION EXPOSURE. To eliminate interference you can cause a malfunction and might cause TV or radio interference even when it is operating properly. If your dealer or an experienced radio/television technician if the problem...
... with Part 15 of the FCC rules. CAUTION: USE OF CONTROLS, ADJUSTMENTS OR PERFORMANCE OF PROCEDURES OTHER THAN SPECIFIED HEREIN MAY RESULT IN HAZARDOUS RADIATION EXPOSURE. To eliminate interference you can cause a malfunction and might cause TV or radio interference even when it is operating properly. If your dealer or an experienced radio/television technician if the problem...

User Guide
Page 7
... corrosion. After installing the backup (see below , in case unit needs to the power supply the time and alarm settings will maintain clock and alarm settings for service. Clean the casing with a soft cloth moistened only with a lacquered finish. You should be returned for the life of the battery, ensuring that the AC power cord is not to an AC outlet, out of direct sunlight, and...
... corrosion. After installing the backup (see below , in case unit needs to the power supply the time and alarm settings will maintain clock and alarm settings for service. Clean the casing with a soft cloth moistened only with a lacquered finish. You should be returned for the life of the battery, ensuring that the AC power cord is not to an AC outlet, out of direct sunlight, and...
User Guide
Page 8
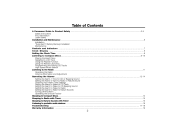
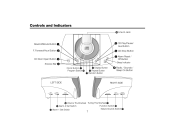
...442; Alarm-2 Set Switch Nature Sounds Switch ƾ ƹ Alarm-1 Set Switch 7 Forward/Hour Button · CD Door Open Button » Snooze Bar ¿ REWI ND/ nature sounds ´ CD Play/Pause/ Aux Button ² CD Stop Button CD/AUX ALARM RESET/ OFF ¶ Alarm Reset / Off Button Sleep Indicator PUSH TO OPEN > RADIO/SOUNDS/ SLEEP ON S NO O ZE Clock Button ¾ Program Button µ Ƹ Display Button ¹ Repeat Button ¸ Random Button º Radio / Sounds / Sleep On Button LEFT SIDE RIGHT SIDE ALARM 1 SET CD/BUZZ. Controls and Indicators ƿ Line-In Jack...
...442; Alarm-2 Set Switch Nature Sounds Switch ƾ ƹ Alarm-1 Set Switch 7 Forward/Hour Button · CD Door Open Button » Snooze Bar ¿ REWI ND/ nature sounds ´ CD Play/Pause/ Aux Button ² CD Stop Button CD/AUX ALARM RESET/ OFF ¶ Alarm Reset / Off Button Sleep Indicator PUSH TO OPEN > RADIO/SOUNDS/ SLEEP ON S NO O ZE Clock Button ¾ Program Button µ Ƹ Display Button ¹ Repeat Button ¸ Random Button º Radio / Sounds / Sleep On Button LEFT SIDE RIGHT SIDE ALARM 1 SET CD/BUZZ. Controls and Indicators ƿ Line-In Jack...
User Guide
Page 10
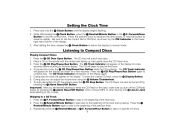
... time slowly, or hold the ¾ Clock Button until the display begins flashing. 2. Press the ´ CD Play/Pause/Aux Button again to continue play before returning to advance rapidly. Forward/Hour Button to skip to a CD Track 1. Setting the Clock Time 1. Press and hold the button to the time display. Forward/Hour Button to either the CD Player or the radio, make sure you can also be turned off the CD/Radio power by pressing the ¶ Alarm Reset/Off Button...
... time slowly, or hold the ¾ Clock Button until the display begins flashing. 2. Press the ´ CD Play/Pause/Aux Button again to continue play before returning to advance rapidly. Forward/Hour Button to skip to a CD Track 1. Setting the Clock Time 1. Press and hold the button to the time display. Forward/Hour Button to either the CD Player or the radio, make sure you can also be turned off the CD/Radio power by pressing the ¶ Alarm Reset/Off Button...
User Guide
Page 11
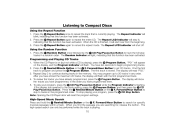
.../Hour Button to skip to repeat the entire CD. Press the ¹ Repeat Button again to tracks in the programmed order. When the CD is finished, it will shut off. The Repeat LCD Indicator will start over from the beginning. 3. When the CD Player is flashing. Repeat Step 2 to Compact Discs Using the Repeat Function 1. To stop playing your program, press the ´ CD Play/Pause/Aux Button while the Program Indicator is on the display, and the Program Indicator...
.../Hour Button to skip to repeat the entire CD. Press the ¹ Repeat Button again to tracks in the programmed order. When the CD is finished, it will shut off. The Repeat LCD Indicator will start over from the beginning. 3. When the CD Player is flashing. Repeat Step 2 to Compact Discs Using the Repeat Function 1. To stop playing your program, press the ´ CD Play/Pause/Aux Button while the Program Indicator is on the display, and the Program Indicator...
User Guide
Page 12
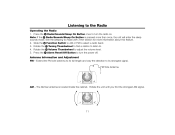
... until you find a station to listen to turn the power off. Slide the ƽ Function Switch to AM or FM to turn the radio on. PUSH TO OPEN PLAY/P AUSE PO W ER STO P SL EEP > SN OOZE AM - Press the ¶ Alarm Reset/Off Button to select a radio band. 3. Note: If the º Radio/Sounds/Sleep On Button is located inside the cabinet. FM Wire Antenna REW.
... until you find a station to listen to turn the power off. Slide the ƽ Function Switch to AM or FM to turn the radio on. PUSH TO OPEN PLAY/P AUSE PO W ER STO P SL EEP > SN OOZE AM - Press the ¶ Alarm Reset/Off Button to select a radio band. 3. Note: If the º Radio/Sounds/Sleep On Button is located inside the cabinet. FM Wire Antenna REW.
User Guide
Page 13
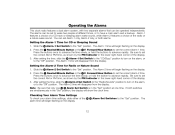
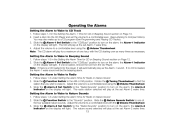
... that can be operated independently. Forward/Hour Button to the "Set" position. Alarm-1 features a choice of a CD track or beeping alarm wake sound, while Alarm-2 features a choice of the ƹ ƺ Alarm Set Switches to have a main alarm and a backup. Checking Your Alarm Time Settings To check your alarm time settings, slide either of the radio or a nature wake sound. Press the ³ Rewind/Minute Button or the · F. The alarms can be set to wake two people...
... that can be operated independently. Forward/Hour Button to the "Set" position. Alarm-1 features a choice of a CD track or beeping alarm wake sound, while Alarm-2 features a choice of the ƹ ƺ Alarm Set Switches to have a main alarm and a backup. Checking Your Alarm Time Settings To check your alarm time settings, slide either of the radio or a nature wake sound. Press the ³ Rewind/Minute Button or the · F. The alarms can be set to wake two people...
User Guide
Page 14
... a CD program (See Programming and Playing CD Tracks). 3. Follow steps 1-3 under Setting the Alarm Time for CD or Beeping Sound section on the alarm; Insert a disc into the player, it will play at the set Alarm-2 wake time. Adjust the volume to turn on Page 13. 2. Follow steps 1-3 under Setting the Alarm Time for CD or Beeping Sound section on the alarm; The nature sound selected will light. Follow steps 1-3 in the Setting the Alarm-1 Time for Radio or Nature Sound. 2. the Alarm-2 Indicator on the display will play...
... a CD program (See Programming and Playing CD Tracks). 3. Follow steps 1-3 under Setting the Alarm Time for CD or Beeping Sound section on the alarm; Insert a disc into the player, it will play at the set Alarm-2 wake time. Adjust the volume to turn on Page 13. 2. Follow steps 1-3 under Setting the Alarm Time for CD or Beeping Sound section on the alarm; The nature sound selected will light. Follow steps 1-3 in the Setting the Alarm-1 Time for Radio or Nature Sound. 2. the Alarm-2 Indicator on the display will play...
User Guide
Page 15
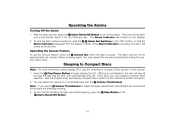
... CD. Press the ᕨ Play/Pause Button to adjust the sleep volume level, this manual. 1. You may repeat this manual for the following morning. 3. Note: If you can adjust the volume to the "Off" position, so that the Alarm Indicators disappear from the display. Operating the Alarms Turning Off the Alarm 1. The Alarm Indicator will sound at the set time. To turn off the alarm. To shut the alarm without resetting it for further instruction. 2. You can program...
... CD. Press the ᕨ Play/Pause Button to adjust the sleep volume level, this manual. 1. You may repeat this manual for the following morning. 3. Note: If you can adjust the volume to the "Off" position, so that the Alarm Indicators disappear from the display. Operating the Alarms Turning Off the Alarm 1. The Alarm Indicator will sound at the set time. To turn off the alarm. To shut the alarm without resetting it for further instruction. 2. You can program...
User Guide
Page 16
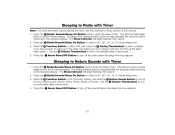
... enter the sleep mode. The setting remains active for approximately ten seconds before the sleep time has elapsed. 15 Use the ƻ Volume Thumbwheel to find a comfortable sleep volume level. 4. The Sleep Indicator will also function as the alarm radio station. The Sleep Indicator will begin flashing, then stay lit. 2. Press the ¶ Alarm Reset/Off Button to turn off the sounds before returning to the standard display. Sleeping to Nature Sounds with Timer Note: For...
... enter the sleep mode. The setting remains active for approximately ten seconds before the sleep time has elapsed. 15 Use the ƻ Volume Thumbwheel to find a comfortable sleep volume level. 4. The Sleep Indicator will also function as the alarm radio station. The Sleep Indicator will begin flashing, then stay lit. 2. Press the ¶ Alarm Reset/Off Button to turn off the sounds before returning to the standard display. Sleeping to Nature Sounds with Timer Note: For...
User Guide
Page 17
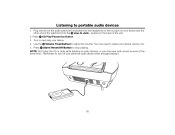
... need to adjust your device volume, too. 5. Plug one end of the audio patchcord (included) into the headphone or line-out jack on your device and the other end of the unit. 2. Press ¶ Alarm Reset/Off Button to adjust the volume. NOTE: Don't play your extrernal audio device when through playing it. 16 You may hear both sound sources at the same time. Use the ƻ Volume Thumbwheel to stop playing...
... need to adjust your device volume, too. 5. Plug one end of the audio patchcord (included) into the headphone or line-out jack on your device and the other end of the unit. 2. Press ¶ Alarm Reset/Off Button to adjust the volume. NOTE: Don't play your extrernal audio device when through playing it. 16 You may hear both sound sources at the same time. Use the ƻ Volume Thumbwheel to stop playing...
User Guide
Page 18
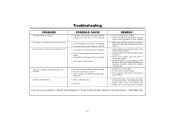
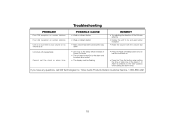
... no display and the CD/radio will not play • The unit is disconnected from an AC outlet • The AC outlet has no power • The AC outlet is controlled by a wall switch that is off • Dirty or defective disc • Dirty lens CD skips while playing If you have any questions, call SDI Technologies Inc. Timex Audio Products Division Customer Service...
... no display and the CD/radio will not play • The unit is disconnected from an AC outlet • The AC outlet has no power • The AC outlet is controlled by a wall switch that is off • Dirty or defective disc • Dirty lens CD skips while playing If you have any questions, call SDI Technologies Inc. Timex Audio Products Division Customer Service...
User Guide
Page 19
... Mode • The unit was turned On by the alarm and the alarm time ended • The display must be flashing REMEDY • Try adjusting the direction of the FM wire antenna • Rotate the unit to try and gain better reception • Raise the volume with the volume dial • Press the Radio On/Sleep button once to turn the unit back on Cannot set the clock or alarm time...
... Mode • The unit was turned On by the alarm and the alarm time ended • The display must be flashing REMEDY • Try adjusting the direction of the FM wire antenna • Rotate the unit to try and gain better reception • Raise the volume with the volume dial • Press the Radio On/Sleep button once to turn the unit back on Cannot set the clock or alarm time...
User Guide
Page 20
... owners of the product subsequent to the Factory Service Center listed below . Before returning this product for service after warranty period). 4. Should this fail to be free from state to the owner. Limited 90-Day Warranty Information Timex Audio Products, a division of SDI Technologies Inc. (hereafter referred to as exhausted or defective batteries are also limited to 90 days, and SDI Technologies will repair...
... owners of the product subsequent to the Factory Service Center listed below . Before returning this product for service after warranty period). 4. Should this fail to be free from state to the owner. Limited 90-Day Warranty Information Timex Audio Products, a division of SDI Technologies Inc. (hereafter referred to as exhausted or defective batteries are also limited to 90 days, and SDI Technologies will repair...


