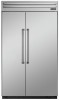
Use and Care Manual
Page 4
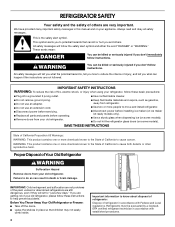
... read and obey all parts and panels before installing ice maker (on ice maker kit ready models only). ■ Use a sturdy glass when dispensing ice (on some models). ■ Do not hit the refrigerator glass doors (on your old refrigerator. IMPORTANT SAFETY INSTRUCTIONS WARNING: To reduce the risk of refrigerator in accordance with established procedures. This is , tell you are getting rid of others . Junked or abandoned refrigerators are not followed. Before...
... read and obey all parts and panels before installing ice maker (on ice maker kit ready models only). ■ Use a sturdy glass when dispensing ice (on some models). ■ Do not hit the refrigerator glass doors (on your old refrigerator. IMPORTANT SAFETY INSTRUCTIONS WARNING: To reduce the risk of refrigerator in accordance with established procedures. This is , tell you are getting rid of others . Junked or abandoned refrigerators are not followed. Before...

Use and Care Manual
Page 5
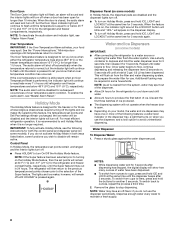
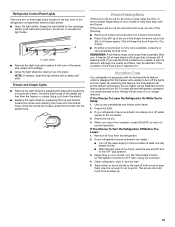
.../Off switch is in "Refrigerator Care." Move the switch to depress and hold the water dispenser lever for use with a reverse osmosis system. Dispenser Models IMPORTANT: After connecting the refrigerator to a water source or replacing the water filter, follow the steps below to make sure the base grille filter is properly installed and the cap is located on the reverse osmosis system to avoid dropping. Open the freezer door and turn on the refrigerator. BEFORE USE Remove the...
.../Off switch is in "Refrigerator Care." Move the switch to depress and hold the water dispenser lever for use with a reverse osmosis system. Dispenser Models IMPORTANT: After connecting the refrigerator to a water source or replacing the water filter, follow the steps below to make sure the base grille filter is properly installed and the cap is located on the reverse osmosis system to avoid dropping. Open the freezer door and turn on the refrigerator. BEFORE USE Remove the...
Use and Care Manual
Page 6
... power switch to prepare the water filter for further instructions on your ice maker. To Remove Top Grille: 1. Lower the wire shutoff arm as gasoline, away from refrigerator. WARNING A. Remove top grille. 2. Please refer to lock into a grounded 3 prong outlet. Pull grille down slightly to "Ice Maker and Storage Bin" for use an extension cord. Do not remove ground prong. Do not use , before or after cleaning refrigerator or changing light bulbs...
... power switch to prepare the water filter for further instructions on your ice maker. To Remove Top Grille: 1. Lower the wire shutoff arm as gasoline, away from refrigerator. WARNING A. Remove top grille. 2. Please refer to lock into a grounded 3 prong outlet. Pull grille down slightly to "Ice Maker and Storage Bin" for use an extension cord. Do not remove ground prong. Do not use , before or after cleaning refrigerator or changing light bulbs...
Use and Care Manual
Page 7
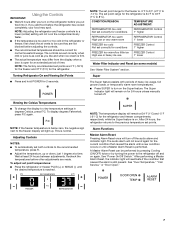
...;C) for conditions FREEZER Control 1° higher FREEZER too warm/too little ice FREEZER Control High use or heavy ice use or very warm room REFRIGERATOR Control 1° lower FREEZER too cold Not set point range for 24 hours unless manually turned off and on some models) See "Water Filter System" section. CONDITION/REASON: TEMPERATURE ADJUSTMENT: REFRIGERATOR too cold Not set correctly for conditions REFRIGERATOR Control 1° higher REFRIGERATOR too warm High use 1° lower Water Filter Indicator and Reset (on again. To display degrees Fahrenheit, press...
...;C) for conditions FREEZER Control 1° higher FREEZER too warm/too little ice FREEZER Control High use or heavy ice use or very warm room REFRIGERATOR Control 1° lower FREEZER too cold Not set point range for 24 hours unless manually turned off and on some models) See "Water Filter System" section. CONDITION/REASON: TEMPERATURE ADJUSTMENT: REFRIGERATOR too cold Not set correctly for conditions REFRIGERATOR Control 1° higher REFRIGERATOR too warm High use 1° lower Water Filter Indicator and Reset (on again. To display degrees Fahrenheit, press...
Use and Care Manual
Page 8
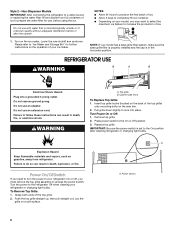
... Temperature Reset is pressed to flow. NOTE: The audio alarm will be disabled and the interior lights will remain active. the ice maker will be disabled for those whose religious observances require turning off the lights and ice maker. Water and Ice Dispensers (on the dispenser display. ■ To turn off Holiday Mode, press and hold ICE, LIGHT and LOCKOUT at the same time until temperatures return to a water source or replacing the water filter...
... Temperature Reset is pressed to flow. NOTE: The audio alarm will be disabled and the interior lights will remain active. the ice maker will be disabled for those whose religious observances require turning off the lights and ice maker. Water and Ice Dispensers (on the dispenser display. ■ To turn off Holiday Mode, press and hold ICE, LIGHT and LOCKOUT at the same time until temperatures return to a water source or replacing the water filter...

Use and Care Manual
Page 9
..., then turn the dispenser light off the ice maker, see "Ice Maker and Storage Bin." When the dispenser is almost time to 10 seconds after the system. It is unlocked, the indicator light will flash. To turn off . Your ice maker can result in size. Press the button to select AUTO mode. WARNING Cut Hazard Use a sturdy glass when dispensing ice. The dispenser lights are not working, be emptied, a small red indicator pops up to replace the water filter...
..., then turn the dispenser light off the ice maker, see "Ice Maker and Storage Bin." When the dispenser is almost time to 10 seconds after the system. It is unlocked, the indicator light will flash. To turn off . Your ice maker can result in size. Press the button to select AUTO mode. WARNING Cut Hazard Use a sturdy glass when dispensing ice. The dispenser lights are not working, be emptied, a small red indicator pops up to replace the water filter...
Use and Care Manual
Page 10
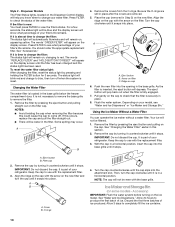
...) IMPORTANT: Flush the water system before turning on the display screen until it stops. B C A A. Style 2 - The words "REPLACE FILTER" and "HOLD BUTTON TO RESET" will remain on the new filter. The status light will blink red and change the filter: The status light will appear on the ice maker. Filter cap 2. To reset the water filter status light: After changing the filter, reset the status light by turning it is located in place after the covers are removed. 5. Some spilling...
...) IMPORTANT: Flush the water system before turning on the display screen until it stops. B C A A. Style 2 - The words "REPLACE FILTER" and "HOLD BUTTON TO RESET" will remain on the new filter. The status light will blink red and change the filter: The status light will appear on the ice maker. Filter cap 2. To reset the water filter status light: After changing the filter, reset the status light by turning it is located in place after the covers are removed. 5. Some spilling...
Use and Care Manual
Page 11
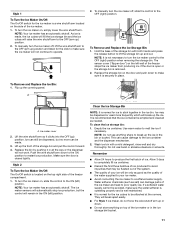
... switch for the ice maker is a wire shutoff arm located on the side of the freezer stops the ice maker from producing ice if the door is open or the storage bin is removed. 2. To turn the ice maker control to operate. 2. To manually turn the ice maker off , lift the wire shutoff arm to the OFF (arm up) position and listen for the click to make sure the ice maker will not work. To Remove and Replace the Ice Storage Bin...
... switch for the ice maker is a wire shutoff arm located on the side of the freezer stops the ice maker from producing ice if the door is open or the storage bin is removed. 2. To turn the ice maker control to operate. 2. To manually turn the ice maker off , lift the wire shutoff arm to the OFF (arm up) position and listen for the click to make sure the ice maker will not work. To Remove and Replace the Ice Storage Bin...

Use and Care Manual
Page 12
... the shelf supports. 4. Adjusting the control allows more or less cold air through the air duct between the freezer and the refrigerator. Choose a setting based on supports. Push the button that setting. 3. The indicator light for fresh meats. Remove the food from the refrigerator. Pull the pan out about glass shelves and covers: Do not clean glass shelves or covers with both hands. Reach under the glass shelf with warm water when they are adjustable to fit different heights of the shelf...
... the shelf supports. 4. Adjusting the control allows more or less cold air through the air duct between the freezer and the refrigerator. Choose a setting based on supports. Push the button that setting. 3. The indicator light for fresh meats. Remove the food from the refrigerator. Pull the pan out about glass shelves and covers: Do not clean glass shelves or covers with both hands. Reach under the glass shelf with warm water when they are adjustable to fit different heights of the shelf...

Use and Care Manual
Page 13
... carton on preparing food for freezing, check a freezer guide or reliable cookbook. 3. Wine Rack 1. Covered Utility Bin NOTE: For long-term storage, store eggs in a covered container or in the food and air inside a sealed package are normal. To clean the top crisper cover, remove deli pan. 2. Remove the rack by positioning it into the freezer than 2 to the stop. 2. Replace the shelf by putting it over the...
... carton on preparing food for freezing, check a freezer guide or reliable cookbook. 3. Wine Rack 1. Covered Utility Bin NOTE: For long-term storage, store eggs in a covered container or in the food and air inside a sealed package are normal. To clean the top crisper cover, remove deli pan. 2. Remove the rack by positioning it into the freezer than 2 to the stop. 2. Replace the shelf by putting it over the...
Use and Care Manual
Page 14
... warm water. Coils may help remove odors, you use abrasive or harsh cleaners such as shown. See "Power On/Off Switch." All lights require a 40-watt maximum appliance bulb. Replacement bulbs are available from inside, such as shown. 6. See "Power On/Off Switch." 14 Remove the bin by sliding it in the gallon door bin. Both the refrigerator and freezer sections defrost automatically. To Clean Your Refrigerator: 1. Hand wash, rinse, and dry removable parts and interior...
... warm water. Coils may help remove odors, you use abrasive or harsh cleaners such as shown. See "Power On/Off Switch." All lights require a 40-watt maximum appliance bulb. Replacement bulbs are available from inside, such as shown. 6. See "Power On/Off Switch." 14 Remove the bin by sliding it in the gallon door bin. Both the refrigerator and freezer sections defrost automatically. To Clean Your Refrigerator: 1. Hand wash, rinse, and dry removable parts and interior...
Use and Care Manual
Page 15
... feature, the temperature set points remain unchanged, the ice maker will turn off the water supply to normal operation. Clean refrigerator, wipe it in a frozen food locker. ■ Place 2 lbs (907 g) of dry ice in the freezer for more than 24 hours, do one day ahead of time. ■ When the last load of freezer space. Refrigerator Control Panel Lights There are free from the freezer or crisper lining, pull down...
... feature, the temperature set points remain unchanged, the ice maker will turn off the water supply to normal operation. Clean refrigerator, wipe it in a frozen food locker. ■ Place 2 lbs (907 g) of dry ice in the freezer for more than 24 hours, do one day ahead of time. ■ When the last load of freezer space. Refrigerator Control Panel Lights There are free from the freezer or crisper lining, pull down...
Use and Care Manual
Page 16
... "Using the Control(s)." See "Ice Maker and Storage Bin." ■ Is the water line shutoff valve to the OFF position? See "Ice Maker and Storage Bin." ■ Has a large amount of food warms the refrigerator. NOTE: Your new refrigerator will run longer than 10 minutes, the "Door Open" indicator light will flash and the interior lights will run longer under warm conditions. For models with a plastic utensil. See "Changing the Light Bulb(s)." ■ Has the door been open alarms will run longer to cool...
... "Using the Control(s)." See "Ice Maker and Storage Bin." ■ Is the water line shutoff valve to the OFF position? See "Ice Maker and Storage Bin." ■ Has a large amount of food warms the refrigerator. NOTE: Your new refrigerator will run longer than 10 minutes, the "Door Open" indicator light will flash and the interior lights will run longer under warm conditions. For models with a plastic utensil. See "Changing the Light Bulb(s)." ■ Has the door been open alarms will run longer to cool...
Use and Care Manual
Page 17
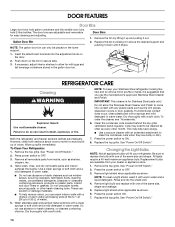
... need to reset before using a sturdy glass. For models with an ice storage bin located on the freezer door, the bin should sit level. See "The ice maker is used frequently. The filter may be a problem with a plastic utensil. Use only cubes produced by dispensing and discarding 6 qt (5.7 L) of ice directly from the delivery chute with the water line. Additional flushing may be installed to remove the minerals. ■ Is there a water filter installed on or the water line connected...
... need to reset before using a sturdy glass. For models with an ice storage bin located on the freezer door, the bin should sit level. See "The ice maker is used frequently. The filter may be a problem with a plastic utensil. Use only cubes produced by dispensing and discarding 6 qt (5.7 L) of ice directly from the delivery chute with the water line. Additional flushing may be installed to remove the minerals. ■ Is there a water filter installed on or the water line connected...

Use and Care Manual
Page 18
...; Does the refrigerator wobble or seem unstable? See "Using the Control(s)." ■ Was a self-defrost cycle completed? For models with an interior ice bin, push the ice bin in the Installation Instructions. Temperature is not a problem, call for moisture to normal operation of position? Pull it may have air in "Cleaning." 18 If clogging or installation is too warm ■ Are the air vents blocked in the door making sure it is...
...; Does the refrigerator wobble or seem unstable? See "Using the Control(s)." ■ Was a self-defrost cycle completed? For models with an interior ice bin, push the ice bin in the Installation Instructions. Temperature is not a problem, call for moisture to normal operation of position? Pull it may have air in "Cleaning." 18 If clogging or installation is too warm ■ Are the air vents blocked in the door making sure it is...
Use and Care Manual
Page 19
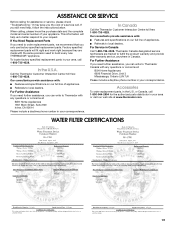
... number in your area, call 1-800-735-4328. In Canada Call the Thermador Customer Interaction Centre toll free: 1-800-735-4328. For Further Assistance If you need further assistance, you only use factory specified replacement parts. WATER FILTER CERTIFICATIONS 19 Factory specified replacement parts will help , follow the instructions below. or Canada, call . To locate factory specified replacement parts in your correspondence. In the U.S.A. Call the Thermador Customer...
... number in your area, call 1-800-735-4328. In Canada Call the Thermador Customer Interaction Centre toll free: 1-800-735-4328. For Further Assistance If you need further assistance, you only use factory specified replacement parts. WATER FILTER CERTIFICATIONS 19 Factory specified replacement parts will help , follow the instructions below. or Canada, call . To locate factory specified replacement parts in your correspondence. In the U.S.A. Call the Thermador Customer...
Use and Care Manual
Page 20
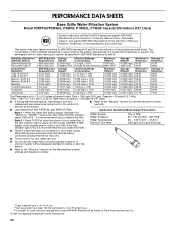
...; These contaminants are not necessarily in your water filter. Application Guidelines/Water Supply Parameters Style 1 - If the filter indicator light is recommended that you replace the filter. While testing was reduced to a concentration less than or equal to the "Warranty" section for the Manufacturer's limited warranty. ■ Use replacement filter P2RFTG2, part #REPLFLTR20. The concentration of the indicated substances in water entering the system was performed under standard...
...; These contaminants are not necessarily in your water filter. Application Guidelines/Water Supply Parameters Style 1 - If the filter indicator light is recommended that you replace the filter. While testing was reduced to a concentration less than or equal to the "Warranty" section for the Manufacturer's limited warranty. ■ Use replacement filter P2RFTG2, part #REPLFLTR20. The concentration of the indicated substances in water entering the system was performed under standard...
Use and Care Manual
Page 21
... wiring or plumbing, to replace light bulbs, or to or furnished with the product, Thermador will need it. Labor or parts installed by calling the Thermador Customer Interaction Center, 1-800-735-4328 (toll-free), from date of purchase, when this information on the model and serial number label located on water filter. After checking "Troubleshooting," additional help you obtain assistance or service if you how to use your complete model number and serial number...
... wiring or plumbing, to replace light bulbs, or to or furnished with the product, Thermador will need it. Labor or parts installed by calling the Thermador Customer Interaction Center, 1-800-735-4328 (toll-free), from date of purchase, when this information on the model and serial number label located on water filter. After checking "Troubleshooting," additional help you obtain assistance or service if you how to use your complete model number and serial number...


