
Installation Manual
Page 4
... to the appliance ..... 31 Aligning the ice-water dispenser 31 Attaching the cover strips 32 Adjusting the door opening angle 33 4 Removing the installation support part 19 7. Checking the installation enclosure 11 2. Attaching the lower bracket 22 11.
... to the appliance ..... 31 Aligning the ice-water dispenser 31 Attaching the cover strips 32 Adjusting the door opening angle 33 4 Removing the installation support part 19 7. Checking the installation enclosure 11 2. Attaching the lower bracket 22 11.

Installation Manual
Page 10
Panel unification part (Metal strip) FPCONNTS10 For connection of the water pipe (without further preliminary work surfaces! Maximum outer diameter of two door panels. Freedom Heater Kit for ...
Panel unification part (Metal strip) FPCONNTS10 For connection of the water pipe (without further preliminary work surfaces! Maximum outer diameter of two door panels. Freedom Heater Kit for ...

Installation Manual
Page 11
... can be used to attach the supplied accessories to the appliance. risk of tipping over while it is complete, otherwise the parts may be connected securely to the installation enclosure walls (see "Installation dimensions". 3. Note: Do not remove transportation safety devices ...an edge protection to the wall. 7. Check the dimensions of the installation enclosure, see section on "Installation dimensions". 5. All cabinet parts in doubt, contact your appliance. Remove transportation protection devices (a) and lift appliance off the pallet - Check the floor. Check that...
... can be used to attach the supplied accessories to the appliance. risk of tipping over while it is complete, otherwise the parts may be connected securely to the installation enclosure walls (see "Installation dimensions". 3. Note: Do not remove transportation safety devices ...an edge protection to the wall. 7. Check the dimensions of the installation enclosure, see section on "Installation dimensions". 5. All cabinet parts in doubt, contact your appliance. Remove transportation protection devices (a) and lift appliance off the pallet - Check the floor. Check that...
Installation Manual
Page 17
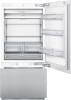
Note: In the case of the fastening sheets (lateral) with the cabinet parts located next to the bolt included in the installation accessories for side-by-side installation. Shorten the fitting strip (a) to the required height to the ... gap. 6. Instructions are special installation steps. If there enough room on the bars of a side-by -Side installation this installation step is not possible. These parts have been removed. 3.
Note: In the case of the fastening sheets (lateral) with the cabinet parts located next to the bolt included in the installation accessories for side-by-side installation. Shorten the fitting strip (a) to the required height to the ... gap. 6. Instructions are special installation steps. If there enough room on the bars of a side-by -Side installation this installation step is not possible. These parts have been removed. 3.

Installation Manual
Page 19
... as precise as an optional accessory, see the section on , the appliance should now be purchased from customer service as possible. Removing the installation support part Unscrew the positioning aid from damage possibly caused to ensure that the gap width is always shorter than the thickness of the door panel. ...
... as precise as an optional accessory, see the section on , the appliance should now be purchased from customer service as possible. Removing the installation support part Unscrew the positioning aid from damage possibly caused to ensure that the gap width is always shorter than the thickness of the door panel. ...
Installation Manual
Page 25
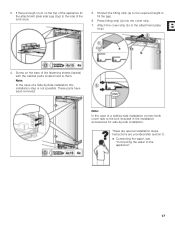
Change over the screw for the ventilation grille to adapt to the modified door hinge is included in the installation materials and accessories. 9. Mount new the ventilation grill. 7. Change over the hinge angle. 8. A replacement part for the lower bracket. 25 Attach the ventilation grille. 6.
Change over the screw for the ventilation grille to adapt to the modified door hinge is included in the installation materials and accessories. 9. Mount new the ventilation grill. 7. Change over the hinge angle. 8. A replacement part for the lower bracket. 25 Attach the ventilation grille. 6.
Installation Manual
Page 26
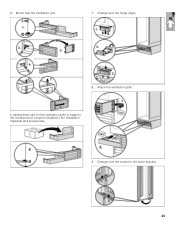
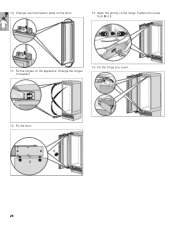
10. Fix the hinge box cover. 12. Fix the door. 26 Tighten the screw from 0 to I. 11. Change the hinges crosswise! 14. Span the spring on the door. 13. Change over the fixation parts on the hinge. Fix the hinges on the appliance.
10. Fix the hinge box cover. 12. Fix the door. 26 Tighten the screw from 0 to I. 11. Change the hinges crosswise! 14. Span the spring on the door. 13. Change over the fixation parts on the hinge. Fix the hinges on the appliance.
Installation Manual
Page 27
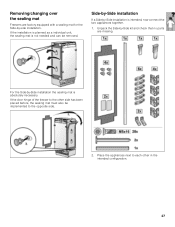
Unpack the Side-by -Side installation the sealing mat is absolutely necessary. For the Side-by -Side kit and check that no parts are factory equipped with a sealing mat for the Side-by -Side installation is intended, now connect the two appliances together. 1. Place the appliances next to ...
Unpack the Side-by -Side installation the sealing mat is absolutely necessary. For the Side-by -Side kit and check that no parts are factory equipped with a sealing mat for the Side-by -Side installation is intended, now connect the two appliances together. 1. Place the appliances next to ...


