

Use and Care Manual
Page 3
... safety 4 Important information when using the appliance ..... 4 Children in the household 4 General regulations 4 Information concerning disposal 5 * Disposal of packaging 5 * Disposal of your old appliance 5 Installing the appliance 5 Transporting 5 Installation location 5 Ventilation 5 Connecting the appliance 5 Water connection 5 Electrical connection 6 Getting to know your appliance 7 2 door model 7 3 door model 8 Controls 9 Switching the appliance on...
... safety 4 Important information when using the appliance ..... 4 Children in the household 4 General regulations 4 Information concerning disposal 5 * Disposal of packaging 5 * Disposal of your old appliance 5 Installing the appliance 5 Transporting 5 Installation location 5 Ventilation 5 Connecting the appliance 5 Water connection 5 Electrical connection 6 Getting to know your appliance 7 2 door model 7 3 door model 8 Controls 9 Switching the appliance on...
Use and Care Manual
Page 4
... cans) or explosive substances in the home and the home environment. Risk of explosion! ■ Do not stand on how to install, use in the appliance. This appliance is the personal responsibility and duty of the customer to have limited physical, sensory or mental ...it is intended for the appliance. ■ People (children incl.) who have this socket replaced with the instructions and warnings. Improper installations and repairs may put frozen food straight from the freezer compartment into your mouth. The manufacturer guarantees that minor or moderately severe injury ...
... cans) or explosive substances in the home and the home environment. Risk of explosion! ■ Do not stand on how to install, use in the appliance. This appliance is the personal responsibility and duty of the customer to have limited physical, sensory or mental ...it is intended for the appliance. ■ People (children incl.) who have this socket replaced with the instructions and warnings. Improper installations and repairs may put frozen food straight from the freezer compartment into your mouth. The manufacturer guarantees that minor or moderately severe injury ...
Use and Care Manual
Page 5
... 1. During transportation the oil in the base. For connection to the local regulations of the appropriate water supply company. When installing the water connection, pay attention to direct sunlight and not placed near a heat source, e.g. Information concerning disposal * Disposal... of packaging The packaging protects your appliance from damage during transportation and installation. The installation location should be secured during transit. A cold water connection is ventilated only via the ventilation grille in the ...
... 1. During transportation the oil in the base. For connection to the local regulations of the appropriate water supply company. When installing the water connection, pay attention to direct sunlight and not placed near a heat source, e.g. Information concerning disposal * Disposal... of packaging The packaging protects your appliance from damage during transportation and installation. The installation location should be secured during transit. A cold water connection is ventilated only via the ventilation grille in the ...
Use and Care Manual
Page 6
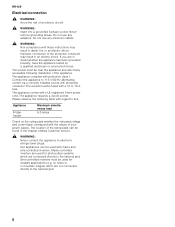
...or in mountain lodges) which are in an electric shock. Connect the appliance to electronic energy saver plugs. Please observe the following installation of the protective conductor may result in the chapter entitled Customer service. , WARNING: Never connect the appliance to 115 V/60 Hz... alternating current via a correctly installed socket with mains and sine-controlled inverters. Mains-controlled inverters are not connected directly to 16 A fuse. on the rating plate ...
...or in mountain lodges) which are in an electric shock. Connect the appliance to electronic energy saver plugs. Please observe the following installation of the protective conductor may result in the chapter entitled Customer service. , WARNING: Never connect the appliance to 115 V/60 Hz... alternating current via a correctly installed socket with mains and sine-controlled inverters. Mains-controlled inverters are not connected directly to 16 A fuse. on the rating plate ...

Use and Care Manual
Page 15
... without a water filter. Note: After use the appliance in the household rubbish. Take a new filter cartridge from customer service or a specialist dealer. , CAUTION: ■ After installing a new filter, always discard the ice produced within the first 24 hours after filtering. The filter cartridge can be changed at least every 6 months. In...
... without a water filter. Note: After use the appliance in the household rubbish. Take a new filter cartridge from customer service or a specialist dealer. , CAUTION: ■ After installing a new filter, always discard the ice produced within the first 24 hours after filtering. The filter cartridge can be changed at least every 6 months. In...

Use and Care Manual
Page 18
... customer service or authorized technicians only. Preventing noises The appliance is flowing through the tubing. These lights may be installed in direct sunlight or near a heat source (e.g. Tips for saving energy ■ Install the appliance in the refrigerator. radiator, cooker). Bottles or receptacles are touching each other. 18 If required, use an...
... customer service or authorized technicians only. Preventing noises The appliance is flowing through the tubing. These lights may be installed in direct sunlight or near a heat source (e.g. Tips for saving energy ■ Install the appliance in the refrigerator. radiator, cooker). Bottles or receptacles are touching each other. 18 If required, use an...
Use and Care Manual
Page 20
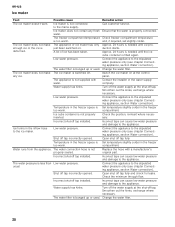
... taps can cause low water pressure and damage to the appliance. Ice forms in the freezer too warm. Incorrect shut-off tap installed. Change the water filter. 20 Approx. 24 hours is not properly inserted. Connect the appliance to the stipulated water pressure only ... Temperature in the freezer space is switched off. Check the position, re-insert where necessary. Incorrect shut-off tap installed. Open shut off tap installed. Temperature in the freezer too warm. The water connection hose is Set temperature slightly colder in the freezer space is ...
... taps can cause low water pressure and damage to the appliance. Ice forms in the freezer too warm. Incorrect shut-off tap installed. Change the water filter. 20 Approx. 24 hours is not properly inserted. Connect the appliance to the stipulated water pressure only ... Temperature in the freezer space is switched off. Check the position, re-insert where necessary. Incorrect shut-off tap installed. Open shut off tap installed. Temperature in the freezer too warm. The water connection hose is Set temperature slightly colder in the freezer space is ...

Use and Care Manual
Page 22
... as well as for transportation to the nearest authorized customer service, but you should contact an authorized Thermador customer service center in your vicinity. installation in or around the product; IN SOME COUNTRIES THE EXCLUSION OR THE RESTRICTION OF INCIDENTAL OR CONSEQUENTIAL ... of electrical, sanitary or building regulations, provisions or laws of the state, country, region, city or district, including installation of stainless steel parts: Thermador will repair or replace all liable for environmental damage, e.g. Any attempt to change, modify or extend this warranty requires ...
... as well as for transportation to the nearest authorized customer service, but you should contact an authorized Thermador customer service center in your vicinity. installation in or around the product; IN SOME COUNTRIES THE EXCLUSION OR THE RESTRICTION OF INCIDENTAL OR CONSEQUENTIAL ... of electrical, sanitary or building regulations, provisions or laws of the state, country, region, city or district, including installation of stainless steel parts: Thermador will repair or replace all liable for environmental damage, e.g. Any attempt to change, modify or extend this warranty requires ...

Installation Manual
Page 4
... an edge protection 15 4. Removing the packaging 11 3. Transport of the installation enclosure ...... 20 4. Installation preparation 13 5. Attaching an alternative anti-tip-device 15 3. Aligning the appliance in the installation enclosure 19 2. Attaching the appliance to the top of the kitchen ..... 6 Installation 7 Installation room 7 Stable installation 7 Installation enclosure 7 Furniture 7 Floor 7 Aligning the appliance 7 Connecting the power 8 Grounding...
... an edge protection 15 4. Removing the packaging 11 3. Transport of the installation enclosure ...... 20 4. Installation preparation 13 5. Attaching an alternative anti-tip-device 15 3. Aligning the appliance in the installation enclosure 19 2. Attaching the appliance to the top of the kitchen ..... 6 Installation 7 Installation room 7 Stable installation 7 Installation enclosure 7 Furniture 7 Floor 7 Aligning the appliance 7 Connecting the power 8 Grounding...
Installation Manual
Page 5
... this warning. Note to Consumer - Be sure to something in accordance with the National Electric Code, ANSI/NFPA70 - Note to Installer - Immediately repair or replace electric service cords that minor or moderate injuries or damage may occur as a result of not observing ...and/or local codes. In Canada, in accordance with your Owner's Manual for future reference. TWO PEOPLE ARE REQUIRED FOR PROPER INSTALLATION. Keep these instructions with the Canadian Electric Code C22.1 - Important Safety Instructions , WARNING These appliances are intended for use . Unplug ...
... this warning. Note to Consumer - Be sure to something in accordance with the National Electric Code, ANSI/NFPA70 - Note to Installer - Immediately repair or replace electric service cords that minor or moderate injuries or damage may occur as a result of not observing ...and/or local codes. In Canada, in accordance with your Owner's Manual for future reference. TWO PEOPLE ARE REQUIRED FOR PROPER INSTALLATION. Keep these instructions with the Canadian Electric Code C22.1 - Important Safety Instructions , WARNING These appliances are intended for use . Unplug ...
Installation Manual
Page 6
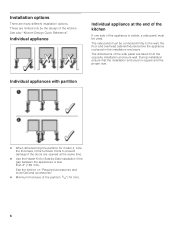
... overhead cabinet/fixtures before the appliance is less than 6" (160 mm). Installation options There are limited only by -Side installation if the gap between the appliances is placed in the installation enclosure. The side panel must be connected firmly to prevent damage if the... doors are taken from the opposite installation enclosure wall. The dimensions of the partition 5/8" (16 mm). 6 These are many different installation options. Individual appliances with ...
... overhead cabinet/fixtures before the appliance is less than 6" (160 mm). Installation options There are limited only by -Side installation if the gap between the appliances is placed in the installation enclosure. The side panel must be connected firmly to prevent damage if the... doors are taken from the opposite installation enclosure wall. The dimensions of the partition 5/8" (16 mm). 6 These are many different installation options. Individual appliances with ...
Installation Manual
Page 7
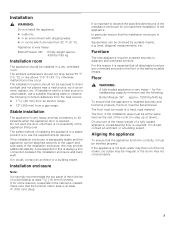
... (30 mm) from an electric range, 12" (300 mm) from a gas range. If the appliance is not level, water may occur. The installation location should not drop below 55 °F (13 °C) or rise above 110 °F (43 °C), otherwise malfunctions may flow out of a fully loaded ...! Floor , WARNING: A fully-loaded appliance is opened. The floor in rooms which are connected securely to observe the specified dimensions of the installation enclosure for this is square. If in doubt, contact an architect or a building expert. It is important to the floor or the wall ...
... (30 mm) from an electric range, 12" (300 mm) from a gas range. If the appliance is not level, water may occur. The installation location should not drop below 55 °F (13 °C) or rise above 110 °F (43 °C), otherwise malfunctions may flow out of a fully loaded ...! Floor , WARNING: A fully-loaded appliance is opened. The floor in rooms which are connected securely to observe the specified dimensions of the installation enclosure for this is square. If in doubt, contact an architect or a building expert. It is important to the floor or the wall ...

Installation Manual
Page 8
... to drinking water! Additional grounding procedure Some local regulations may result in another easily accessible location. The water pressure must be installed by a licensed electrician only. Failure to follow these instructions can be purchased seperately. In the event of a malfunction or... requires a 3-wire receptacle. Appliance BottomFreezer 36" Maximal load at the side on the right (a), at one time 6.0 Ampere For the installation position of the water pipe (without fittings): 3/8" (9.5 mm). 8 In such cases, the required ground wire, clamp and screw are in...
... to drinking water! Additional grounding procedure Some local regulations may result in another easily accessible location. The water pressure must be installed by a licensed electrician only. Failure to follow these instructions can be purchased seperately. In the event of a malfunction or... requires a 3-wire receptacle. Appliance BottomFreezer 36" Maximal load at the side on the right (a), at one time 6.0 Ampere For the installation position of the water pipe (without fittings): 3/8" (9.5 mm). 8 In such cases, the required ground wire, clamp and screw are in...

Installation Manual
Page 9
... the water-box be placed adjacent to be accessed for installation of the power connection C Opening depth of enclosure, depending on kitchen design C = 24" (610 mm) minimum 9 B Area for service without uninstalling the appliance. Installation dimensions IMPORTANT ! If this is strongly recommended the top ...panel of solid material at least 4" (100 mm) deep. IMPORTANT ! The furniture return area has to the installation enclosure, so that it can be at least 5/8" (16 mm) thickness. It is not possible, place the recessed water box within the ...
... the water-box be placed adjacent to be accessed for installation of the power connection C Opening depth of enclosure, depending on kitchen design C = 24" (610 mm) minimum 9 B Area for service without uninstalling the appliance. Installation dimensions IMPORTANT ! If this is strongly recommended the top ...panel of solid material at least 4" (100 mm) deep. IMPORTANT ! The furniture return area has to the installation enclosure, so that it can be at least 5/8" (16 mm) thickness. It is not possible, place the recessed water box within the ...
Installation Manual
Page 10
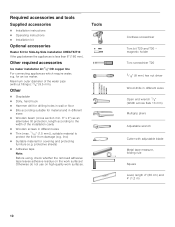
...; Wooden beam (cross section min. 3" x 4") as an alternative tilt protection, length according to Suitable material for Side-by-Side installation XHEATKIT10 If the gap between the appliances is less than 6" (160 mm). protect the 1fl/o1o6r" (1.5 mm)), suitable material from damage (e.g. ...Otherwise do not use on the work surfaces. Maximum outer diameter of the installation cavity Wooden screws in wall or floor Bits according suitable for an ice maker. for material and in different sizes...
...; Wooden beam (cross section min. 3" x 4") as an alternative tilt protection, length according to Suitable material for Side-by-Side installation XHEATKIT10 If the gap between the appliances is less than 6" (160 mm). protect the 1fl/o1o6r" (1.5 mm)), suitable material from damage (e.g. ...Otherwise do not use on the work surfaces. Maximum outer diameter of the installation cavity Wooden screws in wall or floor Bits according suitable for an ice maker. for material and in different sizes...
Installation Manual
Page 11
... angle). 2. See section on "Connecting the power" and in transit. See section on "Connecting the water" and in doubt, contact your appliance. Check that the installation enclosure is very heavy! 11 Remove accessories from the underside of the adjacent cabinet/fixtures. Check the floor. To avoid floor damage: 1. appliance is square...
... angle). 2. See section on "Connecting the power" and in transit. See section on "Connecting the water" and in doubt, contact your appliance. Check that the installation enclosure is very heavy! 11 Remove accessories from the underside of the adjacent cabinet/fixtures. Check the floor. To avoid floor damage: 1. appliance is square...
Installation Manual
Page 12
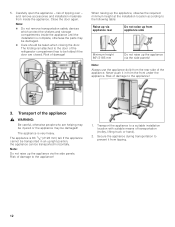
5. When raising up the appliance, observe the required minimum height at the installation location according to a suitable installation location with suitable means of the appliance. Note: Always use the appliance dolly from the front under the ...Secure the appliance during transportation to the appliance! 3. Never push it from inside the appliance until the installation is very heavy. Transport of tipping over - and remove accessories and installation materials from tipping. 12 Note: Do not remove transportation safety devices which protect the shelves...
5. When raising up the appliance, observe the required minimum height at the installation location according to a suitable installation location with suitable means of the appliance. Note: Always use the appliance dolly from the front under the ...Secure the appliance during transportation to the appliance! 3. Never push it from inside the appliance until the installation is very heavy. Transport of tipping over - and remove accessories and installation materials from tipping. 12 Note: Do not remove transportation safety devices which protect the shelves...
Installation Manual
Page 13
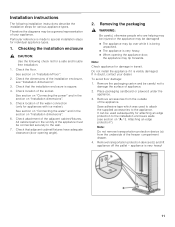
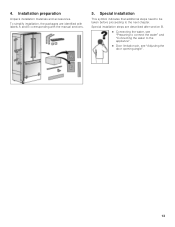
Special installation This symbol indicates that additional steps need to be taken before proceeding to the appliance". Door limitation pin, see "Adjusting the door opening angle". 13 Special installation steps are identified with labels A and B corresponding with the manual sections. 5. Installation preparation Unpack installation materials and accessories. 4. To simplify installation, the packages are described after section B. Connecting the water, see "Preparing to connect the water" and "Connecting the water to the next chapter.
Special installation This symbol indicates that additional steps need to be taken before proceeding to the appliance". Door limitation pin, see "Adjusting the door opening angle". 13 Special installation steps are identified with labels A and B corresponding with the manual sections. 5. Installation preparation Unpack installation materials and accessories. 4. To simplify installation, the packages are described after section B. Connecting the water, see "Preparing to connect the water" and "Connecting the water to the next chapter.

Installation Manual
Page 14
... length cannot be observed for various applications. Specify the attachment points of 21/8" (54 mm) over the appliance to the section on "Installation dimensions". 2. a sufficiently dimensioned wood board. Be sure screws hold tight. Important notes for fastening with dowels. The anti-tip-brackets (a)... use in light-weight masonry material such as cinder block. Always wear safety glasses and other necessary protective devices or apparel when installing or working with dowels and screws: Not recommended for use in new concrete which the screws could penetrate. , CAUTION: Risk...
... length cannot be observed for various applications. Specify the attachment points of 21/8" (54 mm) over the appliance to the section on "Installation dimensions". 2. a sufficiently dimensioned wood board. Be sure screws hold tight. Important notes for fastening with dowels. The anti-tip-brackets (a)... use in light-weight masonry material such as cinder block. Always wear safety glasses and other necessary protective devices or apparel when installing or working with dowels and screws: Not recommended for use in new concrete which the screws could penetrate. , CAUTION: Risk...

Installation Manual
Page 15
...is no play between the appliance and the anti-tip-device. Depending to the subsurface: Locate wall studs in the rear of the installation enclosure, it is deeper than the appliance, select a beam which has a larger cross section or attach 2 beams. The... beam thickness, diameter #12 or #14. If possible, always screw the wooden beam to attach edge protection made of the installation enclosure. 3. Note: If the installation enclosure is recommended to existing studs on the rear panel of a suitable material. 2. Attaching an alternative anti-tipdevice Important note:...
...is no play between the appliance and the anti-tip-device. Depending to the subsurface: Locate wall studs in the rear of the installation enclosure, it is deeper than the appliance, select a beam which has a larger cross section or attach 2 beams. The... beam thickness, diameter #12 or #14. If possible, always screw the wooden beam to attach edge protection made of the installation enclosure. 3. Note: If the installation enclosure is recommended to existing studs on the rear panel of a suitable material. 2. Attaching an alternative anti-tipdevice Important note:...
