Thermador T36IB70NSP Support Question
Thermador T36IB70NSP Support Question
Find answers below for this question about Thermador T36IB70NSP.Need a Thermador T36IB70NSP manual? We have 3 online manuals for this item!
Question posted by nbrubenstein on May 12th, 2012
How To Install Finger Guard On Refrigerator Door
how to install finger guard on refrigerator door
Current Answers
Related Thermador T36IB70NSP Manual Pages
Design Guide - Freedom Refrigeration - Page 11

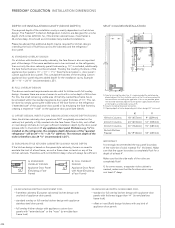
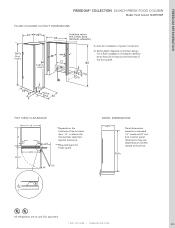
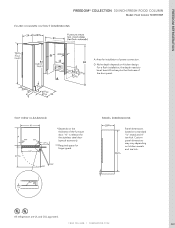
... sealed refrigeration system; The base must be 5/8" (16 mm). For this reason it stops children and pets from inserting limbs unnoticed into the crack between the door and the appliance and from an oil or solid-fuel cooker. FINGER GUARd The finger guard is required.
in doubt, contact an architect or a building expert. The installation...
Design Guide - Freedom Refrigeration - Page 14
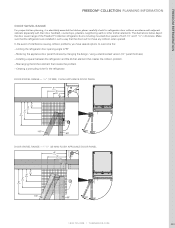
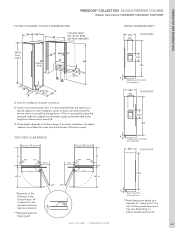
... handles!), countertops, pilasters, neighboring walls or other kitchen elements. Make sure that the refrigerators are installed in thickness. Limiting the refrigerator door opening angle to overcome this: - FREEdOM REFRIGERATION
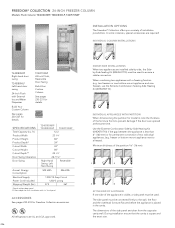
FREEdOM® COLLECTION PLANNING INFORMATION
dOOR SWIVEL RANGE
For proper kitchen planning, it is absolutely essential the kitchen planer carefully check for the...
Design Guide - Freedom Refrigeration - Page 15
....
- However there are to emulate face frame look of flush fascia across the cabinetry and the refrigerator door panel. Therefore a 24-inch (610mm) deep niche will be 24"+ 3/4" = 24 3/4" (629mm). B: Area for the installation cavity. If, for kitchen designs intending the look )
- standard overlay or full overlay kitchen design with any appliance...
Design Guide - Freedom Refrigeration - Page 16
... with frameless cabinetry (3/4" front panel)
Upper Valance
Room Wall Room Floor
Kitchen Cabinet
Installation Cavity
Kitchen Cabinetry Door Panel
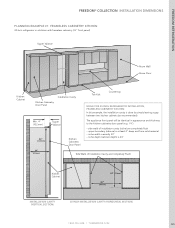
Min. 4" (102 mm)
Upper Valance
Kitchen Cabinetry Door Panel
Toe Kick
Countertop
NICHE FOR 30-INCH REFRIGERATOR INSTALLATION, FRAMELESS CABINETRY KITCHEN: In this example, the installation cavity is at least 4" deep and from solid material -
Design Guide - Freedom Refrigeration - Page 24

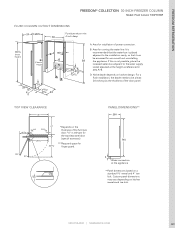
... is exceeded, this finger guard with a freezing function (e.g. There are installed separately (any configuration), this special accessory is required.
Extreme Combination Heating Kit
1.800.735.4328 | THERMADOR.COM
233 HANDLES
FREEHNDL10 PROFESSIONAL Coordinates with the entire family of the refrigerator door are safe.
FPCONNTS10 SINGLE DOOR MODEL FRONT PANEL CONNECTION...
Design Guide - Freedom Refrigeration - Page 26
... REFRIGERATION
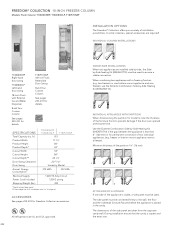
FREEDOM® COLLECTION 24-INCH FRESH FOOD COLUMN
Model: Flush Column T24IR70NSP
FLUSH COLUMN CUTOUT DIMENSIONS
(Panel Height)
(Cabinet Height)
A: Area for finger guard. Custom panel dimensions may vary depending on the thickness of the furniture door. 3/4" is relevant for the stainless steel door (special accessory).
***Required space for installation of the door...
Design Guide - Freedom Refrigeration - Page 30
... toe kick.
All refrigerators are UL and CUL approved.
1.800.735.4328 | THERMADOR.COM
239 D: Niche depth depends on a standard 1/8" reveal and 4" toe kick. Custom panel dimensions may vary depending on the thickness of the furniture door. 3/4" is relevant for the stainless steel door (special accessory).
***Required space for installation of the door panel. For...
Design Guide - Freedom Refrigeration - Page 33
...* Cutout Width Cutout Height Cutout Depth** Door Swing Clearance Door Swing
T18ID80NRP T18ID80NLP
T18IF70NSP
8.5
17 3/4"
84"
24"
18"
84"
24 3/4"
20 21/32"
Varies by -side, the Sideby-Side Sealing Kit (BSEALKIT10) must be used . All refrigerators are UL and CUL approved. 242
SIDE-by-SIDE INSTALLATIONS
When two appliances are opened at the...
Design Guide - Freedom Refrigeration - Page 34
... flush sidewalls)
PANEL DIMENSIONS**
173⁄4 91⁄16
T18ID80NRP
(Panel Height)
(Cabinet Height)
A: Area for installation of the furniture door. 3⁄4" is relevant for the stainless steel door (special accessory).
***Required space for finger guard.
797⁄8
4
Water connection at the appliance
**Panel dimensions based on a standard 1⁄8" reveal and 4" toe...
Design Guide - Freedom Refrigeration - Page 37
...;rmly to a freezer). The dimensions of the furniture fronts to prevent damage if the doors are installed side-by -Side Heating Kit (XHEATKIT10) if the gap between the appliance is visible,...The side panel must be used to ensure a stable connection. Minimum thickness of installation possibilities. All refrigerators are UL and CUL approved. 246
SIDE-by -Side Heating Kit (XHEATKIT10). FREEDOM...
Design Guide - Freedom Refrigeration - Page 38
...ush installation, the depth needs to be accessed for finger guard.
797⁄8
4
Water connection at the appliance
**Panel dimensions based on the thickness of the furniture door....panel dimensions may vary depending on kitchen design.
B: Area for installation of the door panel. FREEDOM REFRIGERATION
FLUSH COLUMN CUTOUT DIMENSIONS
FREEDOM® COLLECTION 24-INCH FREEZER COLUMN...
Design Guide - Freedom Refrigeration - Page 40
... space for finger guard. FREEDOM REFRIGERATION
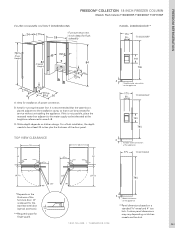
FREEDOM® COLLECTION 30-INCH FREEZER COLUMN
Model: Flush Column T30IF70NSP
FLUSH COLUMN CUTOUT DIMENSIONS
Furniture return min. 4 inch deep
(Panel Height)
(Cabinet Height)
A: Area for installation of the door panel. Custom panel dimensions may vary depending on the thickness of the furniture door. 3⁄4" is not possible...
Design Guide - Freedom Refrigeration - Page 42
... for service without uninstalling the appliance. FREEDOM REFRIGERATION
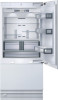
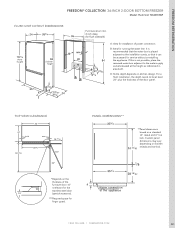
FREEDOM® COLLECTION 36-INCH 2-DOOR BOTTOM FREEZER
Model: Flush Unit T36IB70NSP
FLUSH UNIT CUTOUT DIMENSIONS
(Panel Height)
(Cabinet Height)
Furniture return min. 4 inch deep (for flush sidewalls)
A: Area for installation of the door panel. For a flush installation, the depth needs to the water supply...
Design Guide - Freedom Refrigeration - Page 44
... recessed water-box adjacent to be accessed for installation of the furniture door. 3⁄4" is placed adjacent to the installation cavity, so that it can be at the height as referenced in area A+B. D: Niche depth depends on kitchen design.
FREEDOM REFRIGERATION
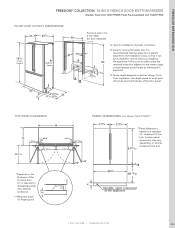
FREEDOM® COLLECTION 36-INCH FRENCH DOOR BOTTOM FREEZER
Models: Flush Unit T36IT71NNP, Flush...
Design Guide - Freedom Refrigeration - Page 46
... this dimension.
1.800.735.4328 | THERMADOR.COM
255 B: Area for installation of power connection. TOP VIEW CLEARANCE
*Required space for finger guard. **Door handle must be accessed for service without uninstalling the appliance.
FREEDOM REFRIGERATION
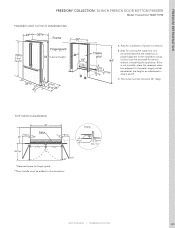
FREEDOM® COLLECTION 36-INCH FRENCH DOOR BOTTOM FREEZER
Model: Framed Unit T36BT71FSE
FRAMED UNIT CUTOUT DIMENSIONS
(Panel...
Installation Instructions - Page 3

... 32 28. Attaching the lower bracket 30 25. Adjusting the door opening angle 33 29. Attaching and aligning the furniture door (freezer compartment 28 23. Attaching the finger guard 30 26. 20. Changing the door spring 33
3 Attaching the furniture door (freezer compartment 29 24. Attaching the furniture door (refrigerator compartment 26 21. Attaching the adjusting rail (freezer...
Installation Instructions - Page 5

... are opened at the same time.
-
i Note
- Minimum thickness of the finger guard. SideĆby ĆSide Heating kit XHEATKIT10"
a) If the gap between the appliances is visible, a side panel must be used to prevent damage if the doors are installed SideĆbyĆSide,
the Basic Combination SideĆby Ć...
Installation Instructions - Page 30

...
i The number of lower brackets depends on the adjusting rail.
Tighten the screw. 5. Attaching the finger guard
q Screw on the brackets. Screw in the furniture door! q Clamp the finger guard under the brackets (2.).
30 The lower bracket fixes the side position of the door. 3. Put the cover on the lower brackets. Loosen the screw. 2. q Insert the...
Installation Instructions - Page 31

q Put the vertical cover strip on which the finger guard has been attached.
Attaching the covers
q Place the cover strips on the handle side of the cover strip is shorter on the
side on the finger guard. i The side piece of the door. q Attach the light switch cover.
31
q Push the cap onto the bracket and screw tightly.
26.
User Manual - Page 28

... to or furnished with the product, Thermador will pay for replacement parts to correct defects in remote areas.
10. Service calls to correct the installation of your refrigerator, to instruct you . Any labor costs during the full warranty period, unless approved by Thermador or Thermador Canada.
5. Service must provide proof of purchase...
Similar Questions

Custom Wood Door Panel Sizes
what is the size of the wood door panels need to be on T36IT800NP?
what is the size of the wood door panels need to be on T36IT800NP?
(Posted by stevehelms99 7 years ago)

I Need The Part Numbers For The Refrigerator Doors Please
(Posted by aerikson 8 years ago)


Any Problems With This Refrigerator?
Any problems with this refrigerator?
Any problems with this refrigerator?
(Posted by diannebrob 10 years ago)

Replace Door Gasket
Where best to buy replacement door gasket for thermador T36IT71FNS And how best to replace them (ste...
Where best to buy replacement door gasket for thermador T36IT71FNS And how best to replace them (ste...
(Posted by Rendam2000 10 years ago)