
Installation Manual
Page 4
... toe kick panel 18 2. Attaching the door panel 21 10. Adjusting the door spring 23 Special installation 24 Changing over the door hinges 24 Removing/changing over the sealing mat 27 Side-by -Side 6 Individual appliances with partition 6 Individual appliance at the end of the kitchen ..... 6 Installation 7 Installation room 7 Stable installation 7 Installation enclosure 7 Furniture 7 Floor 7 Aligning the appliance 7 Connecting the power 8 Grounding instruction 8 Additional grounding procedure 8 Connecting the water 8 Installation dimensions 9 Required accessories...
... toe kick panel 18 2. Attaching the door panel 21 10. Adjusting the door spring 23 Special installation 24 Changing over the door hinges 24 Removing/changing over the sealing mat 27 Side-by -Side 6 Individual appliances with partition 6 Individual appliance at the end of the kitchen ..... 6 Installation 7 Installation room 7 Stable installation 7 Installation enclosure 7 Furniture 7 Floor 7 Aligning the appliance 7 Connecting the power 8 Grounding instruction 8 Additional grounding procedure 8 Connecting the water 8 Installation dimensions 9 Required accessories...
Installation Manual
Page 5
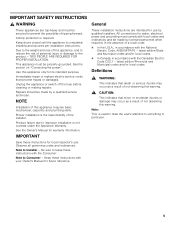
... Appliance Warranty. This appliance must be made by qualified installers. IMPORTANT Save these instructions for local inspector's use by a qualified service technician. latest edition/Provincial and Municipal codes and/or local codes. TWO PEOPLE ARE REQUIRED FOR PROPER INSTALLATION. Unplug the appliance or switch off the fuse before cleaning or making repairs. Product failure due to the product - Keep these instructions with your Owner's Manual...
... Appliance Warranty. This appliance must be made by qualified installers. IMPORTANT Save these instructions for local inspector's use by a qualified service technician. latest edition/Provincial and Municipal codes and/or local codes. TWO PEOPLE ARE REQUIRED FOR PROPER INSTALLATION. Unplug the appliance or switch off the fuse before cleaning or making repairs. Product failure due to the product - Keep these instructions with your Owner's Manual...

Installation Manual
Page 7
..., a load-bearing floor is not level, water may not close properly. 7 On account of the heavy weight of the ice maker, ice cubes may be at the same level as an oven, radiator, etc. If the appliance is required. The installation location should not be flat and level. Stable installation The appliance is unavoidable, use the supplied anti-tip devices. If in...
..., a load-bearing floor is not level, water may not close properly. 7 On account of the heavy weight of the ice maker, ice cubes may be at the same level as an oven, radiator, etc. If the appliance is required. The installation location should not be flat and level. Stable installation The appliance is unavoidable, use the supplied anti-tip devices. If in...

Installation Manual
Page 8
... easily accessible location. A separate shut-off valve directly next to follow these instructions can be purchased seperately. Connecting the power , WARNING: Electrical Shock Hazard Plug into a grounded 3 prong outlet. Do not remove ground prong. Do not use an adapter. Do not use a self-piercing valve! The receptacle must be installed for the water connection must be installed by a licensed electrician only. IceMaker) Freezer 24...
... easily accessible location. A separate shut-off valve directly next to follow these instructions can be purchased seperately. Connecting the power , WARNING: Electrical Shock Hazard Plug into a grounded 3 prong outlet. Do not remove ground prong. Do not use an adapter. Do not use a self-piercing valve! The receptacle must be installed for the water connection must be installed by a licensed electrician only. IceMaker) Freezer 24...

Installation Manual
Page 10
Panel unification part (Metal strip) FPCONNTS10 For connection of two individual appliances, e.g. Other required accessories Ice maker installation kit 1/4" OD copper line For connecting appliances which require water, e.g. for covering and protecting furniture (e.g. protective sheets) Adhesive tape Note: Before using, check whether the removed adhesive tape leaves adhesive residue on high-quality work surfaces! Tools 10 Cordless screwdriver Torx bit T20 + magnetic holder Torx screwdriver...
Panel unification part (Metal strip) FPCONNTS10 For connection of two individual appliances, e.g. Other required accessories Ice maker installation kit 1/4" OD copper line For connecting appliances which require water, e.g. for covering and protecting furniture (e.g. protective sheets) Adhesive tape Note: Before using, check whether the removed adhesive tape leaves adhesive residue on high-quality work surfaces! Tools 10 Cordless screwdriver Torx bit T20 + magnetic holder Torx screwdriver...

Installation Manual
Page 11
... diagrams may be damaged! The appliance may be a general representation of the water connection (only for damage in doubt, contact your appliance. Note: Do not remove transportation safety devices which was used subsequently for individual appliance types. 1. Checking the installation enclosure , CAUTION: Use the following installation instructions describe the installation steps for various appliance types: Refrigerator units Freezer units Freezer units with ice maker...
... diagrams may be damaged! The appliance may be a general representation of the water connection (only for damage in doubt, contact your appliance. Note: Do not remove transportation safety devices which was used subsequently for individual appliance types. 1. Checking the installation enclosure , CAUTION: Use the following installation instructions describe the installation steps for various appliance types: Refrigerator units Freezer units Freezer units with ice maker...

Installation Manual
Page 12
Installation preparation Unpack installation materials and accessories. Special installation steps are described after section C. Change over door hinge, see "Changing over the door hinges". Sealing mat, see "Removing/ changing over the sealing mat" Side-by-Side installation, see "Sideby-Side installation". Connecting the water, see "Adjusting the door opening angle". 1. Secure the appliance during transportation to the appliance". Ice-water dispenser, see "Aligning the ice-water dispenser". Cover strips for...
Installation preparation Unpack installation materials and accessories. Special installation steps are described after section C. Change over door hinge, see "Changing over the door hinges". Sealing mat, see "Removing/ changing over the sealing mat" Side-by-Side installation, see "Sideby-Side installation". Connecting the water, see "Adjusting the door opening angle". 1. Secure the appliance during transportation to the appliance". Ice-water dispenser, see "Aligning the ice-water dispenser". Cover strips for...
Installation Manual
Page 14
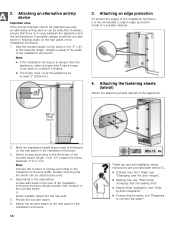
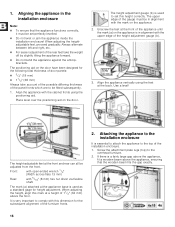
...; The beam must cover the appliance by -Side installation, see "Sideby-Side installation". Connecting the water, see "Removing/ changing over the door hinges". Sealing mat, see "Preparing to attach edge protection made of the installation enclosure. 1. Select screws according to the thickness of the installation enclosure and accordingly transfer their location to the rear panel of the installation enclosure, it is no...
...; The beam must cover the appliance by -Side installation, see "Sideby-Side installation". Connecting the water, see "Removing/ changing over the door hinges". Sealing mat, see "Preparing to attach edge protection made of the installation enclosure. 1. Select screws according to the thickness of the installation enclosure and accordingly transfer their location to the rear panel of the installation enclosure, it is no...
Installation Manual
Page 15
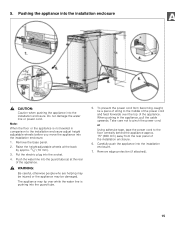
... water line is not leveled in the appliance, pull the cable upwards. Remove edge protection (if attached). 15 Do not damage the water line or power cord. Carefully push the appliance into the installation enclosure. Pushing the appliance into the installation enclosure , CAUTION: Caution when pushing the appliance into the installation enclosure. 7. Put the electric plug into the guard tube. 5. Push the water line into the installation...
... water line is not leveled in the appliance, pull the cable upwards. Remove edge protection (if attached). 15 Do not damage the water line or power cord. Carefully push the appliance into the installation enclosure. Pushing the appliance into the installation enclosure , CAUTION: Caution when pushing the appliance into the installation enclosure. 7. Put the electric plug into the guard tube. 5. Push the water line into the installation...
Installation Manual
Page 16
.... Place level over the positioning aid on the door have been designed for height adjustment. Front: with open-ended wrench 1/2" (Width across flats 13 mm) Rear: with the cabinet fronts using the feet at the front of the appliance until the mark (a) on the appliance is used to set perfectly levelled. Do not twist or jam the appliance inside the installation enclosure...
.... Place level over the positioning aid on the door have been designed for height adjustment. Front: with open-ended wrench 1/2" (Width across flats 13 mm) Rear: with the cabinet fronts using the feet at the front of the appliance until the mark (a) on the appliance is used to set perfectly levelled. Do not twist or jam the appliance inside the installation enclosure...

Installation Manual
Page 19
... attached instead of damage caused by leaking water from damage possibly caused to load the door storage compartments in the separate installation instructions for carrying out this accessory. 5. Preparing the door panels Important note: When performing any work step can be found in the appliance with a water connection: In order to shut off valve closed. 4. 3. Press the POWER button again to avoid the risk...
... attached instead of damage caused by leaking water from damage possibly caused to load the door storage compartments in the separate installation instructions for carrying out this accessory. 5. Preparing the door panels Important note: When performing any work step can be found in the appliance with a water connection: In order to shut off valve closed. 4. 3. Press the POWER button again to avoid the risk...
Installation Manual
Page 23
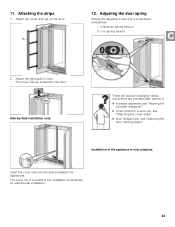
... strips 1. Attach the cover strip (a) on the door. 12. Attach the light switch cover. Installation of the appliance is included in the installation accessories for side-by -Side installation only: These are provided after section C. Ice-water dispenser, see "Aligning the ice-water dispenser". Cover strips for a wine unit, see "Attaching the cover strips" Door limitation pin, see "Adjusting the door opening angle". The cover rail is now...
... strips 1. Attach the cover strip (a) on the door. 12. Attach the light switch cover. Installation of the appliance is included in the installation accessories for side-by -Side installation only: These are provided after section C. Ice-water dispenser, see "Aligning the ice-water dispenser". Cover strips for a wine unit, see "Attaching the cover strips" Door limitation pin, see "Adjusting the door opening angle". The cover rail is now...
Installation Manual
Page 30
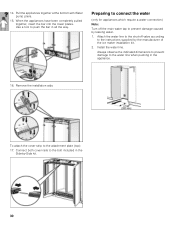
... the indicated dimensions to prevent damage to the instructions supplied by leaking water. 1. Pull the appliances together at the bottom with Water pump pliers. 15. Attach the water line to the shut-off the main water tap to the bolt included in the appliance. 16. Install the water line. Connect both cover rails to prevent damage caused by the manufacturer of the ice maker installation kit. 2. To attach the cover strip...
... the indicated dimensions to prevent damage to the instructions supplied by leaking water. 1. Pull the appliances together at the bottom with Water pump pliers. 15. Attach the water line to the shut-off the main water tap to the bolt included in the appliance. 16. Install the water line. Connect both cover rails to prevent damage caused by the manufacturer of the ice maker installation kit. 2. To attach the cover strip...
Installation Manual
Page 31
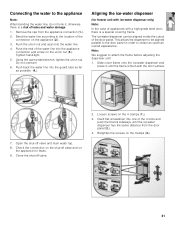
... covering frame. Remove the cap from the door panel (2.). 4. Loosen screws on the clamps (3.). 31 Using the open-ended wrench, tighten the union nut. This allows the dispenser to be aligned inside the cutout of leaks and water damage. 1. Note: We suggest to obtain an optimum overall appearance. Check the connection on the shut-off valve and on the appliance for freezer unit with ice-water dispenser...
... covering frame. Remove the cap from the door panel (2.). 4. Loosen screws on the clamps (3.). 31 Using the open-ended wrench, tighten the union nut. This allows the dispenser to be aligned inside the cutout of leaks and water damage. 1. Note: We suggest to obtain an optimum overall appearance. Check the connection on the shut-off valve and on the appliance for freezer unit with ice-water dispenser...
Use and Care Manual
Page 3
...ON the appliance 4 Technical safety 4 Important information when using the appliance ..... 4 Children in the household 4 General regulations 4 Installing the appliance 5 Transporting 5 Installation location 5 Ventilation 5 Connecting the appliance 5 Electrical connection 5 Getting to know your appliance 6 Controls 7 Switching the appliance on 7 Operating tips 7 Set the language 7 Setting the temperature 8 Refrigerator compartment 8 Special functions 8 Setup mode 8 Vacation mode 8 Sabbath mode 8 Energy saving mode 9 Super cooling 9 Switching on 9 Alarm function 9 en-us...
...ON the appliance 4 Technical safety 4 Important information when using the appliance ..... 4 Children in the household 4 General regulations 4 Installing the appliance 5 Transporting 5 Installation location 5 Ventilation 5 Connecting the appliance 5 Electrical connection 5 Getting to know your appliance 6 Controls 7 Switching the appliance on 7 Operating tips 7 Set the language 7 Setting the temperature 8 Refrigerator compartment 8 Special functions 8 Setup mode 8 Vacation mode 8 Sabbath mode 8 Energy saving mode 9 Super cooling 9 Switching on 9 Alarm function 9 en-us...

Use and Care Manual
Page 4
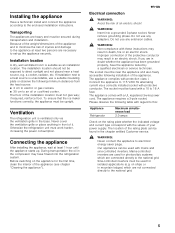
... switch ON the appliance Please read the operating and installation instructions carefully. Retain all documents for the next owner. Repairs may be sealed and stored in the household ■ Keep children away from folding cartons and cling wrap! ■ Do not allow children to defrost or clean the appliance! Only original parts supplied by the manufacturer may be connected by the manufacturer, customer service...
... switch ON the appliance Please read the operating and installation instructions carefully. Retain all documents for the next owner. Repairs may be sealed and stored in the household ■ Keep children away from folding cartons and cling wrap! ■ Do not allow children to defrost or clean the appliance! Only original parts supplied by the manufacturer may be connected by the manufacturer, customer service...
Use and Care Manual
Page 5
... via a correctly installed socket with a UL registered 3-wire power cord. Do not use any adapters. The appliance complies with these instructions may have the appliance tested by a qualified electrician or service technician. Please observe the following table with regard to this: Appliance Refrigerator Maximum simultaneous load 2.0 amps Check on the rating plate whether the indicated voltage and current type correspond with the...
... via a correctly installed socket with a UL registered 3-wire power cord. Do not use any adapters. The appliance complies with these instructions may have the appliance tested by a qualified electrician or service technician. Please observe the following table with regard to this: Appliance Refrigerator Maximum simultaneous load 2.0 amps Check on the rating plate whether the indicated voltage and current type correspond with the...
Use and Care Manual
Page 7
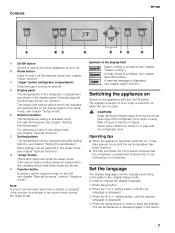
...: 1. D Display panel The temperatures in the display panel. The menus and setting options which have been made are shown in the refrigerator compartment are stored. In order to cool. Press the @ or A setting button, until the set temperature is not required. Switching the appliance on Switch on the display panel in the setup mode, see chapter Alarm function. Set the language The display languages can be changed using the setting buttons, see chapter "Setup mode". C "super" button (refrigerator compartment) Switches...
...: 1. D Display panel The temperatures in the display panel. The menus and setting options which have been made are shown in the refrigerator compartment are stored. In order to cool. Press the @ or A setting button, until the set temperature is not required. Switching the appliance on Switch on the display panel in the setup mode, see chapter Alarm function. Set the language The display languages can be changed using the setting buttons, see chapter "Setup mode". C "super" button (refrigerator compartment) Switches...
Use and Care Manual
Page 8
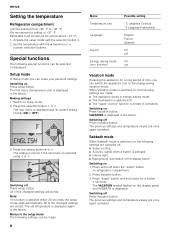
... +35 °F to the energy-saving vacation mode. The set temperature is displayed in the fascia. Switching off Press Vacation button. Making settings 1. Switching off : ■ Super cooling ■ Acoustic signal when a button is pressed ■ Interior light ■ Background illumination of the changed settings are made . 8 Menu Temperature unit Language Sound Energy saving mode (eco function) Possible setting °C (degrees Celsius) °F (degrees Fahrenheit) English French Spanish On Off On...
... +35 °F to the energy-saving vacation mode. The set temperature is displayed in the fascia. Switching off Press Vacation button. Making settings 1. Switching off : ■ Super cooling ■ Acoustic signal when a button is pressed ■ Interior light ■ Background illumination of the changed settings are made . 8 Menu Temperature unit Language Sound Energy saving mode (eco function) Possible setting °C (degrees Celsius) °F (degrees Fahrenheit) English French Spanish On Off On...
Use and Care Manual
Page 14
... it repaired by unauthorized customer service (including in-house repairs or testing the inner life of the appliance); (3) Adjustments, changes or modifications of any kind after the warranty period has elapsed, this also applies to repairs, pro-rata charging or product replacement. en-us Warranty The limited warranty from BSH Home Appliances in this limited product guarantee applies only to the Thermador fridge-freezers (the...
... it repaired by unauthorized customer service (including in-house repairs or testing the inner life of the appliance); (3) Adjustments, changes or modifications of any kind after the warranty period has elapsed, this also applies to repairs, pro-rata charging or product replacement. en-us Warranty The limited warranty from BSH Home Appliances in this limited product guarantee applies only to the Thermador fridge-freezers (the...


