
Installation Manual
Page 14
... range is pulled away from the range itself. Qty 415078 4 655322 1 Description Screw, Phillips, #10 x 11/2" (38.1mm) Anti-Tip Bracket, Floor-Mounted English 12 THERMADOR Service Part No. Tools Needed for Installation of the range. ATTENTION - Step 5: Installing Anti-Tip Device WARNING -
... range is pulled away from the range itself. Qty 415078 4 655322 1 Description Screw, Phillips, #10 x 11/2" (38.1mm) Anti-Tip Bracket, Floor-Mounted English 12 THERMADOR Service Part No. Tools Needed for Installation of the range. ATTENTION - Step 5: Installing Anti-Tip Device WARNING -

Installation Manual
Page 19
... mounting location. 4. The backsplash must be installed prior to installing an overhead hood given that the bottom rear edge of the backsplash (see Figure 11). Parts Included (10) 1" (25.4mm) screws Tools Needed Phillips screwdriver or drill 30", 36", 48" (760mm, 913mm, 1218mm) (1) Backsplash Tape measure 42" (1070mm) (1) Installation Guide Pencil...
... mounting location. 4. The backsplash must be installed prior to installing an overhead hood given that the bottom rear edge of the backsplash (see Figure 11). Parts Included (10) 1" (25.4mm) screws Tools Needed Phillips screwdriver or drill 30", 36", 48" (760mm, 913mm, 1218mm) (1) Backsplash Tape measure 42" (1070mm) (1) Installation Guide Pencil...

Installation Manual
Page 23
... the backsplash first and the backguard second before use. WARNING: High Shelf Parts Included Fingers or hands could result. Severe injury could get very hot! Backguard Installation PRG366JG PRL366JG PRG364JDG PRL364JDG PRG486JDG PRL486JDG AVAILABLE FOR THESE MODELS: Pro Grand® 36" Gas Range 6 Burner...over 30 pounds (13.6kg) (13) T-20 Torx Stainless screws (16 or 14) T-20 Torx drill point screws (1) Installation Guide Low Back Parts Included (1) Low Back panel High Shelf (9 or 8) T-20 Torx stainless screws (8 or 6) T-20 Torx drill point screws Low Back (1) Installation ...
... the backsplash first and the backguard second before use. WARNING: High Shelf Parts Included Fingers or hands could result. Severe injury could get very hot! Backguard Installation PRG366JG PRL366JG PRG364JDG PRL364JDG PRG486JDG PRL486JDG AVAILABLE FOR THESE MODELS: Pro Grand® 36" Gas Range 6 Burner...over 30 pounds (13.6kg) (13) T-20 Torx Stainless screws (16 or 14) T-20 Torx drill point screws (1) Installation Guide Low Back Parts Included (1) Low Back panel High Shelf (9 or 8) T-20 Torx stainless screws (8 or 6) T-20 Torx drill point screws Low Back (1) Installation ...

Installation Manual
Page 27
... around the leg. 4. If not, adjust the (2) screws under the back of the stainless steel 'sleeves'. 2. Remove plastic coverings of the griddle plate. The mating part has dimples (that the burner caps are correctly seated on the back of the range's cooktop. FIGURE 22: LEG COVERS INSTALLED FIGURE 21: LEG COVERS...
... around the leg. 4. If not, adjust the (2) screws under the back of the stainless steel 'sleeves'. 2. Remove plastic coverings of the griddle plate. The mating part has dimples (that the burner caps are correctly seated on the back of the range's cooktop. FIGURE 22: LEG COVERS INSTALLED FIGURE 21: LEG COVERS...

Installation Manual
Page 28
... Work Gloves 1. Mount the Toe Kick Panel on page 25). 2. Toe Kick Panel (optional) (PA [36,48] JTKG) Toe Kick Parts Included (1) Toe Kick panel (4) T-20 Torx drill point screws 3. Mounting hole locations (x2) Figure 23: Toe Kick Panel Installation English 26 The mating... part has extruded dimples on both sides of the Toe Kick Panel should feel a definitive snap, letting you know that the part has been installed. 5. Remove protective plastic covering from the Toe Kick Panel.
... Work Gloves 1. Mount the Toe Kick Panel on page 25). 2. Toe Kick Panel (optional) (PA [36,48] JTKG) Toe Kick Parts Included (1) Toe Kick panel (4) T-20 Torx drill point screws 3. Mounting hole locations (x2) Figure 23: Toe Kick Panel Installation English 26 The mating... part has extruded dimples on both sides of the Toe Kick Panel should feel a definitive snap, letting you know that the part has been installed. 5. Remove protective plastic covering from the Toe Kick Panel.
Installation Manual
Page 96
... many years of creative cooking. We are certified for planning purposes only. Parts & Accessories Parts, filters, descalers, stainless steel cleaners and more can be purchased in your specific ventilation requirements. For the most detailed information, refer to supporting you and your Thermador appliance needs service. Pour une information plus détaillée, reportez...
... many years of creative cooking. We are certified for planning purposes only. Parts & Accessories Parts, filters, descalers, stainless steel cleaners and more can be purchased in your specific ventilation requirements. For the most detailed information, refer to supporting you and your Thermador appliance needs service. Pour une information plus détaillée, reportez...
Use and Care Manual
Page 5
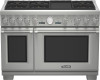
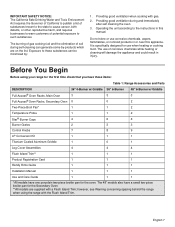
... 1 Safety 2 Important Safety Instructions 2 Before You Begin 7 Using Your Range for the First Time 7 Range Description 10 Parts Identification - 48" Range 10 Parts Identification - 36" Range 11 Using The Cooktop 12 Cookware Recommendations 17 Specialty Cookware 18 Surface Burner Cooking Recommendations ....... 19 Electric...Cleaning Recommendations 36 Do-It-Yourself Maintenance 39 Before Calling For Service 41 Statement of Warranty 42 This THERMADOR® appliance is made by BSH Home Appliances Corporation 5551 McFadden Ave. Huntington Beach, CA 92649 Questions? 1-800-735-...
... 1 Safety 2 Important Safety Instructions 2 Before You Begin 7 Using Your Range for the First Time 7 Range Description 10 Parts Identification - 48" Range 10 Parts Identification - 36" Range 11 Using The Cooktop 12 Cookware Recommendations 17 Specialty Cookware 18 Surface Burner Cooking Recommendations ....... 19 Electric...Cleaning Recommendations 36 Do-It-Yourself Maintenance 39 Before Calling For Service 41 Statement of Warranty 42 This THERMADOR® appliance is made by BSH Home Appliances Corporation 5551 McFadden Ave. Huntington Beach, CA 92649 Questions? 1-800-735-...

Use and Care Manual
Page 8
... to light the two left alone or unattended in an area where appliances are instructed in use extreme care when using your new THERMADOR PROFESSIONAL® range has been designed to dissipate before lighting the burner manually. All other servicing should climb onto the appliance to ... qualified persons. In the event a burner goes out and gas escapes, open a window or a door. Do not repair or replace any part of the appliance unless specifically recommended in accordance with a match. If children are equipped with this manual. When properly cared for the proper method...
... to light the two left alone or unattended in an area where appliances are instructed in use extreme care when using your new THERMADOR PROFESSIONAL® range has been designed to dissipate before lighting the burner manually. All other servicing should climb onto the appliance to ... qualified persons. In the event a burner goes out and gas escapes, open a window or a door. Do not repair or replace any part of the appliance unless specifically recommended in accordance with a match. If children are equipped with this manual. When properly cared for the proper method...
Use and Care Manual
Page 9
...potholders, or other bulky cloth in place of potholders. Grease should never be certain the curtains do not reach through fire to line any part of the appliance or place anything against the oven. In the event that may catch on hot surfaces may be allowed to extinguish flames. ... is being called. • You can fight the fire with baking soda. IMPORTANT SAFETY INSTRUCTIONS READ AND SAVE THESE INSTRUCTIONS Never use any part of the range or oven for the size of the cooktop burner. For personal safety, wear proper apparel. Some fabrics are highly flammable and...
...potholders, or other bulky cloth in place of potholders. Grease should never be certain the curtains do not reach through fire to line any part of the appliance or place anything against the oven. In the event that may catch on hot surfaces may be allowed to extinguish flames. ... is being called. • You can fight the fire with baking soda. IMPORTANT SAFETY INSTRUCTIONS READ AND SAVE THESE INSTRUCTIONS Never use any part of the range or oven for the size of the cooktop burner. For personal safety, wear proper apparel. Some fabrics are highly flammable and...
Use and Care Manual
Page 10
... a pan larger than one burner, such as a space heater to prevent movement when stirring or turning food. Always use can damage the cooktop or oven parts. Hold the handle of the range's cooktop. IMPORTANT SAFETY INSTRUCTIONS READ AND SAVE THESE INSTRUCTIONS WARNING: NEVER use this precaution can result in tipping of...
... a pan larger than one burner, such as a space heater to prevent movement when stirring or turning food. Always use can damage the cooktop or oven parts. Hold the handle of the range's cooktop. IMPORTANT SAFETY INSTRUCTIONS READ AND SAVE THESE INSTRUCTIONS WARNING: NEVER use this precaution can result in tipping of...
Use and Care Manual
Page 11
...a hot surface. Before self-cleaning the oven, remove the broiler pan, oven racks, temperature probe and any type of heat, ignite or cause metal parts to possible hot surfaces, clean around the burner and burner ports. It is used. If the gasket becomes worn or excessively soiled with food particles...installed whenever the range is essential for a good seal during baking. let hot air or steam escape before servicing this booklet. Clean only those parts indicated in the oven. If the fan does not operate, do not touch the broiler element, the interior surfaces of the oven or the ...
...a hot surface. Before self-cleaning the oven, remove the broiler pan, oven racks, temperature probe and any type of heat, ignite or cause metal parts to possible hot surfaces, clean around the burner and burner ports. It is used. If the gasket becomes worn or excessively soiled with food particles...installed whenever the range is essential for a good seal during baking. let hot air or steam escape before servicing this booklet. Clean only those parts indicated in the oven. If the fan does not operate, do not touch the broiler element, the interior surfaces of the oven or the ...
Use and Care Manual
Page 12
...-piece broiler pan for use corrosive chemicals, vapors, flammables, or nonfood products in or near this manual. Exposure to these items: Table 1: Range Accessories and Parts DESCRIPTION Full Access® Oven Racks, Main Oven Full Access® Oven Racks, Secondary Oven Two-Piece Broil Pan* 36" 4-Burner w/ Griddle 3 0 1 36" 6-Burner 3 0 1 48...
...-piece broiler pan for use corrosive chemicals, vapors, flammables, or nonfood products in or near this manual. Exposure to these items: Table 1: Range Accessories and Parts DESCRIPTION Full Access® Oven Racks, Main Oven Full Access® Oven Racks, Secondary Oven Two-Piece Broil Pan* 36" 4-Burner w/ Griddle 3 0 1 36" 6-Burner 3 0 1 48...

Use and Care Manual
Page 15
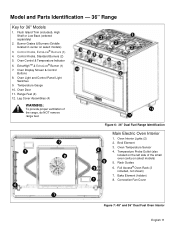
... Switch 13. Electric Griddle Knob (1) 5. Control Knobs, ExtraHighTM & ExtraLow® (1) 4. Secondary Oven Control Knobs 6. Key for 48" Models 1. Control Panel Light 12. Description Model and Parts Identification - 48" Range 11 11 22 22 55 8 66 7 7 78 7 9 9 1100 9 9 1100 1111 12 12 44 33 11 Figure 4: 48" Dual Fuel Control Panel 13...
... Switch 13. Electric Griddle Knob (1) 5. Control Knobs, ExtraHighTM & ExtraLow® (1) 4. Secondary Oven Control Knobs 6. Key for 48" Models 1. Control Panel Light 12. Description Model and Parts Identification - 48" Range 11 11 22 22 55 8 66 7 7 78 7 9 9 1100 9 9 1100 1111 12 12 44 33 11 Figure 4: 48" Dual Fuel Control Panel 13...
Use and Care Manual
Page 16
Model and Parts Identification - 36" Range Key for 36" Models 1. Oven Door 11. Oven Temperature Sensor 4. Temperature Probe Outlet (also located on the left side of the range, ...
Model and Parts Identification - 36" Range Key for 36" Models 1. Oven Door 11. Oven Temperature Sensor 4. Temperature Probe Outlet (also located on the left side of the range, ...
Use and Care Manual
Page 29
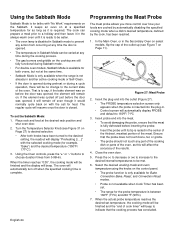
..., as it is required. Ensure that the probe does not touch bone, fat, or gristle. • The probe should not touch any part of the cooking dish or parts of the meat. When the actual probe temperature reaches the desired set temperature, the cooking mode will remain off even though it would...
..., as it is required. Ensure that the probe does not touch bone, fat, or gristle. • The probe should not touch any part of the cooking dish or parts of the meat. When the actual probe temperature reaches the desired set temperature, the cooking mode will remain off even though it would...
Use and Care Manual
Page 39
...® feature, cannot be harmful upon sufficient exposure. The amount of smoke stain is outside the door seal area. Wipe up the excessive food soil. Parts of the appliance may facilitate the emission of small amounts of appliances and lack adult reactions to these individuals away during self-cleaning process may...
...® feature, cannot be harmful upon sufficient exposure. The amount of smoke stain is outside the door seal area. Wipe up the excessive food soil. Parts of the appliance may facilitate the emission of small amounts of appliances and lack adult reactions to these individuals away during self-cleaning process may...
Use and Care Manual
Page 40
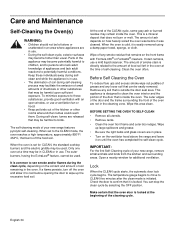
... instructions on a small inconspicuous area first. 2. Select OFF using the Mode Selector Ring (see Figure 31 on Range Cleaning Recommendations, page 36. Most exterior parts of any part of cleaner. It is below 500°F/200°C and the automatic Door Lock completes its open automatically when the oven is imperative that...
... instructions on a small inconspicuous area first. 2. Select OFF using the Mode Selector Ring (see Figure 31 on Range Cleaning Recommendations, page 36. Most exterior parts of any part of cleaner. It is below 500°F/200°C and the automatic Door Lock completes its open automatically when the oven is imperative that...
Use and Care Manual
Page 41
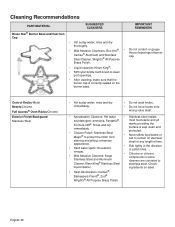
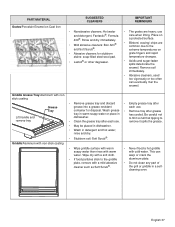
... on label. • Heat discoloration: Cameo®, Barkeepers Friend®, Zud®. enhances steel for any length of time. Rinse and dry immediately. Cleaning Recommendations PART/MATERIAL SUGGESTED CLEANERS IMPORTANT REMINDERS Brass Star® Burner Base and Cast Iron Cap • Hot sudsy water; Control Knobs/Metal Bezels/Chrome Full Access...
... on label. • Heat discoloration: Cameo®, Barkeepers Friend®, Zud®. enhances steel for any length of time. Rinse and dry immediately. Cleaning Recommendations PART/MATERIAL SUGGESTED CLEANERS IMPORTANT REMINDERS Brass Star® Burner Base and Cast Iron Cap • Hot sudsy water; Control Knobs/Metal Bezels/Chrome Full Access...
Use and Care Manual
Page 42
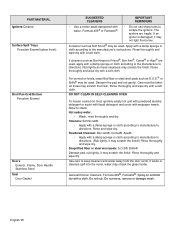
... • Remove tray after each use . Griddle/Aluminum with non-stick coating • Wipe griddle surface with warm soapy water then rinse with cold water. PART/MATERIAL Grates/Porcelain Enamel on grate fingers and rapid temperature changes. • Acidic and sugar-laden spills deteriorate the enamel. Be careful not dishwasher. remove... disposal. Remove soil immediately. • Abrasive cleaners, used too vigorously or too often can warp or crack the aluminum plate. • Do not clean any part of the grill or griddle in detergent and hot water;
... • Remove tray after each use . Griddle/Aluminum with non-stick coating • Wipe griddle surface with warm soapy water then rinse with cold water. PART/MATERIAL Grates/Porcelain Enamel on grate fingers and rapid temperature changes. • Acidic and sugar-laden spills deteriorate the enamel. Be careful not dishwasher. remove... disposal. Remove soil immediately. • Abrasive cleaners, used too vigorously or too often can warp or crack the aluminum plate. • Do not clean any part of the grill or griddle in detergent and hot water;
Use and Care Manual
Page 43
PART/MATERIAL Igniters/Ceramic Surface Spill Trays Porcelain Enamel (gloss finish) Broil Pan Grid/Bottom Porcelain Enamel Doors Exterior, Frame, Door Handle Stainless Steel Seal Door ...
PART/MATERIAL Igniters/Ceramic Surface Spill Trays Porcelain Enamel (gloss finish) Broil Pan Grid/Bottom Porcelain Enamel Doors Exterior, Frame, Door Handle Stainless Steel Seal Door ...
