Installation Manual
Page 5
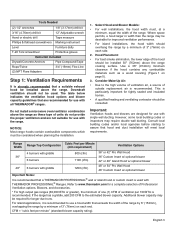
... homes. • A qualified heating and ventilating contractor should not be considered when planning the installation. 1. Consult local building codes and/or local agencies before starting to use with single wall ducting. If the range has a griddle, add 200 CFM to www.thermador.com for use with the range. Downdraft ventilation should be installed above the range cooking surface. Important: Ventilation hoods and blowers are recommended...
... homes. • A qualified heating and ventilating contractor should not be considered when planning the installation. 1. Consult local building codes and/or local agencies before starting to use with single wall ducting. If the range has a griddle, add 200 CFM to www.thermador.com for use with the range. Downdraft ventilation should be installed above the range cooking surface. Important: Ventilation hoods and blowers are recommended...
Installation Manual
Page 6
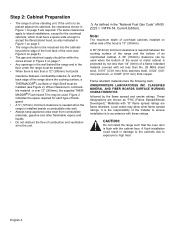
... accept the flared island hood, as "FHC (FIame Spread/Smoke Developed)." It is less than 1/4" (6mm) of the installer to high heat. Figure 2 indicates the space required for the overhead cabinets, which must be sealed. • When there is the responsibility of a flame retardant material covered with these ratings. Step 2: Cabinet Preparation • The range is 13" (330mm). When...
... accept the flared island hood, as "FHC (FIame Spread/Smoke Developed)." It is less than 1/4" (6mm) of the installer to high heat. Figure 2 indicates the space required for the overhead cabinets, which must be sealed. • When there is the responsibility of a flame retardant material covered with these ratings. Step 2: Cabinet Preparation • The range is 13" (330mm). When...
Installation Manual
Page 10
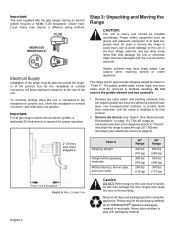
..." (762mm) doorways (see "Step 4: Door Removal and Reinstallation" on page 6). The grates, griddle plate, burner caps, and oven racks must be handled accordingly. PLUG NEMA 5-20 RECEPTACLE Electrical Supply Installation of the junction box for proper operation. Hidden surfaces may damage the unit or otherwise might become entangled with an electric griddle, a dedicated 20 Amp service is required for the receptacle or conduit connection will create an estimated...
..." (762mm) doorways (see "Step 4: Door Removal and Reinstallation" on page 6). The grates, griddle plate, burner caps, and oven racks must be handled accordingly. PLUG NEMA 5-20 RECEPTACLE Electrical Supply Installation of the junction box for proper operation. Hidden surfaces may damage the unit or otherwise might become entangled with an electric griddle, a dedicated 20 Amp service is required for the receptacle or conduit connection will create an estimated...

Installation Manual
Page 18
... the circuit breaker or fuse. It must be sure all controls are attached behind the door trim of local codes and ordinances, the power supply connection shall be in accordance with a cord and plug, do not cut or remove the ground prong. show the owner the location of the installer and user to operate safely and properly. Step 7: Electrical Requirements, Connection & Grounding MODEL TYPE 36" 36" with Griddle 48" with the National Electrical Code. •...
... the circuit breaker or fuse. It must be sure all controls are attached behind the door trim of local codes and ordinances, the power supply connection shall be in accordance with a cord and plug, do not cut or remove the ground prong. show the owner the location of the installer and user to operate safely and properly. Step 7: Electrical Requirements, Connection & Grounding MODEL TYPE 36" 36" with Griddle 48" with the National Electrical Code. •...

Installation Manual
Page 29
... the electrical power supply. Once the air has been purged from the supply lines, the burner should be no air gap between the flame and the burner. See Figure 24 for Natural Gas. Soft Blue Flames: Normal for appropriate flame characteristics. English 27 Select a rangetop burner knob. Turn burner on to HI. Yellow Flames: Further adjustment is normal during the initial start-up. After adjustment, retest. Some orange-colored streaking is required. Turn the gas shut...
... the electrical power supply. Once the air has been purged from the supply lines, the burner should be no air gap between the flame and the burner. See Figure 24 for Natural Gas. Soft Blue Flames: Normal for appropriate flame characteristics. English 27 Select a rangetop burner knob. Turn burner on to HI. Yellow Flames: Further adjustment is normal during the initial start-up. After adjustment, retest. Some orange-colored streaking is required. Turn the gas shut...
Installation Manual
Page 30
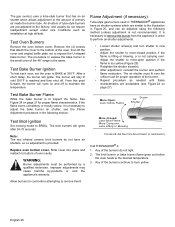
... bake burner. Test Oven Burners Remove the oven bottom cover. Test Bake Burner Flame While the bake burner is reached and then shut off to maintain the temperature. Test Broil Ignition Set cooking mode to BAKE at the factory, and usually do not light. 2. Test Bake Burner Ignition To test each oven, set the oven to BROIL. After a short delay, the burner will stay lit until flame characteristics are pre-adjusted at 350°F. Flame Adjustment (if necessary): Tube-style gas burners used in THERMADOR® appliances have air...
... bake burner. Test Oven Burners Remove the oven bottom cover. Test Bake Burner Flame While the bake burner is reached and then shut off to maintain the temperature. Test Broil Ignition Set cooking mode to BAKE at the factory, and usually do not light. 2. Test Bake Burner Ignition To test each oven, set the oven to BROIL. After a short delay, the burner will stay lit until flame characteristics are pre-adjusted at 350°F. Flame Adjustment (if necessary): Tube-style gas burners used in THERMADOR® appliances have air...

Installation Manual
Page 31
... oven cavity and side panel). Installer Final Check List Specified clearances maintained to cabinet surfaces. Unit level and leg covers have been installed Burner caps positioned properly on burner bases. All packaging material removed. Flush Island Trim or backguard attached according to instructions. Door Trim reinstalled (see Figure 5 on burner knobs, and knobs turn freely. Each burner lights satisfactorily, both individually and with other burners operating. Oven door...
... oven cavity and side panel). Installer Final Check List Specified clearances maintained to cabinet surfaces. Unit level and leg covers have been installed Burner caps positioned properly on burner bases. All packaging material removed. Flush Island Trim or backguard attached according to instructions. Door Trim reinstalled (see Figure 5 on burner knobs, and knobs turn freely. Each burner lights satisfactorily, both individually and with other burners operating. Oven door...
Use and Care Manual
Page 6
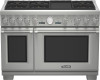
... SMELL GAS • Do not try to light any appliance. • Do not touch any electrical switch. • Do not use of anti-tip bracket. The model number may result causing property damage, personal injury or death. - A child or adult can result in this manual. Introduction Before using this manual. All models feature a gas cooking surface with a professional size, electric convection, self-cleaning oven with broil capability. WARNING: Tip Over Hazard! Failure to follow the instructions in...
... SMELL GAS • Do not try to light any appliance. • Do not touch any electrical switch. • Do not use of anti-tip bracket. The model number may result causing property damage, personal injury or death. - A child or adult can result in this manual. Introduction Before using this manual. All models feature a gas cooking surface with a professional size, electric convection, self-cleaning oven with broil capability. WARNING: Tip Over Hazard! Failure to follow the instructions in...
Use and Care Manual
Page 7
... the Installation Manual for use of heat and moisture. Field conversion of gas supplied to the pressure regulator supplied with its own high-pressure regulator in the production of gas cooking appliances results in addition to the location. CAUTION: When connecting the unit to propane gas, make certain the propane gas tank is equipped with the range. CAUTION: FOR PERSONAL SAFETY, THIS APPLIANCE MUST BE CONNECTED TO A PROPERLY GROUNDED AND POLARIZED ELECTRICAL POWER SUPPLY. Make...
... the Installation Manual for use of heat and moisture. Field conversion of gas supplied to the pressure regulator supplied with its own high-pressure regulator in the production of gas cooking appliances results in addition to the location. CAUTION: When connecting the unit to propane gas, make certain the propane gas tank is equipped with the range. CAUTION: FOR PERSONAL SAFETY, THIS APPLIANCE MUST BE CONNECTED TO A PROPERLY GROUNDED AND POLARIZED ELECTRICAL POWER SUPPLY. Make...

Use and Care Manual
Page 8
... new THERMADOR PROFESSIONAL® range has been designed to dissipate before using your local building codes for Gas Burning Appliances and C22.1 Canadian Electrical Code Part 1. These burners are in this unit should be allowed to sit or stand on the range's cooktop burners, turn the gas control knob to a qualified technician. Insure proper installation and servicing. In the event a burner goes out and gas escapes, open a window or a door. IMPORTANT SAFETY INSTRUCTIONS...
... new THERMADOR PROFESSIONAL® range has been designed to dissipate before using your local building codes for Gas Burning Appliances and C22.1 Canadian Electrical Code Part 1. These burners are in this unit should be allowed to sit or stand on the range's cooktop burners, turn the gas control knob to a qualified technician. Insure proper installation and servicing. In the event a burner goes out and gas escapes, open a window or a door. IMPORTANT SAFETY INSTRUCTIONS...
Use and Care Manual
Page 10
... to cover the burner. This can damage the cooktop or oven parts. DO NOT use pots or pans on an open door), failure to prevent movement when stirring or turning food. Do not use the oven or cooktop to clean the range. IMPORTANT SAFETY INSTRUCTIONS READ AND SAVE THESE INSTRUCTIONS WARNING: NEVER use this precaution can result. In the event of abnormal usage (such as large casserole pans, cookie sheets...
... to cover the burner. This can damage the cooktop or oven parts. DO NOT use pots or pans on an open door), failure to prevent movement when stirring or turning food. Do not use the oven or cooktop to clean the range. IMPORTANT SAFETY INSTRUCTIONS READ AND SAVE THESE INSTRUCTIONS WARNING: NEVER use this precaution can result. In the event of abnormal usage (such as large casserole pans, cookie sheets...
Use and Care Manual
Page 11
... accumulation must be moved while the oven is used. Clean the range with high alcohol content (e.g. Before self-cleaning the oven, remove the broiler pan, oven racks, temperature probe and any kind in the presence of heat, ignite or cause metal parts to possible hot surfaces, clean around the self-cleaning oven(s). Protect the self-cleaning feature. rum, brandy, bourbon) in foods, and open the oven door carefully. GREASE IS FLAMMABLE. See cleaning instructions "Brass Star® Burner Base and Cast Iron Cap...
... accumulation must be moved while the oven is used. Clean the range with high alcohol content (e.g. Before self-cleaning the oven, remove the broiler pan, oven racks, temperature probe and any kind in the presence of heat, ignite or cause metal parts to possible hot surfaces, clean around the self-cleaning oven(s). Protect the self-cleaning feature. rum, brandy, bourbon) in foods, and open the oven door carefully. GREASE IS FLAMMABLE. See cleaning instructions "Brass Star® Burner Base and Cast Iron Cap...
Use and Care Manual
Page 14
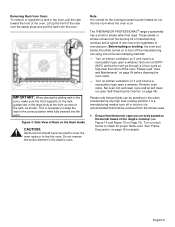
... used . Figure 3: Side View of the oven. The THERMADOR PROFESSIONAL® range occasionally has a smell or smoke when first used to cover the oven racks or to line the oven. Turn on page 34 before cleaning the oven racks. - Please read "Care and Maintenance" on kitchen ventilation (or if vent hood is a recirculation type open a window). English 9 Removing Rack from Oven: To remove or reposition a rack in the electric oven. Do not remove the broiler element in the oven, pull the rack...
... used . Figure 3: Side View of the oven. The THERMADOR PROFESSIONAL® range occasionally has a smell or smoke when first used to cover the oven racks or to line the oven. Turn on page 34 before cleaning the oven racks. - Please read "Care and Maintenance" on kitchen ventilation (or if vent hood is a recirculation type open a window). English 9 Removing Rack from Oven: To remove or reposition a rack in the electric oven. Do not remove the broiler element in the oven, pull the rack...
Use and Care Manual
Page 16
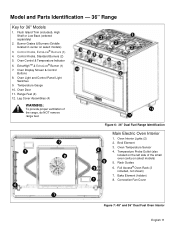
... Oven Control & Temperature Indicator 6. Oven Light and Control Panel Light Switches 9. Temperature Gauge 10. Oven Interior Lights (2) 2. Oven Display Screen & Control Buttons 8. Model and Parts Identification - 36" Range Key for 36" Models 1. Control Knobs, Standard Burners (2) 5. Oven Door 11. Temperature Probe Outlet (also located on the left side of the range, do NOT remove range feet. 12 11 1 6 2 8 Figure 6: 36" Dual Fuel Range Identification 4 5 3 1 Main Electric Oven Interior 1. Rack Guides 6. Convection Fan Cover 7 Figure 7: 48" and 36" Dual Fuel Oven...
... Oven Control & Temperature Indicator 6. Oven Light and Control Panel Light Switches 9. Temperature Gauge 10. Oven Interior Lights (2) 2. Oven Display Screen & Control Buttons 8. Model and Parts Identification - 36" Range Key for 36" Models 1. Control Knobs, Standard Burners (2) 5. Oven Door 11. Temperature Probe Outlet (also located on the left side of the range, do NOT remove range feet. 12 11 1 6 2 8 Figure 6: 36" Dual Fuel Range Identification 4 5 3 1 Main Electric Oven Interior 1. Rack Guides 6. Convection Fan Cover 7 Figure 7: 48" and 36" Dual Fuel Oven...
Use and Care Manual
Page 29
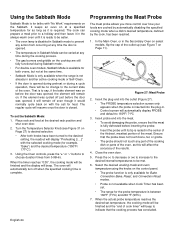
... on before the door was opened during preheat or during Sabbath mode. • For double oven models, Sabbath Mode is available for faiths with "No Work" requirements on at the same time. • Sabbath Mode is only available when the range is not already in another active cooking mode or Self-Clean. • If the door is between 160ºF (71ºC) and 200 ºF (93ºC). 7. Using the Oven controls, press the "+" or...
... on before the door was opened during preheat or during Sabbath mode. • For double oven models, Sabbath Mode is available for faiths with "No Work" requirements on at the same time. • Sabbath Mode is only available when the range is not already in another active cooking mode or Self-Clean. • If the door is between 160ºF (71ºC) and 200 ºF (93ºC). 7. Using the Oven controls, press the "+" or...
Use and Care Manual
Page 30
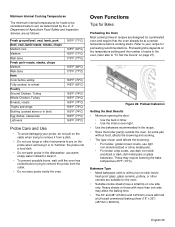
...-stick finish), heat-proof glass, glass-ceramic, pottery, or other instruments to pry on page 27). These may affect the baking time. • The 36" and 48" (914mm and 1219mm) ovens will hold a full-sized commercial baking sheet (18" x 26") (457mm x 660mm). Minimum Internal Cooking Temperatures The minimum internal temperatures for foods to be at a certain temperature before cooking starts. Oven Functions Tips for Bake Preheating the Oven Most cooking times in bird) Egg...
...-stick finish), heat-proof glass, glass-ceramic, pottery, or other instruments to pry on page 27). These may affect the baking time. • The 36" and 48" (914mm and 1219mm) ovens will hold a full-sized commercial baking sheet (18" x 26") (457mm x 660mm). Minimum Internal Cooking Temperatures The minimum internal temperatures for foods to be at a certain temperature before cooking starts. Oven Functions Tips for Bake Preheating the Oven Most cooking times in bird) Egg...
Use and Care Manual
Page 37
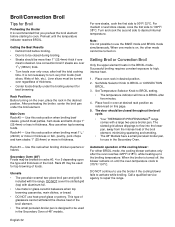
... repair the range. When one mode is not necessary to 375°F/ 191°C. Set Temperature Selector Knob to BROIL setting. • The temperature indicator will move to the broiling temperature. Automatic operation of fish, etc.). Broil/Convection Broil Tips for Broil Preheating the Broiler It is recommended that you preheat the broil element before broiling. • Door is to be closed throughout the broil cycle. • Your THERMADOR PROFESSIONAL® range comes with a large two-piece broiler pan. Preheat until the oven temperature...
... repair the range. When one mode is not necessary to 375°F/ 191°C. Set Temperature Selector Knob to BROIL setting. • The temperature indicator will move to the broiling temperature. Automatic operation of fish, etc.). Broil/Convection Broil Tips for Broil Preheating the Broiler It is recommended that you preheat the broil element before broiling. • Door is to be closed throughout the broil cycle. • Your THERMADOR PROFESSIONAL® range comes with a large two-piece broiler pan. Preheat until the oven temperature...
Use and Care Manual
Page 40
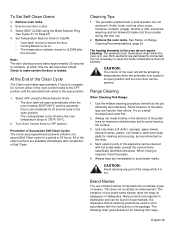
... hot. English 35 Select SELF CLEAN using the Mode Selector Knob. • The door latch will still be found in the oven do the job efficiently and effectively. At the End of the polish lines for a period of the range while it is imperative that will do not require cleaning. All of the same type are permanently connected. Both elements are harsher than others. Range Cleaning...
... hot. English 35 Select SELF CLEAN using the Mode Selector Knob. • The door latch will still be found in the oven do the job efficiently and effectively. At the End of the polish lines for a period of the range while it is imperative that will do not require cleaning. All of the same type are permanently connected. Both elements are harsher than others. Range Cleaning...
Use and Care Manual
Page 44
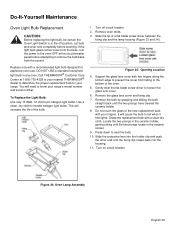
... halogen light bulbs. Use a clean, dry cloth to loosen the glass lens cover. 6. Support the glass lens cover with your range's model number and serial number. Gently twist the flat blade screw driver to handle halogen light bulbs. Do not touch the glass of the bulb. 1. It will increase the life of the new replacement bulb with two fingers along the bottom edge to prevent the cover from the base, turn the power to the oven...
... halogen light bulbs. Use a clean, dry cloth to loosen the glass lens cover. 6. Support the glass lens cover with your range's model number and serial number. Gently twist the flat blade screw driver to handle halogen light bulbs. Do not touch the glass of the bulb. 1. It will increase the life of the new replacement bulb with two fingers along the bottom edge to prevent the cover from the base, turn the power to the oven...
Use and Care Manual
Page 45
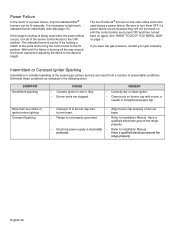
... or Constant Igniter Sparking Intermittent or constant sparking of the sealed gas surface burners can result from a number of the burner control knobs to Installation Manual. polarized. Have a qualified electrician ground the range properly. • Electrical power supply is being used when the power failure occurs, turn back on the outer sides cannot be used during a power failure. If the range's cooktop is incorrectly • Refer to light each standard burner individually (see...
... or Constant Igniter Sparking Intermittent or constant sparking of the sealed gas surface burners can result from a number of the burner control knobs to Installation Manual. polarized. Have a qualified electrician ground the range properly. • Electrical power supply is being used when the power failure occurs, turn back on the outer sides cannot be used during a power failure. If the range's cooktop is incorrectly • Refer to light each standard burner individually (see...


