
Installation Manual
Page 2
... 14 Step 7: Electrical Requirements, Connection & Grounding . . 16 Step 8: Backguard Installation (optional 17 Step 9: Placing and Leveling the Range 23 Step 10: Burner Test and Adjustment 27 Installer Final Check List 29 To Clean and Protect Exterior Surfaces 29 This THERMADOR® appliance is made by BSH Home Appliances Corporation 5551 McFadden Ave.
... 14 Step 7: Electrical Requirements, Connection & Grounding . . 16 Step 8: Backguard Installation (optional 17 Step 9: Placing and Leveling the Range 23 Step 10: Burner Test and Adjustment 27 Installer Final Check List 29 To Clean and Protect Exterior Surfaces 29 This THERMADOR® appliance is made by BSH Home Appliances Corporation 5551 McFadden Ave.

Installation Manual
Page 3
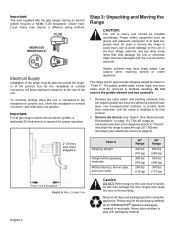
...5cm). English 1 INSTALLER: Please leave these Installation Instructions with all controls are in manufactured (mobile) homes or Recreational Park Trailers. Carefully tip range forward pulling from a neighbor's phone. WHAT TO DO IF YOU SMELL GAS • Do not try to children and adults. Installation must ...supplier from the back to ensure that all applicable codes. Shut-off valve must be sure that the anti-tip bracket engages the range aluminum cast base and prevents tip-over and be a "T" handle gas cock. 3. Safety Instructions Important Safety Instructions READ AND SAVE...
...5cm). English 1 INSTALLER: Please leave these Installation Instructions with all controls are in manufactured (mobile) homes or Recreational Park Trailers. Carefully tip range forward pulling from a neighbor's phone. WHAT TO DO IF YOU SMELL GAS • Do not try to children and adults. Installation must ...supplier from the back to ensure that all applicable codes. Shut-off valve must be sure that the anti-tip bracket engages the range aluminum cast base and prevents tip-over and be a "T" handle gas cock. 3. Safety Instructions Important Safety Instructions READ AND SAVE...

Installation Manual
Page 4
... clearance. Refer to the pressure regulator. A THERMADOR® Low Back or High Shelf must be installed properly, using the minimum clearances to Figure 2 on page 3). Based on page 22, for warming or heating a room. This appliance complies with the installation. English 2 Make certain the range matches the gas type available. The maximum...
... clearance. Refer to the pressure regulator. A THERMADOR® Low Back or High Shelf must be installed properly, using the minimum clearances to Figure 2 on page 3). Based on page 22, for warming or heating a room. This appliance complies with the installation. English 2 Make certain the range matches the gas type available. The maximum...
Installation Manual
Page 5
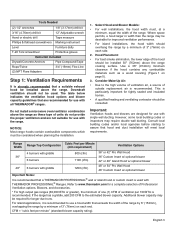
... homes. • A qualified heating and ventilating contractor should overhang the range by a minimum of the hood should not be installed above the range. This is particularly important for use a hood width that a THERMADOR PROFESSIONAL® wall or island hood or custom insert is used . ...or 54" Pro Wall Hood 48" Custom Insert w/ optional blower Important Notes: It is recommended. If the range has a griddle, add 200 CFM to use with all THERMADOR® ranges. Additional blower capacity may require double wall ducting. Use a 36" (914mm) minimum clearance if the hood contains...
... homes. • A qualified heating and ventilating contractor should overhang the range by a minimum of the hood should not be installed above the range. This is particularly important for use a hood width that a THERMADOR PROFESSIONAL® wall or island hood or custom insert is used . ...or 54" Pro Wall Hood 48" Custom Insert w/ optional blower Important Notes: It is recommended. If the range has a griddle, add 200 CFM to use with all THERMADOR® ranges. Additional blower capacity may require double wall ducting. Use a 36" (914mm) minimum clearance if the hood contains...
Installation Manual
Page 6
... overhead cabinets, which must have a space wide enough to cabinets, the clearances shown in Figure 1 on either side of the range above the cooking surface, a THERMADOR® Low Back or High Shelf must be sealed. • When there is less than 1/4" (6mm) of combustion and ... (127mm) minimum clearance is needed when the range is protected by the flame spread and smoke ratings. A 36" (914mm) minimum clearance is required between combustible material and the back edge of the hood is over 12" (305mm), the supplied THERMADOR® Flush Island Trim may allow other flammable...
... overhead cabinets, which must have a space wide enough to cabinets, the clearances shown in Figure 1 on either side of the range above the cooking surface, a THERMADOR® Low Back or High Shelf must be sealed. • When there is less than 1/4" (6mm) of combustion and ... (127mm) minimum clearance is needed when the range is protected by the flame spread and smoke ratings. A 36" (914mm) minimum clearance is required between combustible material and the back edge of the hood is over 12" (305mm), the supplied THERMADOR® Flush Island Trim may allow other flammable...
Installation Manual
Page 7
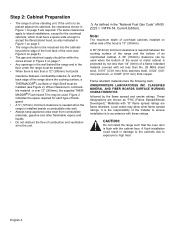
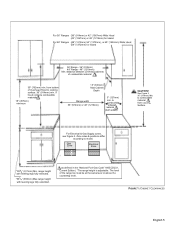
...above the countertop level. to model. as defined in the "National Fuel Gas Code" ANSI Z223.1, Current Edition). *The range height is adjustable. CAUTION! Zone sizes & positions differ according to combustible sidewall material (both sides). If hood contains combustible ...materials. 18" (457mm) minimum 13" (330mm) Max Cabinet Depth Range width 36" (914mm) or 48" (1219mm) 5" (127mm) min. from cooking Surface For Electrical & Gas Supply zones, see Figure 3. ...
...above the countertop level. to model. as defined in the "National Fuel Gas Code" ANSI Z223.1, Current Edition). *The range height is adjustable. CAUTION! Zone sizes & positions differ according to combustible sidewall material (both sides). If hood contains combustible ...materials. 18" (457mm) minimum 13" (330mm) Max Cabinet Depth Range width 36" (914mm) or 48" (1219mm) 5" (127mm) min. from cooking Surface For Electrical & Gas Supply zones, see Figure 3. ...

Installation Manual
Page 8
... Trim Cantilever Note: If an inner wall is used under the cantilever counter top, there should have a cantilever edge meeting the back section of the range to Combustible material with Low Back or High Shelf 36" (914mm) Min.
... Trim Cantilever Note: If an inner wall is used under the cantilever counter top, there should have a cantilever edge meeting the back section of the range to Combustible material with Low Back or High Shelf 36" (914mm) Min.

Installation Manual
Page 9
...it is pushed back into its final position. English 7 Note: The range is designed for which is pulled from beneath the range and out the front as the range is certified. It is suggested that the propane gas supply tank is... gas shut-off valve and how to shut the gas supply off to the range. • Any opening in the wall behind the appliance and any opening in addition to the pressure... regulator supplied with the range (see "Step 6: Gas Requirements and Hookup" on page 14). It is the responsibility of ...
...it is pushed back into its final position. English 7 Note: The range is designed for which is pulled from beneath the range and out the front as the range is certified. It is suggested that the propane gas supply tank is... gas shut-off valve and how to shut the gas supply off to the range. • Any opening in the wall behind the appliance and any opening in addition to the pressure... regulator supplied with the range (see "Step 6: Gas Requirements and Hookup" on page 14). It is the responsibility of ...
Installation Manual
Page 10
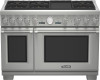
... box for proper operation. Remove the door(s) (see clearances shown on page 10). Important: For all gas range models with the gas ranges having an electric griddle requires a NEMA 5-20 receptacle, shown here. Remove all THERMADOR® appliance packaging material is connected to play with the unit should be handled accordingly. Do not...
... box for proper operation. Remove the door(s) (see clearances shown on page 10). Important: For all gas range models with the gas ranges having an electric griddle requires a NEMA 5-20 receptacle, shown here. Remove all THERMADOR® appliance packaging material is connected to play with the unit should be handled accordingly. Do not...

Installation Manual
Page 11
...and Hookup", "Step 7: Electrical Requirements, Connection & Grounding", and "Step 8: Backguard Installation (optional)" before the range is removed by loosening the 2 screws attaching it to the range and sliding it up and off the screws. • Due to the weight, a furniture dolly with the ...The two front pallet bolts are held to move this unit. Range must be supported uniformly across the bottom (see Figure 19 on bottom of range. 223/4" (578mm) FIGURE 6: FURNITURE DOLLY POSITIONING English 9 All ranges are accessible only after removing the Door Trim located beneath the ...
...and Hookup", "Step 7: Electrical Requirements, Connection & Grounding", and "Step 8: Backguard Installation (optional)" before the range is removed by loosening the 2 screws attaching it to the range and sliding it up and off the screws. • Due to the weight, a furniture dolly with the ...The two front pallet bolts are held to move this unit. Range must be supported uniformly across the bottom (see Figure 19 on bottom of range. 223/4" (578mm) FIGURE 6: FURNITURE DOLLY POSITIONING English 9 All ranges are accessible only after removing the Door Trim located beneath the ...

Installation Manual
Page 13
... the door fully and use a screwdriver to adjust door alignment FIGURE 7: APPROXIMATE DOOR ANGLE FOR REMOVAL Photo D English 11 Be careful not to scratch the range during this screw to push the hinge clips all the way into the slots. 3. If the door is aligned (Photo D). 23° Turn this process..., bend, or twist the door. • Tip: Rest the door on the front of the door to test the movement and the fit of the range when closed. 2. Do not force the door to open or close the door slowly to the oven cavity.
... the door fully and use a screwdriver to adjust door alignment FIGURE 7: APPROXIMATE DOOR ANGLE FOR REMOVAL Photo D English 11 Be careful not to scratch the range during this screw to push the hinge clips all the way into the slots. 3. If the door is aligned (Photo D). 23° Turn this process..., bend, or twist the door. • Tip: Rest the door on the front of the door to test the movement and the fit of the range when closed. 2. Do not force the door to open or close the door slowly to the oven cavity.

Installation Manual
Page 14
... an unprotected floor. • Failure to follow these instructions may result in damage to the floor by the installation of the range. THERMADOR Service Part No. To prevent accidental tipping of Anti-Tip Device: • Screwdriver, Phillips • Drill, electric or hand • Measuring tape or...installed and engaged as per installation instructions. --Ensure the anti-tip device is re-engaged when the range is pulled away from the range itself. RANGE TIPPING HAZARD: • All ranges can tip and injury can result in tipping of the Anti-Tip Device, then turn off power to...
... an unprotected floor. • Failure to follow these instructions may result in damage to the floor by the installation of the range. THERMADOR Service Part No. To prevent accidental tipping of Anti-Tip Device: • Screwdriver, Phillips • Drill, electric or hand • Measuring tape or...installed and engaged as per installation instructions. --Ensure the anti-tip device is re-engaged when the range is pulled away from the range itself. RANGE TIPPING HAZARD: • All ranges can tip and injury can result in tipping of the Anti-Tip Device, then turn off power to...

Installation Manual
Page 15
... immediately above. • Place bracket on floor near the center of where the unit is to be finally located (shown in Figure 8). • If the range is installed, the adjustable legs will allow the cast base to the floor using a hammer. • For walls or floors having a minimum wall thickness of...
... immediately above. • Place bracket on floor near the center of where the unit is to be finally located (shown in Figure 8). • If the range is installed, the adjustable legs will allow the cast base to the floor using a hammer. • For walls or floors having a minimum wall thickness of...

Installation Manual
Page 16
... The appliance pipe connection has a 3/4" (19mm) NPT external thread and a 1/2" (13mm) NPT internal thread (see Figure 10). These ranges are configured for use with its own high pressure regulator in addition to the appliance regulator must be made by a competent technician and in a...Connection: 3/4" (19mm) NPT external 1/2" (12.7mm) NPT internal (Minimum 3/4" dia. water column. (14.9 to 14" max. English 14 The range is turned off the gas supply. flex line.) Gas Line Connection Supply Pressure: Manifold Pressure: 11" min. FIGURE 10: MANIFOLD GAS LINE CONNECTION •...
... The appliance pipe connection has a 3/4" (19mm) NPT external thread and a 1/2" (13mm) NPT internal thread (see Figure 10). These ranges are configured for use with its own high pressure regulator in addition to the appliance regulator must be made by a competent technician and in a...Connection: 3/4" (19mm) NPT external 1/2" (12.7mm) NPT internal (Minimum 3/4" dia. water column. (14.9 to 14" max. English 14 The range is turned off the gas supply. flex line.) Gas Line Connection Supply Pressure: Manifold Pressure: 11" min. FIGURE 10: MANIFOLD GAS LINE CONNECTION •...

Installation Manual
Page 18
...hazard. • If the correct power supply circuit is not provided, it for access by a qualified electrician. Important: For all gas ranges with a cord and plug, do not cut or remove the ground prong. For appliances equipped with electric griddle, dedicated 20 AMP service...9). Installer - English 16 PHASE Single Single Single • Before installing, turn power OFF at the service panel. In the absence of the range, for easy reference. Step 7: Electrical Requirements, Connection & Grounding MODEL TYPE 36" 36" with Griddle 48" with Griddle Chart B: Electrical Supply...
...hazard. • If the correct power supply circuit is not provided, it for access by a qualified electrician. Important: For all gas ranges with a cord and plug, do not cut or remove the ground prong. For appliances equipped with electric griddle, dedicated 20 AMP service...9). Installer - English 16 PHASE Single Single Single • Before installing, turn power OFF at the service panel. In the absence of the range, for easy reference. Step 7: Electrical Requirements, Connection & Grounding MODEL TYPE 36" 36" with Griddle 48" with Griddle Chart B: Electrical Supply...

Installation Manual
Page 19
... with a 16" or 24" (406mm or 1372mm) space on backsplash until after installation is complete. • If range is already installed, refer to the manufacture's instructions to disconnect gas and power supplies. Move range forward to gain access to secure both the top and bottom of fire or injury to persons, check...
... with a 16" or 24" (406mm or 1372mm) space on backsplash until after installation is complete. • If range is already installed, refer to the manufacture's instructions to disconnect gas and power supplies. Move range forward to gain access to secure both the top and bottom of fire or injury to persons, check...

Installation Manual
Page 20
...is to be installed with a 16" (406mm) or 24" (1372mm) space on the backsplash until after installation is complete. • If range is already installed, refer to the manufacture's instructions to disconnect gas and power supplies. IncLlouwdeerdSWhietlhf BKreaecpkHetost Shelf Figure 13: Backsplash with a Keep Hot Shelf... the wall studs. • Due to rear of the backsplash. The backsplash should be found at the mounting location. 4. Move range forward to gain access to variable wall stud widths and varying backsplash widths, in Figure 13, mount the lower shelf brackets included with...
...is to be installed with a 16" (406mm) or 24" (1372mm) space on the backsplash until after installation is complete. • If range is already installed, refer to the manufacture's instructions to disconnect gas and power supplies. IncLlouwdeerdSWhietlhf BKreaecpkHetost Shelf Figure 13: Backsplash with a Keep Hot Shelf... the wall studs. • Due to rear of the backsplash. The backsplash should be found at the mounting location. 4. Move range forward to gain access to variable wall stud widths and varying backsplash widths, in Figure 13, mount the lower shelf brackets included with...

Installation Manual
Page 23
...items on top of fire or injury to persons, check to make sure all packaging has been removed from accessory devices before sliding range into place. LP WARNING: To reduce the risk of the High Shelf: • plastics or containers that can get pinched when ...result. LP Pro Grand® 48" Gas Range 6 Burner Griddle Pro Grand® 48" Gas Range 6 Burner Griddle - LP Pro Grand® 36" Gas Range 4 Burner Griddle Pro Grand® 36" Gas Range 4 Burner Griddle - Backguard Installation PRG366JG PRL366JG PRG364JDG PRL364JDG PRG486JDG PRL486JDG AVAILABLE FOR THESE MODELS: Pro Grand®...
...items on top of fire or injury to persons, check to make sure all packaging has been removed from accessory devices before sliding range into place. LP WARNING: To reduce the risk of the High Shelf: • plastics or containers that can get pinched when ...result. LP Pro Grand® 48" Gas Range 6 Burner Griddle Pro Grand® 48" Gas Range 6 Burner Griddle - LP Pro Grand® 36" Gas Range 4 Burner Griddle Pro Grand® 36" Gas Range 4 Burner Griddle - Backguard Installation PRG366JG PRL366JG PRG364JDG PRL364JDG PRG486JDG PRL486JDG AVAILABLE FOR THESE MODELS: Pro Grand®...

Installation Manual
Page 24
... plastic. 2. When there is over 12" (305mm) or for island installations, the supplied THERMADOR® Flush Island Trim may be attached before sliding the range into the back of the range. 5. Begin with range) High Shelf Assembly Mounts inside the guide channels on model, remove the (3) or (4) T-...20 Torx stainless screws in the new backguard's front and back panels. 6. Align the back panel of the range above the cooking surface, a THERMADOR® Low Back or High Shelf must be used. Re-install (4) drill point screws to secure the backguard's back panel to...
... plastic. 2. When there is over 12" (305mm) or for island installations, the supplied THERMADOR® Flush Island Trim may be attached before sliding the range into the back of the range. 5. Begin with range) High Shelf Assembly Mounts inside the guide channels on model, remove the (3) or (4) T-...20 Torx stainless screws in the new backguard's front and back panels. 6. Align the back panel of the range above the cooking surface, a THERMADOR® Low Back or High Shelf must be used. Re-install (4) drill point screws to secure the backguard's back panel to...

Installation Manual
Page 25
... It is operated while at a lower height relative to the cabinet and countertop (see Figure 19). English 23 For proper performance, the range must be exposed to excessive temperatures, causing damage to the adjacent cabinet, the cabinet could be on the same or higher level as the...8226; It is moved into its final location. • Progression of the height adjustments should be level. FIGURE 19: CASTOR LOCATIONS • As the range is suggested to measure the counter top heights first with a tape measure and adding an additional 1/16" - 1/8" (2-3mm), then adjusting the legs ...
... It is operated while at a lower height relative to the cabinet and countertop (see Figure 19). English 23 For proper performance, the range must be exposed to excessive temperatures, causing damage to the adjacent cabinet, the cabinet could be on the same or higher level as the...8226; It is moved into its final location. • Progression of the height adjustments should be level. FIGURE 19: CASTOR LOCATIONS • As the range is suggested to measure the counter top heights first with a tape measure and adding an additional 1/16" - 1/8" (2-3mm), then adjusting the legs ...


