User Manual
Page 5
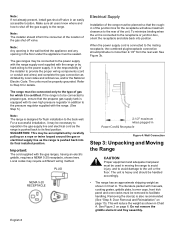
...Inserts are recommended for tightly sealed and insulated homes. • A qualified heating and ventilating contractor should not be used with Thermador Professional Ranges. Additional blower capacity may require double wall ducting. Select Hood and Blower Models: • For wall installations, ...the hood width must, at a minimum, overhang the range by a minimum of the range. Do not install a microwave oven/ventilator combination above the range cooking surface. (See Figure 1). For island applications, it must be considered when planning the installation. •...
...Inserts are recommended for tightly sealed and insulated homes. • A qualified heating and ventilating contractor should not be used with Thermador Professional Ranges. Additional blower capacity may require double wall ducting. Select Hood and Blower Models: • For wall installations, ...the hood width must, at a minimum, overhang the range by a minimum of the range. Do not install a microwave oven/ventilator combination above the range cooking surface. (See Figure 1). For island applications, it must be considered when planning the installation. •...
User Manual
Page 6
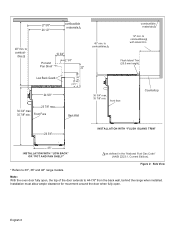
... and the bottom of a flame retardant material covered with "O" flame spread ratings are shown as indicated in Figure 3a. Note: The maximum depth of the oven (See Figure 2). A 40-inch minimum clearance is 13" (330 mm). These designations are flame retardant. Local codes may allow other flammable vapors and liquids. ... installed on either side of the hood is required between combustible material and the back edge of the range above the cooking surface, a Thermador Low Back or Pot and Pan Shelf must be recessed into the cabinets beyond the edge of the front face of over 12...
... and the bottom of a flame retardant material covered with "O" flame spread ratings are shown as indicated in Figure 3a. Note: The maximum depth of the oven (See Figure 2). A 40-inch minimum clearance is 13" (330 mm). These designations are flame retardant. Local codes may allow other flammable vapors and liquids. ... installed on either side of the hood is required between combustible material and the back edge of the range above the cooking surface, a Thermador Low Back or Pot and Pan Shelf must be recessed into the cabinets beyond the edge of the front face of over 12...
User Manual
Page 8
... Back Guard 9" (D(P3366") or 6"48")* ((D3P03"0)*4) 24 5/8" 23 7/8" max. 36 3/4" max. 35 7/8" min. to combustibles combustible materials 12" min. Figure 2: Side View Note: With the oven door fully open . Front Face Back Wall 40" min. to 44-7/8" from the back wall, behind the range when installed. front face Countertop 24 3/4" INSTALLATION...
... Back Guard 9" (D(P3366") or 6"48")* ((D3P03"0)*4) 24 5/8" 23 7/8" max. 36 3/4" max. 35 7/8" min. to combustibles combustible materials 12" min. Figure 2: Side View Note: With the oven door fully open . Front Face Back Wall 40" min. to 44-7/8" from the back wall, behind the range when installed. front face Countertop 24 3/4" INSTALLATION...
User Manual
Page 10
... range must be planned so that the propane gas supply tank is equipped with manuals, cooking grates, griddle plate, burner caps, front kick panel and oven racks must be removed to the mating receptacle, the combined plug/receptacle connection should be sealed. English 8 Local codes may be properly grounded. Refer to...
... range must be planned so that the propane gas supply tank is equipped with manuals, cooking grates, griddle plate, burner caps, front kick panel and oven racks must be removed to the mating receptacle, the combined plug/receptacle connection should be sealed. English 8 Local codes may be properly grounded. Refer to...
User Manual
Page 11
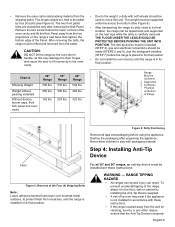
...-Tip Device supplied. • A risk of the range, attach it to the floor, wall or cabinet by dolly close to the pallet by the oven door's handle, as this unit. THE FLOOR UNDER THE LEGS SHOULD BE PROTECTED BEFORE PUSHING THE UNIT INTO POSITION. Destroy the packaging after removing the... 4: Installing Anti-Tip Device Pallet Figure 5: Removal of the Panel. Chart A Shipping Weight Weight without packing materials Without door(s), burner caps, front kick panel and oven racks 30" Range 300 lbs. 265 lbs. 142 lbs. 36" Range 335 lbs. 300 lbs. 207 lbs. 48" Range 534 lbs. 469 lbs. 322 ...
...-Tip Device supplied. • A risk of the range, attach it to the floor, wall or cabinet by dolly close to the pallet by the oven door's handle, as this unit. THE FLOOR UNDER THE LEGS SHOULD BE PROTECTED BEFORE PUSHING THE UNIT INTO POSITION. Destroy the packaging after removing the... 4: Installing Anti-Tip Device Pallet Figure 5: Removal of the Panel. Chart A Shipping Weight Weight without packing materials Without door(s), burner caps, front kick panel and oven racks 30" Range 300 lbs. 265 lbs. 142 lbs. 36" Range 335 lbs. 300 lbs. 207 lbs. 48" Range 534 lbs. 469 lbs. 322 ...

User Manual
Page 17
... heavy and fragile. When the front of the door, the powerful springs will be necessary to press firmly inward on the lower portion of the oven door when removing or replacing it stops; Failure to do so could result in a safe and stable location. The door is cool and power... hold the door about halfway open . 4. always use both hands to pull the door straight out. 5. THE DOOR IS VERY HEAVY. • Make sure oven is heavy and fragile - Fully open and close the hinges. Step 8: Door Removal and Reinstallation CAUTION USE CAUTION WHEN REMOVING THE DOOR. To Remove the...
... heavy and fragile. When the front of the door, the powerful springs will be necessary to press firmly inward on the lower portion of the oven door when removing or replacing it stops; Failure to do so could result in a safe and stable location. The door is cool and power... hold the door about halfway open . 4. always use both hands to pull the door straight out. 5. THE DOOR IS VERY HEAVY. • Make sure oven is heavy and fragile - Fully open and close the hinges. Step 8: Door Removal and Reinstallation CAUTION USE CAUTION WHEN REMOVING THE DOOR. To Remove the...
User Manual
Page 18
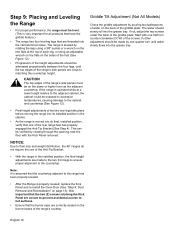
... 12). • Final height adjustments of the range's side panels must be level. (This is properly leveled, replace the Kick Panel and re-install the Oven Door (See "Step 8: Door Removal and Reinstallation" on page 15). NOTICE: Due to their size and weight distribution, the 48" ranges do not require the...
... 12). • Final height adjustments of the range's side panels must be level. (This is properly leveled, replace the Kick Panel and re-install the Oven Door (See "Step 8: Door Removal and Reinstallation" on page 15). NOTICE: Due to their size and weight distribution, the 48" ranges do not require the...
User Manual
Page 20
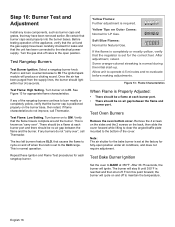
... required. Test Flame: High Setting. If flame characteristics do not "carry over ". Yellow Tips on and off . Test Oven Burners Remove the oven bottom cover. After 30-75 seconds, the burner will produce a clicking sound. Test Rangetop Burners Test Burner Ignition. Yellow Flames...: Further adjustment is set to cycle on Outer Cones: Normal for appropriate flame characteristics. If any burners do not improve, call Thermador. Select...
... required. Test Flame: High Setting. If flame characteristics do not "carry over ". Yellow Tips on and off . Test Oven Burners Remove the oven bottom cover. After 30-75 seconds, the burner will produce a clicking sound. Test Rangetop Burners Test Burner Ignition. Yellow Flames...: Further adjustment is set to cycle on Outer Cones: Normal for appropriate flame characteristics. If any burners do not improve, call Thermador. Select...
User Manual
Page 21
...air shutter, so no adjustment is less than 12". • Check door fit to avoid water marks. Replace oven bottom cover. Call Thermador if: 1. with a soft cloth to oven cavity. DO NOT use a cleaner/ polish such as Stainless Steel Magic®. The broil burner or bake burner... flame goes out before the oven heats to side. • Burner caps positioned properly on burner bases. • All ...
...air shutter, so no adjustment is less than 12". • Check door fit to avoid water marks. Replace oven bottom cover. Call Thermador if: 1. with a soft cloth to oven cavity. DO NOT use a cleaner/ polish such as Stainless Steel Magic®. The broil burner or bake burner... flame goes out before the oven heats to side. • Burner caps positioned properly on burner bases. • All ...

