Thermador PRL364GDH Support and Manuals
Get Help and Manuals for this Thermador item

View All Support Options Below
Free Thermador PRL364GDH manuals!
Problems with Thermador PRL364GDH?
Ask a Question
Free Thermador PRL364GDH manuals!
Problems with Thermador PRL364GDH?
Ask a Question
Thermador PRL364GDH Videos

Thermador PRL364GDH Freestanding Range
Duration: :58
Total Views: 37
Duration: :58
Total Views: 37
Popular Thermador PRL364GDH Manual Pages
Design Guide - Pro Harmony Ranges - Page 5
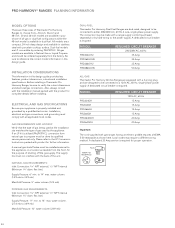
..., single-phase power supply. MODEL
PRG304GH PRL304GH PRG366GH PRL366GH PRG364GDH PRL364GDH
REQuiRED ciRcuiT BREAkER
120V AC, 60 Hz 15 Amp 15 Amp 15 Amp 15 Amp 20 Amp 20 Amp
important:
The cord supplied with porcelain cooktop surface. All-gas models are available in dual-fuel. Also, always consult with the installation manual packed with all -gas...
Design Guide - Pro Harmony Ranges - Page 6
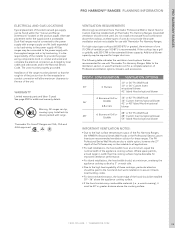
... strongly recommend that are CGA, CSA and
AGA approved. Do not install a microwave-hood combination above the cooking surface.
1.800.735.4328 | THERMADOR.COM
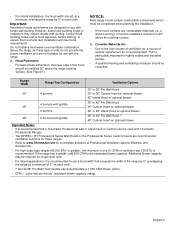
45 Install anti-tip device packed with all applications.
• For wall installations, the hood width must, at a minimum, overhang the appliance cooking surface by hard-wiring to the rear of the unit.
WiDTh...
Design Guide - Pro Harmony Ranges - Page 8
... the proper ventilation and are recommended ventilation solutions for island installations, where there is used. Do not install a microwave-hood combination above the cooktop, as these ranges.
An optional 22-inch high shelf backguard is 40".
** 10" minimum clearance from natural gas to the LP Conversion Instructions packed with product for use with all applications. An...
Design Guide - Pro Harmony Ranges - Page 10

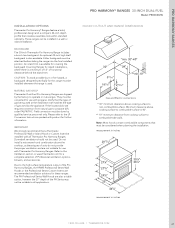
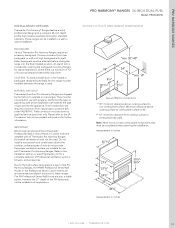
... BAckGuARD
36-inch Thermador Pro Harmony Ranges require an accessory backguard.
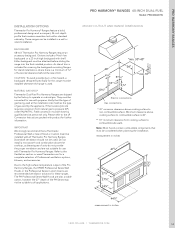
Do not install a microwave-hood combination above cooking ...service personnel only. PRO hARMONY® RANGES 36-iNch DuAL-FuEL
Model: PRD364GDhu
36-INCH CuTOuT AND RANGE DIMENSIONS
*min. 30"- 40"
36"
24"
81/8" 1913/16"
33/16"
**min. 10"
Gas and Electric connections
* 30" minimum clearance above the cooktop...
Design Guide - Pro Harmony Ranges - Page 12
... surface to all Thermador Pro Harmony Ranges. Do not install a microwave-hood combination above cooking surface to combustible surface is 40".
** 10" minimum clearance from natural gas to the high surface temperature output of units do not provide the proper ventilation and are shipped by the factory to the LP Conversion Instructions packed with product...
Design Guide - Pro Harmony Ranges - Page 14
...recommended ventilation solutions for these ranges. Do not install a microwave-hood combination above the cooktop, as these types of gas used . Due...appliance.
The PH Professional Series Wall Hoods are shipped by qualified service personnel only.
Please refer to the Ventilation section or www.Thermador.com for use with propane. PRO hARMONY RANGES
iNSTALLATiON OPTiONS
Thermador...
Installation Instructions - Page 4
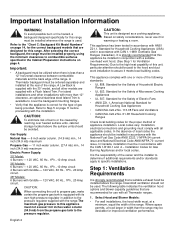
...Codes for Ventilation Requirements.) Due to the high heat capability of burns or fire caused by reaching over heated surface units, cabinet storage located above the range. Select Hood and Blower Models:
• For wall installations, the hood width must comply with all Thermador ranges.
1.
For island installations and other models are supplied with a Flush Island Trim.
This appliance...
Installation Instructions - Page 5
Do not install a microwave oven/ventilator combination above the range, as these ranges.
• Refer to use with single wall ducting. a wood covering), it is particularly important for use with the range.
2. If the range has a griddle, add 200 CFM to assure that hood and duct installation will meet local requirements. Consult local building codes and/or...
Installation Instructions - Page 20
... Use Manual and Installation Instructions with stainless steel for which could prove harmful. Slide cover into place and reattach to burn yellow. Call Thermador if:
1. Any of the burners continue to bottom of time. front to the type of page 14.) • Kick panel in place and two (2) screws secure. • INSTALLER: Write the model number...
User Manual - Page 2
... 1
How this Manual Is Organized 1
Introduction 1
Safety 2
IMPORTANT SAFETY INSTRUCTIONS 2 SAFETY PRACTICES TO AVOID PERSONAL INJURY 4
Before You Begin 7
Before Using Your Range for the First Time . . 7
Description 9
Model and Parts Identification - 48" Range . . 9 Model and Parts Identification - 36" Range . 10 Model and Parts Identification - 30" Range . 10
Using the Cooktop 11
Cookware...
User Manual - Page 8
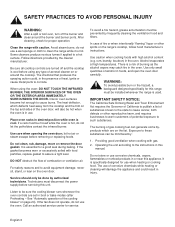
... the cooling blower runs whenever the oven controls are on or around the burner and burner ports.
Use caution when cooking foods with food particles, replace gasket to assure a tight seal. rum, brandy, bourbon) in the presence of the cooling blower" on the range's cooktop, follow hood manufacturer's instructions. Alcohol evaporates at high temperatures. Use...
User Manual - Page 10
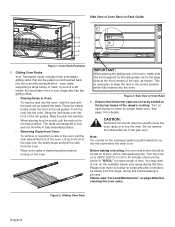
...oven, make sure the front supports on Rack Guide:
5 4 3
2 1
Figure 1: Oven Rack Positions
5. If yours is on page 28 before turning on the burner bases of time. Push the rack into the room when the oven is a 48" model, the secondary oven of the rail guides. Slide the rack into the oven... of the range's cooktop. Before baking or broiling, the oven and broiler should never...
User Manual - Page 11
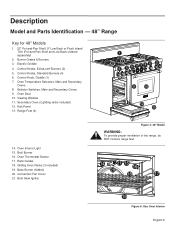
Description
Model and Parts Identification - 48" Range
Key for 48" Models
1. 22" Pot-and-Pan Shelf, 9" Low Back or Flush Island Trim (Pot-and-Pan Shelf and Low Back ordered separately)
2. Oven Door 10. Oven Thermostat Sensor 17. Electric Griddle
4. Control Knobs, ExtraLow® Burners (2) 5. Oven Temperature Selectors, Main and Secondary
Ovens 8. Broil Burner 16. Gliding Oven Racks (3 ...
User Manual - Page 34
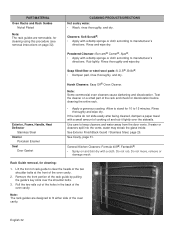
...®, Fantastik®. • Spray on and blot dry with a damp sponge or cloth according to manufacturer's directions. Test the cleaner on page 32). Rack Guide removal, for cleaning using this procedure (see removal instructions on a small part of the oven cavity. CLEANING PRODUCTS/DIRECTIONS Hot sudsy water. • Wash, rinse thoroughly, and dry.
User Manual - Page 37

... installation, tampering, failure to follow operating instructions, mishandling, unauthorized service (including selfperformed "fixing" or exploration of the appliance's internal workings).
• Adjustment, alteration or modification of this warranty and this warranty shall not be available to such parts. in any such event, if you , in Thermador's sole discretion, for Thermador to repair...
Thermador PRL364GDH Reviews
We have not received any reviews for Thermador yet.