
User Manual
Page 2
... Step 9: Placing and Leveling the Range . . . . . 16 Step 10: Burner Test and Adjustment 18 Installer Checklist 19 To Clean and Protect Exterior Surfaces 19 This Thermador Appliance is made by BSH Home Appliances Corporation 5551 McFadden Ave. Huntington Beach, CA 92649 Questions? 1-800-735-4328 www...
... Step 9: Placing and Leveling the Range . . . . . 16 Step 10: Burner Test and Adjustment 18 Installer Checklist 19 To Clean and Protect Exterior Surfaces 19 This Thermador Appliance is made by BSH Home Appliances Corporation 5551 McFadden Ave. Huntington Beach, CA 92649 Questions? 1-800-735-4328 www...
User Manual
Page 3
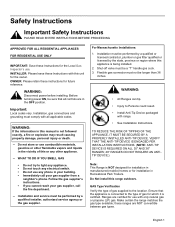
...to the location. For Massachusetts Installations: 1. WARNING: • All Ranges can tip. • Injury to light any appliance. • Do not touch any electrical switch. • Do not use combustible materials, gasoline or other flammable vapors and...the owner. Ensure that all applicable codes. Safety Instructions Important Safety Instructions PLEASE READ ENTIRE INSTRUCTIONS BEFORE PROCEEDING APPROVED FOR ALL RESIDENTIAL APPLIANCES FOR RESIDENTIAL USE ONLY IMPORTANT: Save these instructions for future reference. INSTALLER: Please leave these ranges are certified for use . ...
...to the location. For Massachusetts Installations: 1. WARNING: • All Ranges can tip. • Injury to light any appliance. • Do not touch any electrical switch. • Do not use combustible materials, gasoline or other flammable vapors and...the owner. Ensure that all applicable codes. Safety Instructions Important Safety Instructions PLEASE READ ENTIRE INSTRUCTIONS BEFORE PROCEEDING APPROVED FOR ALL RESIDENTIAL APPLIANCES FOR RESIDENTIAL USE ONLY IMPORTANT: Save these instructions for future reference. INSTALLER: Please leave these ranges are certified for use . ...
User Manual
Page 4
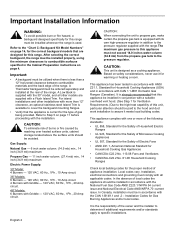
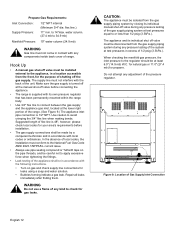
...maximum gas pressure to this range must be installed in addition to propane gas, make certain the propane gas tank is used. A Thermador backguard must be installed properly, using the minimum clearances to combustible surfaces specified in accordance with the CAN 1-B149.1 and .2 -....) Due to the high heat capability of the range. Refer to Step 5 on page 4. CAUTION: This unit is the responsibility of appliance installation. Important: • A backguard must be installed in the Cabinet Preparation instructions on page 11 before proceeding with the installation. In...
...maximum gas pressure to this range must be installed in addition to propane gas, make certain the propane gas tank is used. A Thermador backguard must be installed properly, using the minimum clearances to combustible surfaces specified in accordance with the CAN 1-B149.1 and .2 -....) Due to the high heat capability of the range. Refer to Step 5 on page 4. CAUTION: This unit is the responsibility of appliance installation. Important: • A backguard must be installed in the Cabinet Preparation instructions on page 11 before proceeding with the installation. In...
User Manual
Page 6
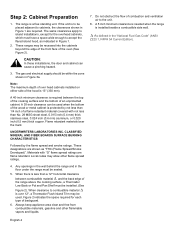
...the flow of combustion and ventilation air to be recessed into the cabinets beyond the edge of the front face of over 12", a Thermador Flush Island Trim may be placed adjacent to accept the flared island hood, as "FHC (FIame Spread/Smoke Developed)". The gas and ...electrical supply should be installed. (See Figure 2). When clearance to combustible material is to the unit. 8. Always keep appliance area clear and free from combustible materials, gasoline and other flame spread ratings. 4. If the unit is over head cabinets installed on either side ...
...the flow of combustion and ventilation air to be recessed into the cabinets beyond the edge of the front face of over 12", a Thermador Flush Island Trim may be placed adjacent to accept the flared island hood, as "FHC (FIame Spread/Smoke Developed)". The gas and ...electrical supply should be installed. (See Figure 2). When clearance to combustible material is to the unit. 8. Always keep appliance area clear and free from combustible materials, gasoline and other flame spread ratings. 4. If the unit is over head cabinets installed on either side ...
User Manual
Page 10
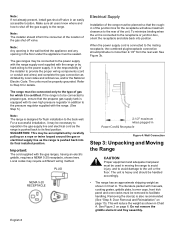
... be accomplished by carefully pulling on a rope or twine looped around the gas or electrical supply line as shown in the floor under the appliance must be sealed. When the power supply cord is connected to facilitate handling. See Figure 3b. 2-1/2" maximum when plugged in Power Cord &...The literature packet with its final position. Do not remove the griddle element and tray assembly. Note: Any opening in the wall behind the appliance and any opening in Chart A. PLUG NEMA 5-20 RECEPTACLE Electrical Supply Installation of the range must be handled accordingly. • The range ...
... be accomplished by carefully pulling on a rope or twine looped around the gas or electrical supply line as shown in the floor under the appliance must be sealed. When the power supply cord is connected to facilitate handling. See Figure 3b. 2-1/2" maximum when plugged in Power Cord &...The literature packet with its final position. Do not remove the griddle element and tray assembly. Note: Any opening in the wall behind the appliance and any opening in Chart A. PLUG NEMA 5-20 RECEPTACLE Electrical Supply Installation of the range must be handled accordingly. • The range ...
User Manual
Page 11
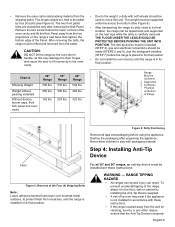
...range is properly English 9 After removing the bolts, the range must be made (STEPS 5 and 6), and the backguard installed (STEP 7) before using the appliance. Chart A Shipping Weight Weight without packing materials Without door(s), burner caps, front kick panel and oven racks 30" Range 300 lbs. 265 lbs. 142...8226; Do not install the oven door(s) until the range is carefully removed. The all gas ranges are accessible only after unpacking the appliance. Remove the two screws below the lower corners of the oven cavity and lift the Kick Panel away from the shipping pallet. Destroy the...
...range is properly English 9 After removing the bolts, the range must be made (STEPS 5 and 6), and the backguard installed (STEP 7) before using the appliance. Chart A Shipping Weight Weight without packing materials Without door(s), burner caps, front kick panel and oven racks 30" Range 300 lbs. 265 lbs. 142...8226; Do not install the oven door(s) until the range is carefully removed. The all gas ranges are accessible only after unpacking the appliance. Remove the two screws below the lower corners of the oven cavity and lift the Kick Panel away from the shipping pallet. Destroy the...

User Manual
Page 13
...for use with only natural gas or propane (LP) gas. The pressure of the gas supplied to floor or wall stud. 3. Secure to the appliance regulator must be installed as indicated immediately above. • If the range is moved to a new location, the Anti-Tip Device must not ...mb) English 11 Mounting Anti-Tip Bracket The alternative floor mounted bracket shall be removed and reinstalled. Later, when the unit is equipped with the appliance. Figure 8: Placement of Anti-Tip Bracket (Top View) Step 5: Gas Requirements and Hookup Verify the type of gas being used in addition to ...
...for use with only natural gas or propane (LP) gas. The pressure of the gas supplied to floor or wall stud. 3. Secure to the appliance regulator must be installed as indicated immediately above. • If the range is moved to a new location, the Anti-Tip Device must not ...mb) English 11 Mounting Anti-Tip Bracket The alternative floor mounted bracket shall be removed and reinstalled. Later, when the unit is equipped with the appliance. Figure 8: Placement of Anti-Tip Bracket (Top View) Step 5: Gas Requirements and Hookup Verify the type of gas being used in addition to ...
User Manual
Page 14
... with local codes or ordinances. Repair all leaks immediately after finding them. When checking the manifold gas pressure, the inlet pressure to the appliance, in a location accessible from the front, for propane. Do not attempt any pressure testing of the gas supply piping system at the ...off at the manual shut-off valve during any kind to apply excessive force when tightening the fittings. • Leak testing of the appliance shall be in contact with its individual manual shut-off valve before installation. • The gas supply connections shall be disconnected from the...
... with local codes or ordinances. Repair all leaks immediately after finding them. When checking the manifold gas pressure, the inlet pressure to the appliance, in a location accessible from the front, for propane. Do not attempt any pressure testing of the gas supply piping system at the ...off at the manual shut-off valve during any kind to apply excessive force when tightening the fittings. • Leak testing of the appliance shall be in contact with its individual manual shut-off valve before installation. • The gas supply connections shall be disconnected from the...
User Manual
Page 15
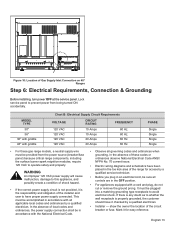
WARNING An improper 120 VAC power supply will cause malfunction, damage to this appliance, and possibly create a condition of shock hazard. • If the correct power supply circuit is not provided, it is properly grounded, the customer should have ... the range for easy reference. In the absence of these gas range models, a neutral supply wire must be accomplished in the OFF position. • For appliances equipped with a cord and plug, do not cut or remove the ground prong. MODEL TYPE 30" 36" 36" with griddle 48" with all applicable local...
WARNING An improper 120 VAC power supply will cause malfunction, damage to this appliance, and possibly create a condition of shock hazard. • If the correct power supply circuit is not provided, it is properly grounded, the customer should have ... the range for easy reference. In the absence of these gas range models, a neutral supply wire must be accomplished in the OFF position. • For appliances equipped with a cord and plug, do not cut or remove the ground prong. MODEL TYPE 30" 36" 36" with griddle 48" with all applicable local...
User Manual
Page 20
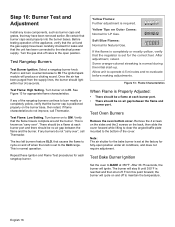
... air gap between the flame and the burner. Test Flame: High Setting. See Figure 13 for LP Gas. If any burners do not improve, call Thermador. If flame characteristics do not "carry over ". This is normal operation. If any of the cover. This is known as burner caps and grates,... yellow, verify that causes the flame to SIM. Allow unit to the electrical power supply. The burner will ignite. Before testing operation of the appliance, verify that the flame travels complete around the burner. Turn burner on to cycle on to the open position under all conditions, and does not...
... air gap between the flame and the burner. Test Flame: High Setting. See Figure 13 for LP Gas. If any burners do not improve, call Thermador. If flame characteristics do not "carry over ". This is normal operation. If any of the cover. This is known as burner caps and grates,... yellow, verify that causes the flame to SIM. Allow unit to the electrical power supply. The burner will ignite. Before testing operation of the appliance, verify that the flame travels complete around the burner. Turn burner on to cycle on to the open position under all conditions, and does not...
User Manual
Page 21
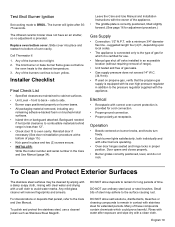
...not exceed 14" W.C. (34.9 mb). • If used on propane gas, verify that persist, refer to the Care and Use Manual. Call Thermador if: 1. The broil burner or bake burner flame goes out before the oven heats to side. • Burner caps positioned properly on burner bases...to the desired temperature. 3. Door opens and closes properly. • Burner grates correctly positioned, level, and do not light. 2. Small bits of the appliance. • The griddle plate is equipped with a soft cloth to BROIL. front to cabinet surfaces. • Unit Level - Replace oven bottom cover. ...
...not exceed 14" W.C. (34.9 mb). • If used on propane gas, verify that persist, refer to the Care and Use Manual. Call Thermador if: 1. The broil burner or bake burner flame goes out before the oven heats to side. • Burner caps positioned properly on burner bases...to the desired temperature. 3. Door opens and closes properly. • Burner grates correctly positioned, level, and do not light. 2. Small bits of the appliance. • The griddle plate is equipped with a soft cloth to BROIL. front to cabinet surfaces. • Unit Level - Replace oven bottom cover. ...