
Installation Instructions
Page 2
... 6: Electrical Requirements, Connection & Grounding 12 Step 7: Backguard Installation 13 Step 8: Door Removal and Reinstallation 14 Step 9: Placing and Leveling the Range 15 Step 10: Burner Test and Adjustment 17 Installer Checklist 18 To Clean and Protect Exterior Surfaces 18 This Thermador Appliance is made by BSH Home Appliances Corporation 5551 McFadden Ave.
... 6: Electrical Requirements, Connection & Grounding 12 Step 7: Backguard Installation 13 Step 8: Door Removal and Reinstallation 14 Step 9: Placing and Leveling the Range 15 Step 10: Burner Test and Adjustment 17 Installer Checklist 18 To Clean and Protect Exterior Surfaces 18 This Thermador Appliance is made by BSH Home Appliances Corporation 5551 McFadden Ave.
Installation Instructions
Page 3
...other flammable vapors and liquids in the vicinity of this or any phone in the OFF position. Installation and service must comply with this range outdoors. Ranges are certified for which it is being installed. 2. WHAT TO DO IF YOU SMELL GAS • Do not try to light any... DEVICE. VERIFY THAT THE ANTI-TIP DEVICE IS ENGAGED PER INSTALLATION INSTRUCTIONS (NOTE: ANTI-TIP DEVICE IS REQUIRED ON ALL 30" AND 36" RANGES; 48" RANGES DO NOT REQUIRE AN ANTITIP DEVICE). WARNING: Disconnect power before installing. English 1 Follow the gas supplier's instructions. • If you cannot ...
...other flammable vapors and liquids in the vicinity of this or any phone in the OFF position. Installation and service must comply with this range outdoors. Ranges are certified for which it is being installed. 2. WHAT TO DO IF YOU SMELL GAS • Do not try to light any... DEVICE. VERIFY THAT THE ANTI-TIP DEVICE IS ENGAGED PER INSTALLATION INSTRUCTIONS (NOTE: ANTI-TIP DEVICE IS REQUIRED ON ALL 30" AND 36" RANGES; 48" RANGES DO NOT REQUIRE AN ANTITIP DEVICE). WARNING: Disconnect power before installing. English 1 Follow the gas supplier's instructions. • If you cannot ...
Installation Instructions
Page 4
...particular attention should not be used . Where space permits, a hood larger in accordance with all Thermador ranges. 1. After selecting the correct backguard, the range must be in the Cabinet Preparation instructions on safety considerations, never use with ANSI Z21.1, Standard for...Important Installation Information WARNING: To avoid possible burn or fire hazard, a backguard designed specifically for this range must be installed whenever the range is used . A Thermador backguard must be avoided. Installation Codes for warming or heating a room. The following standards: &#...
...particular attention should not be used . Where space permits, a hood larger in accordance with all Thermador ranges. 1. After selecting the correct backguard, the range must be in the Cabinet Preparation instructions on safety considerations, never use with ANSI Z21.1, Standard for...Important Installation Information WARNING: To avoid possible burn or fire hazard, a backguard designed specifically for this range must be installed whenever the range is used . A Thermador backguard must be avoided. Installation Codes for warming or heating a room. The following standards: &#...
Installation Instructions
Page 5
...provide the proper ventilation and are recommended ventilation solutions for these ranges. • Refer to www.Thermador.com for a complete selection of Professional Ventilation options, Blowers, and Accessories. • For high output gas ranges (60,000 BTU or greater), the minimum of one ...installation. • If the hood contains any combustible materials (i.e. Important: Ventilation hoods and blowers are designed for use with Thermador Professional Ranges. • The HPWB or PH Professional Series Wall Hoods or the Professional Series Custom Inserts are not suitable for longer...
...provide the proper ventilation and are recommended ventilation solutions for these ranges. • Refer to www.Thermador.com for a complete selection of Professional Ventilation options, Blowers, and Accessories. • For high output gas ranges (60,000 BTU or greater), the minimum of one ...installation. • If the hood contains any combustible materials (i.e. Important: Ventilation hoods and blowers are designed for use with Thermador Professional Ranges. • The HPWB or PH Professional Series Wall Hoods or the Professional Series Custom Inserts are not suitable for longer...
Installation Instructions
Page 6
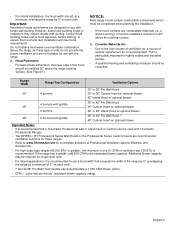
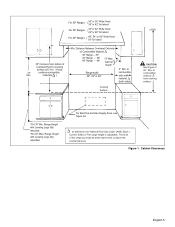
...be within the zone shown in Figure 1 are flame retardant. A 5 inch minimum clearance is needed when the range is to island installations, except for each type of over 12", a Thermador Flush Island Trim may be placed adjacent to accept the flared island hood, as "FHC (FIame Spread/Smoke Developed... space required for the overhead cabinets, which must be recessed into the cabinets beyond the edge of the front face of the range above the cooking surface, a Thermador Low Back or Pot and Pan Shelf must have a space wide enough to cabinets, the clearances shown in Figure 3a. Step...
...be within the zone shown in Figure 1 are flame retardant. A 5 inch minimum clearance is needed when the range is to island installations, except for each type of over 12", a Thermador Flush Island Trim may be placed adjacent to accept the flared island hood, as "FHC (FIame Spread/Smoke Developed... space required for the overhead cabinets, which must be recessed into the cabinets beyond the edge of the front face of the range above the cooking surface, a Thermador Low Back or Pot and Pan Shelf must have a space wide enough to cabinets, the clearances shown in Figure 3a. Step...
Installation Instructions
Page 7
... is adjustable. The level of Combustible Material 30" Range - 30" 36" Range - 36" 48" Range - 48" 13" Max. } Cabinet Depth Range width 30", 36" or 48" 5" Min. Range Height with Leveling Legs fully extended. Range Height with Leveling Legs fully retracted *36-3/4" Max. For 30" Ranges For 36" Ranges For 48" Ranges } } } 30" or 36" Wide Hood 36" or...
... is adjustable. The level of Combustible Material 30" Range - 30" 36" Range - 36" 48" Range - 48" 13" Max. } Cabinet Depth Range width 30", 36" or 48" 5" Min. Range Height with Leveling Legs fully extended. Range Height with Leveling Legs fully retracted *36-3/4" Max. For 30" Ranges For 36" Ranges For 48" Ranges } } } 30" or 36" Wide Hood 36" or...
Installation Instructions
Page 8
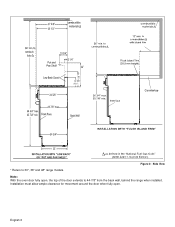
English 6 Figure 2: Side View Note: With the oven door fully open . Installation must allow ample clearance for movement around the door when fully open , the top of the door extends to 30", 36" and 48" range models. * Refers to 44-7/8" from the back wall, behind the range when installed.
English 6 Figure 2: Side View Note: With the oven door fully open . Installation must allow ample clearance for movement around the door when fully open , the top of the door extends to 30", 36" and 48" range models. * Refers to 44-7/8" from the back wall, behind the range when installed.
Installation Instructions
Page 9
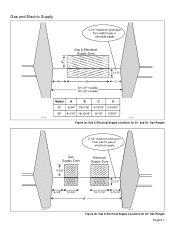
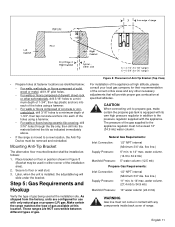
Gas and Electric Supply Figure 3a: Gas & Electrical Supply Locations for 30" and 36" Gas Ranges 2-1/2" maximum protrusion from wall for gas or electrical supply Gas Supply Zone 4-3/8" Electrical Supply Zone 2-1/2" 4-3/8" 10-3/4" 48" 18-11/16" 5-15/16" Figure 3b: Gas & Electrical Supply Locations for 48" Gas Ranges English 7
Gas and Electric Supply Figure 3a: Gas & Electrical Supply Locations for 30" and 36" Gas Ranges 2-1/2" maximum protrusion from wall for gas or electrical supply Gas Supply Zone 4-3/8" Electrical Supply Zone 2-1/2" 4-3/8" 10-3/4" 48" 18-11/16" 5-15/16" Figure 3b: Gas & Electrical Supply Locations for 48" Gas Ranges English 7
Installation Instructions
Page 10
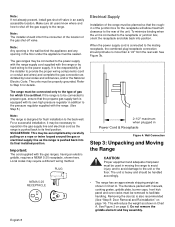
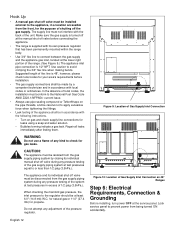
...oven racks must be necessary to the back wall. Local codes may be removed to the power supply. The literature packet with the gas ranges, having an electric griddle, requires a NEMA 5-20 receptacle, shown here. Note: Any opening in the wall behind the appliance and ...receptacle and slide back into its own high pressure regulator in Power Cord & Receptacle Figure 4: Wall Connection Step 3: Unpacking and Moving the Range CAUTION Proper equipment and adequate manpower must be accomplished by local codes and ordinances, and/or the National Electric Code. See Figure 2 on ...
...oven racks must be necessary to the back wall. Local codes may be removed to the power supply. The literature packet with the gas ranges, having an electric griddle, requires a NEMA 5-20 receptacle, shown here. Note: Any opening in the wall behind the appliance and ...receptacle and slide back into its own high pressure regulator in Power Cord & Receptacle Figure 4: Wall Connection Step 3: Unpacking and Moving the Range CAUTION Proper equipment and adequate manpower must be accomplished by local codes and ordinances, and/or the National Electric Code. See Figure 2 on ...
Installation Instructions
Page 11
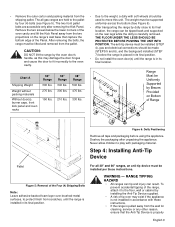
...dolly with soft wheels should be made (STEPS 5 and 6), and the backguard installed (STEP 7) before using the appliance. For all gas ranges are accessible only after unpacking the appliance. THE FLOOR UNDER THE LEGS SHOULD BE PROTECTED BEFORE PUSHING THE UNIT INTO POSITION. Must be lifted and...may damage the door hinges and cause the door to fit incorrectly to the oven cavity. • Due to its final location, the range can result. The weight must be installed (STEP 4), gas and electrical connections should be supported uniformly across the bottom (See Figure 6). &#...
...dolly with soft wheels should be made (STEPS 5 and 6), and the backguard installed (STEP 7) before using the appliance. For all gas ranges are accessible only after unpacking the appliance. THE FLOOR UNDER THE LEGS SHOULD BE PROTECTED BEFORE PUSHING THE UNIT INTO POSITION. Must be lifted and...may damage the door hinges and cause the door to fit incorrectly to the oven cavity. • Due to its final location, the range can result. The weight must be installed (STEP 4), gas and electrical connections should be supported uniformly across the bottom (See Figure 6). &#...
Installation Instructions
Page 12
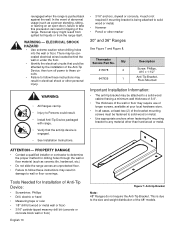
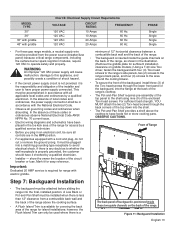
...wires located behind the wall or under the floor. • Identify the electrical circuits that could result. • Install Anti-Tip Device packaged with range. • Verify that the anti-tip device is engaged. • See Installation Instructions. • 3/16" anchors, drywall or concrete, 4 ...8226; Use extreme caution when drilling holes into the wall or floor. Thermador Service Part No. reengaged when the range is due to the size and weight distribution of the 48" models. WARNING: • All Ranges can result in electrical shock or other than hard-wood or metal. ...
...wires located behind the wall or under the floor. • Identify the electrical circuits that could result. • Install Anti-Tip Device packaged with range. • Verify that the anti-tip device is engaged. • See Installation Instructions. • 3/16" anchors, drywall or concrete, 4 ...8226; Use extreme caution when drilling holes into the wall or floor. Thermador Service Part No. reengaged when the range is due to the size and weight distribution of the 48" models. WARNING: • All Ranges can result in electrical shock or other than hard-wood or metal. ...
Installation Instructions
Page 13
Mounting Anti-Tip Bracket The alternative floor mounted bracket shall be installed as indicated immediately above. • If the range is moved to a new location, the Anti-Tip Device must be used at this location. Step 5: Gas Requirements and Hookup Verify the type of gas..."max. As shipped from the factory, units are NOT convertible between different types of gas available at the installation site. English 11 Make certain the range matches the type of gas. Place bracket on floor in position shown in Figure 8 (Bracket may be removed and reinstalled. to 34.9 mb) 5" water ...
Mounting Anti-Tip Bracket The alternative floor mounted bracket shall be installed as indicated immediately above. • If the range is moved to a new location, the Anti-Tip Device must be used at this location. Step 5: Gas Requirements and Hookup Verify the type of gas..."max. As shipped from the factory, units are NOT convertible between different types of gas available at the installation site. English 11 Make certain the range matches the type of gas. Place bracket on floor in position shown in Figure 8 (Bracket may be removed and reinstalled. to 34.9 mb) 5" water ...
Installation Instructions
Page 14
... pressure testing of the system at test pressures in excess of the appliance shall be in accordance with the following instructions. • Turn on 48" Ranges Step 6: Electrical Requirements, Connection & Grounding Before installing, turn power OFF at least 6.0" (14.9 mb) W.C. current issue. • Always use a... flame of shutting off the gas supply. The appliance and its own pressure regulator that has been permanently mounted within the range body. • Use 3/4" flex line to connect between the gas supply and the appliance gas inlet, located at the lower right portion...
... pressure testing of the system at test pressures in excess of the appliance shall be in accordance with the following instructions. • Turn on 48" Ranges Step 6: Electrical Requirements, Connection & Grounding Before installing, turn power OFF at least 6.0" (14.9 mb) W.C. current issue. • Always use a... flame of shutting off the gas supply. The appliance and its own pressure regulator that has been permanently mounted within the range body. • Use 3/4" flex line to connect between the gas supply and the appliance gas inlet, located at the lower right portion...
Installation Instructions
Page 15
...not provided, it is required for island installations; minimum of 12" horizontal clearance between a combustible back wall and the back of the range. • The backguard is inserted inside these codes or ordinances observe National Electrical Code ANSI/ NFPA No. 70 current issue. •... Electric wiring diagrams and schematics have proper power supply connected. Front of Range Step 7: Backguard Installation • The backguard must be installed when there is available for easy reference. however, the Flush Island Trim ...
...not provided, it is required for island installations; minimum of 12" horizontal clearance between a combustible back wall and the back of the range. • The backguard is inserted inside these codes or ordinances observe National Electrical Code ANSI/ NFPA No. 70 current issue. •... Electric wiring diagrams and schematics have proper power supply connected. Front of Range Step 7: Backguard Installation • The backguard must be installed when there is available for easy reference. however, the Flush Island Trim ...
Installation Instructions
Page 16
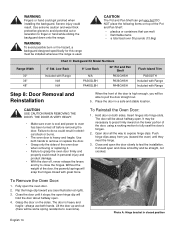
...plastics or containers that can get pinched when installing the backguard. WARNING To avoid possible burn or fire hazard, a backguard designed specifically for this range must be straight, not crooked. Failure to overcome). It may be some spring resistance to do so could result in personal injury and product ... could get very hot! CAUTION The Pot and Pan Shelf can melt • flammable items • a total load over 30 pounds (13.6kg) Range Width 30" 36" 48" Chart C: Backguard Kit Model Numbers 6" Std. DO NOT place the following items on both hands. Place the door in ...
...plastics or containers that can get pinched when installing the backguard. WARNING To avoid possible burn or fire hazard, a backguard designed specifically for this range must be straight, not crooked. Failure to overcome). It may be some spring resistance to do so could result in personal injury and product ... could get very hot! CAUTION The Pot and Pan Shelf can melt • flammable items • a total load over 30 pounds (13.6kg) Range Width 30" 36" 48" Chart C: Backguard Kit Model Numbers 6" Std. DO NOT place the following items on both hands. Place the door in ...
Installation Instructions
Page 17
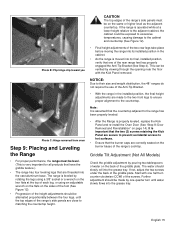
... water slowly flows into its installed position in the installed position, the final height adjustments are correctly seated on the burner bases of the range's cooktop. Further adjustment should slowly roll into its final, installed position, verify that one -quarter turn counter-clockwise (CCW) of the screws... The water should be made to the two front legs to ensure proper alignment to the countertop. CAUTION The top edges of the range's side panels must be level. (This is important that the two (2) screws retaining the Kick Panel are secure to prevent accidental access...
... water slowly flows into its installed position in the installed position, the final height adjustments are correctly seated on the burner bases of the range's cooktop. Further adjustment should slowly roll into its final, installed position, verify that one -quarter turn counter-clockwise (CCW) of the screws... The water should be made to the two front legs to ensure proper alignment to the countertop. CAUTION The top edges of the range's side panels must be level. (This is important that the two (2) screws retaining the Kick Panel are secure to prevent accidental access...
Installation Instructions
Page 19
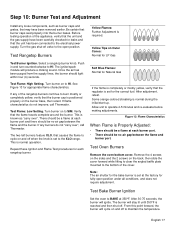
...have been removed earlier. Turn burner on the burner base, then retest. Verify that the regulator is positioned properly on to the XLO range. Test Oven Burners Remove the oven bottom cover. The burner will produce a clicking sound. Turn the gas shut-off . Push in... this point forward, the burner will ignite. Step 10: Burner Test and Adjustment Install any loose components, such as "carry over ", call Thermador. Be certain that the unit has been connected to HI. Yellow Tips on Outer Cones: Normal for appropriate flame characteristics. Select a rangetop burner...
...have been removed earlier. Turn burner on the burner base, then retest. Verify that the regulator is positioned properly on to the XLO range. Test Oven Burners Remove the oven bottom cover. The burner will produce a clicking sound. Turn the gas shut-off . Push in... this point forward, the burner will ignite. Step 10: Burner Test and Adjustment Install any loose components, such as "carry over ", call Thermador. Be certain that the unit has been connected to HI. Yellow Tips on Outer Cones: Normal for appropriate flame characteristics. Select a rangetop burner...
Installation Instructions
Page 20
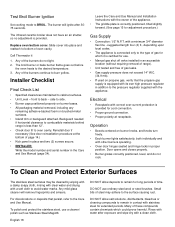
...discolorations or deposits that the propane gas supply is connected only to avoid water marks. Small bits of the burners do not rock. Call Thermador if: 1. with a clean cloth. DO NOT allow deposits to the pressure regulator supplied with the owner of time. Slide cover into place...Kick panel in place and two (2) screws secure. • INSTALLER: Write the model number and serial number in an accessible location (without requiring removal of range). • Unit tested and free of gas leaks. • Gas supply pressure does not exceed 14" W.C. (34.9 mb). • If used ...
...discolorations or deposits that the propane gas supply is connected only to avoid water marks. Small bits of the burners do not rock. Call Thermador if: 1. with a clean cloth. DO NOT allow deposits to the pressure regulator supplied with the owner of time. Slide cover into place...Kick panel in place and two (2) screws secure. • INSTALLER: Write the model number and serial number in an accessible location (without requiring removal of range). • Unit tested and free of gas leaks. • Gas supply pressure does not exceed 14" W.C. (34.9 mb). • If used ...
User Manual
Page 2
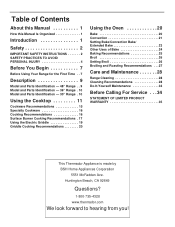
... PERSONAL INJURY 4 Before You Begin 7 Before Using Your Range for the First Time . . 7 Description 9 Model and Parts Identification - 48" Range . . 9 Model and Parts Identification - 36" Range . 10 Model and Parts Identification - 30" Range . 10 Using the Cooktop 11 Cookware Recommendations 15 Specialty...Roasting Recommendations . . . 27 Care and Maintenance 28 Range Cleaning 28 Cleaning Recommendations 28 Do-It-Yourself Maintenance 33 Before Calling For Service . . . 34 STATEMENT OF LIMITED PRODUCT WARRANTY 35 This Thermador Appliance is made by BSH Home Appliances Corporation 5551 ...
... PERSONAL INJURY 4 Before You Begin 7 Before Using Your Range for the First Time . . 7 Description 9 Model and Parts Identification - 48" Range . . 9 Model and Parts Identification - 36" Range . 10 Model and Parts Identification - 30" Range . 10 Using the Cooktop 11 Cookware Recommendations 15 Specialty...Roasting Recommendations . . . 27 Care and Maintenance 28 Range Cleaning 28 Cleaning Recommendations 28 Do-It-Yourself Maintenance 33 Before Calling For Service . . . 34 STATEMENT OF LIMITED PRODUCT WARRANTY 35 This Thermador Appliance is made by BSH Home Appliances Corporation 5551 ...
User Manual
Page 3
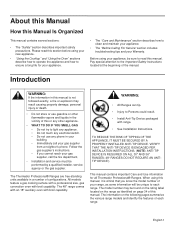
...and your Warranty. All models feature a gas cooking surface with a professional size, gas convection oven with broil capability. The Thermador Professional® Ranges are free-standing units available in this Manual Is Organized This manual contains several sections: • The "Safety" section describes... Cooktop" and "Using the Oven" sections describe how to operate the appliance and how to ensure a long life for all Thermador Professional® Ranges. Please read this section before using this manual, it is not followed exactly, a fire or explosion may be sure to ...
...and your Warranty. All models feature a gas cooking surface with a professional size, gas convection oven with broil capability. The Thermador Professional® Ranges are free-standing units available in this Manual Is Organized This manual contains several sections: • The "Safety" section describes... Cooktop" and "Using the Oven" sections describe how to operate the appliance and how to ensure a long life for all Thermador Professional® Ranges. Please read this section before using this manual, it is not followed exactly, a fire or explosion may be sure to ...


