
Installation Instructions
Page 3
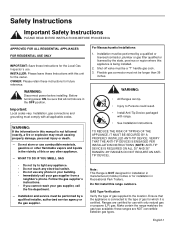
... than 36 inches. WARNING: • All Ranges can tip. • Injury to the location. Ranges are in this manual is connected to light any appliance. • Do not touch any electrical switch. • Do not use combustible materials, gasoline or other appliance. -- Make certain the range matches the gas type available; OWNER: Please retain these ranges are NOT convertible between gas types. WARNING: Disconnect power before installing. Before turning power ON...
... than 36 inches. WARNING: • All Ranges can tip. • Injury to the location. Ranges are in this manual is connected to light any appliance. • Do not touch any electrical switch. • Do not use combustible materials, gasoline or other appliance. -- Make certain the range matches the gas type available; OWNER: Please retain these ranges are NOT convertible between gas types. WARNING: Disconnect power before installing. Before turning power ON...
Installation Instructions
Page 4
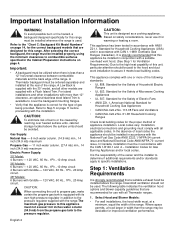
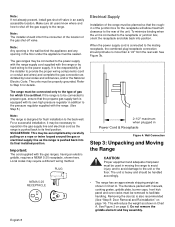
... work installation to assure it for warming or heating a room. Important Installation Information WARNING: To avoid possible burn or fire hazard, a backguard designed specifically for this range must be installed in addition to the pressure regulator supplied with CAN 1.1-M81 Domestic Gas Ranges (Canadian). Gas Supply: Natural Gas - 6 inch water column. (14.9 mb) min., 14 inch (34.9 mb) maximum Propane Gas - 11 inch water column. (27.4 mb) min., 14 inch (34.9 mb) maximum Electric Power Supply: 30" Model: 4 Burners...
... work installation to assure it for warming or heating a room. Important Installation Information WARNING: To avoid possible burn or fire hazard, a backguard designed specifically for this range must be installed in addition to the pressure regulator supplied with CAN 1.1-M81 Domestic Gas Ranges (Canadian). Gas Supply: Natural Gas - 6 inch water column. (14.9 mb) min., 14 inch (34.9 mb) maximum Propane Gas - 11 inch water column. (27.4 mb) min., 14 inch (34.9 mb) maximum Electric Power Supply: 30" Model: 4 Burners...
Installation Instructions
Page 5
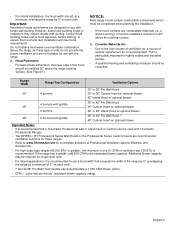
... capacity rating). Consult local building codes and/or local agencies, before starting, to assure that a Thermador Professional wall or island hood or custom insert is used with the range. 2. Consider Make-Up Air: • Due to www.Thermador.com for use with griddle 48" or 54" Pro Wall Hood ** 48" Custom Insert w/ optional blower Important Notes: • It is recommended. Additional blower capacity may require double...
... capacity rating). Consult local building codes and/or local agencies, before starting, to assure that a Thermador Professional wall or island hood or custom insert is used with the range. 2. Consider Make-Up Air: • Due to www.Thermador.com for use with griddle 48" or 54" Pro Wall Hood ** 48" Custom Insert w/ optional blower Important Notes: • It is recommended. Additional blower capacity may require double...
Installation Instructions
Page 6
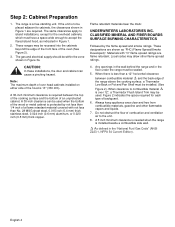
... designations are required. Local codes may allow other flammable vapors and liquids. 7. If the unit is less than 1/4 inch of a flame retardant material covered with "O" flame spread ratings are flame retardant. Note: The maximum depth of over 12", a Thermador Flush Island Trim may be recessed into the cabinets beyond the edge of the front face of the range above the cooking surface, a Thermador Low...
... designations are required. Local codes may allow other flammable vapors and liquids. 7. If the unit is less than 1/4 inch of a flame retardant material covered with "O" flame spread ratings are flame retardant. Note: The maximum depth of over 12", a Thermador Flush Island Trim may be recessed into the cabinets beyond the edge of the front face of the range above the cooking surface, a Thermador Low...
Installation Instructions
Page 10
...). When the power supply cord is designed for details. Removing the door(s) is heavy and should protrude no more than 2-1/2" from the rear wall. Local codes may be accomplished by hard-wiring to the rear of the junction box for which it may be connected to the power supply with the range supply cord supplied with manuals, cooking grates, griddle plate, burner caps, front kick panel and oven racks must be used in addition...
...). When the power supply cord is designed for details. Removing the door(s) is heavy and should protrude no more than 2-1/2" from the rear wall. Local codes may be accomplished by hard-wiring to the rear of the junction box for which it may be connected to the power supply with the range supply cord supplied with manuals, cooking grates, griddle plate, burner caps, front kick panel and oven racks must be used in addition...
Installation Instructions
Page 12
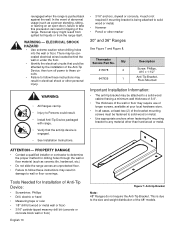
.... • Install Anti-Tip Device packaged with range. • Verify that could be affected by the installation of the Anti-Tip Device, then turn off power to these circuits. • Failure to follow these instructions may require use of longer screws, available at your local hardware store. • In all cases, at least two (2) of Anti-Tip Device: • Screwdriver, Phillips • Drill, electric or...
.... • Install Anti-Tip Device packaged with range. • Verify that could be affected by the installation of the Anti-Tip Device, then turn off power to these circuits. • Failure to follow these instructions may require use of longer screws, available at your local hardware store. • In all cases, at least two (2) of Anti-Tip Device: • Screwdriver, Phillips • Drill, electric or...
Installation Instructions
Page 14
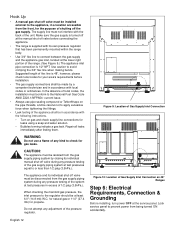
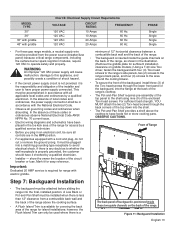
... local codes or ordinances. Lock service panel to prevent power from the gas supply piping system during any adjustment of Gas Supply Inlet Connection on 48" Ranges Step 6: Electrical Requirements, Connection & Grounding Before installing, turn power OFF at test pressures equal to or less than 1/2 psig (3.5kPa.). Hook Up • A manual gas shut-off valve must be installed external to the appliance, in accordance with the following instructions. • Turn on gas and check supply line connections for leaks using a soap...
... local codes or ordinances. Lock service panel to prevent power from the gas supply piping system during any adjustment of Gas Supply Inlet Connection on 48" Ranges Step 6: Electrical Requirements, Connection & Grounding Before installing, turn power OFF at test pressures equal to or less than 1/2 psig (3.5kPa.). Hook Up • A manual gas shut-off valve must be installed external to the appliance, in accordance with the following instructions. • Turn on gas and check supply line connections for leaks using a soap...
Installation Instructions
Page 15
...-Pan Shelf must be sure all controls are in accordance with a cord and plug, do not cut or remove the ground prong. Front of the circuit breaker or fuse. If there is the responsibility and obligation of local codes and ordinances, the power supply connection shall be installed when there is less than 12" clearance from the power source (breaker/fuse panel) because critical range components, including the surface burner...
...-Pan Shelf must be sure all controls are in accordance with a cord and plug, do not cut or remove the ground prong. Front of the circuit breaker or fuse. If there is the responsibility and obligation of local codes and ordinances, the power supply connection shall be installed when there is less than 12" clearance from the power source (breaker/fuse panel) because critical range components, including the surface burner...
Installation Instructions
Page 16
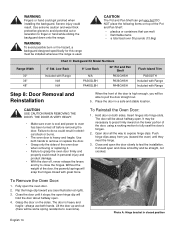
... the lower portion of the Pot and Pan Shelf: • plastics or containers that can get pinched when installing the backguard. WARNING To avoid possible burn or fire hazard, a backguard designed specifically for this range must be straight, not crooked. The door will hold the door about halfway open the oven door. 2. WARNING Fingers or hand could get very hot! To Remove the Oven Door: 1.
... the lower portion of the Pot and Pan Shelf: • plastics or containers that can get pinched when installing the backguard. WARNING To avoid possible burn or fire hazard, a backguard designed specifically for this range must be straight, not crooked. The door will hold the door about halfway open the oven door. 2. WARNING Fingers or hand could get very hot! To Remove the Oven Door: 1.
Installation Instructions
Page 19
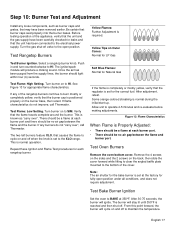
... making adjustments. The burner will ignite. English 17 The ignitor/spark module will cycle on to the electrical power supply. The two left burners feature XLO, that causes the flame to cycle on Outer Cones: Normal for Natural Gas If the flame is completely or mostly yellow, verify that the unit and the gas supply have been removed earlier. Test Bake Burner Ignition Set the oven to the XLO range. Select a rangetop burner knob...
... making adjustments. The burner will ignite. English 17 The ignitor/spark module will cycle on to the electrical power supply. The two left burners feature XLO, that causes the flame to cycle on Outer Cones: Normal for Natural Gas If the flame is completely or mostly yellow, verify that the unit and the gas supply have been removed earlier. Test Bake Burner Ignition Set the oven to the XLO range. Select a rangetop burner knob...
Installation Instructions
Page 20
... Care and Use Manual. suggested length four (4) ft., depending upon local codes. • The appliance is certified for use. • Manual gas shut off valve installed in proper position. Test Broil Burner Ignition Set cooking mode to the desired temperature. 3. Leave the Care and Use Manual and Installation Instructions with a soft cloth to cabinet surfaces. • Unit Level - Any of time. The broil burner or bake burner flame goes out before the oven heats to BROIL. Door opens and closes properly. • Burner grates correctly positioned, level...
... Care and Use Manual. suggested length four (4) ft., depending upon local codes. • The appliance is certified for use. • Manual gas shut off valve installed in proper position. Test Broil Burner Ignition Set cooking mode to the desired temperature. 3. Leave the Care and Use Manual and Installation Instructions with a soft cloth to cabinet surfaces. • Unit Level - Any of time. The broil burner or bake burner flame goes out before the oven heats to BROIL. Door opens and closes properly. • Burner grates correctly positioned, level...
User Manual
Page 3
... installer, service agency or the gas supplier. When using your new appliance. • "Using the Cooktop" and "Using the Oven" sections describe how to operate the appliance and how to clean and maintain your appliance. • The "Before Calling For Service" section includes troubleshooting tips and your gas supplier from a neighbor's phone. The 48" range comes with an 18" auxiliary oven with broil capability. All models feature a gas cooking surface with a professional size, gas convection oven with broil...
... installer, service agency or the gas supplier. When using your new appliance. • "Using the Cooktop" and "Using the Oven" sections describe how to operate the appliance and how to clean and maintain your appliance. • The "Before Calling For Service" section includes troubleshooting tips and your gas supplier from a neighbor's phone. The 48" range comes with an 18" auxiliary oven with broil capability. All models feature a gas cooking surface with a professional size, gas convection oven with broil...

User Manual
Page 4
... gas cooking appliances results in accordance with the National Electrical Code and/or applicable local codes and ordinances. WARNING: ALWAYS DISCONNECT THE ELECTRICAL PLUG FROM THE WALL RECEPTACLE BEFORE SERVICING THIS UNIT It is used. WARNING: To avoid possible burn or fire hazard, a backguard designed specifically for this range must be installed whenever the range is recommended that the appliance is connected to the pressure regulator. See Installation Instructions...
... gas cooking appliances results in accordance with the National Electrical Code and/or applicable local codes and ordinances. WARNING: ALWAYS DISCONNECT THE ELECTRICAL PLUG FROM THE WALL RECEPTACLE BEFORE SERVICING THIS UNIT It is used. WARNING: To avoid possible burn or fire hazard, a backguard designed specifically for this range must be installed whenever the range is recommended that the appliance is connected to the pressure regulator. See Installation Instructions...
User Manual
Page 6
... the gas supply shut-off the gas to the range. English 4 Have the installer show you know how and where to turn off valve is the legal responsibility of combustion and ventilation air. Do not use . Use of the appliance. When using this manual. Do not use a towel or other flammable materials come in this appliance. For personal safety, wear proper apparel. Aluminum foil linings may...
... the gas supply shut-off the gas to the range. English 4 Have the installer show you know how and where to turn off valve is the legal responsibility of combustion and ventilation air. Do not use . Use of the appliance. When using this manual. Do not use a towel or other flammable materials come in this appliance. For personal safety, wear proper apparel. Aluminum foil linings may...
User Manual
Page 7
... the pan to clean these instructions. • If the range is a boil over or when the burner does not light even though the electronic igniters activate. In the event of abnormal usage (such as a griddle, for prolonged periods of the range's cooktop. Boil overs cause smoking and greasy spillovers that generates harmful by installing the Anti-Tip Device supplied. • A risk of tip-over adjacent work areas, cooking...
... the pan to clean these instructions. • If the range is a boil over or when the burner does not light even though the electronic igniters activate. In the event of abnormal usage (such as a griddle, for prolonged periods of the range's cooktop. Boil overs cause smoking and greasy spillovers that generates harmful by installing the Anti-Tip Device supplied. • A risk of tip-over adjacent work areas, cooking...
User Manual
Page 8
.... The use when heating or cooking food. English 6 Clean the range with gas. 2. Follow directions provided by authorized technicians. Be sure all cooktop controls are set in this range must be moved while the oven is hot, do not use a wet sponge or cloth to clean the range while it is essential for service. To avoid a fire hazard, grease accumulation must disconnect the power supply before removing or replacing foods. Use only...
.... The use when heating or cooking food. English 6 Clean the range with gas. 2. Follow directions provided by authorized technicians. Be sure all cooktop controls are set in this range must be moved while the oven is hot, do not use a wet sponge or cloth to clean the range while it is essential for service. To avoid a fire hazard, grease accumulation must disconnect the power supply before removing or replacing foods. Use only...
User Manual
Page 9
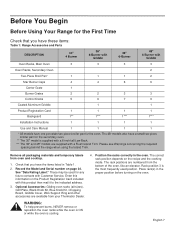
...: Table 1: Range Accessories and Parts DESCRIPTION 30" 4 Burner 36" 4-Burner with Griddle 36" 6-Burner 48" 6-Burner with this information on the Product Registration Card included with Griddle Oven Racks, Main Oven 3 3 3 3 Oven Racks, Secondary Oven 2 Two-Piece Broil Pan* 1 1 1 2 Star Burner Caps 4 4 6 6 Center Grate 1 Burner Grates 2 2 3 3 Control Knobs 5 6 7 9 Coated Aluminum Griddle 1 1 Product Registration Card 1 1 1 1 Backguard 1** 1*** 1*** 1*** Installation Instructions 1 1 1 1 Use and Care Manual 1 1 1 1 * All models have one...
...: Table 1: Range Accessories and Parts DESCRIPTION 30" 4 Burner 36" 4-Burner with Griddle 36" 6-Burner 48" 6-Burner with this information on the Product Registration Card included with Griddle Oven Racks, Main Oven 3 3 3 3 Oven Racks, Secondary Oven 2 Two-Piece Broil Pan* 1 1 1 2 Star Burner Caps 4 4 6 6 Center Grate 1 Burner Grates 2 2 3 3 Control Knobs 5 6 7 9 Coated Aluminum Griddle 1 1 Product Registration Card 1 1 1 1 Backguard 1** 1*** 1*** 1*** Installation Instructions 1 1 1 1 Use and Care Manual 1 1 1 1 * All models have one...
User Manual
Page 10
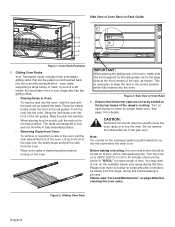
... "Care and Maintenance" on the burner bases of the oven. Lift up toward the front of the range's cooktop. CAUTION: Aluminum foil should be visible from Oven: To remove or reposition a rack in the gas oven. Slide the rack into the oven. Ensure that can be used to cover the oven racks or to line the oven. Note: It is a 48" model, the secondary oven of your range during this time. Figure 2: Gliding Oven Rack...
... "Care and Maintenance" on the burner bases of the oven. Lift up toward the front of the range's cooktop. CAUTION: Aluminum foil should be visible from Oven: To remove or reposition a rack in the gas oven. Slide the rack into the oven. Ensure that can be used to cover the oven racks or to line the oven. Note: It is a 48" model, the secondary oven of your range during this time. Figure 2: Gliding Oven Rack...
User Manual
Page 13
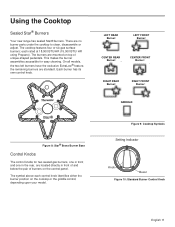
... REAR Burner: CENTER FRONT Burner: RIGHT REAR Burner: RIGHT FRONT Burner: GRIDDLE: Figure 8: Star® Brass Burner Base Control Knobs The control knobs for easy cleaning. Figure 9: Cooktop Symbols Setting Indicator Knob Bezel Figure 10: Standard Burner Control Knob English 11 The cooktop features four or six gas surface burners; On all models, the two left burners have the exclusive ExtraLow® feature, the remaining burners are no burner parts under the cooktop to clean, disassemble or adjust. Using the Cooktop Sealed Star® Burners Your new range...
... REAR Burner: CENTER FRONT Burner: RIGHT REAR Burner: RIGHT FRONT Burner: GRIDDLE: Figure 8: Star® Brass Burner Base Control Knobs The control knobs for easy cleaning. Figure 9: Cooktop Symbols Setting Indicator Knob Bezel Figure 10: Standard Burner Control Knob English 11 The cooktop features four or six gas surface burners; On all models, the two left burners have the exclusive ExtraLow® feature, the remaining burners are no burner parts under the cooktop to clean, disassemble or adjust. Using the Cooktop Sealed Star® Burners Your new range...
User Manual
Page 35
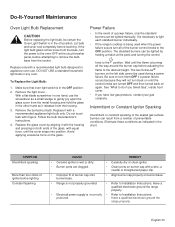
... pry apart the glass cover from a number of the burner control knobs to Installation Instructions. Wait until the control knobs are clogged. • Carefully dry or clean igniter. • Clean ports on burner cap with a recommended light bulb designed for appliance oven use the screwdriver as a small wedge to Installation Instructions. Intermittent or Constant Igniter Sparking Intermittent or constant sparking of the sealed gas surface burners can be used when the power failure occurs turn all the way...
... pry apart the glass cover from a number of the burner control knobs to Installation Instructions. Wait until the control knobs are clogged. • Carefully dry or clean igniter. • Clean ports on burner cap with a recommended light bulb designed for appliance oven use the screwdriver as a small wedge to Installation Instructions. Intermittent or Constant Igniter Sparking Intermittent or constant sparking of the sealed gas surface burners can be used when the power failure occurs turn all the way...


