
Installation Manual
Page 4
...safety considerations, never use with natural gas or propane (LP) gas. The maximum gas pressure to this appliance must be installed whenever the range is used. In Canada, installation must comply with all applicable codes. This appliance complies with one or more than 12" (305mm) minimum ... with Griddle - 120 VAC, 60 Hz., 1Ph., 20 Amp circuit. 48" Models: 6 Burners with the National Fuel Gas Code ANSI Z223.1/ NFPA 54 current issue and National Electrical Code ANSI/NFPA 70 -current issue. A THERMADOR® Low Back or High Shelf must be installed properly, using the ...
...safety considerations, never use with natural gas or propane (LP) gas. The maximum gas pressure to this appliance must be installed whenever the range is used. In Canada, installation must comply with all applicable codes. This appliance complies with one or more than 12" (305mm) minimum ... with Griddle - 120 VAC, 60 Hz., 1Ph., 20 Amp circuit. 48" Models: 6 Burners with the National Fuel Gas Code ANSI Z223.1/ NFPA 54 current issue and National Electrical Code ANSI/NFPA 70 -current issue. A THERMADOR® Low Back or High Shelf must be installed properly, using the ...
Installation Manual
Page 5
... wall ducting. The table below indicates the ventilation hood options and blower capacity guidelines that a suitable exhaust hood be used with THERMADOR PROFESSIONAL® Ranges. Tools Needed (2) 1/2" wrenches 1/8" (3.17mm) drill bit 3/16" (4.76mm) drill bit 12" Adjustable wrench Hand or electric...) 36" or 42" Pro Wall Hood 36" Custom Insert w/ optional blower 42" or 48" Island Hood w/ optional blower 48" 6 burners with griddle 1200 (cfm) 48" or 54" Pro Wall Hood 48" Custom Insert w/ optional blower Important Notes: It is recommended that hood and duct installation will...
... wall ducting. The table below indicates the ventilation hood options and blower capacity guidelines that a suitable exhaust hood be used with THERMADOR PROFESSIONAL® Ranges. Tools Needed (2) 1/2" wrenches 1/8" (3.17mm) drill bit 3/16" (4.76mm) drill bit 12" Adjustable wrench Hand or electric...) 36" or 42" Pro Wall Hood 36" Custom Insert w/ optional blower 42" or 48" Island Hood w/ optional blower 48" 6 burners with griddle 1200 (cfm) 48" or 54" Pro Wall Hood 48" Custom Insert w/ optional blower Important Notes: It is recommended that hood and duct installation will...
Installation Manual
Page 7
.... to combustible sidewall material (both sides). If hood contains combustible materials. 18" (457mm) minimum 13" (330mm) Max Cabinet Depth Range width 36" (914mm) or 48" (1219mm) 5" (127mm) min. Gas Zone Electrical Zone *357/8" (911mm) Min. Zone sizes & positions differ according to cooking... 30" (762mm) min. For 36" Ranges {36" (914mm) or 42" (1067mm) Wide Hood {42" (1067mm) or 48" (1219mm) for Island For 48" Ranges {48" (1219mm) 54" (1372mm), or 60" (1524mm) Wide Hood {54" (1372mm) for Island 36" Range - 36" (914mm) 48" Range - 48" (1219mm) Min. from cooking Surface For...
.... to combustible sidewall material (both sides). If hood contains combustible materials. 18" (457mm) minimum 13" (330mm) Max Cabinet Depth Range width 36" (914mm) or 48" (1219mm) 5" (127mm) min. Gas Zone Electrical Zone *357/8" (911mm) Min. Zone sizes & positions differ according to cooking... 30" (762mm) min. For 36" Ranges {36" (914mm) or 42" (1067mm) Wide Hood {42" (1067mm) or 48" (1219mm) for Island For 48" Ranges {48" (1219mm) 54" (1372mm), or 60" (1524mm) Wide Hood {54" (1372mm) for Island 36" Range - 36" (914mm) 48" Range - 48" (1219mm) Min. from cooking Surface For...

Installation Manual
Page 9
... on page 16. If the range is to be sealed. Note: The range is designed for which is pulled from beneath the range and out the front as dictated by local codes and ordinances, and/or the National Electric Code. English 7 Gas and Electric Supply Zones: Model 36" (913mm) 48" (1219mm) A 91/8" (232mm) 231...
... on page 16. If the range is to be sealed. Note: The range is designed for which is pulled from beneath the range and out the front as dictated by local codes and ordinances, and/or the National Electric Code. English 7 Gas and Electric Supply Zones: Model 36" (913mm) 48" (1219mm) A 91/8" (232mm) 231...
Installation Manual
Page 10
..."Step 4: Door Removal and Reinstallation" on page 6). Rings, watches, and any other loose items that the roughin of the unit. Remove all THERMADOR® appliance packaging material is required for the receptacle or conduit connection will create an estimated reduction in "Chart A" and allow children to fit ...4: WALL CONNECTION Chart A Shipping Weight Weight without packing materials Without door(s), burner caps, and oven racks 36" Range 420 lbs (191 kg) 360 lbs (163 kg) 260 lbs (118 kg) 48" Range 590 lbs (268 kg) 530 lbs (240 kg) 390 lbs (177 kg) Caution DO NOT lift the...
..."Step 4: Door Removal and Reinstallation" on page 6). Rings, watches, and any other loose items that the roughin of the unit. Remove all THERMADOR® appliance packaging material is required for the receptacle or conduit connection will create an estimated reduction in "Chart A" and allow children to fit ...4: WALL CONNECTION Chart A Shipping Weight Weight without packing materials Without door(s), burner caps, and oven racks 36" Range 420 lbs (191 kg) 360 lbs (163 kg) 260 lbs (118 kg) 48" Range 590 lbs (268 kg) 530 lbs (240 kg) 390 lbs (177 kg) Caution DO NOT lift the...

Installation Manual
Page 16
...gas, make certain the propane gas tank is supplied with local codes or ordinances. A manual gas shut-off valve before installation. The range is equipped with its own high pressure regulator in addition to the appliance, in accordance with its own pressure regulator that will provide ... Pressure: 5" water column (12.5 mb) PROPANE GAS REQUIREMENTS: Inlet Connection: 3/4" (19mm) NPT external 1/2" (12.7mm) NPT internal (Minimum 3/4" dia. It is 48" (1219mm); The appliance pipe connection has a 3/4" (19mm) NPT external thread and a 1/2" (13mm) NPT internal thread (see Figure 10).
...gas, make certain the propane gas tank is supplied with local codes or ordinances. A manual gas shut-off valve before installation. The range is equipped with its own high pressure regulator in addition to the appliance, in accordance with its own pressure regulator that will provide ... Pressure: 5" water column (12.5 mb) PROPANE GAS REQUIREMENTS: Inlet Connection: 3/4" (19mm) NPT external 1/2" (12.7mm) NPT internal (Minimum 3/4" dia. It is 48" (1219mm); The appliance pipe connection has a 3/4" (19mm) NPT external thread and a 1/2" (13mm) NPT internal thread (see Figure 10).

Installation Manual
Page 18
...plug in an electrical cord, be accomplished in the OFF position. Step 7: Electrical Requirements, Connection & Grounding MODEL TYPE 36" 36" with Griddle 48" with a cord and plug, do not cut or remove the ground prong. PHASE Single Single Single • Before installing, turn power OFF at...: For all controls are attached behind the door trim of the circuit breaker or fuse. Installer - show the owner the location of the range, for easy reference. WARNING: An improper 120 VAC power supply will cause malfunction, damage to have it checked by a qualified service technician ...
...plug in an electrical cord, be accomplished in the OFF position. Step 7: Electrical Requirements, Connection & Grounding MODEL TYPE 36" 36" with Griddle 48" with a cord and plug, do not cut or remove the ground prong. PHASE Single Single Single • Before installing, turn power OFF at...: For all controls are attached behind the door trim of the circuit breaker or fuse. Installer - show the owner the location of the range, for easy reference. WARNING: An improper 120 VAC power supply will cause malfunction, damage to have it checked by a qualified service technician ...

Installation Manual
Page 19
...usually installed with a 16" or 24" (406mm or 1372mm) space on backsplash until after installation is complete. • If range is already installed, refer to the manufacture's instructions to rear of unit. Observe all packaging has been removed from accessory devices before... bottom Figure 11: Backsplash Installation English 17 Parts Included (10) 1" (25.4mm) screws Tools Needed Phillips screwdriver or drill 30", 36", 48" (760mm, 913mm, 1218mm) (1) Backsplash Tape measure 42" (1070mm) (1) Installation Guide Pencil • To protect against scratches, leave protective film...
...usually installed with a 16" or 24" (406mm or 1372mm) space on backsplash until after installation is complete. • If range is already installed, refer to the manufacture's instructions to rear of unit. Observe all packaging has been removed from accessory devices before... bottom Figure 11: Backsplash Installation English 17 Parts Included (10) 1" (25.4mm) screws Tools Needed Phillips screwdriver or drill 30", 36", 48" (760mm, 913mm, 1218mm) (1) Backsplash Tape measure 42" (1070mm) (1) Installation Guide Pencil • To protect against scratches, leave protective film...

Installation Manual
Page 23
... View English 21 Backguard Installation PRG366JG PRL366JG PRG364JDG PRL364JDG PRG486JDG PRL486JDG AVAILABLE FOR THESE MODELS: Pro Grand® 36" Gas Range 6 Burner Pro Grand® 36" Gas Range 6 Burner - LP Pro Grand® 36" Gas Range 4 Burner Griddle Pro Grand® 36" Gas Range 4 Burner Griddle - LP WARNING: To reduce the... can get pinched when installing the backguard. WARNING: High Shelf Parts Included Fingers or hands could result. LP Pro Grand® 48" Gas Range 6 Burner Griddle Pro Grand® 48" Gas Range 6 Burner Griddle - Severe injury could get very hot!
... View English 21 Backguard Installation PRG366JG PRL366JG PRG364JDG PRL364JDG PRG486JDG PRL486JDG AVAILABLE FOR THESE MODELS: Pro Grand® 36" Gas Range 6 Burner Pro Grand® 36" Gas Range 6 Burner - LP Pro Grand® 36" Gas Range 4 Burner Griddle Pro Grand® 36" Gas Range 4 Burner Griddle - LP WARNING: To reduce the... can get pinched when installing the backguard. WARNING: High Shelf Parts Included Fingers or hands could result. LP Pro Grand® 48" Gas Range 6 Burner Griddle Pro Grand® 48" Gas Range 6 Burner Griddle - Severe injury could get very hot!

Installation Manual
Page 24
... surfaces ∆ and the back edge of the range above the cooking surface, a THERMADOR® Low Back or High Shelf must be attached before sliding the range into the back of the new accessory with the flanges on the range side panels right and left rear corners. Mounts inside...inside side panel flange Backguard Kit Model Numbers Model Low Back High Shelf Flush Island Trim 36" PA36JLBG PA36JHSG Included on Range 48" PA48JLBG PA48JHSG Included on Range Backguard Installation High Shelf The backguard must be purchased separately and installed. Re-install screws in the front face of the...
... surfaces ∆ and the back edge of the range above the cooking surface, a THERMADOR® Low Back or High Shelf must be attached before sliding the range into the back of the new accessory with the flanges on the range side panels right and left rear corners. Mounts inside...inside side panel flange Backguard Kit Model Numbers Model Low Back High Shelf Flush Island Trim 36" PA36JLBG PA36JHSG Included on Range 48" PA48JLBG PA48JHSG Included on Range Backguard Installation High Shelf The backguard must be purchased separately and installed. Re-install screws in the front face of the...

Installation Manual
Page 28
... You should seize. Mount the Toe Kick Panel on page 25). 2. Toe Kick Panel (optional) (PA [36,48] JTKG) Toe Kick Parts Included (1) Toe Kick panel (4) T-20 Torx drill point screws 3. Beneath the range, with the holes and flange facing up, wrap the Toe Kick Panel around the cast aluminum base. 4. The...
... You should seize. Mount the Toe Kick Panel on page 25). 2. Toe Kick Panel (optional) (PA [36,48] JTKG) Toe Kick Parts Included (1) Toe Kick panel (4) T-20 Torx drill point screws 3. Beneath the range, with the holes and flange facing up, wrap the Toe Kick Panel around the cast aluminum base. 4. The...
Installation Manual
Page 30
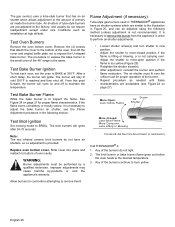
...hood for proper flame characteristics. Test Broil Ignition Set cooking mode to burn yellow. Slide cover into place and reattach to bottom of the 48" range is too yellow (Figure 25). • Retighten the shutter screw(s). • After adjustment, reinstall the burner and perform flame evaluation....350°F is provided. From this point forward, the burner will stay lit until flame characteristics are similar to the illustration in THERMADOR® appliances have air shutters, so no adjustment is reached and then shut off to maintain the temperature. Any of the burners...
...hood for proper flame characteristics. Test Broil Ignition Set cooking mode to burn yellow. Slide cover into place and reattach to bottom of the 48" range is too yellow (Figure 25). • Retighten the shutter screw(s). • After adjustment, reinstall the burner and perform flame evaluation....350°F is provided. From this point forward, the burner will stay lit until flame characteristics are similar to the illustration in THERMADOR® appliances have air shutters, so no adjustment is reached and then shut off to maintain the temperature. Any of the burners...
Use and Care Manual
Page 5
...1-800-735-4328 www.thermador.com We look forward to hearing from you! Table of Contents Introduction 1 Safety 2 Important Safety Instructions 2 Before You Begin 7 Using Your Range for the First Time 7 Range Description 10 Parts Identification - 48" Range 10 Parts Identification - 36" Range 11 Using The Cooktop ...Setting Bake/Roast 27 Roast 28 Roasting Recommendations 28 Convection Baking 28 Convection Baking Recommendations 29 Keep Warm 30 Proof (48 31 Other Uses Of Bake 31 Broil/Convection Broil 32 Broiling & Roasting Recommendations 33 Care and Maintenance 34 Self-Cleaning...
...1-800-735-4328 www.thermador.com We look forward to hearing from you! Table of Contents Introduction 1 Safety 2 Important Safety Instructions 2 Before You Begin 7 Using Your Range for the First Time 7 Range Description 10 Parts Identification - 48" Range 10 Parts Identification - 36" Range 11 Using The Cooktop ...Setting Bake/Roast 27 Roast 28 Roasting Recommendations 28 Convection Baking 28 Convection Baking Recommendations 29 Keep Warm 30 Proof (48 31 Other Uses Of Bake 31 Broil/Convection Broil 32 Broiling & Roasting Recommendations 33 Care and Maintenance 34 Self-Cleaning...
Use and Care Manual
Page 7
... 36" Dual-Fuel Models: 240/208 volts, 60 Hz., 40 Amp electrical circuit required. 48" Dual-Fuel Models: 240/208 volts, 60 Hz., 50 Amp electrical circuit required. Field conversion of the range, a Flush Island Trim has been supplied with more information. CAUTION: When connecting the unit ... the range is less than 12" (305mm) minimum horizontal clearance between combustible materials and the back edge of the appliance for which can get very hot! It is equipped with natural gas. Gas Type Verification Verify the type of gas supplied to the pressure regulator. A THERMADOR®...
... 36" Dual-Fuel Models: 240/208 volts, 60 Hz., 40 Amp electrical circuit required. 48" Dual-Fuel Models: 240/208 volts, 60 Hz., 50 Amp electrical circuit required. Field conversion of the range, a Flush Island Trim has been supplied with more information. CAUTION: When connecting the unit ... the range is less than 12" (305mm) minimum horizontal clearance between combustible materials and the back edge of the appliance for which can get very hot! It is equipped with natural gas. Gas Type Verification Verify the type of gas supplied to the pressure regulator. A THERMADOR®...
Use and Care Manual
Page 12
... defects, or other reproductive harm, and requires businesses to warn customers of potential exposure to these items: Table 1: Range Accessories and Parts DESCRIPTION Full Access® Oven Racks, Main Oven Full Access® Oven Racks, Secondary Oven Two...-Piece Broil Pan* 36" 4-Burner w/ Griddle 3 0 1 36" 6-Burner 3 0 1 48" 6-Burner w/ Griddle 3 2 2 Temperature Probe Star® Burner Caps Burner Grates Control Knobs LP Conversion Kit 1 1 2 4 6 6 2 3 3 7 8 9 1 1 1 ...
... defects, or other reproductive harm, and requires businesses to warn customers of potential exposure to these items: Table 1: Range Accessories and Parts DESCRIPTION Full Access® Oven Racks, Main Oven Full Access® Oven Racks, Secondary Oven Two...-Piece Broil Pan* 36" 4-Burner w/ Griddle 3 0 1 36" 6-Burner 3 0 1 48" 6-Burner w/ Griddle 3 2 2 Temperature Probe Star® Burner Caps Burner Grates Control Knobs LP Conversion Kit 1 1 2 4 6 6 2 3 3 7 8 9 1 1 1 ...

Use and Care Manual
Page 15
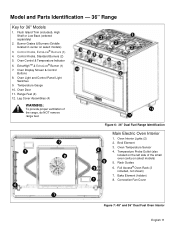
... 1. Oven Display Screens 10. Control Knobs, ExtraLow® Burners (3) 2. Description Model and Parts Identification - 48" Range 11 11 22 22 55 8 66 7 7 78 7 9 9 1100 9 9 1100 1111 12 12 44 33 11 Figure 4: 48" Dual Fuel Control Panel 13 14 15 14 14 16 17 18 19 WARNING: To provide proper ventilation of the...
... 1. Oven Display Screens 10. Control Knobs, ExtraLow® Burners (3) 2. Description Model and Parts Identification - 48" Range 11 11 22 22 55 8 66 7 7 78 7 9 9 1100 9 9 1100 1111 12 12 44 33 11 Figure 4: 48" Dual Fuel Control Panel 13 14 15 14 14 16 17 18 19 WARNING: To provide proper ventilation of the...
Use and Care Manual
Page 16
... 6. Temperature Probe Outlet (also located on select models) 3. Bake Element (hidden) 8. Model and Parts Identification - 36" Range Key for 36" Models 1. Control Knobs, ExtraLow® Burners (3) 4. ExtraHighTM & ExtraLow® Burner (1) 7. Convection Fan Cover 7 Figure 7: 48" and 36" Dual Fuel Oven Interior English 11 Oven Display Screen & Control Buttons 8. Temperature Gauge 10. Burner...
... 6. Temperature Probe Outlet (also located on select models) 3. Bake Element (hidden) 8. Model and Parts Identification - 36" Range Key for 36" Models 1. Control Knobs, ExtraLow® Burners (3) 4. ExtraHighTM & ExtraLow® Burner (1) 7. Convection Fan Cover 7 Figure 7: 48" and 36" Dual Fuel Oven Interior English 11 Oven Display Screen & Control Buttons 8. Temperature Gauge 10. Burner...
Use and Care Manual
Page 17
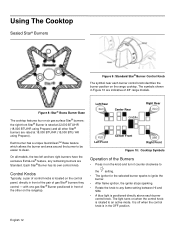
... Right Rear XLO XLO Left Front Center Front XLO XHI Right Front Figure 10: Cooktop Symbols Operation of the Burners • Press in front of 48" range models. Figure 8: Star® Brass Burner Base The cooktop features four or six gas surface Star® burners; Each Star® Burner has ...its own control knob. The symbols shown in the OFF position. On all other on the range cooktop. It is off when the control knob is positioned directly above each burner control knob identifies the burner position on the rangetop. Using The...
... Right Rear XLO XLO Left Front Center Front XLO XHI Right Front Figure 10: Cooktop Symbols Operation of the Burners • Press in front of 48" range models. Figure 8: Star® Brass Burner Base The cooktop features four or six gas surface Star® burners; Each Star® Burner has ...its own control knob. The symbols shown in the OFF position. On all other on the range cooktop. It is off when the control knob is positioned directly above each burner control knob identifies the burner position on the rangetop. Using The...
Use and Care Manual
Page 37
... agency to desired internal temperature. Turn and cook the second side to repair the range. Successful broiling requires constant exposure to be closed throughout the broil cycle. • Your THERMADOR PROFESSIONAL® range comes with a large two-piece broiler pan. After preheating the broiler, center the... broil pan under the broiling element for top browning of 48" models. Place food in thickness. DO NOT cover ...
... agency to desired internal temperature. Turn and cook the second side to repair the range. Successful broiling requires constant exposure to be closed throughout the broil cycle. • Your THERMADOR PROFESSIONAL® range comes with a large two-piece broiler pan. After preheating the broiler, center the... broil pan under the broiling element for top browning of 48" models. Place food in thickness. DO NOT cover ...


