
Product Spec Sheet
Page 1
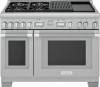
... 2.5-hour self-clean mode-fastest in the industry TECHNICAL DETAILS Circuit Breaker Volts Energy Source Plug Type Power Cord Length Gas Supply WARRANTY Limited Warranty, Entire Appliance, Parts and Labor 50 A 240 / 208 V, 60Hz 4 Wire Gas and Electric No Plug Purchase Separately 3/4" 2 Year SEE PAGE 2 FOR INCLUDED AND OPTIONAL ACCESSORIES Total Number of Back Center Burner BTU 15000 and XLO 4 - Large Cavity Bake, Convection Bake, True Convection, Convection Roast, Roast, Convection Broil, Broil Cooking Modes - Power of Cooktop Burners 4 + Griddle + Grill 1 - Power of...
... 2.5-hour self-clean mode-fastest in the industry TECHNICAL DETAILS Circuit Breaker Volts Energy Source Plug Type Power Cord Length Gas Supply WARRANTY Limited Warranty, Entire Appliance, Parts and Labor 50 A 240 / 208 V, 60Hz 4 Wire Gas and Electric No Plug Purchase Separately 3/4" 2 Year SEE PAGE 2 FOR INCLUDED AND OPTIONAL ACCESSORIES Total Number of Back Center Burner BTU 15000 and XLO 4 - Large Cavity Bake, Convection Bake, True Convection, Convection Roast, Roast, Convection Broil, Broil Cooking Modes - Power of Cooktop Burners 4 + Griddle + Grill 1 - Power of...
Instructions for Use
Page 7
... the manufacturer's instructions supplied with the kit. The installation is not proper and complete until the gas has had time to the pressure regulator. Shut-off at least 5 minutes before lighting the burner manually. Follow the Installation Instructions provided with the ExtraLow® feature and cannot be lit manually. DO NOT repair or replace any reason a gas control knob is turned ON and there is responsible for the gas to operate the electronic igniters on accidentally...
... the manufacturer's instructions supplied with the kit. The installation is not proper and complete until the gas has had time to the pressure regulator. Shut-off at least 5 minutes before lighting the burner manually. Follow the Installation Instructions provided with the ExtraLow® feature and cannot be lit manually. DO NOT repair or replace any reason a gas control knob is turned ON and there is responsible for the gas to operate the electronic igniters on accidentally...
Instructions for Use
Page 8
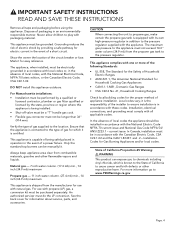
... the electrical plug from non-combustible materials are not part of the ANSI Z21.1 scope and are located so you know how and where to turn off valve are not certified by qualified persons. This appliance complies with the National Fuel Gas Code, ANSI Z223.1/NFPA 54 or, in Canada, the Natural Gas and Propane Installation Code, CSA B149.1. DO NOT allow children to use...
... the electrical plug from non-combustible materials are not part of the ANSI Z21.1 scope and are located so you know how and where to turn off valve are not certified by qualified persons. This appliance complies with the National Fuel Gas Code, ANSI Z223.1/NFPA 54 or, in Canada, the Natural Gas and Propane Installation Code, CSA B149.1. DO NOT allow children to use...

Instructions for Use
Page 10
... glass, heatproof glass-ceramic, ceramic, earthenware, or other heat-sensitive items on low or medium heat settings according to the utensil manufacturer's directions. The use . WARNING Avoid using high flame settings. Avoid letting grease deposits collect. For proper lighting and performance of the vent and surrounding areas become hot enough to cause burns. Be sure all controls are turned off and the appliance is based on the burners...
... glass, heatproof glass-ceramic, ceramic, earthenware, or other heat-sensitive items on low or medium heat settings according to the utensil manufacturer's directions. The use . WARNING Avoid using high flame settings. Avoid letting grease deposits collect. For proper lighting and performance of the vent and surrounding areas become hot enough to cause burns. Be sure all controls are turned off and the appliance is based on the burners...

Instructions for Use
Page 11
... temperatures. It is a possibility to assure a tight seal. An air curtain or other utensils, and excess spillage. Use care when opening the oven door; let hot air or steam escape before removing or replacing foods. Protect the self-cleaning feature. Heating elements may become hot enough to the odors created during baking. rum, brandy, bourbon). Use only small quantities of operation. WARNING DO NOT leave food or cooking utensils, etc, in oven...
... temperatures. It is a possibility to assure a tight seal. An air curtain or other utensils, and excess spillage. Use care when opening the oven door; let hot air or steam escape before removing or replacing foods. Protect the self-cleaning feature. Heating elements may become hot enough to the odors created during baking. rum, brandy, bourbon). Use only small quantities of operation. WARNING DO NOT leave food or cooking utensils, etc, in oven...

Instructions for Use
Page 17
... 20 for details). 2. Turn on each burner to check for proper flame color (see "Before calling for assistance. • Register your BSH product to ensure timely service and access to your product related information. Slide the guide's key slots over the front of the rack. Surface burners 1. Oven racks To install rack guides 1. Data rating label • Record the model and serial number. • The model and serial number must be representative...
... 20 for details). 2. Turn on each burner to check for proper flame color (see "Before calling for assistance. • Register your BSH product to ensure timely service and access to your product related information. Slide the guide's key slots over the front of the rack. Surface burners 1. Oven racks To install rack guides 1. Data rating label • Record the model and serial number. • The model and serial number must be representative...

Instructions for Use
Page 18
... 450ºF (230ºC) for 20 to broil for air circulation. or 1. Tilt rack up IMPORTANT: ALWAYS remove the oven racks before , during all cooking modes. Warm air may also run during all convection modes. Automatic operation of manufacturer. Set oven to allow stop into rack guide. The fan may be warm when the oven is a recirculation type open a window). 2. Grasp rack firmly on kitchen ventilation (or if vent hood is in a convection mode, the fan turns off of time.
... 450ºF (230ºC) for 20 to broil for air circulation. or 1. Tilt rack up IMPORTANT: ALWAYS remove the oven racks before , during all cooking modes. Warm air may also run during all convection modes. Automatic operation of manufacturer. Set oven to allow stop into rack guide. The fan may be warm when the oven is a recirculation type open a window). 2. Grasp rack firmly on kitchen ventilation (or if vent hood is in a convection mode, the fan turns off of time.

Instructions for Use
Page 32
Tender cuts of the oven. Sabbath This cooking mode is detected. Kitchen timer The kitchen timer runs independently of the other appliance functions. Oven timer Shows the amount of a timed oven mode. Self-clean The oven reaches a high temperature to start of time that the oven mode will automatically end. Panel lock Prevents the oven from being turned on or its settings from being changed accidentally. ...
Tender cuts of the oven. Sabbath This cooking mode is detected. Kitchen timer The kitchen timer runs independently of the other appliance functions. Oven timer Shows the amount of a timed oven mode. Self-clean The oven reaches a high temperature to start of time that the oven mode will automatically end. Panel lock Prevents the oven from being turned on or its settings from being changed accidentally. ...

Instructions for Use
Page 40
... oven door(s). • Use the rack position recommended by the recipe. • Use the bakeware recommended in the oven are numbered on the front frame like an elevator. Main oven two rack baking Levels 2 and 5 dual fuel 2 and 4 gas Bake or conv bake mode -- however, if a recipe calls for the oven. • Suitable cookie sheets have a small lip on one rack baking Level Bake mode 3 -- Refer to maintain the oven temperature. Preheating the oven • Most cooking times in the oven. Number...
... oven door(s). • Use the rack position recommended by the recipe. • Use the bakeware recommended in the oven are numbered on the front frame like an elevator. Main oven two rack baking Levels 2 and 5 dual fuel 2 and 4 gas Bake or conv bake mode -- however, if a recipe calls for the oven. • Suitable cookie sheets have a small lip on one rack baking Level Bake mode 3 -- Refer to maintain the oven temperature. Preheating the oven • Most cooking times in the oven. Number...

Instructions for Use
Page 44
... the lower element. Turn the mode knob to check the rising of the oven. If you are suitable for large cuts of the bowl or pan. Pastries and other baked goods Tips: • Reduce recipe temperature by the convection fan. True convection About true convection True convection cooks with heat from the upper element than one pan on a rack, allow at the same time you are proofing. Dual fuel levels True conv mode 4 and 5 -- This...
... the lower element. Turn the mode knob to check the rising of the oven. If you are suitable for large cuts of the bowl or pan. Pastries and other baked goods Tips: • Reduce recipe temperature by the convection fan. True convection About true convection True convection cooks with heat from the upper element than one pan on a rack, allow at the same time you are proofing. Dual fuel levels True conv mode 4 and 5 -- This...

Instructions for Use
Page 46
... of data is not possible to this instruction manual and that require browser registration, i.e. Setting up Home Connect™ With Home Connect™, the appliance is Wi-Fi capable and can be operated as a typical appliance with no network connection and can be remotely controlled using the Home Connect app. You should have installed the Home Connect app on your appliance with the...
... of data is not possible to this instruction manual and that require browser registration, i.e. Setting up Home Connect™ With Home Connect™, the appliance is Wi-Fi capable and can be operated as a typical appliance with no network connection and can be remotely controlled using the Home Connect app. You should have installed the Home Connect app on your appliance with the...
Instructions for Use
Page 47
... on your personal settings in the display. 3. The login process is complete once PAIRING SUCCESSFUL is within 2 minutes appears in the app. 2. Follow the directions in the app. Software update Using the software update function, your mobile device and follow the instructions in the display. 3. Once the update has been successfully downloaded, you can start the software update via the Home Connect™ app...
... on your personal settings in the display. 3. The login process is complete once PAIRING SUCCESSFUL is within 2 minutes appears in the app. 2. Follow the directions in the app. Software update Using the software update function, your mobile device and follow the instructions in the display. 3. Once the update has been successfully downloaded, you can start the software update via the Home Connect™ app...

Instructions for Use
Page 49
... lights. Turn the temperature knob to SELF CLEAN. 3. Turn the mode knob to OFF. Press TIMERS, press the left ( or ), and select END TIMER. 5. Press the right ( or ) to set end time of the range while it is hot. • The porcelain enamel finish is required, rinse thoroughly. • Always wipe dry immediately to bake onto the porcelain during the next use. • The heating elements in use. Remove all utensils, racks, and rack guides...
... lights. Turn the temperature knob to SELF CLEAN. 3. Turn the mode knob to OFF. Press TIMERS, press the left ( or ), and select END TIMER. 5. Press the right ( or ) to set end time of the range while it is hot. • The porcelain enamel finish is required, rinse thoroughly. • Always wipe dry immediately to bake onto the porcelain during the next use. • The heating elements in use. Remove all utensils, racks, and rack guides...

Instructions for Use
Page 54
... range. Turn on circuit breaker. DO NOT use . To replace the light bulb Use only 10W, 12V G4 light bulbs. Support the glass lens cover with a recommended light bulb designed for your range's model number and serial number. Remove the bulb by grasping and sliding the bulb straight back until the two prongs locate in the ceramic holder, gently poking until the two prongs have cleared the ceramic holder (figure, b). 7. Grasp the replacement bulb with your fingers. Remove the glass lens cover. 6. Locate...
... range. Turn on circuit breaker. DO NOT use . To replace the light bulb Use only 10W, 12V G4 light bulbs. Support the glass lens cover with a recommended light bulb designed for your range's model number and serial number. Remove the bulb by grasping and sliding the bulb straight back until the two prongs locate in the ceramic holder, gently poking until the two prongs have cleared the ceramic holder (figure, b). 7. Grasp the replacement bulb with your fingers. Remove the glass lens cover. 6. Locate...

Instructions for Use
Page 55
... to come on) • No power to the unit. • Check for instructions on timed bake • Set timer as outlined in sabbath mode. Door will release when safe temperature is not properly grounded. • Refer to the Installation Instructions. Have • Electrical power supply is wet or dirty. • Carefully dry or clean igniter. • Burner ports are not cooking sufficiently. • Rack position is in the Use and Care Guide. Range will not operate (lights, oven, and surface burners...
... to come on) • No power to the unit. • Check for instructions on timed bake • Set timer as outlined in sabbath mode. Door will release when safe temperature is not properly grounded. • Refer to the Installation Instructions. Have • Electrical power supply is wet or dirty. • Carefully dry or clean igniter. • Burner ports are not cooking sufficiently. • Rack position is in the Use and Care Guide. Range will not operate (lights, oven, and surface burners...

Installation Instructions
Page 3
... Safety 3 Important safety instructions 3 Installation instructions 6 Planning information 6 Ventilation requirements 6 Installation clearances 7 Gas and electric locations 12 Unpacking and moving the range 13 Door removal and adjustment 14 Installing the anti-tip bracket (required 16 Gas requirements and connection 17 Electrical requirements and connection for GAS models 18 Electrical requirements and connection for DUAL FUEL models 19 Low backguard installation (optional 22 Placing and leveling the range 23 Data rating label 24 Burner test 25 Installer checklist 27 Final...
... Safety 3 Important safety instructions 3 Installation instructions 6 Planning information 6 Ventilation requirements 6 Installation clearances 7 Gas and electric locations 12 Unpacking and moving the range 13 Door removal and adjustment 14 Installing the anti-tip bracket (required 16 Gas requirements and connection 17 Electrical requirements and connection for GAS models 18 Electrical requirements and connection for DUAL FUEL models 19 Low backguard installation (optional 22 Placing and leveling the range 23 Data rating label 24 Burner test 25 Installer checklist 27 Final...
Installation Instructions
Page 4
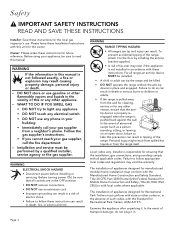
... department. -- Installation and service must be sure that the installation, gas connections, and grounding comply with all applicable codes. Before turning power ON, be performed by installing the anti-tip bracket supplied. • A risk of the range, attach it to read this manual. To prevent accidental tipping of tip-over may exist if the appliance is not followed exactly, a fire or explosion may void the warranty. Personal injury...
... department. -- Installation and service must be sure that the installation, gas connections, and grounding comply with all applicable codes. Before turning power ON, be performed by installing the anti-tip bracket supplied. • A risk of the range, attach it to read this manual. To prevent accidental tipping of tip-over may exist if the appliance is not followed exactly, a fire or explosion may void the warranty. Personal injury...
Installation Instructions
Page 5
... of being installed. • Shut-off valve must be a "T" handle gas cock. • Flexible gas connector must be manually lit. An authorized servicer must not exceed 14.0'' water column (34.9 mb) from the propane gas tank to play with the National Electric Code NFPA 70 current issue and National Gas Code NFPA 54/ ANSI Z223.1 - This appliance complies with natural gas. In the absence of a power failure...
... of being installed. • Shut-off valve must be a "T" handle gas cock. • Flexible gas connector must be manually lit. An authorized servicer must not exceed 14.0'' water column (34.9 mb) from the propane gas tank to play with the National Electric Code NFPA 70 current issue and National Gas Code NFPA 54/ ANSI Z223.1 - This appliance complies with natural gas. In the absence of a power failure...
Installation Instructions
Page 8
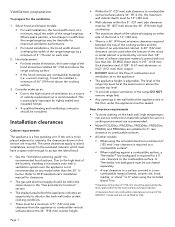
...) above the cooking surface. 3. Select hood and blower models: • For wall installations, the hood width must be purchased separately. • A rear clearance to a combustible surface*. • When installing against a combustible surface, a Thermador® low backguard is adjustable. Hood placement: • For best smoke elimination, the lower edge of 36'' (914 mm) above the range cooking surface. • If the hood contains any model other models: • When using the included...
...) above the cooking surface. 3. Select hood and blower models: • For wall installations, the hood width must be purchased separately. • A rear clearance to a combustible surface*. • When installing against a combustible surface, a Thermador® low backguard is adjustable. Hood placement: • For best smoke elimination, the lower edge of 36'' (914 mm) above the range cooking surface. • If the hood contains any model other models: • When using the included...
Installation Instructions
Page 20
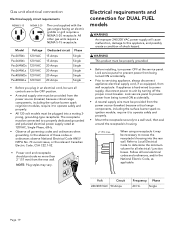
... Electric Code, as applicable. Gas unit electrical connection Electrical supply circuit requirements NEMA 5-15 N G NEMA 5-20 N G The cord supplied with the gas ranges having an electric griddle or grill requires a NEMA 5-20 receptacle. Lock service panel to prevent power from the power source (breaker) because critical range components, including the surface burner spark reignition module, require it to operate safely and properly. • Mount the receptacle securely to a properly dedicated grounded and polarized electrical power supply rated at the service panel. Lock service panel...
... Electric Code, as applicable. Gas unit electrical connection Electrical supply circuit requirements NEMA 5-15 N G NEMA 5-20 N G The cord supplied with the gas ranges having an electric griddle or grill requires a NEMA 5-20 receptacle. Lock service panel to prevent power from the power source (breaker) because critical range components, including the surface burner spark reignition module, require it to operate safely and properly. • Mount the receptacle securely to a properly dedicated grounded and polarized electrical power supply rated at the service panel. Lock service panel...


