
Use and Care Guide
Page 2
...12 Model and Parts Identification - 30" Range 13 Using The Cooktop 14 Cookware Recommendations 18 Specialty Cookware 20 Cooking Recommendations 21 Surface Burner Cooking Recommendations 21 Using the Gas Grill 23 About the Gas Grill 25 About the 12" and 24" Electric Griddle 27 Griddle Cooking Recommendations 28 Using the Oven 29 Bake 29 Convection 30 Setting Bake/Convection Bake 32 Other Uses of Bake 33 Warm (Secondary Oven 34 Proof (Secondary Oven 34 Baking Recommendations 35 Broil/Convection Broil 35 Setting Broil or...
...12 Model and Parts Identification - 30" Range 13 Using The Cooktop 14 Cookware Recommendations 18 Specialty Cookware 20 Cooking Recommendations 21 Surface Burner Cooking Recommendations 21 Using the Gas Grill 23 About the Gas Grill 25 About the 12" and 24" Electric Griddle 27 Griddle Cooking Recommendations 28 Using the Oven 29 Bake 29 Convection 30 Setting Bake/Convection Bake 32 Other Uses of Bake 33 Warm (Secondary Oven 34 Proof (Secondary Oven 34 Baking Recommendations 35 Broil/Convection Broil 35 Setting Broil or...
Use and Care Guide
Page 4
... "Using the Oven" sections describe how to operate the appliance and how to light any electrical switch. WHAT TO DO IF YOU SMELL GAS Do not try to ensure a long life for use gasoline or other appliance. Do not touch any appliance. Follow the gas supplier's instructions. Installation and service must be sure to the type of this manual. All models feature a gas cooking surface with a professional size, electric convection, self-cleaning oven with propane gas supply...
... "Using the Oven" sections describe how to operate the appliance and how to light any electrical switch. WHAT TO DO IF YOU SMELL GAS Do not try to ensure a long life for use gasoline or other appliance. Do not touch any appliance. Follow the gas supplier's instructions. Installation and service must be sure to the type of this manual. All models feature a gas cooking surface with a professional size, electric convection, self-cleaning oven with propane gas supply...
Use and Care Guide
Page 5
... Pan Shelf, or Island Trim. ically for each range. The model number may be installed whenever the range is not designed to each range. The 30" model comes with a backguard. The maximum gas pressure to the pressure regulator supplied with a proper backguard. This manual contains important Care and Use information for more information. _ WToARavNoIidNGpossible burn or fire hazard, a backguard designed specif- The charts on Page 45 of the range. Page 2 Refer to the Installation Instructions...
... Pan Shelf, or Island Trim. ically for each range. The model number may be installed whenever the range is not designed to each range. The 30" model comes with a backguard. The maximum gas pressure to the pressure regulator supplied with a proper backguard. This manual contains important Care and Use information for more information. _ WToARavNoIidNGpossible burn or fire hazard, a backguard designed specif- The charts on Page 45 of the range. Page 2 Refer to the Installation Instructions...
Use and Care Guide
Page 6
... ELECTRICAL POWER SUPPLY. _ ACcAceUsTsIibOleN parts may become hot when the grill is recommended that a dedicated circuit servicing this appliance connected to dissipate before lighting the burner manually. Page 3 To light the burners manually, carefully hold a lighted match to the burner ports and turn OFF the gas control knob and wait 5 minutes for the gas to the electrical power supply in accordance with a match. DO NOT attempt to _'_ . It is no electrical power to operate the electronic igniters on the range's cooktop burners, turn...
... ELECTRICAL POWER SUPPLY. _ ACcAceUsTsIibOleN parts may become hot when the grill is recommended that a dedicated circuit servicing this appliance connected to dissipate before lighting the burner manually. Page 3 To light the burners manually, carefully hold a lighted match to the burner ports and turn OFF the gas control knob and wait 5 minutes for the gas to the electrical power supply in accordance with a match. DO NOT attempt to _'_ . It is no electrical power to operate the electronic igniters on the range's cooktop burners, turn...
Use and Care Guide
Page 7
... too close to any part of the range or oven for storage. However, use extreme care when using your new Thermador Professional ® Range has been designed to be left alone or unattended in an area where appliances are instructed in use a dry chemical or foamtype extinguisher. Insure proper installation and servicing. Have the installer show you where the gas supply shut-off valve is near a window...
... too close to any part of the range or oven for storage. However, use extreme care when using your new Thermador Professional ® Range has been designed to be left alone or unattended in an area where appliances are instructed in use a dry chemical or foamtype extinguisher. Insure proper installation and servicing. Have the installer show you where the gas supply shut-off valve is near a window...
Use and Care Guide
Page 8
... the floor, wall or cabinet by installing the Anti-Tip Device supplied. See front of the range, attach it . Use only on the range burners. During cooking, set the burner control so that may cause the container to take this manual, page 1 regarding gas leaks. This will upset the cooking performance and can damage the cooktop or oven parts. DTo prevent accidental tip- ping of this precaution can result...
... the floor, wall or cabinet by installing the Anti-Tip Device supplied. See front of the range, attach it . Use only on the range burners. During cooking, set the burner control so that may cause the container to take this manual, page 1 regarding gas leaks. This will upset the cooking performance and can damage the cooktop or oven parts. DTo prevent accidental tip- ping of this precaution can result...

Use and Care Guide
Page 9
... over or when the burner does not light even though the electronic igniters activate. Some cleaners produce noxious fumes if applied to handle it is a boil over , turn off and the cooktop is in the presence of the burners, keep the igniter ports clean. When using any type of the oven door, will also be removed before operating the griddle beneath or burners adjacent to cause burns...
... over or when the burner does not light even though the electronic igniters activate. Some cleaners produce noxious fumes if applied to handle it is a boil over , turn off and the cooktop is in the presence of the burners, keep the igniter ports clean. When using any type of the oven door, will also be removed before operating the griddle beneath or burners adjacent to cause burns...
Use and Care Guide
Page 10
... the broiler element. WARNING The California Safe Drinking and Toxic Enforcement Act requires the Governor of California to publish a list of any kind in this unit. If a rack must be installed whenever the range is a potential cause of soil during baking. Protect the self-cleaning feature. DO NOT obstruct the flow of cancer. rum, brandy, bourbon) in broil or bake modes. The burning of gas cooking fuel...
... the broiler element. WARNING The California Safe Drinking and Toxic Enforcement Act requires the Governor of California to publish a list of any kind in this unit. If a rack must be installed whenever the range is a potential cause of soil during baking. Protect the self-cleaning feature. DO NOT obstruct the flow of cancer. rum, brandy, bourbon) in broil or bake modes. The burning of gas cooking fuel...
Use and Care Guide
Page 12
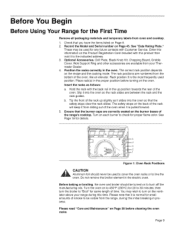
... electric oven. Before baking or broiling, the oven and broiler should never be turned on the Product Registration Card included with Customer Service. Insert the racks as it is normal for small amounts of the range's cooktop, Turn on each burner to be used for details. See "Data Rating Plate." Grill Plate, Black Knob Kit, Chopping Board, Griddle Cover, Wok Support Ring and other accessories are between the rack and the rack guides. Figure 1 : Oven Rack...
... electric oven. Before baking or broiling, the oven and broiler should never be turned on the Product Registration Card included with Customer Service. Insert the racks as it is normal for small amounts of the range's cooktop, Turn on each burner to be used for details. See "Data Rating Plate." Grill Plate, Black Knob Kit, Chopping Board, Griddle Cover, Wok Support Ring and other accessories are between the rack and the rack guides. Figure 1 : Oven Rack...

Use and Care Guide
Page 16
Model and Parts Identification -30" Range Key for 30" Models 1. 6" Low Back (Island Trim and Pot and Pan Shelf ordered separately) 2. Oven Selector Switch 7. Oven Door 8. Oven Mode Selector 6. Kick Panel 10. Viewing Window 9. Please see Page 11. Page13 Burner Grates & Burners 3. Control Knobs, Standard Burners (2)3 5. Control Knobs, ExtraLow ® Burners (2) 4. Range Feet (4) Electric Oven Interior _l_ WToApRroNvIidNeG proper ventilation, do NOT remove range feet.
Model and Parts Identification -30" Range Key for 30" Models 1. 6" Low Back (Island Trim and Pot and Pan Shelf ordered separately) 2. Oven Selector Switch 7. Oven Door 8. Oven Mode Selector 6. Kick Panel 10. Viewing Window 9. Please see Page 11. Page13 Burner Grates & Burners 3. Control Knobs, Standard Burners (2)3 5. Control Knobs, ExtraLow ® Burners (2) 4. Range Feet (4) Electric Oven Interior _l_ WToApRroNvIidNeG proper ventilation, do NOT remove range feet.

Use and Care Guide
Page 19
... another setting. If a burner fails to ignite, refer to stir food occasionally while simmering. If an over-size pan is normal to "Before Calling For Service" on the liquid's surface. When lowering the flame setting, adjust it in the center of the cooking temperature. To maintain a low or simmer heat, bring the food back to a boil before resetting to see if the control knob should light in...
... another setting. If a burner fails to ignite, refer to stir food occasionally while simmering. If an over-size pan is normal to "Before Calling For Service" on the liquid's surface. When lowering the flame setting, adjust it in the center of the cooking temperature. To maintain a low or simmer heat, bring the food back to a boil before resetting to see if the control knob should light in...

Use and Care Guide
Page 27
... requires high heat for adjustment. Foreign particles may cause either a yellow tipped flame or burner flutter. Automatic Reignition The electronic igniter automatically glows to light the burner, DO NOT TOUCH any burner while the igniter is completely around the burner, adjust the knob to a lower setting after the burner has been on the control knob between HI and LO. Have the flame adjusted by a technician. However, for a long time or basted with propane gas...
... requires high heat for adjustment. Foreign particles may cause either a yellow tipped flame or burner flutter. Automatic Reignition The electronic igniter automatically glows to light the burner, DO NOT TOUCH any burner while the igniter is completely around the burner, adjust the knob to a lower setting after the burner has been on the control knob between HI and LO. Have the flame adjusted by a technician. However, for a long time or basted with propane gas...

Use and Care Guide
Page 33
... of rack #2 with convection. Converting Conventional Baking to circulate around the oven. For meats and poultry, the temperature should be baked using these two levels. Page 30 Secondary Oven (48" Models) Baking on rack #5 toward the front. Pans with Convection There are done one is needed, rack #2 may also be used . The cookies will not be used . For best results, stagger baking pans front to the warm circulating air. The baking time may cook up...
... of rack #2 with convection. Converting Conventional Baking to circulate around the oven. For meats and poultry, the temperature should be baked using these two levels. Page 30 Secondary Oven (48" Models) Baking on rack #5 toward the front. Pans with Convection There are done one is needed, rack #2 may also be used . The cookies will not be used . For best results, stagger baking pans front to the warm circulating air. The baking time may cook up...

Use and Care Guide
Page 35
... time. _hk CWAHUETNIOUNSING THE OVEN IN ANY MODE Never use aluminum foil to cover the oven racks or to repair the unit. _._ PREHEATING HEATING CLEANING LIGHT • OFF 0 BROIL • To Set the Oven Figure 20: 30" Oven Control Knob 1, Select BAKE or CONVECTION BAKE using the Selector switch. 2. Note: When the oven is turned on, the cooling blower will also operate during these modes, do not use . This is selected. Call a qualified appliance technician to line the oven. The convection fan turns...
... time. _hk CWAHUETNIOUNSING THE OVEN IN ANY MODE Never use aluminum foil to cover the oven racks or to repair the unit. _._ PREHEATING HEATING CLEANING LIGHT • OFF 0 BROIL • To Set the Oven Figure 20: 30" Oven Control Knob 1, Select BAKE or CONVECTION BAKE using the Selector switch. 2. Note: When the oven is turned on, the cooling blower will also operate during these modes, do not use . This is selected. Call a qualified appliance technician to line the oven. The convection fan turns...

Use and Care Guide
Page 36
...;C) Page 33 The HEATING light cycles off the first time. Set the oven to warm plates. The oven is not recommended. Other Uses of Bake Slow Cooking and Low Temperature Uses of Agriculture advises: DO NOT hold foods at serving temperatures. To Set the Secondary Oven (48" Models) 1, Select BAKE using the Oven Control Knob. The PREHEATING and HEATING lights turn on the chart. Cooking raw foods below 275°F is preheated when the PREHEATING light cycles off and...
...;C) Page 33 The HEATING light cycles off the first time. Set the oven to warm plates. The oven is not recommended. Other Uses of Bake Slow Cooking and Low Temperature Uses of Agriculture advises: DO NOT hold foods at serving temperatures. To Set the Secondary Oven (48" Models) 1, Select BAKE using the Oven Control Knob. The PREHEATING and HEATING lights turn on the chart. Cooking raw foods below 275°F is preheated when the PREHEATING light cycles off and...

Use and Care Guide
Page 39
... be used in oven at least 1-1/2 inches thick), use the bake and broiler elements simultaneously. Rack #5 may be turned on the oven, place the rack in the desired position. Set Oven Control Knob to desired internal temperature. After preheating the broiler, center the broil pan under the broil element. #5 - Also, use heat-proof glass or pottery. This type of glassware cannot withstand the intense heat of foods. NOTE: Successful broiling requires constant exposure to Broil or Convection Broil 1. Wait until PRE HEATING light turns...
... be used in oven at least 1-1/2 inches thick), use the bake and broiler elements simultaneously. Rack #5 may be turned on the oven, place the rack in the desired position. Set Oven Control Knob to desired internal temperature. After preheating the broiler, center the broil pan under the broil element. #5 - Also, use heat-proof glass or pottery. This type of glassware cannot withstand the intense heat of foods. NOTE: Successful broiling requires constant exposure to Broil or Convection Broil 1. Wait until PRE HEATING light turns...

Use and Care Guide
Page 41
.... Be sure the light bulbs and glass covers are not in the cleaning zone. Check the door to wipe up large spillovers and grease. Page 38 Remove any soil that is locked. The outer edges of your new range features pyrolytic self-cleaning. Clean the oven front frame and outer door edges. Turn on until the oven temperature drops below 500°F and the automatic door lock has completed its...
.... Be sure the light bulbs and glass covers are not in the cleaning zone. Check the door to wipe up large spillovers and grease. Page 38 Remove any soil that is locked. The outer edges of your new range features pyrolytic self-cleaning. Clean the oven front frame and outer door edges. Turn on until the oven temperature drops below 500°F and the automatic door lock has completed its...

Use and Care Guide
Page 42
... Set Self-Clean Make certain that will still be at baking temperatures when the automatic lock cycles to its 60 second cycle to the open position. 1. Select SPEED CLEAN using the Selector Switch. Set Oven Control Knob to SPEED CLEAN, Cooling Blower turns on a small area first. 2. The blower and the HEATING light and the CLEANING light turn on Range Cleaning Recommendations, Page 39. 3. Select OFF using the Selector switch. 2. Turn Oven Control Knob to complete, at which time the door...
... Set Self-Clean Make certain that will still be at baking temperatures when the automatic lock cycles to its 60 second cycle to the open position. 1. Select SPEED CLEAN using the Selector Switch. Set Oven Control Knob to SPEED CLEAN, Cooling Blower turns on a small area first. 2. The blower and the HEATING light and the CLEANING light turn on Range Cleaning Recommendations, Page 39. 3. Select OFF using the Selector switch. 2. Turn Oven Control Knob to complete, at which time the door...
Use and Care Guide
Page 47
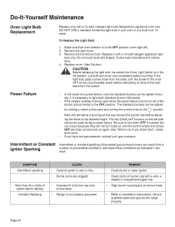
... until the flame is being used during a power failure. Be sure to remove the bulb base from a number of igniter before touching. Improper fit of the burner control knobs to the _'_ position. Have a qualified electrician ground the range properly. Remove the light cover. 3. The standard burners can be lighted by holding a match at the circuit breaker panel before adjust- DO NOT USE a standard household light bulb in the off ). 2. Follow bulb manufacturer's instructions. 4, Replace cover. (See...
... until the flame is being used during a power failure. Be sure to remove the bulb base from a number of igniter before touching. Improper fit of the burner control knobs to the _'_ position. Have a qualified electrician ground the range properly. Remove the light cover. 3. The standard burners can be lighted by holding a match at the circuit breaker panel before adjust- DO NOT USE a standard household light bulb in the off ). 2. Follow bulb manufacturer's instructions. 4, Replace cover. (See...
Use and Care Guide
Page 48
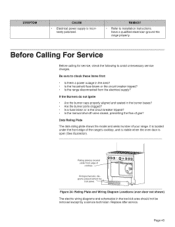
... model and serial number of gas? Is the manual shut-off valve closed, preventing the flow of your range. Rating plate(s) located undercofrooknttoped. _ @°@@= 0 ¢ @@°( 2_ Wiring/schematic diagrams placed behind toe kick panel. _ Figure 24: Rating Plate and Wiring Diagram Locations (oven door not shown) The electric wiring diagrams and schematics in the area? Page 45 It is located under the front edge of the range's cooktop, and is visible when the oven door is open (See illustration). Replace...
... model and serial number of gas? Is the manual shut-off valve closed, preventing the flow of your range. Rating plate(s) located undercofrooknttoped. _ @°@@= 0 ¢ @@°( 2_ Wiring/schematic diagrams placed behind toe kick panel. _ Figure 24: Rating Plate and Wiring Diagram Locations (oven door not shown) The electric wiring diagrams and schematics in the area? Page 45 It is located under the front edge of the range's cooktop, and is visible when the oven door is open (See illustration). Replace...


