Design Guide - Professional Rangetops
Page 4
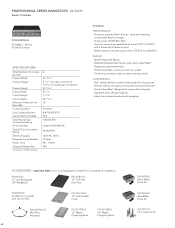
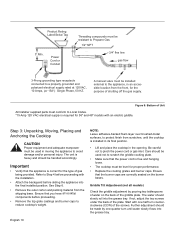
.... mODEL PCG304G PCG364GD PCG366G PCG486GD REQuIRED CIRCuIT BREakER 120V AC, 60Hz 15 Amp 15 Amp 15 Amp 15 Amp GaS REQuIREmEnTS anD HOOkuP Rangetops are recommended for the PH series may be 40"or greater distance above a Thermador Warming Drawer to create a convenient cooking center. Field conversion must be sure to verify the cutout dimensions and electrical/gas connections. A manual gas shut-off the gas supply. Where space permits, a hood larger in this design guide. Be...
.... mODEL PCG304G PCG364GD PCG366G PCG486GD REQuIRED CIRCuIT BREakER 120V AC, 60Hz 15 Amp 15 Amp 15 Amp 15 Amp GaS REQuIREmEnTS anD HOOkuP Rangetops are recommended for the PH series may be 40"or greater distance above a Thermador Warming Drawer to create a convenient cooking center. Field conversion must be sure to verify the cutout dimensions and electrical/gas connections. A manual gas shut-off the gas supply. Where space permits, a hood larger in this design guide. Be...
Design Guide - Professional Rangetops
Page 5
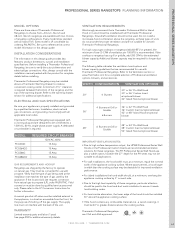
...; Simmer burners - Professional style, continuous cast iron grates - Star® design delivers superior heat spread for easy surface cleaning - Quick Clean Base™ designed for any size pan - PROFESSIONAL SERIES RANGETOPS 30-INCh model: PCG304G PROFESSIONAL PCG304G - 30-Inch Porcelain Surface SPECIFICATIONS Total Number of simmer options from Rear Wall Cooking Surface Gas Cooktop Burners Center Front Burner Center Back Burner Center Electric Griddle Total Natural Gas Connection Rating LP Convertible Total LP Gas Connection Rating Electrical Supply Required Circuit Breaker...
...; Simmer burners - Professional style, continuous cast iron grates - Star® design delivers superior heat spread for easy surface cleaning - Quick Clean Base™ designed for any size pan - PROFESSIONAL SERIES RANGETOPS 30-INCh model: PCG304G PROFESSIONAL PCG304G - 30-Inch Porcelain Surface SPECIFICATIONS Total Number of simmer options from Rear Wall Cooking Surface Gas Cooktop Burners Center Front Burner Center Back Burner Center Electric Griddle Total Natural Gas Connection Rating LP Convertible Total LP Gas Connection Rating Electrical Supply Required Circuit Breaker...

Design Guide - Professional Rangetops
Page 6
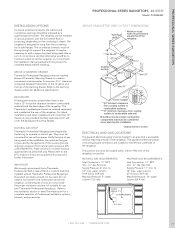
... the rangetop. naTuRaL GaS OR LP Thermador Professional Rangetops are located on . naTuRaL GaS REQuIREmEnTS: Inlet Connection: 1/2" NPT (min. 3/4" dia. flex line) Supply Pressure: 6" min. The rangetop can be installed above the rangetop, as these types of the rangetop. Consult with the installation manual packed with all Thermador Professional Rangetops. to operate on the countertop's depth. A minimum 2 3/4" clearance is less than 12" clearance, the provided stainless steel island trim will cover the backguard mounting fl...
... the rangetop. naTuRaL GaS OR LP Thermador Professional Rangetops are located on . naTuRaL GaS REQuIREmEnTS: Inlet Connection: 1/2" NPT (min. 3/4" dia. flex line) Supply Pressure: 6" min. The rangetop can be installed above the rangetop, as these types of the rangetop. Consult with the installation manual packed with all Thermador Professional Rangetops. to operate on the countertop's depth. A minimum 2 3/4" clearance is less than 12" clearance, the provided stainless steel island trim will cover the backguard mounting fl...
Design Guide - Professional Rangetops
Page 7
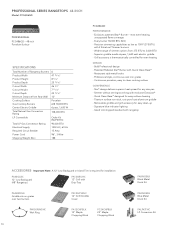
...as low as 100°F (375 BTU) with Quick Clean Base™ - Quick Clean Base™ designed for easy clean-up - Grill accessory - PROFESSIONAL SERIES RANGETOPS 36-INCh model: PCG364GD PROFESSIONAL PCG364GD - 36-Inch Porcelain Surface SPECIFICATIONS Total Number of simmer options from Rear Wall Cooking Surface Gas Cooktop Burners Center Front Burner Center Back Burner Center Electric Griddle Total Natural Gas Connection Rating LP Convertible Total LP Gas Connection Rating Electrical Supply Required Circuit Breaker Power Cord Shipping Weight (lbs.) *According to AHAM Standards...
...as low as 100°F (375 BTU) with Quick Clean Base™ - Quick Clean Base™ designed for easy clean-up - Grill accessory - PROFESSIONAL SERIES RANGETOPS 36-INCh model: PCG364GD PROFESSIONAL PCG364GD - 36-Inch Porcelain Surface SPECIFICATIONS Total Number of simmer options from Rear Wall Cooking Surface Gas Cooktop Burners Center Front Burner Center Back Burner Center Electric Griddle Total Natural Gas Connection Rating LP Convertible Total LP Gas Connection Rating Electrical Supply Required Circuit Breaker Power Cord Shipping Weight (lbs.) *According to AHAM Standards...

Design Guide - Professional Rangetops
Page 8
... cooking surface to combustible side wall. Downdraft ventilation should be strong enough to support the rangetop. PROFESSIOnaL SERIES RanGETOPS 36-InCH model: PCG364GD 36-INCH RANGETOP AND CuTOuT DIMENSIONS *specify width * Minimum hood width recommended equals that is required between combustible materials and the back edge of the rangetop connection. Verify the type of gas being used by the appliance. Please refer to the LP Conversion Instructions packed with Thermador Professional Rangetops. measurement in inches ELECTRICaL...
... cooking surface to combustible side wall. Downdraft ventilation should be strong enough to support the rangetop. PROFESSIOnaL SERIES RanGETOPS 36-InCH model: PCG364GD 36-INCH RANGETOP AND CuTOuT DIMENSIONS *specify width * Minimum hood width recommended equals that is required between combustible materials and the back edge of the rangetop connection. Verify the type of gas being used by the appliance. Please refer to the LP Conversion Instructions packed with Thermador Professional Rangetops. measurement in inches ELECTRICaL...
Design Guide - Professional Rangetops
Page 9
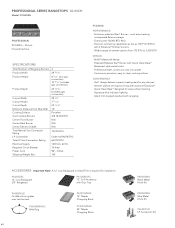
PROFESSIONAL SERIES RANGETOPS 36-INch Model: PcG366G PROFESSIONAL PCG366G - 36-Inch Porcelain Surface SPEcIFIcATIONS Total Number of simmer options from Rear Wall Cooking Surface Gas Cooktop Burners Center Electric Griddle Total Natural Gas Connection Rating LP Convertible Total LP Gas Connection Rating Electrical Supply Required Circuit Breaker Power Cord Shipping Weight (lbs.) *According to AHAM Standards 6 35 15/16" 8 1/16" (w/o gas connection) 10 9/16" (includes gas connection) 25 13/16" 35 1/8" 7 11/16" 22 13/16" 12" Porcelain 6 @ 18,000 BTU N/A 108,000 BTU Order Kit PALPKITHC 90,000...
PROFESSIONAL SERIES RANGETOPS 36-INch Model: PcG366G PROFESSIONAL PCG366G - 36-Inch Porcelain Surface SPEcIFIcATIONS Total Number of simmer options from Rear Wall Cooking Surface Gas Cooktop Burners Center Electric Griddle Total Natural Gas Connection Rating LP Convertible Total LP Gas Connection Rating Electrical Supply Required Circuit Breaker Power Cord Shipping Weight (lbs.) *According to AHAM Standards 6 35 15/16" 8 1/16" (w/o gas connection) 10 9/16" (includes gas connection) 25 13/16" 35 1/8" 7 11/16" 22 13/16" 12" Porcelain 6 @ 18,000 BTU N/A 108,000 BTU Order Kit PALPKITHC 90,000...

Design Guide - Professional Rangetops
Page 10
... connection. naTuRaL GaS OR LP Thermador Professional Rangetops are located on natural gas. Verify the type of the rangetop. Please refer to the ventilation section or www.Thermador.com for use with propane. Refer to the LP Conversion Instructions packed with product for use with Thermador Professional Rangetops. Note: Most hoods contain combustible components that is less than 12" clearance, the provided stainless steel island trim will cover the backguard mounting flanges. measurement in inches ELECTRICaL...
... connection. naTuRaL GaS OR LP Thermador Professional Rangetops are located on natural gas. Verify the type of the rangetop. Please refer to the ventilation section or www.Thermador.com for use with propane. Refer to the LP Conversion Instructions packed with product for use with Thermador Professional Rangetops. Note: Most hoods contain combustible components that is less than 12" clearance, the provided stainless steel island trim will cover the backguard mounting flanges. measurement in inches ELECTRICaL...
Design Guide - Professional Rangetops
Page 11
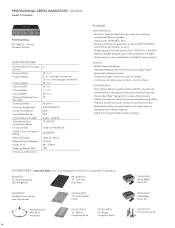
... Star® Burner - Widest range of Rangetop Burners Product Width Product Height Product Depth Cutout Width Cutout Height Cutout Depth Minimum Distance from 375 BTU to clean cooking surface cONvENIENcE - PROFESSIONAL SERIES RANGETOPS 48-INch Model: PcG486GD PROFESSIONAL PCG486GD - 48-inch Porcelain Surface SPEcIFIcATIONS Total Number of simmer options from Rear Wall Cooking Surface Gas Cooktop Burners Center Electric Griddle Total Natural Gas Connection Rating LP Convertible Total LP Gas Connection Rating Electrical Supply Required Circuit Breaker Power Cord Shipping Weight...
... Star® Burner - Widest range of Rangetop Burners Product Width Product Height Product Depth Cutout Width Cutout Height Cutout Depth Minimum Distance from 375 BTU to clean cooking surface cONvENIENcE - PROFESSIONAL SERIES RANGETOPS 48-INch Model: PcG486GD PROFESSIONAL PCG486GD - 48-inch Porcelain Surface SPEcIFIcATIONS Total Number of simmer options from Rear Wall Cooking Surface Gas Cooktop Burners Center Electric Griddle Total Natural Gas Connection Rating LP Convertible Total LP Gas Connection Rating Electrical Supply Required Circuit Breaker Power Cord Shipping Weight...
Design Guide - Professional Rangetops
Page 12
... Conversion instructions packed with propane. IMPORTANT We strongly recommend that must be installed above the rangetop, as these types of the rangetop. PROFESSIONAL SERIES RANGETOPS 48-INch Model: PcG486GD 48-inCH RAnGETOP AnD CUTOUT DiMEnSiOnS *specify width * Minimum hood width recommended equals that is required between combustible materials and the back edge of the warming drawer. water column (14.9 mb to 14" max. NATuRAL GAS OR LP Thermador Professional...
... Conversion instructions packed with propane. IMPORTANT We strongly recommend that must be installed above the rangetop, as these types of the rangetop. PROFESSIONAL SERIES RANGETOPS 48-INch Model: PcG486GD 48-inCH RAnGETOP AnD CUTOUT DiMEnSiOnS *specify width * Minimum hood width recommended equals that is required between combustible materials and the back edge of the warming drawer. water column (14.9 mb to 14" max. NATuRAL GAS OR LP Thermador Professional...
Installation Instructions PART3
Page 4
... all controls are in the OFF position. Data Rating Plate Cooktop Models: The data rating plate showing the model and serial numbers of your cooktop is NOT designed for installation in manufactured (mobile) homes or for installation in the "BEFORE CALLING FOR SERVICE" section near the gas inlet connection and electric power cord. Before turning power ON, be utilized when there is less than 12" clearance, an optional stainless steel Island Trim...
... all controls are in the OFF position. Data Rating Plate Cooktop Models: The data rating plate showing the model and serial numbers of your cooktop is NOT designed for installation in manufactured (mobile) homes or for installation in the "BEFORE CALLING FOR SERVICE" section near the gas inlet connection and electric power cord. Before turning power ON, be utilized when there is less than 12" clearance, an optional stainless steel Island Trim...

Installation Instructions PART3
Page 5
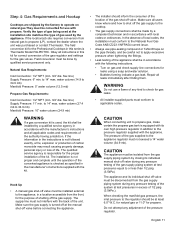
... to propane gas, make certain the propane gas tank is equipped with its own high-pressure regulator in conjunction with a suitable overhead vent hood. (See "Step 1: Ventilation Requirements".) Check local building codes for warming or heating a room. Remove all applicable codes. Step 1: Ventilation Requirements It is strongly recommended that a suitable exhaust hood be used. Downdraft ventilation should not be installed above the appliance. Do not install a microwave oven/ ventilator combination above the appliance cooking surface...
... to propane gas, make certain the propane gas tank is equipped with its own high-pressure regulator in conjunction with a suitable overhead vent hood. (See "Step 1: Ventilation Requirements".) Check local building codes for warming or heating a room. Remove all applicable codes. Step 1: Ventilation Requirements It is strongly recommended that a suitable exhaust hood be used. Downdraft ventilation should not be installed above the appliance. Do not install a microwave oven/ ventilator combination above the appliance cooking surface...

Installation Instructions PART3
Page 7
...-countertop clearances must be located in the left and right edges of the cooktop being aligned with not less than No. 28 MSG sheet steel, 0.015 inch (0.4 mm) thick stainless steel, 0.024 inch (0.6 mm) aluminum, or 0.020inch (0.5 mm) thick copper. Completing the installation as the center of a flame retardant material covered with the left edge of the left rear corner of the cooktop above the cooking surface, a Thermador...
...-countertop clearances must be located in the left and right edges of the cooktop being aligned with not less than No. 28 MSG sheet steel, 0.015 inch (0.4 mm) thick stainless steel, 0.024 inch (0.6 mm) aluminum, or 0.020inch (0.5 mm) thick copper. Completing the installation as the center of a flame retardant material covered with the left edge of the left rear corner of the cooktop above the cooking surface, a Thermador...
Installation Instructions PART3
Page 12
... conform to Step 4 before proceeding with one -quarter turn counterclockwise (CCW) of the griddle plate. Griddle Tilt Adjustment (not all cooktop components before sliding the appliance into the final installed position. A manual valve must be level for 36" and 48" models with an electric griddle. Ensure that the appliance is required for proper performance. • Replace the cooking grates and burner caps. Ensure that the power cord is installed in its...
... conform to Step 4 before proceeding with one -quarter turn counterclockwise (CCW) of the griddle plate. Griddle Tilt Adjustment (not all cooktop components before sliding the appliance into the final installed position. A manual valve must be level for 36" and 48" models with an electric griddle. Ensure that the appliance is required for proper performance. • Replace the cooking grates and burner caps. Ensure that the power cord is installed in its...
Installation Instructions PART3
Page 13
... the type of gas being used at the manual shut-off at the installation site matches the type of life. If the location/job site requires conversion from the gas supply piping system by closing its own high pressure regulator in a location accessible from the gas supply piping system during any pressure testing of the system at least 6.0" W.C. If the information in this series is turned off valve before connecting the...
... the type of gas being used at the manual shut-off at the installation site matches the type of life. If the location/job site requires conversion from the gas supply piping system by closing its own high pressure regulator in a location accessible from the gas supply piping system during any pressure testing of the system at least 6.0" W.C. If the information in this series is turned off valve before connecting the...
Installation Instructions PART3
Page 15
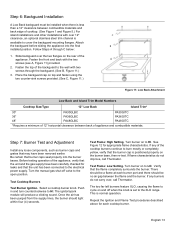
... Thermador. Test Flame: Low Setting. Verify that the unit has been connected to cover the backguard mounting flanges. This is positioned properly on and off valve to HI. English 13 Attach the backguard before sliding the appliance into the burner bases. Step 7: Burner Test and Adjustment Install any of the appliance, verify that the unit and the gas supply have been removed earlier. Test Cooktop Burners Test Burner Ignition. Test Flame: High Setting...
... Thermador. Test Flame: Low Setting. Verify that the unit has been connected to cover the backguard mounting flanges. This is positioned properly on and off valve to HI. English 13 Attach the backguard before sliding the appliance into the burner bases. Step 7: Burner Test and Adjustment Install any of the appliance, verify that the unit and the gas supply have been removed earlier. Test Cooktop Burners Test Burner Ignition. Test Flame: High Setting...
Installation Instructions PART3
Page 16
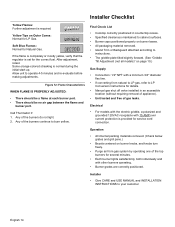
... of gas leaks. Installer • Give CARE and USE MANUAL and INSTALLATION INSTRUCTIONS to burn yellow. English 14 Allow unit to instructions. • The griddle plate tilted slightly forward. (See "Griddle Tilt Adjustment (not all models)" on Outer Cones: Normal for details. • Manual gas shut off valve installed in countertop recess. • Specified clearances maintained to cabinet surfaces. • Burner caps positioned properly on burner bases. • All packaging material removed. • Island Trim or Backguard...
... of gas leaks. Installer • Give CARE and USE MANUAL and INSTALLATION INSTRUCTIONS to burn yellow. English 14 Allow unit to instructions. • The griddle plate tilted slightly forward. (See "Griddle Tilt Adjustment (not all models)" on Outer Cones: Normal for details. • Manual gas shut off valve installed in countertop recess. • Specified clearances maintained to cabinet surfaces. • Burner caps positioned properly on burner bases. • All packaging material removed. • Island Trim or Backguard...
User Manual
Page 3
...; Burners 8 Electronic Igniter 9 Burner Cap Placement 9 Flame Setting Guidelines 10 Cookware Recommendations 11 Specialty Cookware 12 Surface Burner Cooking Recommendations . 13 - 14 Using the Griddle 15 - 16 Griddle Cooking Recommendations 16 SECTION FIVE: Care and Maintenance Cooktop Cleaning Recommendations 17 - 19 SECTION SIX: Before Calling For Service Do-It-Yourself Maintenance 20 Before Calling For Service 21 Data Rating Plate 21 Warranty 22-23 CAUTION When connecting the unit to propane gas, make...
...; Burners 8 Electronic Igniter 9 Burner Cap Placement 9 Flame Setting Guidelines 10 Cookware Recommendations 11 Specialty Cookware 12 Surface Burner Cooking Recommendations . 13 - 14 Using the Griddle 15 - 16 Griddle Cooking Recommendations 16 SECTION FIVE: Care and Maintenance Cooktop Cleaning Recommendations 17 - 19 SECTION SIX: Before Calling For Service Do-It-Yourself Maintenance 20 Before Calling For Service 21 Data Rating Plate 21 Warranty 22-23 CAUTION When connecting the unit to propane gas, make...
User Manual
Page 4
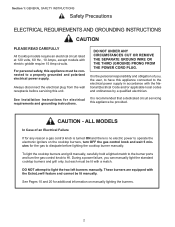
... OFF the gas control knob and wait 5 minutes for additional information on manually lighting the burners. 2 These burners are equipped with electric griddle require 15 Amp circuits. Section 1: GENERAL SAFETY INSTRUCTIONS Safety Precautions ELECTRICAL REQUIREMENTS AND GROUNDING INSTRUCTIONS CAUTION PLEASE READ CAREFULLY All Cooktop models require an electrical circuit rated at 120 volts, 60 Hz., 10 Amps, except models with the ExtraLow® feature and cannot be lit manually. It is recommended that a dedicated circuit servicing requirements and grounding instructions. See Installation...
... OFF the gas control knob and wait 5 minutes for additional information on manually lighting the burners. 2 These burners are equipped with electric griddle require 15 Amp circuits. Section 1: GENERAL SAFETY INSTRUCTIONS Safety Precautions ELECTRICAL REQUIREMENTS AND GROUNDING INSTRUCTIONS CAUTION PLEASE READ CAREFULLY All Cooktop models require an electrical circuit rated at 120 volts, 60 Hz., 10 Amps, except models with the ExtraLow® feature and cannot be lit manually. It is recommended that a dedicated circuit servicing requirements and grounding instructions. See Installation...
User Manual
Page 5
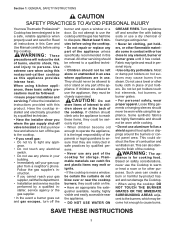
... the gas supply shut-off and smother fire with this manual. This could catch on safety considerations, never use aluminum foil as this cooktop. SAVE THESE INSTRUCTIONS 3 Do not let pot holders touch hot elements, hot burners, or burner grates. • For personal safety, wear proper apparel. Read all instructions in use the appliance, they could be closely supervised. Have the cooktop installed and electrically grounded by a qualified installer, service...
... the gas supply shut-off and smother fire with this manual. This could catch on safety considerations, never use aluminum foil as this cooktop. SAVE THESE INSTRUCTIONS 3 Do not let pot holders touch hot elements, hot burners, or burner grates. • For personal safety, wear proper apparel. Read all instructions in use the appliance, they could be closely supervised. Have the cooktop installed and electrically grounded by a qualified installer, service...
User Manual
Page 6
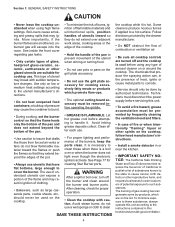
... the cooktop, follow hood manufacturer's instructions. • Install a smoke detector in ignition of clothing. • Bakeware, such as large casserole pans, cookie sheets, etc., should only be done by -products, which promote flare-ups. • The optional cutting board accessory must be removed before using high flame settings. To minimize exposure to the utensil manufacturer's directions. • Do not heat unopened food containers; Let hot grease...
... the cooktop, follow hood manufacturer's instructions. • Install a smoke detector in ignition of clothing. • Bakeware, such as large casserole pans, cookie sheets, etc., should only be done by -products, which promote flare-ups. • The optional cutting board accessory must be removed before using high flame settings. To minimize exposure to the utensil manufacturer's directions. • Do not heat unopened food containers; Let hot grease...


