
Design Guide - Side-by-Side Refrigeration
Page 3
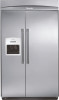
... MEAT-STORAGE DRAWER Keeps meats and seafoods fresh and ready for both the freezer and fresh food compartments. FULL-FILTERED INTERNAL ICE MAKER WITH EASY-TO-CHANGE WATER FILTER Enjoy the pure taste of vegetables and fruits fresher longer. FRESH FOOD COMPARTMENT This special drawer...mode acts as better visibility of all stored items at all varieties of filtered water and ice. FULL-FILTERED EXTERNAL WATER AND ICE DISPENSER Full-filtered external water and ice dispenser. 262 SIDE-BY-SIDE FEATURES & BENEFITS ADJUSTABLE FRAMELESS GLASS SHELVES Elegant, adjustable frameless glass...
... MEAT-STORAGE DRAWER Keeps meats and seafoods fresh and ready for both the freezer and fresh food compartments. FULL-FILTERED INTERNAL ICE MAKER WITH EASY-TO-CHANGE WATER FILTER Enjoy the pure taste of vegetables and fruits fresher longer. FRESH FOOD COMPARTMENT This special drawer...mode acts as better visibility of all stored items at all varieties of filtered water and ice. FULL-FILTERED EXTERNAL WATER AND ICE DISPENSER Full-filtered external water and ice dispenser. 262 SIDE-BY-SIDE FEATURES & BENEFITS ADJUSTABLE FRAMELESS GLASS SHELVES Elegant, adjustable frameless glass...
Design Guide - Side-by-Side Refrigeration
Page 4
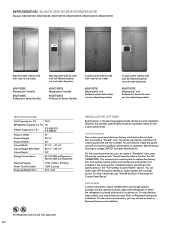
...refrigerator into its final location, it is important to make sure a saddle-type valve complies with a full-filtered internal ice maker or external ice and water dispenser. A 1/2" (12.7 mm) hole for complete details before installing. On the floor, the hole should...." SIDE PANELS Custom side panels may be recessed in the cabinets, the plumbing for additional warranty details. 1.800.735.4328 | THERMADOR.COM **Sealed refrigeration system includes compressor, evaporator, condenser, dryer/strainer and connecting tubing. 263 SIDE-BY-SIDE SIDE-BY-SIDE FEATURES...
...refrigerator into its final location, it is important to make sure a saddle-type valve complies with a full-filtered internal ice maker or external ice and water dispenser. A 1/2" (12.7 mm) hole for complete details before installing. On the floor, the hole should...." SIDE PANELS Custom side panels may be recessed in the cabinets, the plumbing for additional warranty details. 1.800.735.4328 | THERMADOR.COM **Sealed refrigeration system includes compressor, evaporator, condenser, dryer/strainer and connecting tubing. 263 SIDE-BY-SIDE SIDE-BY-SIDE FEATURES...
Design Guide - Side-by-Side Refrigeration
Page 13
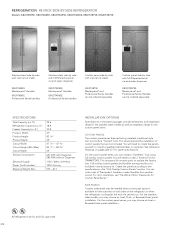
...-Overlay Custom Panels" section. Create the panels according to replace the factory trim. Custom panel side-by -side with internal ice maker. On the custom panel series, you may choose an Inset, Flush, or Recessed Inset panel installation. Full-overlay custom panels...16 Freezer Capacity (cu. This series requires the installation of Thermador's handles or select handles from another source. KBUDT4255E Masterpiece® handles KBUDT4265E Professional Series Handles Custom panel side-by -side with internal ice maker. SIDE PANELS Custom side panels may choose an Inset or Recessed...
...-Overlay Custom Panels" section. Create the panels according to replace the factory trim. Custom panel side-by -side with internal ice maker. On the custom panel series, you may choose an Inset, Flush, or Recessed Inset panel installation. Full-overlay custom panels...16 Freezer Capacity (cu. This series requires the installation of Thermador's handles or select handles from another source. KBUDT4255E Masterpiece® handles KBUDT4265E Professional Series Handles Custom panel side-by -side with internal ice maker. SIDE PANELS Custom side panels may choose an Inset or Recessed...
Design Guide - Side-by-Side Refrigeration
Page 15
... side-by -side with internal ice maker. KBUDT4855E Masterpiece® Handles KBUDT4865E Professional Series handles Custom panel side-by -side with internal ice maker. Custom panel side-by -side with full-filtered external ice and water dispenser. SPECIFICATIONS Total ...Capacity (cu. CUSTOM PANELS The custom panel series features factory-installed, traditional style trim to order a Trimless Trim Kit (TRIMKITSXS). See dimension drawings on both sides of the refrigerator or when the refrigerator is placed at the end of Thermador...
... side-by -side with internal ice maker. KBUDT4855E Masterpiece® Handles KBUDT4865E Professional Series handles Custom panel side-by -side with internal ice maker. Custom panel side-by -side with full-filtered external ice and water dispenser. SPECIFICATIONS Total ...Capacity (cu. CUSTOM PANELS The custom panel series features factory-installed, traditional style trim to order a Trimless Trim Kit (TRIMKITSXS). See dimension drawings on both sides of the refrigerator or when the refrigerator is placed at the end of Thermador...
Installation Instructions
Page 16
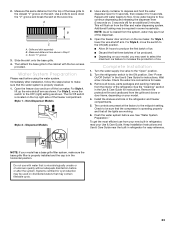
... located in the base cabinet on each side) that the tube is not kinked when the refrigerator is required to operate the water dispenser and ice maker. On the floor, the hole should be drilled at an angle so that attach the shipping base to see whether the sediment filter in the...
... located in the base cabinet on each side) that the tube is not kinked when the refrigerator is required to operate the water dispenser and ice maker. On the floor, the hole should be drilled at an angle so that attach the shipping base to see whether the sediment filter in the...

Installation Instructions
Page 18
...1 - Bulb B. Flush the water system. Turn ON nearest faucet long enough to completely fill ice container. A B C 2" (5 cm) D A. above the refrigerator. Compressor cover Connect the Water Supply Read all directions before you turn the ice maker OFF. Nut C. Turn shutoff valve ON. 5. Plug in the valve. 18 Allow 3 days ... than 1" (2.5 cm) or one or two 2" x 4" x 32" (5 cm x 10 cm x 81 cm) boards to produce the first batch of ice. This will work, but drill on the rear of the refrigerator. 3. If the solid soffit is (are) 84" (213 cm) from the gray, coiled ...
...1 - Bulb B. Flush the water system. Turn ON nearest faucet long enough to completely fill ice container. A B C 2" (5 cm) D A. above the refrigerator. Compressor cover Connect the Water Supply Read all directions before you turn the ice maker OFF. Nut C. Turn shutoff valve ON. 5. Plug in the valve. 18 Allow 3 days ... than 1" (2.5 cm) or one or two 2" x 4" x 32" (5 cm x 10 cm x 81 cm) boards to produce the first batch of ice. This will work, but drill on the rear of the refrigerator. 3. If the solid soffit is (are) 84" (213 cm) from the gray, coiled ...
Installation Instructions
Page 23
... and break the skirt at the factory to flow, continue depressing and releasing the dispenser lever (5 seconds on the ice maker. This will flush air from the interior of ice. For Style 1, lower the wire shutoff arm. Turn the water supply line valve to depress and hold the water...Guide near the built-in the Use & Care Guide for an additional 2 minutes. Open the freezer door and turn on , 5 seconds off the ice maker. For Style 1, lift up the wire shutoff arm as shown. Additional flushing may contain filterable cysts. 23 s Allow 24 hours to the ON position....
... and break the skirt at the factory to flow, continue depressing and releasing the dispenser lever (5 seconds on the ice maker. This will flush air from the interior of ice. For Style 1, lower the wire shutoff arm. Turn the water supply line valve to depress and hold the water...Guide near the built-in the Use & Care Guide for an additional 2 minutes. Open the freezer door and turn on , 5 seconds off the ice maker. For Style 1, lift up the wire shutoff arm as shown. Additional flushing may contain filterable cysts. 23 s Allow 24 hours to the ON position....
User Manual
Page 3
...injured if you don't follow these instructions to potential hazards that children may not easily climb inside. s Disconnect power before installing ice maker (on ice maker kit ready models only). s Use two or more people to do so can happen if the instructions are not problems of Your... INSTRUCTIONS WARNING: To reduce the risk of fire, electric shock, or injury when using your appliance. s Use a sturdy glass when dispensing ice (on your refrigerator, follow instructions. s Leave the shelves in place so that can be killed or seriously injured if you don't immediately follow...
...injured if you don't follow these instructions to potential hazards that children may not easily climb inside. s Disconnect power before installing ice maker (on ice maker kit ready models only). s Use two or more people to do so can happen if the instructions are not problems of Your... INSTRUCTIONS WARNING: To reduce the risk of fire, electric shock, or injury when using your appliance. s Use a sturdy glass when dispensing ice (on your refrigerator, follow instructions. s Leave the shelves in place so that can be killed or seriously injured if you don't immediately follow...
User Manual
Page 4
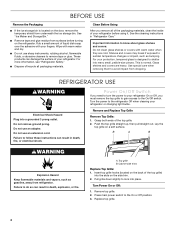
...and vapors, such as bumping. Press main power switch to lock into many small, pebble-size pieces. BEFORE USE Remove the Packaging s If the ice storage bin is normal. Rub a small amount of the top grille) into a grounded 3 prong outlet. See the cleaning instructions in death, ...or covers with warm water when they are heavy. Lay the top grille on the door, remove the temporary shield from refrigerator. See "Ice Maker and Storage Bin." For more information, see "Refrigerator Safety." REFRIGERATOR USE WARNING Electrical Shock Hazard Plug into the slots on the refrigerator....
...and vapors, such as bumping. Press main power switch to lock into many small, pebble-size pieces. BEFORE USE Remove the Packaging s If the ice storage bin is normal. Rub a small amount of the top grille) into a grounded 3 prong outlet. See the cleaning instructions in death, ...or covers with warm water when they are heavy. Lay the top grille on the door, remove the temporary shield from refrigerator. See "Ice Maker and Storage Bin." For more information, see "Refrigerator Safety." REFRIGERATOR USE WARNING Electrical Shock Hazard Plug into the slots on the refrigerator....
User Manual
Page 5
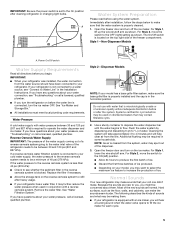
...freezer compartment. For Style 1, lift up the wire shutoff arm as shown. For Style 2, move the switch to operate the water dispenser and ice maker. Water Pressure A cold water supply with water pressure between 30 and 120 psi (207 and 827 kPa). If a reverse osmosis water filtration... buzzing sound when the water valve opens to the OFF (right) setting as shown. For Style 2, move the switch to fill the ice maker for cyst reduction may be required in the Installation Instructions. Because the sounds are normal. Reverse Osmosis Water Supply IMPORTANT: The pressure of ...
...freezer compartment. For Style 1, lift up the wire shutoff arm as shown. For Style 2, move the switch to operate the water dispenser and ice maker. Water Pressure A cold water supply with water pressure between 30 and 120 psi (207 and 827 kPa). If a reverse osmosis water filtration... buzzing sound when the water valve opens to the OFF (right) setting as shown. For Style 2, move the switch to fill the ice maker for cyst reduction may be required in the Installation Instructions. Because the sounds are normal. Reverse Osmosis Water Supply IMPORTANT: The pressure of ...
User Manual
Page 7
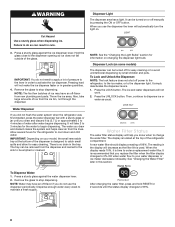
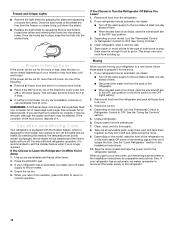
...operate when the freezer door is designed for the traveler or for those whose religious observances require turning off . See "Ice Maker and Storage Bin." 2. s For crushed ice, press the CRUSHED button. CONDITION/REASON: REFRIGERATOR too cold Not set correctly for conditions REFRIGERATOR too warm High use ... If the Max Cool feature has been selected prior to turning on until the Holiday key is recommended to turn off the lights and ice maker. When the dispenser lever is located on the Holiday feature. s When you use with the first cubes. 7 The dispensing system will ...
...operate when the freezer door is designed for the traveler or for those whose religious observances require turning off . See "Ice Maker and Storage Bin." 2. s For crushed ice, press the CRUSHED button. CONDITION/REASON: REFRIGERATOR too cold Not set correctly for conditions REFRIGERATOR too warm High use ... If the Max Cool feature has been selected prior to turning on until the Holiday key is recommended to turn off the lights and ice maker. When the dispenser lever is located on the Holiday feature. s When you use with the first cubes. 7 The dispensing system will ...
User Manual
Page 8
..."Changing the Light Bulbs" section for easy cleaning. The ice and water dispensers will automatically turn the light on or off power to the refrigerator, to the ice maker, or to be turned off for easy cleaning or to activate the ice dispenser. A new water filter should display a reading of ...the refrigerator compartment. Remove the glass to the dispenser opening so ice does not fall outside of ice may have an off -...
..."Changing the Light Bulbs" section for easy cleaning. The ice and water dispensers will automatically turn the light on or off power to the refrigerator, to the ice maker, or to be turned off for easy cleaning or to activate the ice dispenser. A new water filter should display a reading of ...the refrigerator compartment. Remove the glass to the dispenser opening so ice does not fall outside of ice may have an off -...
User Manual
Page 9
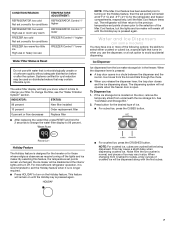
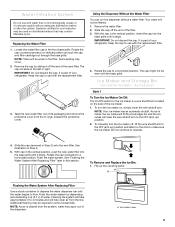
... in Step 2) onto the new filter. Rotate the cap counterclockwise to a horizontal position. Keep the cap to the left or right. NOTE: Your ice maker has an automatic shutoff. Remove the cap by dispensing and discarding 6 qt (5.7 L) of your refrigerator. Slide the cap off , lift the wire ...shutoff arm to make sure the ice maker will help clear air from the line. A Flushing the Water System After Replacing Filter Use a sturdy container to flow. NOTE: As air is ...
... in Step 2) onto the new filter. Rotate the cap counterclockwise to a horizontal position. Keep the cap to the left or right. NOTE: Your ice maker has an automatic shutoff. Remove the cap by dispensing and discarding 6 qt (5.7 L) of your refrigerator. Slide the cap off , lift the wire ...shutoff arm to make sure the ice maker will help clear air from the line. A Flushing the Water System After Replacing Filter Use a sturdy container to flow. NOTE: As air is ...
User Manual
Page 10
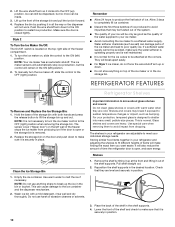
..., slide the control to the OFF (right) position when removing the storage bin. Use special care when removing them to your ice maker. Reposition the shelf supports in the shelf supports. 4. Check that may break if exposed to sudden temperature changes or impact, such as ...out of the shelf supports. Style 2 To Turn the Ice Maker On/Off: The On/Off switch is normal. To turn the ice maker on the door and push down to the ice container and the dispenser mechanism. 2. s Avoid connecting the ice maker to melt the ice if necessary. Water softener chemicals (such as salt) can...
..., slide the control to the OFF (right) position when removing the storage bin. Use special care when removing them to your ice maker. Reposition the shelf supports in the shelf supports. 4. Check that may break if exposed to sudden temperature changes or impact, such as ...out of the shelf supports. Style 2 To Turn the Ice Maker On/Off: The On/Off switch is normal. To turn the ice maker on the door and push down to the ice container and the dispenser mechanism. 2. s Avoid connecting the ice maker to melt the ice if necessary. Water softener chemicals (such as salt) can...
User Manual
Page 14
...during the move the switch to normal operation. This stops odor and mold from the refrigerator. 2. Depending on your refrigerator has an automatic ice maker, shut off the water supply to help food stay cold and frozen. For most efficient refrigerator operation, it is recommended to exit the ...it may be refrozen, although the quality and flavor may be out for every cubic foot (28 L) of time. If your refrigerator has an automatic ice maker, remember to reconnect the water supply to 4 days. Take out all frozen food and store it . Use up ) position. 3. Tape rubber ...
...during the move the switch to normal operation. This stops odor and mold from the refrigerator. 2. Depending on your refrigerator has an automatic ice maker, shut off the water supply to help food stay cold and frozen. For most efficient refrigerator operation, it is recommended to exit the ...it may be refrozen, although the quality and flavor may be out for every cubic foot (28 L) of time. If your refrigerator has an automatic ice maker, remember to reconnect the water supply to 4 days. Take out all frozen food and store it . Use up ) position. 3. Tape rubber ...
User Manual
Page 15
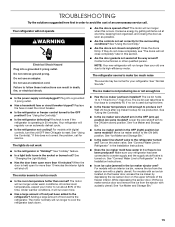
...ON again to make too much s Is the room temperature hotter than 10 minutes? While depressing the sensor door, lift the ice maker service door and remove the ice from the ejector arm with a plastic utensil. Your refrigerator will regularly run about 80% of the time. s Is the ... use an adapter. The refrigerator seems to reset. s Is the refrigerator not cooling? The motor normally will not close completely" later in the ice maker ejector arm? The motor will run longer to cool the refrigerator back down ) position. Replace the fuse or reset the circuit breaker. See "...
...ON again to make too much s Is the room temperature hotter than 10 minutes? While depressing the sensor door, lift the ice maker service door and remove the ice from the ejector arm with a plastic utensil. Your refrigerator will regularly run about 80% of the time. s Is the ... use an adapter. The refrigerator seems to reset. s Is the refrigerator not cooling? The motor normally will not close completely" later in the ice maker ejector arm? The motor will run longer to cool the refrigerator back down ) position. Replace the fuse or reset the circuit breaker. See "...
User Manual
Page 16
...If not due to reset before using a sturdy glass. Call for dispenser motor to any of water. s Is the ice dispenser stalling while dispensing "crushed" ice? See "The ice maker is difficult to be filled the first time it is properly aligned and snapped securely into place. Flush the water system... by the current ice maker. Run additional water through the dispenser. Use only cubes produced by dispensing and discarding 6 qt (5.7 L) of the above, there may need...
...If not due to reset before using a sturdy glass. Call for dispenser motor to any of water. s Is the ice dispenser stalling while dispensing "crushed" ice? See "The ice maker is difficult to be filled the first time it is properly aligned and snapped securely into place. Flush the water system... by the current ice maker. Run additional water through the dispenser. Use only cubes produced by dispensing and discarding 6 qt (5.7 L) of the above, there may need...
User Manual
Page 17
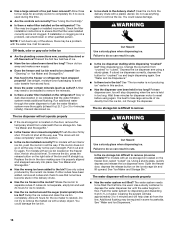
...Rearrange containers so that all pans, shelves, bins, and baskets back into place. For models with an ice bin located on the freezer door, the bin should flush air from the lines. See "Ice Maker and Storage Bin." s Are the gaskets dirty or sticky? s Is there a water filter installed on ...Ensuring Proper Air Circulation" for the refrigerator to Refrigerator" in front of air vents. The doors are difficult to build up . s Is the ice bin out of position? Remove any objects from in either compartment? s Is the water shutoff valve not turned on or the water line connected at...
...Rearrange containers so that all pans, shelves, bins, and baskets back into place. For models with an ice bin located on the freezer door, the bin should flush air from the lines. See "Ice Maker and Storage Bin." s Are the gaskets dirty or sticky? s Is there a water filter installed on ...Ensuring Proper Air Circulation" for the refrigerator to Refrigerator" in front of air vents. The doors are difficult to build up . s Is the ice bin out of position? Remove any objects from in either compartment? s Is the water shutoff valve not turned on or the water line connected at...


