

User Guide
Page 2
...any other party. © 2005 Texas Instruments Incorporated Windows and Macintosh are trademarks of their respective owners. In no warranty, either express or implied, including but not limited to anyone for special, collateral, incidental, or consequential damages in connection with or arising out of the ...purchase or use of these materials, and the sole and exclusive liability of Texas Instruments, regardless of the form of action, shall not exceed the purchase price...
...any other party. © 2005 Texas Instruments Incorporated Windows and Macintosh are trademarks of their respective owners. In no warranty, either express or implied, including but not limited to anyone for special, collateral, incidental, or consequential damages in connection with or arising out of the ...purchase or use of these materials, and the sole and exclusive liability of Texas Instruments, regardless of the form of action, shall not exceed the purchase price...

User Guide
Page 3
... circuit different from that interference will not occur in a residential installation. However, there is no guarantee that to which the receiver is connected. • Consult the dealer or an experienced radio/television technician for a Class B digital device, pursuant to Part 15 of the following...one or more of the FCC rules. iii This equipment generates, uses, and can try to correct the interference by Texas Instruments may cause harmful interference to radio communications. USA FCC Information Concerning Radio Frequency Interference This equipment has been tested and found...
... circuit different from that interference will not occur in a residential installation. However, there is no guarantee that to which the receiver is connected. • Consult the dealer or an experienced radio/television technician for a Class B digital device, pursuant to Part 15 of the following...one or more of the FCC rules. iii This equipment generates, uses, and can try to correct the interference by Texas Instruments may cause harmful interference to radio communications. USA FCC Information Concerning Radio Frequency Interference This equipment has been tested and found...
User Guide
Page 8
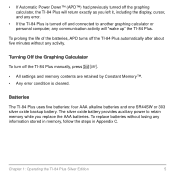
... silver oxide backup battery. Turning Off the Graphing Calculator To turn off the TI-84 Plus manually, press y M. • All settings and memory contents are retained by Constant Memory™. • Any error condition is turned off and connected to retain memory while you left it, including... the display, cursor, and any error. • If the TI-84 Plus is cleared. • If Automatic Power Down™ (APD™) had previously turned off the graphing calculator, the TI-84 Plus will return exactly as...
... silver oxide backup battery. Turning Off the Graphing Calculator To turn off the TI-84 Plus manually, press y M. • All settings and memory contents are retained by Constant Memory™. • Any error condition is turned off and connected to retain memory while you left it, including... the display, cursor, and any error. • If the TI-84 Plus is cleared. • If Automatic Power Down™ (APD™) had previously turned off the graphing calculator, the TI-84 Plus will return exactly as...
User Guide
Page 23
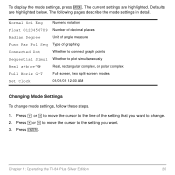
... Radian Degree Unit of angle measure Func Par Pol Seq Type of the setting that you want to the line of graphing Connected Dot Whether to connect graph points Sequential Simul Whether to plot simultaneously Real a+bi re^qi Real, rectangular complex, or polar complex Full Horiz ... To change . 2. Press ~ or | to move the cursor to change mode settings, follow these steps. 1. Chapter 1: Operating the TI-84 Plus Silver Edition 20 The following pages describe the mode settings in detail. The current settings are highlighted below. Defaults are highlighted. Press †...
... Radian Degree Unit of angle measure Func Par Pol Seq Type of the setting that you want to the line of graphing Connected Dot Whether to connect graph points Sequential Simul Whether to plot simultaneously Real a+bi re^qi Real, rectangular complex, or polar complex Full Horiz ... To change . 2. Press ~ or | to move the cursor to change mode settings, follow these steps. 1. Chapter 1: Operating the TI-84 Plus Silver Edition 20 The following pages describe the mode settings in detail. The current settings are highlighted below. Defaults are highlighted. Press †...
User Guide
Page 26
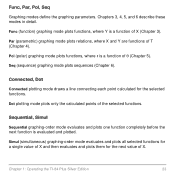
... them for the selected functions. Sequential, Simul Sequential graphing-order mode evaluates and plots one function completely before the next function is evaluated and plotted. Chapter 1: Operating the TI-84 Plus Silver Edition 23 Dot plotting mode plots only the calculated points of T (Chapter 4). Seq (sequence) graphing mode plots sequences (Chapter 6). Chapters 3, 4, 5, and 6 describe these...
... them for the selected functions. Sequential, Simul Sequential graphing-order mode evaluates and plots one function completely before the next function is evaluated and plotted. Chapter 1: Operating the TI-84 Plus Silver Edition 23 Dot plotting mode plots only the calculated points of T (Chapter 4). Seq (sequence) graphing mode plots sequences (Chapter 6). Chapters 3, 4, 5, and 6 describe these...
User Guide
Page 51
... archive where they cannot be edited or deleted inadvertently. Archiving also allows you to connect and communicate with a TI-84 Plus Silver Edition, a TI-84 Plus, a TI-83 Plus Silver Edition, a TI-83 Plus, a TI-83, a TI-82, a TI-73, CBL 2™, or a CBR™ System. The TI-84 Plus also has an I/O port using a USB unit-to-unit cable to free...
... archive where they cannot be edited or deleted inadvertently. Archiving also allows you to connect and communicate with a TI-84 Plus Silver Edition, a TI-84 Plus, a TI-83 Plus Silver Edition, a TI-83 Plus, a TI-83, a TI-82, a TI-73, CBL 2™, or a CBR™ System. The TI-84 Plus also has an I/O port using a USB unit-to-unit cable to free...

User Guide
Page 52
... 1: Operating the TI-84 Plus Silver Edition 49 As future software upgrades become available on the TI Web site, you select 2:Goto, then the previous screen is displayed. • If you can download the software to your PC and then use the TI Connect™ software and... a USB computer cable to : Chapter 19 Error Conditions Diagnosing an Error The TI-84 Plus detects errors while performing these tasks. • Evaluating an expression • Executing an instruction • Plotting a graph • Storing a value When the TI-84 Plus detects ...
... 1: Operating the TI-84 Plus Silver Edition 49 As future software upgrades become available on the TI Web site, you select 2:Goto, then the previous screen is displayed. • If you can download the software to your PC and then use the TI Connect™ software and... a USB computer cable to : Chapter 19 Error Conditions Diagnosing an Error The TI-84 Plus detects errors while performing these tasks. • Evaluating an expression • Executing an instruction • Plotting a graph • Storing a value When the TI-84 Plus detects ...
User Guide
Page 99
... each mode setting. • Float or 0123456789 (fixed) decimal mode affects displayed graph coordinates. • Radian or Degree angle mode affects interpretation of some functions. • Connected or Dot plotting mode affects plotting of selected functions. • Sequential or Simul graphing-order mode affects function plotting when more defined functions at once. Setting...
... each mode setting. • Float or 0123456789 (fixed) decimal mode affects displayed graph coordinates. • Radian or Degree angle mode affects interpretation of some functions. • Connected or Dot plotting mode affects plotting of selected functions. • Sequential or Simul graphing-order mode affects function plotting when more defined functions at once. Setting...

User Guide
Page 104
Use the styles to visually differentiate functions to be graphed together. Icon Style ç Line Description A solid line connects plotted points; For example, in Func mode, FnOff :FnOn 1,3 turns off all functions in the Y= editor, and then turns on or ...of each function in the current mode is the default in the Y= Editor This table describes the graph styles available for function graphing. Setting Graph Styles for Functions MATH Graph Style Icons in Connected mode Chapter 3: Function Graphing 101 Press Í. • To turn on Y1 and Y3. this is set Y1 as ...
Use the styles to visually differentiate functions to be graphed together. Icon Style ç Line Description A solid line connects plotted points; For example, in Func mode, FnOff :FnOn 1,3 turns off all functions in the Y= editor, and then turns on or ...of each function in the current mode is the default in the Y= Editor This table describes the graph styles available for function graphing. Setting Graph Styles for Functions MATH Graph Style Icons in Connected mode Chapter 3: Function Graphing 101 Press Í. • To turn on Y1 and Y3. this is set Y1 as ...

User Guide
Page 105
...for a function, follow these steps. 1. Setting the Graph Style To set the graph style for Par, Pol, and Seq modes. Icon Style è Thick é Above ê Below ë Path ì Animate í Dot Description A thick solid line connects plotted points Shading covers the area above . The ...seven styles rotate in the same order in which they are not available in the table above the graph Shading covers the area below the graph A circular cursor traces the leading edge of...
...for a function, follow these steps. 1. Setting the Graph Style To set the graph style for Par, Pol, and Seq modes. Icon Style è Thick é Above ê Below ë Path ì Animate í Dot Description A thick solid line connects plotted points Shading covers the area above . The ...seven styles rotate in the same order in which they are not available in the table above the graph Shading covers the area below the graph A circular cursor traces the leading edge of...
User Guide
Page 140
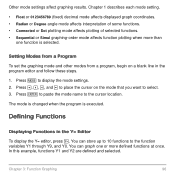
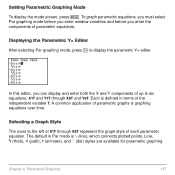
... the parametric Y= editor. Line, è (thick), ë (path), ì (animate), and í (dot) styles are available for parametric graphing. Chapter 4: Parametric Graphing 137 Setting Parametric Graphing Mode To display the mode screen, press z. In this editor, you enter the components of parametric graphs is ç (line), which connects plotted points. A common application of parametric equations.
... the parametric Y= editor. Line, è (thick), ë (path), ì (animate), and í (dot) styles are available for parametric graphing. Chapter 4: Parametric Graphing 137 Setting Parametric Graphing Mode To display the mode screen, press z. In this editor, you enter the components of parametric graphs is ç (line), which connects plotted points. A common application of parametric equations.

User Guide
Page 149
... connects plotted points. Line, è (thick), ë (path), ì (animate), and í (dot) styles are available for the window variables and before you can enter and display up to six polar equations, r1 through r6 represent the graph style of each polar equation. Selecting Graph ...Styles The icons to display the polar Y= editor. To graph polar equations, you must select Pol graphing mode before you enter polar equations. Displaying the Polar Y=...
... connects plotted points. Line, è (thick), ë (path), ì (animate), and í (dot) styles are available for the window variables and before you can enter and display up to six polar equations, r1 through r6 represent the graph style of each polar equation. Selecting Graph ...Styles The icons to display the polar Y= editor. To graph polar equations, you must select Pol graphing mode before you enter polar equations. Displaying the Polar Y=...

User Guide
Page 322
You may want to sort the lists before you plot them. Scatter Scatter (")plots plot the data points from Xlist and Ylist as coordinate pairs, showing each point as a box ( › ), cross ( + ), or dot ( ¦ ). You can use SortA( or SortD( to use the same list for Xlist and Ylist. xyLine xyLine (Ó)is a scatter plot in which the data points are plotted and connected in order of appearance in Xlist and Ylist. Chapter 12: Statistics 319 Xlist and Ylist must be the same length.
You may want to sort the lists before you plot them. Scatter Scatter (")plots plot the data points from Xlist and Ylist as coordinate pairs, showing each point as a box ( › ), cross ( + ), or dot ( ¦ ). You can use SortA( or SortD( to use the same list for Xlist and Ylist. xyLine xyLine (Ó)is a scatter plot in which the data points are plotted and connected in order of appearance in Xlist and Ylist. Chapter 12: Statistics 319 Xlist and Ylist must be the same length.
User Guide
Page 409
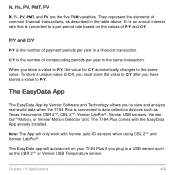
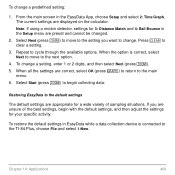
... allows you plug in a financial transaction. The EasyData app will only work with the EasyData App already installed. P/Y and C/Y P/Y is connected to P/Y. The TI-84 Plus comes with Vernier auto-ID sensors when using CBL 2é and Vernier LabProê. Chapter 14: Applications 406 When you have stored ...USB Temperature sensor. Note: The App will autolaunch on the values of payment periods per year in a USB sensor such as Texas Instruments CBR 2é, CBL 2é, Vernier LabProê, Vernier USB sensors, Vernier Go!éMotion, or Vernier Motion Detector Unit.
... allows you plug in a financial transaction. The EasyData app will only work with the EasyData App already installed. P/Y and C/Y P/Y is connected to P/Y. The TI-84 Plus comes with Vernier auto-ID sensors when using CBL 2é and Vernier LabProê. Chapter 14: Applications 406 When you have stored ...USB Temperature sensor. Note: The App will autolaunch on the values of payment periods per year in a USB sensor such as Texas Instruments CBR 2é, CBL 2é, Vernier LabProê, Vernier USB sensors, Vernier Go!éMotion, or Vernier Motion Detector Unit.
User Guide
Page 410
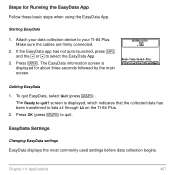
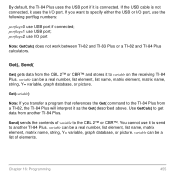
...;. The Ready to lists L1 through L4 on the TI-84 Plus. 2. EasyData Settings Changing EasyData settings EasyData displays the most commonly used settings before data collection begins. Make sure the cables are firmly connected. 2. screen is displayed for Running the EasyData App ... (press s) to select the EasyData App. 3. Chapter 14: Applications 407 Starting EasyData 1. Attach your data collection device to your TI-84 Plus. Steps for about three seconds followed by the main screen. The EasyData information screen is displayed, which indicates that the collected...
...;. The Ready to lists L1 through L4 on the TI-84 Plus. 2. EasyData Settings Changing EasyData settings EasyData displays the most commonly used settings before data collection begins. Make sure the cables are firmly connected. 2. screen is displayed for Running the EasyData App ... (press s) to select the EasyData App. 3. Chapter 14: Applications 407 Starting EasyData 1. Attach your data collection device to your TI-84 Plus. Steps for about three seconds followed by the main screen. The EasyData information screen is displayed, which indicates that the collected...
User Guide
Page 411
... Next (press q) to move to cycle through the available options. Select Start (press q) to the TI-84 Plus, choose File and select 1:New. Note: If using a motion detector, settings for your specific... restore the default settings in the EasyData App, choose Setup and select 2: Time Graph. When the option is connected to begin with the default settings, and then adjust the settings for 3: Distance ...Match and 4: Ball Bounce in the Setup menu are displayed on the calculator. Repeat ...
... Next (press q) to move to cycle through the available options. Select Start (press q) to the TI-84 Plus, choose File and select 1:New. Note: If using a motion detector, settings for your specific... restore the default settings in the EasyData App, choose Setup and select 2: Time Graph. When the option is connected to begin with the default settings, and then adjust the settings for 3: Distance ...Match and 4: Ball Bounce in the Setup menu are displayed on the calculator. Repeat ...
User Guide
Page 458
...( does not work between TI.82 and TI-83 Plus or a TI.82 and TI-84 Plus calculators. portflag=2 use USB port; Send( sends the contents of elements. variable can be a real number, list element, list name, matrix element, matrix name, string, Y= variable, graph database, or picture. If the USB cable is connected. You cannot use USB port...
...( does not work between TI.82 and TI-83 Plus or a TI.82 and TI-84 Plus calculators. portflag=2 use USB port; Send( sends the contents of elements. variable can be a real number, list element, list name, matrix element, matrix name, string, Y= variable, graph database, or picture. If the USB cable is connected. You cannot use USB port...

User Guide
Page 551
...... Press Í. 12. Chapter 19: Communication Link 548 Press † until the selection cursor ( 4 ) is on. 9. On the sending unit, press y 8 to -unit cable. Connect the graphing calculators with the USB unit-to display the SEND menu. 10. On the receiving unit, press y 8 ~ to [A] MATRX. The MATRIX editor screen is displayed. 11. Push...
...... Press Í. 12. Chapter 19: Communication Link 548 Press † until the selection cursor ( 4 ) is on. 9. On the sending unit, press y 8 to -unit cable. Connect the graphing calculators with the USB unit-to display the SEND menu. 10. On the receiving unit, press y 8 ~ to [A] MATRX. The MATRIX editor screen is displayed. 11. Push...
User Guide
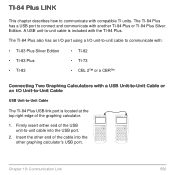
Page 553
... the TI-84 Plus. Firmly insert either end of the USB unit-to-unit cable into the other end of the graphing calculator. 1. TI-84 Plus LINK This chapter describes how to communicate with another TI-84 Plus or TI-84 Plus Silver Edition. Chapter 19: Communication Link 550 Insert the other graphing calculator's USB port. The TI-84 Plus has a USB port to connect...
... the TI-84 Plus. Firmly insert either end of the USB unit-to-unit cable into the other end of the graphing calculator. 1. TI-84 Plus LINK This chapter describes how to communicate with another TI-84 Plus or TI-84 Plus Silver Edition. Chapter 19: Communication Link 550 Insert the other graphing calculator's USB port. The TI-84 Plus has a USB port to connect...

User Guide
Page 554
...bottom edge of the cable into the other end of the graphing calculator. 3. Insert the other graphing calculator's I/O port. Insert the other graphing calculator's I /O unit-to-unit cable. Firmly insert either end of the I/O unit-to -Unit Cable The TI-84 Plus I/O link port is located at the top left ... into the other end of the graphing calculator. 1. With a CBL 2 or CBR and a TI-84 Plus, you can collect and analyze real-world data. Linking to the CBL/CBR System The CBL 2™ and the CBR™ are optional accessories that also connect to a TI-84 Plus with the I /O port....
...bottom edge of the cable into the other end of the graphing calculator. 3. Insert the other graphing calculator's I/O port. Insert the other graphing calculator's I /O unit-to-unit cable. Firmly insert either end of the I/O unit-to -Unit Cable The TI-84 Plus I/O link port is located at the top left ... into the other end of the graphing calculator. 1. With a CBL 2 or CBR and a TI-84 Plus, you can collect and analyze real-world data. Linking to the CBL/CBR System The CBL 2™ and the CBR™ are optional accessories that also connect to a TI-84 Plus with the I /O port....


