

User Guide
Page 3
... receiving antenna. • Increase the separation between the equipment and receiver. • Connect the equipment into an outlet on , you can be determined by turning the equipment off and on a circuit different from that interference will not occur in a residential installation. If this equipment not expressly approved by one or... protection against harmful interference in a particular installation. These limits are designed to radio or television reception, which can try to correct the interference by Texas Instruments may cause harmful interference to radio communications.
... receiving antenna. • Increase the separation between the equipment and receiver. • Connect the equipment into an outlet on , you can be determined by turning the equipment off and on a circuit different from that interference will not occur in a residential installation. If this equipment not expressly approved by one or... protection against harmful interference in a particular installation. These limits are designed to radio or television reception, which can try to correct the interference by Texas Instruments may cause harmful interference to radio communications.

User Guide
Page 7
Turning On and Turning Off the TI-84 Plus Turning On the Graphing Calculator To turn on the TI-84 Plus, press É. • If you previously had turned off the graphing calculator by pressing y M, the TI-84 Plus displays the home screen as it was when you last used it and clears any error. Chapter 1: Operating the TI-84 Plus Silver Edition 4 The y key accesses the second function printed in green above each key. The ƒ key accesses the alpha function printed in blue above each key.
Turning On and Turning Off the TI-84 Plus Turning On the Graphing Calculator To turn on the TI-84 Plus, press É. • If you previously had turned off the graphing calculator by pressing y M, the TI-84 Plus displays the home screen as it was when you last used it and clears any error. Chapter 1: Operating the TI-84 Plus Silver Edition 4 The y key accesses the second function printed in green above each key. The ƒ key accesses the alpha function printed in blue above each key.
User Guide
Page 8
... return exactly as you replace the AAA batteries. Batteries The TI-84 Plus uses five batteries: four AAA alkaline batteries and one SR44SW or 303 silver oxide backup battery. Turning Off the Graphing Calculator To turn off the TI-84 Plus manually, press y M. • All settings and memory... contents are retained by Constant Memory™. • Any error condition is turned off the TI-84 Plus automatically after about five minutes without...
... return exactly as you replace the AAA batteries. Batteries The TI-84 Plus uses five batteries: four AAA alkaline batteries and one SR44SW or 303 silver oxide backup battery. Turning Off the Graphing Calculator To turn off the TI-84 Plus manually, press y M. • All settings and memory... contents are retained by Constant Memory™. • Any error condition is turned off the TI-84 Plus automatically after about five minutes without...
User Guide
Page 9
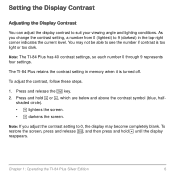
...0 (lightest) to suit your viewing angle and lighting conditions. shaded circle). • † lightens the screen. • } darkens the screen. The TI-84 Plus retains the contrast setting in the top-right corner indicates the current level. Press and release the y key. 2. Chapter 1: Operating the... which are below and above the contrast symbol (blue, half- As you adjust the contrast setting to see the number if contrast is turned off. You may not be able to 0, the display may become completely blank. Setting the Display Contrast Adjusting the Display Contrast You can...
...0 (lightest) to suit your viewing angle and lighting conditions. shaded circle). • † lightens the screen. • } darkens the screen. The TI-84 Plus retains the contrast setting in the top-right corner indicates the current level. Press and release the y key. 2. Chapter 1: Operating the... which are below and above the contrast symbol (blue, half- As you adjust the contrast setting to see the number if contrast is turned off. You may not be able to 0, the display may become completely blank. Setting the Display Contrast Adjusting the Display Contrast You can...
User Guide
Page 10
... can display a horizontally or vertically split screen to evaluate. When to Replace Batteries When the batteries are displayed on the graphing calculator. On this period, the TI-84 Plus will turn on the same screen. All memory should be retained. To replace the batteries without losing any information in memory, follow the steps in Appendix...
... can display a horizontally or vertically split screen to evaluate. When to Replace Batteries When the batteries are displayed on the graphing calculator. On this period, the TI-84 Plus will turn on the same screen. All memory should be retained. To replace the batteries without losing any information in memory, follow the steps in Appendix...
User Guide
Page 14
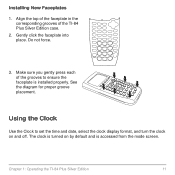
See the diagram for proper groove placement. Chapter 1: Operating the TI-84 Plus Silver Edition 11 Installing New Faceplates 1. Gently click the faceplate into place. Align the top of the faceplate in the corresponding grooves of the grooves to set the time and date, select the clock display format, and turn the clock on by default and is accessed from the mode screen. Make sure you gently press each of the TI-84 Plus Silver Edition case. 2. Using the Clock Use the Clock to ensure the faceplate is turned on and off. The clock is installed properly. Do not force. 3.
See the diagram for proper groove placement. Chapter 1: Operating the TI-84 Plus Silver Edition 11 Installing New Faceplates 1. Gently click the faceplate into place. Align the top of the faceplate in the corresponding grooves of the grooves to set the time and date, select the clock display format, and turn the clock on by default and is accessed from the mode screen. Make sure you gently press each of the TI-84 Plus Silver Edition case. 2. Using the Clock Use the Clock to ensure the faceplate is turned on and off. The clock is installed properly. Do not force. 3.
User Guide
Page 16
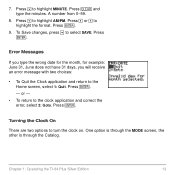
Press Í. 9. Press † to turn the clock on. Press Í. - Turning the Clock On There are two options to highlight AM/PM. One option is through the MODE screen, the other is through the Catalog. Press ' ... 31 days, you will receive an error message with two choices: • To Quit the Clock application and return to highlight MINUTE. Chapter 1: Operating the TI-84 Plus Silver Edition 13 A number from 0-59. 8. To Save changes, press † to highlight the format. Press Í. 7. Press ~ or | to select SAVE. or - •...
Press Í. 9. Press † to turn the clock on. Press Í. - Turning the Clock On There are two options to highlight AM/PM. One option is through the MODE screen, the other is through the Catalog. Press ' ... 31 days, you will receive an error message with two choices: • To Quit the Clock application and return to highlight MINUTE. Chapter 1: Operating the TI-84 Plus Silver Edition 13 A number from 0-59. 8. To Save changes, press † to highlight the format. Press Í. 7. Press ~ or | to select SAVE. or - •...
User Guide
Page 17
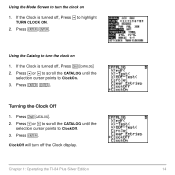
... until the selection cursor points to ClockOn. 3. Press Í. Press Í Í. Chapter 1: Operating the TI-84 Plus Silver Edition 14 Turning the Clock Off 1. ClockOff will turn the clock on 1. Using the Mode Screen to turn off the Clock display. Using the Catalog to highlight TURN CLOCK ON. 2. Press Í Í. If the Clock is...
... until the selection cursor points to ClockOn. 3. Press Í. Press Í Í. Chapter 1: Operating the TI-84 Plus Silver Edition 14 Turning the Clock Off 1. ClockOff will turn the clock on 1. Using the Mode Screen to turn off the Clock display. Using the Catalog to highlight TURN CLOCK ON. 2. Press Í Í. If the Clock is...
User Guide
Page 22
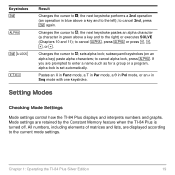
...numbers, including elements of matrices and lists, are retained by the Constant Memory feature when the TI-84 Plus is set automatically. Pastes an X in Func mode, a T in Par mode,... or †. Setting Modes Checking Mode Settings Mode settings control how the TI-84 Plus displays and interprets numbers and graphs. the next keystroke pastes an alpha character (a character in green above a ...a 2nd operation (an operation in Seq mode with one keystroke. Chapter 1: Operating the TI-84 Plus Silver Edition 19 Changes the cursor to the left); Mode settings are displayed according...
...numbers, including elements of matrices and lists, are retained by the Constant Memory feature when the TI-84 Plus is set automatically. Pastes an X in Func mode, a T in Par mode,... or †. Setting Modes Checking Mode Settings Mode settings control how the TI-84 Plus displays and interprets numbers and graphs. the next keystroke pastes an alpha character (a character in green above a ...a 2nd operation (an operation in Seq mode with one keystroke. Chapter 1: Operating the TI-84 Plus Silver Edition 19 Changes the cursor to the left); Mode settings are displayed according...

User Guide
Page 32
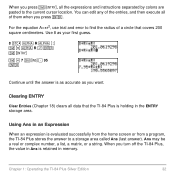
... the expression without affecting the value in a storage area called ENTRY (last entry). ENTRY (Last Entry) Storage Area Using ENTRY (Last Entry) When you turn off the TI-84 Plus, ENTRY is placed in memory. Press Í. The variable name you began these steps. Note: You can edit the characters pasted to evaluate...
... the expression without affecting the value in a storage area called ENTRY (last entry). ENTRY (Last Entry) Storage Area Using ENTRY (Last Entry) When you turn off the TI-84 Plus, ENTRY is placed in memory. Press Í. The variable name you began these steps. Note: You can edit the characters pasted to evaluate...
User Guide
Page 35
... When an expression is holding in memory. For the equation A=pr2, use trial and error to a storage area called Ans (last answer). When you turn off the TI-84 Plus, the value in Ans is as accurate as your first guess. 8 ¿ ƒ R ƒ ã:ä yB ƒ R ¡Í y [ y | 7 y 6 Ë 95 Í...
... When an expression is holding in memory. For the equation A=pr2, use trial and error to a storage area called Ans (last answer). When you turn off the TI-84 Plus, the value in Ans is as accurate as your first guess. 8 ¿ ƒ R ƒ ã:ä yB ƒ R ¡Í y [ y | 7 y 6 Ë 95 Í...

User Guide
Page 102
...you enter or edit a function, it is highlighted. A function is selected when the = sign is deselected. The TI-84 Plus graphs only the selected functions. Chapter 3: Function Graphing 99 Yn(value) Yn({value1,value2,value3, . . .,value n}) Selecting and Deselecting Functions Selecting and Deselecting a Function... any or all functions Y1 through Y9, and Y0. You can select and deselect (turn off) a function in the Y= editor, follow these steps. 1. Press o to place the cursor on and turn on the function's = sign. 4. When you clear a function, it is selected automatically...
...you enter or edit a function, it is highlighted. A function is selected when the = sign is deselected. The TI-84 Plus graphs only the selected functions. Chapter 3: Function Graphing 99 Yn(value) Yn({value1,value2,value3, . . .,value n}) Selecting and Deselecting Functions Selecting and Deselecting a Function... any or all functions Y1 through Y9, and Y0. You can select and deselect (turn off) a function in the Y= editor, follow these steps. 1. Press o to place the cursor on and turn on the function's = sign. 4. When you clear a function, it is selected automatically...

User Guide
Page 103
not the variable Yn) of each function you want to turn on or turn off . Chapter 3: Function Graphing 100 Select 4:On/Off to display the VARS Y-VARS menu. 2. Select 1:FnOn to turn on one or more functions or 2:FnOff to turn off. • If you select is highlighted on this line. To change the on/off...
not the variable Yn) of each function you want to turn on or turn off . Chapter 3: Function Graphing 100 Select 4:On/Off to display the VARS Y-VARS menu. 2. Select 1:FnOn to turn on one or more functions or 2:FnOff to turn off. • If you select is highlighted on this line. To change the on/off...

User Guide
Page 104
... Y3 as a thick line. For example, in Func mode, FnOff :FnOn 1,3 turns off all functions in the Y= Editor This table describes the graph styles available for function graphing. this is displayed. Setting Graph Styles for Functions MATH Graph Style Icons in the Y= editor, and then turns on Y1 and Y3. FnOn[function#,function#, . . .,function n] FnOff[function...
... Y3 as a thick line. For example, in Func mode, FnOff :FnOn 1,3 turns off all functions in the Y= Editor This table describes the graph styles available for function graphing. this is displayed. Setting Graph Styles for Functions MATH Graph Style Icons in the Y= editor, and then turns on Y1 and Y3. FnOn[function#,function#, . . .,function n] FnOff[function...

User Guide
Page 108
To turn off tick marks, set Xscl=0 and Yscl=0. The default is the portion of the coordinate plane defined by Xmin, Xmax, Ymin, and Ymax. The window variables differ from one graphing mode to the right shows the default values in Func graphing mode and Radian angle mode. ... scale) defines the distance between tick marks on the x-axis. Xres sets pixel resolution (1 through 8) for function graphs only. The window editor above and to another. Setting the Viewing Window Variables The TI-84 Plus Viewing Window The viewing window is 1. • At Xres=1, functions are evaluated and...
To turn off tick marks, set Xscl=0 and Yscl=0. The default is the portion of the coordinate plane defined by Xmin, Xmax, Ymin, and Ymax. The window variables differ from one graphing mode to the right shows the default values in Func graphing mode and Radian angle mode. ... scale) defines the distance between tick marks on the x-axis. Xres sets pixel resolution (1 through 8) for function graphs only. The window editor above and to another. Setting the Viewing Window Variables The TI-84 Plus Viewing Window The viewing window is 1. • At Xres=1, functions are evaluated and...

User Guide
Page 138
... to ç originally.) 8. Enter these values for X1T and Y1T. (These keystrokes assume that all graph styles were set AxesOff, which turns off the axes. Press | | } Í to change the graph style to ë for the window variables. Press p. Tmin=0 Tmax=5 Tstep=.1 Xmin=L10 Xmax=100 Xscl=50 Ymin=L5 Ymax=15 Yscl...
... to ç originally.) 8. Enter these values for X1T and Y1T. (These keystrokes assume that all graph styles were set AxesOff, which turns off the axes. Press | | } Í to change the graph style to ë for the window variables. Press p. Tmin=0 Tmax=5 Tstep=.1 Xmin=L10 Xmax=100 Xscl=50 Ymin=L5 Ymax=15 Yscl...

User Guide
Page 190
...in the Y= editor. • Change the window variable values. • Turn stat plots on Func, Par, Pol, and Seq graphs. If a graph is not displayed when you use any of the actions listed above, the graph is replotted without the drawings when you want to identify the coordinates. The... to draw on or off. • Clear existing drawings with ClrDraw. Before Drawing on a Graph The DRAW instructions draw on a Graph You can use the DRAW instructions, consider whether you display the graph again. You can execute these instructions from the home screen or from within a program.
...in the Y= editor. • Change the window variable values. • Turn stat plots on Func, Par, Pol, and Seq graphs. If a graph is not displayed when you use any of the actions listed above, the graph is replotted without the drawings when you want to identify the coordinates. The... to draw on or off. • Clear existing drawings with ClrDraw. Before Drawing on a Graph The DRAW instructions draw on a Graph You can use the DRAW instructions, consider whether you display the graph again. You can execute these instructions from the home screen or from within a program.

User Guide
Page 203
..., Pen was used to create the arrow pointing to turn on the point where you want to begin drawing again, and then repeat steps 2, 3, and 4. Using Pen to Draw on a Graph Using Pen to Draw on a Graph Pen draws directly on a displayed graph, follow these steps. 1. Select A:Pen from the... home screen or a program. To draw on a graph only. Press Í to turn off the pen. To cancel Pen, press '. Move the cursor....
..., Pen was used to create the arrow pointing to turn on the point where you want to begin drawing again, and then repeat steps 2, 3, and 4. Using Pen to Draw on a Graph Using Pen to Draw on a Graph Pen draws directly on a displayed graph, follow these steps. 1. Select A:Pen from the... home screen or a program. To draw on a graph only. Press Í to turn off the pen. To cancel Pen, press '. Move the cursor....

User Guide
Page 204
... pixel on a point. Drawing Points on whether you want to draw the point. The TI-84 Plus's interpretation of these steps. 1. DRAW POINTS 1: Pt-On( 2: Pt-Off( 3: Pt-Change( 4: Pxl-On( 5: Pxl-Off( 6: Pxl-Change( 7: pxl-Test( STO Turns on , 0 if pixel off . Select 1:Pt-On( from a graph. Press Í to draw the point...
... pixel on a point. Drawing Points on whether you want to draw the point. The TI-84 Plus's interpretation of these steps. 1. DRAW POINTS 1: Pt-On( 2: Pt-Off( 3: Pt-Change( 4: Pxl-On( 5: Pxl-Off( 6: Pxl-Change( 7: pxl-Test( STO Turns on , 0 if pixel off . Select 1:Pt-On( from a graph. Press Í to draw the point...

User Guide
Page 205
...Pt-Off( (point off status. To cancel Pt-Off(, press '. To cancel Pt-On(, press '. Changing Points with Pt-Off( To erase (turn off) a drawn point on a graph, follow these steps. 1. To continue changing points, repeat steps 2 and 3. Move the cursor to the point you want to change the point's... on a graph, follow these steps. 1. Chapter 8: Draw Instructions 202 Move the cursor to the point you want to erase. 3. Press Í to erase ...
...Pt-Off( (point off status. To cancel Pt-Off(, press '. To cancel Pt-On(, press '. Changing Points with Pt-Off( To erase (turn off) a drawn point on a graph, follow these steps. 1. To continue changing points, repeat steps 2 and 3. Move the cursor to the point you want to change the point's... on a graph, follow these steps. 1. Chapter 8: Draw Instructions 202 Move the cursor to the point you want to erase. 3. Press Í to erase ...

