
Guidebook
Page 2
... any implied warranties of merchantability and fitness for special, collateral, incidental, or consequential damages in connection with or arising out of the purchase or use of these materials, and the sole and exclusive liability of Texas Instruments, regardless of the form of action, shall not exceed the purchase price of Vernier Software & Technology...
... any implied warranties of merchantability and fitness for special, collateral, incidental, or consequential damages in connection with or arising out of the purchase or use of these materials, and the sole and exclusive liability of Texas Instruments, regardless of the form of action, shall not exceed the purchase price of Vernier Software & Technology...
Guidebook
Page 11
...TI-84 Plus Silver Edition 4 Batteries The TI-84 Plus uses five batteries: four AAA alkaline batteries and one level at a time. f Press y † to retain memory while you turn off the TI-84 Plus manually, press y M. • All settings and memory contents are low, a low-battery message is displayed when you replace the AAA batteries. Turning Off the Graphing Calculator... To turn on the graphing calculator. • If the TI-84 Plus is turned off and connected to another graphing calculator or personal computer, any activity....
...TI-84 Plus Silver Edition 4 Batteries The TI-84 Plus uses five batteries: four AAA alkaline batteries and one level at a time. f Press y † to retain memory while you turn off the TI-84 Plus manually, press y M. • All settings and memory contents are low, a low-battery message is displayed when you replace the AAA batteries. Turning Off the Graphing Calculator... To turn on the graphing calculator. • If the TI-84 Plus is turned off and connected to another graphing calculator or personal computer, any activity....

Guidebook
Page 21
...the TI-84 Plus displays and interprets numbers and graphs. All numbers, including elements of matrices and lists, are highlighted. The current settings are displayed according to the current mode settings. Normal Sci Eng Float 0123456789 Radian Degree Func Par Pol Seq Connected Dot...performs a third function of the underline cursor; subsequent keystrokes access the third functions of the answers Chapter 1: Operating the TI-84 Plus Silver Edition 14 Defaults are in detail. inserts characters in Seq mode with one keystroke. Changes the cursor to Ø; If...
...the TI-84 Plus displays and interprets numbers and graphs. All numbers, including elements of matrices and lists, are highlighted. The current settings are displayed according to the current mode settings. Normal Sci Eng Float 0123456789 Radian Degree Func Par Pol Seq Connected Dot...performs a third function of the underline cursor; subsequent keystrokes access the third functions of the answers Chapter 1: Operating the TI-84 Plus Silver Edition 14 Defaults are in detail. inserts characters in Seq mode with one keystroke. Changes the cursor to Ø; If...
Guidebook
Page 24
... the n/d template. Seq (sequence) graphing mode plots sequences (Chapter 6). For example, you enter , a data type error displays. Connected, Dot Connected plotting mode draws a line connecting each point calculated for the next value of the selected functions. To perform division with a complex number in the form re^qi. Chapter 1: Operating the TI-84 Plus Silver Edition 17 Dot plotting mode...
... the n/d template. Seq (sequence) graphing mode plots sequences (Chapter 6). For example, you enter , a data type error displays. Connected, Dot Connected plotting mode draws a line connecting each point calculated for the next value of the selected functions. To perform division with a complex number in the form re^qi. Chapter 1: Operating the TI-84 Plus Silver Edition 17 Dot plotting mode...

Guidebook
Page 40
... to the left of the variable names. Communication Link The TI-84 Plus has a USB port using an I /O port using a USB unit-to-unit cable to connect and communicate with a TI-84 Plus Silver Edition, a TI-84 Plus, a TI-83 Plus Silver Edition, a TI-83 Plus, a TI-83, a TI-82, a TI-73, CBL 2™, or a CBR™ System. With TI Connect™ software and a USB computer cable, you to free up...
... to the left of the variable names. Communication Link The TI-84 Plus has a USB port using an I /O port using a USB unit-to-unit cable to connect and communicate with a TI-84 Plus Silver Edition, a TI-84 Plus, a TI-83 Plus Silver Edition, a TI-83 Plus, a TI-83, a TI-82, a TI-73, CBL 2™, or a CBR™ System. With TI Connect™ software and a USB computer cable, you to free up...

Guidebook
Page 74
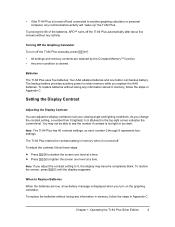
... Float or 0123456789 (fixed) decimal mode affects displayed graph coordinates. • Radian or Degree angle mode affects interpretation of some functions. • Connected or Dot plotting mode affects plotting of 10 graph picture variables (Pic1 through Pic9, and Pic0; Press... graphing; Chapter 8). Then you can store a picture of the current graph display to select. 3. Setting the Graph Modes Checking and Changing the Graphing Mode To display the mode screen, press z. The TI-84 Plus has four graphing modes. • Func (function graphing) • Par (parametric graphing;...
... Float or 0123456789 (fixed) decimal mode affects displayed graph coordinates. • Radian or Degree angle mode affects interpretation of some functions. • Connected or Dot plotting mode affects plotting of 10 graph picture variables (Pic1 through Pic9, and Pic0; Press... graphing; Chapter 8). Then you can store a picture of the current graph display to select. 3. Setting the Graph Modes Checking and Changing the Graphing Mode To display the mode screen, press z. The TI-84 Plus has four graphing modes. • Func (function graphing) • Par (parametric graphing;...

Guidebook
Page 78
... editor. 2. The seven styles rotate in the same order in which they are listed in Connected mode A thick solid line connects plotted points Shading covers the area above . 5. Chapter 3: Function Graphing 71 this is displayed. (Steps 2 and 3 are not available in the first column. ...Animate í Dot Description A solid line connects plotted points; For example, you have selected a style. Press o to be graphed together. Press † and } to move the cursor left, past the = sign, to the graph style icon in all graphing modes. Press | | to move the cursor...
... editor. 2. The seven styles rotate in the same order in which they are listed in Connected mode A thick solid line connects plotted points Shading covers the area above . 5. Chapter 3: Function Graphing 71 this is displayed. (Steps 2 and 3 are not available in the first column. ...Animate í Dot Description A solid line connects plotted points; For example, you have selected a style. Press o to be graphed together. Press † and } to move the cursor left, past the = sign, to the graph style icon in all graphing modes. Press | | to move the cursor...

Guidebook
Page 100
... at Tmin on the first parametric equation (X1T and Y1T). Each is ç (line), which connects plotted points. Defining and Displaying Parametric Graphs TI-84 Plus Graphing Mode Similarities The steps for defining a parametric graph are available for defining a function graph. Selecting a Graph Style The icons to trace the curve, the cursor follows the path of each parametric equation...
... at Tmin on the first parametric equation (X1T and Y1T). Each is ç (line), which connects plotted points. Defining and Displaying Parametric Graphs TI-84 Plus Graphing Mode Similarities The steps for defining a parametric graph are available for defining a function graph. Selecting a Graph Style The icons to trace the curve, the cursor follows the path of each parametric equation...

Guidebook
Page 105
...231; (line), which connects plotted points. Each is q. Defining and Editing Polar Equations To define or edit a polar equation, follow the steps in terms of r1 through r6. Chapter 5: Polar Graphing 98 Setting Polar Graphing Mode To display the ...graphing. Selecting Graph Styles The icons to six polar equations, r1 through r6 represent the graph style of the equations. Selecting and Deselecting Polar Equations The TI-84 Plus graphs only the selected polar equations. Defining and Displaying Polar Graphs TI-84 Plus Graphing Mode Similarities The steps for defining a polar graph...
...231; (line), which connects plotted points. Each is q. Defining and Editing Polar Equations To define or edit a polar equation, follow the steps in terms of r1 through r6. Chapter 5: Polar Graphing 98 Setting Polar Graphing Mode To display the ...graphing. Selecting Graph Styles The icons to six polar equations, r1 through r6 represent the graph style of the equations. Selecting and Deselecting Polar Equations The TI-84 Plus graphs only the selected polar equations. Defining and Displaying Polar Graphs TI-84 Plus Graphing Mode Similarities The steps for defining a polar graph...

Guidebook
Page 137
... the point where you want to 10 characters. Place the cursor on the current graph the characters comprising value, which can capture the image you created using TI-Connect™ software and save it as a picture file on a graph only. The TI-84 Plus will evaluate an expression and display the result with up to begin drawing.
... the point where you want to 10 characters. Place the cursor on the current graph the characters comprising value, which can capture the image you created using TI-Connect™ software and save it as a picture file on a graph only. The TI-84 Plus will evaluate an expression and display the result with up to begin drawing.

Guidebook
Page 215
The six types of plots available are plotted and connected in order of appearance in one or more lists. 2. Store the stat data in Xlist and Ylist. Turn on the plots you plot them. You ... the data points from Xlist and Ylist as coordinate pairs, showing each point as appropriate. 3. You may want to three plots. Display and explore the graph.
The six types of plots available are plotted and connected in order of appearance in one or more lists. 2. Store the stat data in Xlist and Ylist. Turn on the plots you plot them. You ... the data points from Xlist and Ylist as coordinate pairs, showing each point as appropriate. 3. You may want to three plots. Display and explore the graph.
Guidebook
Page 270
... of common financial transactions, as described in a USB sensor such as Texas Instruments CBR 2é, CBL 2é, Vernier LabProê, Vernier USB sensors, Vernier Go!éMotion, or Vernier Motion Detector Unit. The TI-84 Plus comes with Vernier auto-ID sensors when using the EasyData™ App... is converted to a per-period rate based on your TI-84 Plus if you to data collection devices such as the CBR 2é or Vernier USB Temperature sensor. C/Y is connected to view and analyze real-world data when the TI-84 Plus is the number of payment periods per year in a ...
... of common financial transactions, as described in a USB sensor such as Texas Instruments CBR 2é, CBL 2é, Vernier LabProê, Vernier USB sensors, Vernier Go!éMotion, or Vernier Motion Detector Unit. The TI-84 Plus comes with Vernier auto-ID sensors when using the EasyData™ App... is converted to a per-period rate based on your TI-84 Plus if you to data collection devices such as the CBR 2é or Vernier USB Temperature sensor. C/Y is connected to view and analyze real-world data when the TI-84 Plus is the number of payment periods per year in a ...

Guidebook
Page 271
...calculator. To change a setting, enter 1 or 2 digits, and then select Next (press q). 5. From the main screen in the EasyData™ App while a data collection device is displayed for a wide variety of the best settings, begin collecting data. Note: If using a motion detector, settings for your TI-84 Plus...data collection device to the TI-84 Plus, choose File and select 1:New. The EasyData™ information screen is connected to your specific activity. To restore the default settings in the EasyData™ App, choose Setup and select 2: Time Graph. Chapter 14: Applications 264...
...calculator. To change a setting, enter 1 or 2 digits, and then select Next (press q). 5. From the main screen in the EasyData™ App while a data collection device is displayed for a wide variety of the best settings, begin collecting data. Note: If using a motion detector, settings for your TI-84 Plus...data collection device to the TI-84 Plus, choose File and select 1:New. The EasyData™ information screen is connected to your specific activity. To restore the default settings in the EasyData™ App, choose Setup and select 2: Time Graph. Chapter 14: Applications 264...
Guidebook
Page 300
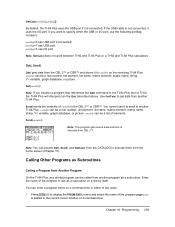
..., string, Y= variable, graph database, or picture. Send(variable) Note: This program gets sound data and time in either the USB or I /O port Note: GetCalc( does not work between TI.82 and TI-83 Plus or a TI.82 and TI-84 Plus calculators. Calling Other Programs as ...TI-84 Plus, any stored program can be called from a TI.82, the TI-84 Plus will interpret it as a subroutine on a command line in seconds from another TI-84 Plus. variable can be a list of the program to execute them from the CATALOG to use as the Get( described above. portflag=1 use USB port if connected...
..., string, Y= variable, graph database, or picture. Send(variable) Note: This program gets sound data and time in either the USB or I /O port Note: GetCalc( does not work between TI.82 and TI-83 Plus or a TI.82 and TI-84 Plus calculators. Calling Other Programs as ...TI-84 Plus, any stored program can be called from a TI.82, the TI-84 Plus will interpret it as a subroutine on a command line in seconds from another TI-84 Plus. variable can be a list of the program to execute them from the CATALOG to use as the Get( described above. portflag=1 use USB port if connected...
Guidebook
Page 351
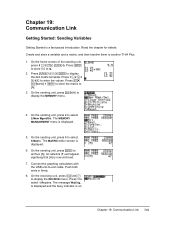
... unit, press 2 to another TI-84 Plus. 1. The message Waiting... Create and store a variable and a matrix, and then transfer them to select 2:Mem Mgmt/Del. Press t to select 5:Matrix. The MEMORY MANAGEMENT menu is a fast-paced introduction. On the sending unit, press 5 to display the 2x2 matrix template. Connect the graphing calculators with the USB unit...
... unit, press 2 to another TI-84 Plus. 1. The message Waiting... Create and store a variable and a matrix, and then transfer them to select 2:Mem Mgmt/Del. Press t to select 5:Matrix. The MEMORY MANAGEMENT menu is a fast-paced introduction. On the sending unit, press 5 to display the 2x2 matrix template. Connect the graphing calculators with the USB unit...
Guidebook
Page 352
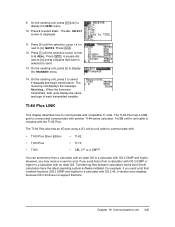
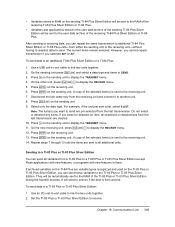
... a calculator with the TI-84 Plus. On the sending unit, press ~ to select 1:Transmit and begin transmission. The TI-84 Plus also has an I/O port using a I/O unit-to-unit cable to communicate with: • TI-83 Plus Silver Edition • TI-83 Plus • TI-83 • TI-82 • TI-73 ... menu. 10. The TI-84 Plus has a USB port to communicate with another TI-84 series calculator. Press Í. 12. TI-84 Plus LINK This chapter describes how to connect and communicate with compatible TI units. For example, if you send items from a calculator with an older OS to...
... a calculator with the TI-84 Plus. On the sending unit, press ~ to select 1:Transmit and begin transmission. The TI-84 Plus also has an I/O port using a I/O unit-to-unit cable to communicate with: • TI-83 Plus Silver Edition • TI-83 Plus • TI-83 • TI-82 • TI-73 ... menu. 10. The TI-84 Plus has a USB port to communicate with another TI-84 series calculator. Press Í. 12. TI-84 Plus LINK This chapter describes how to connect and communicate with compatible TI units. For example, if you send items from a calculator with an older OS to...
Guidebook
Page 353
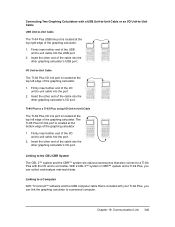
.... 2. TI-84 Plus to a TI-83 Plus using I/O Unit-to-Unit Cable The TI-84 Plus I /O unit-to a Computer With TI Connect™ software and the USB computer cable that also connect to a TI-84 Plus with your TI-84 Plus, you can link the graphing calculator to -unit cable into the other end of the graphing calculator. Insert the other graphing calculator's USB port. Firmly insert either end of the graphing calculator. 1. The TI-83 Plus...
.... 2. TI-84 Plus to a TI-83 Plus using I/O Unit-to-Unit Cable The TI-84 Plus I /O unit-to a Computer With TI Connect™ software and the USB computer cable that also connect to a TI-84 Plus with your TI-84 Plus, you can link the graphing calculator to -unit cable into the other end of the graphing calculator. Insert the other graphing calculator's USB port. Firmly insert either end of the graphing calculator. 1. The TI-83 Plus...
Guidebook
Page 356
... features in the user data archive of the sending TI-84 Plus Silver Edition will be automatically sent to the RAM of the TI-83 Plus or TI-83 Plus Silver Edition during the transfer process. Repeat steps 7 through 13 until the items are pre-selected from the receiving unit and connect it to another unit. 8. Use an I/O unit-to...
... features in the user data archive of the sending TI-84 Plus Silver Edition will be automatically sent to the RAM of the TI-83 Plus or TI-83 Plus Silver Edition during the transfer process. Repeat steps 7 through 13 until the items are pre-selected from the receiving unit and connect it to another unit. 8. Use an I/O unit-to...

Guidebook
Page 363
... home screen. † I /O 9:ClrTable Returns the complex conjugate of a complex number or list of one or more listnames. ... Connected Turns off the clock display in memory. EDIT 4:ClrList Clears all Y= editor graph- † z style settings to 0 the dimension of complex numbers. y @ Returns hyperbolic cosine of a real number, expression, or list. cosh...
... home screen. † I /O 9:ClrTable Returns the complex conjugate of a complex number or list of one or more listnames. ... Connected Turns off the clock display in memory. EDIT 4:ClrList Clears all Y= editor graph- † z style settings to 0 the dimension of complex numbers. y @ Returns hyperbolic cosine of a real number, expression, or list. cosh...

Guidebook
Page 368
... occurs, for the discrete geometric DISTR distribution with the specified probability of success p. By default, the TI-84 Plus uses the USB port if it is not connected, it uses the I /O A:Get( Gets contents of variable on another TI-84 Plus and stores it † in {hour,minute,second} format. getDate Returns an integer representing the...
... occurs, for the discrete geometric DISTR distribution with the specified probability of success p. By default, the TI-84 Plus uses the USB port if it is not connected, it uses the I /O A:Get( Gets contents of variable on another TI-84 Plus and stores it † in {hour,minute,second} format. getDate Returns an integer representing the...


