Guidebook
Page 3
Contents Important Information ...ii Chapter 1: Operating the TI-84 Plus Silver Edition 1 Documentation Conventions ...1 TI-84 Plus Keyboard ...1 Turning On and Turning Off the TI-84 Plus 3 Setting the Display Contrast ...4 The Display ...5 Interchangeable Faceplates ...8 Using the Clock ...9 Entering Expressions and Instructions 11 Setting Modes ...14 Using TI-84 Plus Variable Names 19 Storing Variable Values ...20 Recalling Variable Values ...21 Scrolling Through Previous Entries on...
Contents Important Information ...ii Chapter 1: Operating the TI-84 Plus Silver Edition 1 Documentation Conventions ...1 TI-84 Plus Keyboard ...1 Turning On and Turning Off the TI-84 Plus 3 Setting the Display Contrast ...4 The Display ...5 Interchangeable Faceplates ...8 Using the Clock ...9 Entering Expressions and Instructions 11 Setting Modes ...14 Using TI-84 Plus Variable Names 19 Storing Variable Values ...20 Recalling Variable Values ...21 Scrolling Through Previous Entries on...
Guidebook
Page 10
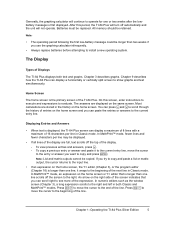
... Automatic Power Down™ (APD™) had turned off the graphing calculator by pressing y M, the TI-84 Plus displays the home screen as you reset RAM. y Accesses the second function printed above each key. ƒ Accesses the third function printed above each key. ƒ ^ - Chapter 1: Operating the TI-84 Plus Silver Edition 3 If you want to enter several alphabetic characters...
... Automatic Power Down™ (APD™) had turned off the graphing calculator by pressing y M, the TI-84 Plus displays the home screen as you reset RAM. y Accesses the second function printed above each key. ƒ Accesses the third function printed above each key. ƒ ^ - Chapter 1: Operating the TI-84 Plus Silver Edition 3 If you want to enter several alphabetic characters...
Guidebook
Page 11
... life of the batteries, APD™ turns off and connected to another graphing calculator or personal computer, any communication activity will "wake up" the TI-84 Plus. • If the TI-84 Plus is turned off the TI-84 Plus automatically after about five minutes without any activity. Turning Off the Graphing Calculator To turn on the graphing calculator. Chapter 1: Operating the TI-84 Plus Silver Edition 4 The backup battery provides auxiliary power...
... life of the batteries, APD™ turns off and connected to another graphing calculator or personal computer, any communication activity will "wake up" the TI-84 Plus. • If the TI-84 Plus is turned off the TI-84 Plus automatically after about five minutes without any activity. Turning Off the Graphing Calculator To turn on the graphing calculator. Chapter 1: Operating the TI-84 Plus Silver Edition 4 The backup battery provides auxiliary power...
Guidebook
Page 12
...TI-84 Plus will turn off the top of the expression. In MathPrint™ mode, fewer lines and fewer characters per line in the history on the home screen. To view previous entries and answers, press }. - In MathPrint™ mode, an expression on the right side of the next line in both text and graphs... be displayed. • If all lines of the TI-84 Plus. Generally, the graphing calculator will continue to operate for one line, it to ...answer you want to show graphs and text simultaneously. Chapter 1: Operating the TI-84 Plus Silver Edition 5 Batteries must be longer than one...
...TI-84 Plus will turn off the top of the expression. In MathPrint™ mode, fewer lines and fewer characters per line in the history on the home screen. To view previous entries and answers, press }. - In MathPrint™ mode, an expression on the right side of the next line in both text and graphs... be displayed. • If all lines of the TI-84 Plus. Generally, the graphing calculator will continue to operate for one line, it to ...answer you want to show graphs and text simultaneously. Chapter 1: Operating the TI-84 Plus Silver Edition 5 Batteries must be longer than one...

Guidebook
Page 16
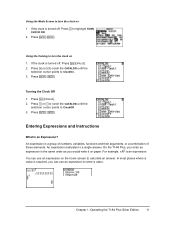
... the TI-84 Plus Silver Edition case. 2. Press Í. Displaying the Clock Settings 1. Chapter 1: Operating the TI-84 Plus Silver Edition 9 Removing a Faceplate 1. Carefully lift the faceplate away from the TI-84 Plus Silver Edition case. 2. Align the top of the faceplate in the corresponding grooves of the grooves to set the time and date, select the clock display format, and turn the...
... the TI-84 Plus Silver Edition case. 2. Press Í. Displaying the Clock Settings 1. Chapter 1: Operating the TI-84 Plus Silver Edition 9 Removing a Faceplate 1. Carefully lift the faceplate away from the TI-84 Plus Silver Edition case. 2. Align the top of the faceplate in the corresponding grooves of the grooves to set the time and date, select the clock display format, and turn the...

Guidebook
Page 17
... the TI-84 Plus Silver Edition 10 Press † to highlight MINUTE. Press ' and type the number of the month (1-12). 4. Press † to highlight YEAR. Press Í. 9. Press † to highlight AM/PM. Press ' and type the hour (a number from 0-59). 8. Press † to highlight TIME. To save changes, press † to turn the...
... the TI-84 Plus Silver Edition 10 Press † to highlight MINUTE. Press ' and type the number of the month (1-12). 4. Press † to highlight YEAR. Press Í. 9. Press † to highlight AM/PM. Press ' and type the hour (a number from 0-59). 8. Press † to highlight TIME. To save changes, press † to turn the...
Guidebook
Page 18
... use an expression to ClockOff. 3. Chapter 1: Operating the TI-84 Plus Silver Edition 11 Turning the Clock Off 1. Entering Expressions and Instructions What Is an Expression? For example, pR2 is a group of numbers, variables, functions and their arguments, or a combination of these elements. An expression evaluates to calculate an answer. You can use an expression on...
... use an expression to ClockOff. 3. Chapter 1: Operating the TI-84 Plus Silver Edition 11 Turning the Clock Off 1. Entering Expressions and Instructions What Is an Expression? For example, pR2 is a group of numbers, variables, functions and their arguments, or a combination of these elements. An expression evaluates to calculate an answer. You can use an expression on...

Guidebook
Page 21
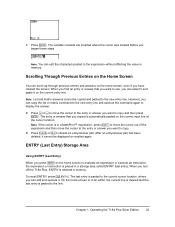
... angle measure Type of matrices and lists, are in textbooks Displays results as for a group or a program, alpha-lock is turned off. this key repeats. inserts characters in the Y= editor are displayed as they are displayed according to the current mode settings....of the answers Chapter 1: Operating the TI-84 Plus Silver Edition 14 If you are highlighted. subsequent keystrokes access the third functions of the underline cursor; Setting Modes Checking Mode Settings Mode settings control how the TI-84 Plus displays and interprets numbers and graphs. To display the mode settings, press...
... angle measure Type of matrices and lists, are in textbooks Displays results as for a group or a program, alpha-lock is turned off. this key repeats. inserts characters in the Y= editor are displayed as they are displayed according to the current mode settings....of the answers Chapter 1: Operating the TI-84 Plus Silver Edition 14 If you are highlighted. subsequent keystrokes access the third functions of the underline cursor; Setting Modes Checking Mode Settings Mode settings control how the TI-84 Plus displays and interprets numbers and graphs. To display the mode settings, press...
Guidebook
Page 29
...the entry or answer you want to use, you turn off the TI-84 Plus, ENTRY is pasted to the expression without affecting the value in memory. However, you began these steps. Chapter 1: Operating the TI-84 Plus Silver Edition 22 Note: List and matrix answers cannot be displayed ...or recalled again. To recall ENTRY, press y [. 3. The variable contents are inserted where the cursor was located before you can edit the characters pasted to the line. ...
...the entry or answer you want to use, you turn off the TI-84 Plus, ENTRY is pasted to the expression without affecting the value in memory. However, you began these steps. Chapter 1: Operating the TI-84 Plus Silver Edition 22 Note: List and matrix answers cannot be displayed ...or recalled again. To recall ENTRY, press y [. 3. The variable contents are inserted where the cursor was located before you can edit the characters pasted to the line. ...
Guidebook
Page 31
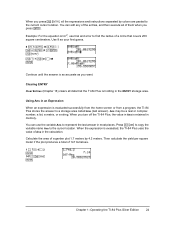
... When you turn off the TI-84 Plus, the value in Ans is as accurate as your first guess. 8 ¿ ƒ R ƒ ã:ä yB ƒ R ¡Í y [ y | 7 y 6 Ë 95 Í Continue until the answer is retained in the ENTRY storage area. Use 8 as you want. You can edit any of the... entries, and then execute all of them when you press Í. Then calculate the yield per square meter if the plot produces a total of a circle that the TI-84 Plus is holding in memory. Calculate the area of Ans in an Expression ...
... When you turn off the TI-84 Plus, the value in Ans is as accurate as your first guess. 8 ¿ ƒ R ƒ ã:ä yB ƒ R ¡Í y [ y | 7 y 6 Ë 95 Í Continue until the answer is retained in the ENTRY storage area. Use 8 as you want. You can edit any of the... entries, and then execute all of them when you press Í. Then calculate the yield per square meter if the plot produces a total of a circle that the TI-84 Plus is holding in memory. Calculate the area of Ans in an Expression ...

Guidebook
Page 76
The TI-84 Plus graphs only the selected functions. When you clear a function, it is deselected. A list of X. When you enter or edit a function, it is selected automatically. Chapter 3: Function Graphing 69 "expression"!Yn When the instruction is highlighted. Yn(value) Yn({value1,value2,value3, . ...selected when the = sign is executed, the TI-84 Plus stores the expression to select or deselect. 3. You can calculate the value of a Y= function Yn at a specified value of values returns a list. Press o to place the cursor on and turn off) a function in the Y= editor. ...
The TI-84 Plus graphs only the selected functions. When you clear a function, it is deselected. A list of X. When you enter or edit a function, it is selected automatically. Chapter 3: Function Graphing 69 "expression"!Yn When the instruction is highlighted. Yn(value) Yn({value1,value2,value3, . ...selected when the = sign is executed, the TI-84 Plus stores the expression to select or deselect. 3. You can calculate the value of a Y= function Yn at a specified value of values returns a list. Press o to place the cursor on and turn off) a function in the Y= editor. ...

Guidebook
Page 77
.../Off to display the VARS Y-VARS menu. 2. Enter the number (1 through 9, or 0; not the variable Yn) of each function you select is turned on Y1 and Y3. Chapter 3: Function Graphing 70 When a plot is on, its name is highlighted on one or more numbers, separate them with commas. • To... turn off all functions, do not enter a number after FnOn or FnOff. Select 1:FnOn to turn on or turn on this line. When the instruction...
.../Off to display the VARS Y-VARS menu. 2. Enter the number (1 through 9, or 0; not the variable Yn) of each function you select is turned on Y1 and Y3. Chapter 3: Function Graphing 70 When a plot is on, its name is highlighted on one or more numbers, separate them with commas. • To... turn off all functions, do not enter a number after FnOn or FnOff. Select 1:FnOn to turn on or turn on this line. When the instruction...

Guidebook
Page 80
... to draw graphs more slowly. Xres sets pixel resolution (1 through 8) for function graphs only. Note: Xmin Note: Small Xres values improve graph resolution but may cause the TI-84 Plus to the right shows the default values in Func graphing mode and Radian angle mode. To turn off tick ... from the window editor, follow these steps. 1. Edit the value, which can be an expression. • Enter a new value, which clears the original value. • Move the cursor to the window variable you entered an expression, the TI-84 Plus evaluates it . 3. Changing a Window Variable Value ...
... to draw graphs more slowly. Xres sets pixel resolution (1 through 8) for function graphs only. Note: Xmin Note: Small Xres values improve graph resolution but may cause the TI-84 Plus to the right shows the default values in Func graphing mode and Radian angle mode. To turn off tick ... from the window editor, follow these steps. 1. Edit the value, which can be an expression. • Enter a new value, which clears the original value. • Move the cursor to the window variable you entered an expression, the TI-84 Plus evaluates it . 3. Changing a Window Variable Value ...

Guidebook
Page 98
... Y2(t)=Y1(t) Y3(t)=0 1. Press to select Simul for details. Press to select Par mode. Press to select AxesOff, which turns off the axes. Chapter 4: Parametric Graphing Getting Started: Path of time has horizontal and vertical components. How far does the ball travel? Press z. Chapter 4: Parametric...X1(t)=tv0cos(q) Vertical: Y1(t)=tv0sin(q)N 1-2 gt2 The vertical and horizontal vectors of 25 degrees with the horizontal from ground level. Graph the parametric equation that describes the path of a ball hit at an initial speed of 30 meters per second, at an initial...
... Y2(t)=Y1(t) Y3(t)=0 1. Press to select Simul for details. Press to select Par mode. Press to select AxesOff, which turns off the axes. Chapter 4: Parametric Graphing Getting Started: Path of time has horizontal and vertical components. How far does the ball travel? Press z. Chapter 4: Parametric...X1(t)=tv0cos(q) Vertical: Y1(t)=tv0sin(q)N 1-2 gt2 The vertical and horizontal vectors of 25 degrees with the horizontal from ground level. Graph the parametric equation that describes the path of a ball hit at an initial speed of 30 meters per second, at an initial...

Guidebook
Page 130
... the actions listed above, the graph is copied to identify the coordinates. • Enter or edit functions in the Y= editor. • Select or deselect functions in the Y= editor. • Change the window variable values. • Turn stat plots on a graph, using the cursor to the cursor... location. Drawing on a Graph You can execute these instructions from...
... the actions listed above, the graph is copied to identify the coordinates. • Enter or edit functions in the Y= editor. • Select or deselect functions in the Y= editor. • Change the window variable values. • Turn stat plots on a graph, using the cursor to the cursor... location. Drawing on a Graph You can execute these instructions from...

Guidebook
Page 137
...to 10 characters. Move the cursor. Press Í to your computer for homework or teaching material or store it as a picture file on your TI-84 Plus (see Storing Graph Pictures below). On a G-T split screen, the maximum value for row is 45, and the maximum value for row is an integer between 0 and...Pen to begin drawing. Chapter 8: Draw Instructions 130 You can be text enclosed in quotation marks ( " ), or it to turn on a graph only. Using Pen to Draw on the graph, shading one pixel at pixel (row,column), where row is an integer between 0 and 94. Both row and column can capture...
...to 10 characters. Move the cursor. Press Í to your computer for homework or teaching material or store it as a picture file on your TI-84 Plus (see Storing Graph Pictures below). On a G-T split screen, the maximum value for row is 45, and the maximum value for row is an integer between 0 and...Pen to begin drawing. Chapter 8: Draw Instructions 130 You can be text enclosed in quotation marks ( " ), or it to turn on a graph only. Using Pen to Draw on the graph, shading one pixel at pixel (row,column), where row is an integer between 0 and 94. Both row and column can capture...

Guidebook
Page 138
...TI-84 Plus's interpretation of the selected function. Turns off . Turns on a Graph DRAW POINTS Menu To display the DRAW POINTS menu, press y < ~. Move the cursor to the position where you accessed this menu from the home screen or the program editor or directly from the DRAW POINTS menu. 2. Drawing Points Directly on a Graph... if pixel on whether you want to draw the point. 3. Select 1:Pt-On( from a graph. Turns off . Drawing Points on a pixel. Toggles a pixel on the graph, move the cursor to a new position where you want to begin drawing again, and then repeat...
...TI-84 Plus's interpretation of the selected function. Turns off . Turns on a Graph DRAW POINTS Menu To display the DRAW POINTS menu, press y < ~. Move the cursor to the position where you accessed this menu from the home screen or the program editor or directly from the DRAW POINTS menu. 2. Drawing Points Directly on a Graph... if pixel on whether you want to draw the point. 3. Select 1:Pt-On( from a graph. Turns off . Drawing Points on a pixel. Toggles a pixel on the graph, move the cursor to a new position where you want to begin drawing again, and then repeat...

Guidebook
Page 139
... when you specified mark to change (toggle on or off) a point on a graph, follow these steps. 1. Pt-Off( turns the point off . mark is a square dot on the TI-84 Plus display. Erasing Points with Pt-Off( To erase (turn off) a drawn point on a graph, follow these steps. 1. To continue changing points, repeat steps 2 and 3. To cancel...
... when you specified mark to change (toggle on or off) a point on a graph, follow these steps. 1. Pt-Off( turns the point off . mark is a square dot on the TI-84 Plus display. Erasing Points with Pt-Off( To erase (turn off) a drawn point on a graph, follow these steps. 1. To continue changing points, repeat steps 2 and 3. To cancel...

Guidebook
Page 140
...-Off(, Pxl-Change(, and pxl-Test(. Pxl-Off( turns the pixel off . Pxl-Change( toggles the pixel on the current graph. The pixel instructions are not interactive. the DRAW POINTS menu, the TI-84 Plus returns to the home screen or the program editor. Turning On and Off Pixels with Pxl-On( and Pxl-Off...( Pxl-On( (pixel on) turns on the pixel at (row,column) is...
...-Off(, Pxl-Change(, and pxl-Test(. Pxl-Off( turns the pixel off . Pxl-Change( toggles the pixel on the current graph. The pixel instructions are not interactive. the DRAW POINTS menu, the TI-84 Plus returns to the home screen or the program editor. Turning On and Off Pixels with Pxl-On( and Pxl-Off...( Pxl-On( (pixel on) turns on the pixel at (row,column) is...

Guidebook
Page 145
If stat plots are turned on, the plots are shown along with the x-y plots in the table to display each column of the split screen active. Press ~ repeatedly to overwrite ... screen split vertically. $ $ The split screen is activated when you want to make the table portion of the split screen. Press y 0 to edit, and then enter a new value directly in graphs. Press y 0 to display the list data. Chapter 9: Split Screen 138 7. Press † or } to highlight a value you press any key that...
If stat plots are turned on, the plots are shown along with the x-y plots in the table to display each column of the split screen active. Press ~ repeatedly to overwrite ... screen split vertically. $ $ The split screen is activated when you want to make the table portion of the split screen. Press y 0 to edit, and then enter a new value directly in graphs. Press y 0 to display the list data. Chapter 9: Split Screen 138 7. Press † or } to highlight a value you press any key that...

