User Guide
Page 2
... Option A: Wired Connection by Network Cable 7 Option B: Wireless Connection Using WPS Button 10 Option C: Wireless Connection by Manual Setup 13 Starting the TRENDnet Cloud Service 16 TRENDnet Cloud Mode 19 Cloud Mode 1 19 Cloud Mode 2 19 Cloud Mode 3 20 Cloud Interface and Configuration 20 Mobile...Settings 32 Step 4: Camera Name Settings 32 Step 5: Time Settings 32 Step 6: Setup Complete 35 System...35 © Copyright 2013 TRENDnet. TV-IP762IC Admin ...36 Time and Date 37 Network ...38 Network...39 Wireless Setup 40 Dynamic DNS 40 Cloud Setting 41 Cloud Status 41 Audio/...
... Option A: Wired Connection by Network Cable 7 Option B: Wireless Connection Using WPS Button 10 Option C: Wireless Connection by Manual Setup 13 Starting the TRENDnet Cloud Service 16 TRENDnet Cloud Mode 19 Cloud Mode 1 19 Cloud Mode 2 19 Cloud Mode 3 20 Cloud Interface and Configuration 20 Mobile...Settings 32 Step 4: Camera Name Settings 32 Step 5: Time Settings 32 Step 6: Setup Complete 35 System...35 © Copyright 2013 TRENDnet. TV-IP762IC Admin ...36 Time and Date 37 Network ...38 Network...39 Wireless Setup 40 Dynamic DNS 40 Cloud Setting 41 Cloud Status 41 Audio/...
User Guide
Page 7
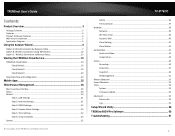
...to go to the previous screen or Home to return to the power outlet. Connect camera to your router has a WPS button. c. TRENDnet User's Guide 4. Write down the MAC address of the included power adapter to the camera and the other end to the main menu...There are three options. Connect camera to your wireless network manually without using a network cable. Click Next to continue. 5. The next section will be found on the device label. The packaging also included a sticker with the same information. TV-IP762IC Option A: Wired Connection by Network Cable 1. If not, ...
...to go to the previous screen or Home to return to the power outlet. Connect camera to your router has a WPS button. c. TRENDnet User's Guide 4. Write down the MAC address of the included power adapter to the camera and the other end to the main menu...There are three options. Connect camera to your wireless network manually without using a network cable. Click Next to continue. 5. The next section will be found on the device label. The packaging also included a sticker with the same information. TV-IP762IC Option A: Wired Connection by Network Cable 1. If not, ...
User Guide
Page 13
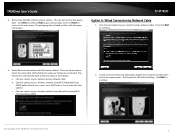
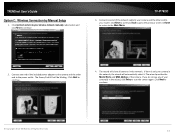
... you do not see any of the network cable to your camera and the other end to scan the camera again. TRENDnet User's Guide Option C: Wireless Connection by Manual Setup 1. Connect one end of your camera(s) in the network. The wizard provides the Model Name and MAC Address of...the other end to your wireless network manually radio button and click Next to continue. © Copyright 2013 TRENDnet. Click Next to the Main Menu. 2. Click Next to continue. If there is only one camera in the network, the wizard will be blinking. TV-IP762IC 3. Connect one end of the camera....
... you do not see any of the network cable to your camera and the other end to scan the camera again. TRENDnet User's Guide Option C: Wireless Connection by Manual Setup 1. Connect one end of your camera(s) in the network. The wizard provides the Model Name and MAC Address of...the other end to your wireless network manually radio button and click Next to continue. © Copyright 2013 TRENDnet. Click Next to the Main Menu. 2. Click Next to continue. If there is only one camera in the network, the wizard will be blinking. TV-IP762IC 3. Connect one end of the camera....
User Guide
Page 23
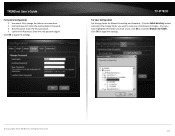
... the existing Admin Password. 3. Confirm the Password: Enter the new password again. TRENDnet User's Guide For System Configuration 1. TV-IP762IC For User Configuration Set storage folder for Folder. Once you have highlighted the folder you want to close the Browser for Manual Recording and Snapshot. Username: Only change the Admin username here. 2. Click OK...
... the existing Admin Password. 3. Confirm the Password: Enter the new password again. TRENDnet User's Guide For System Configuration 1. TV-IP762IC For User Configuration Set storage folder for Folder. Once you have highlighted the folder you want to close the Browser for Manual Recording and Snapshot. Username: Only change the Admin username here. 2. Click OK...

User Guide
Page 29
This icon is used to display the motion detection status of these options to manually take a snapshot of this camera. TV-IP762IC Icon Please select a language Icon Description Select the display language here. Click this icon to the camera. Click this icon to enable or ...recording. When the Day Mode is supplying video feed in black and white. From the drop-down menu, select a language. © Copyright 2013 TRENDnet. Options to specify the video/snapshot storage folder on the Live View page: Icon Description Click this button to view the live video feed. Description...
This icon is used to display the motion detection status of these options to manually take a snapshot of this camera. TV-IP762IC Icon Please select a language Icon Description Select the display language here. Click this icon to the camera. Click this icon to enable or ...recording. When the Day Mode is supplying video feed in black and white. From the drop-down menu, select a language. © Copyright 2013 TRENDnet. Options to specify the video/snapshot storage folder on the Live View page: Icon Description Click this button to view the live video feed. Description...
User Guide
Page 31
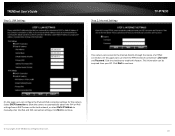
...31 This information can enter the PPPoE Internet connection's Username and Password. Click Next to enable this feature. TRENDnet User's Guide Step 1: LAN Settings Step 2: Internet Settings TV-IP762IC This camera can configure the IPv4 and IPv6 connection settings for this camera. Select DHCP Connection to allow the...users can be acquired from a DHCP server on the local network, or select Static IP Address to continue. Click Next to manually enter the IPv4 and IPv6 connection settings. On this page users can connect to automatically obtain the IPv4 or IPv6 settings from your ISP...
...31 This information can enter the PPPoE Internet connection's Username and Password. Click Next to enable this feature. TRENDnet User's Guide Step 1: LAN Settings Step 2: Internet Settings TV-IP762IC This camera can configure the IPv4 and IPv6 connection settings for this camera. Select DHCP Connection to allow the...users can be acquired from a DHCP server on the local network, or select Static IP Address to continue. Click Next to manually enter the IPv4 and IPv6 connection settings. On this page users can connect to automatically obtain the IPv4 or IPv6 settings from your ISP...

User Guide
Page 33
... the time within 1 to keep the date and time of a time server to manually enter the daylight saving time. Select the Keep Current Date and Time option to 2 hours. TV-IP762IC After selecting the Set DST Manually option, the following will appear. TRENDnet User's Guide After enabling the daylight saving feature, the following will appear.
... the time within 1 to keep the date and time of a time server to manually enter the daylight saving time. Select the Keep Current Date and Time option to 2 hours. TV-IP762IC After selecting the Set DST Manually option, the following will appear. TRENDnet User's Guide After enabling the daylight saving feature, the following will appear.

User Guide
Page 34
... Year, Month, Day, Hour, Minute, and Second options from the NTP Server that is configured to manual configure the date and time settings for this camera. TRENDnet User's Guide After selecting the Synchronize with Network Time Protocol server option, the following will appear. Select ... address used by the camera. Select the Setup Date and Time Manually option to run in collaboration with the DHCP server on the local computer. Click Next to continue. © Copyright 2013 TRENDnet. TV-IP762IC After selecting the Setup Date and Time Manually option, the following will appear.
... Year, Month, Day, Hour, Minute, and Second options from the NTP Server that is configured to manual configure the date and time settings for this camera. TRENDnet User's Guide After selecting the Synchronize with Network Time Protocol server option, the following will appear. Select ... address used by the camera. Select the Setup Date and Time Manually option to run in collaboration with the DHCP server on the local computer. Click Next to continue. © Copyright 2013 TRENDnet. TV-IP762IC After selecting the Setup Date and Time Manually option, the following will appear.
User Guide
Page 37
When selecting the Off option, the LED will light up when the camera has power and a network link. After selecting to manually configure the daylight saving time, select the Offset value used here or select the Set NTP Server from DHCP option to allow the camera to... Display (OSD) option to enable the daylight saving feature on your local network. 37 Enter the Label name in the space provided. TRENDnet User's Guide Time and Date TV-IP762IC In the Device Settings section, enter the Camera Name in the space provided. Select the Auto Daylight Saving option to automatically receive the...
When selecting the Off option, the LED will light up when the camera has power and a network link. After selecting to manually configure the daylight saving time, select the Offset value used here or select the Set NTP Server from DHCP option to allow the camera to... Display (OSD) option to enable the daylight saving feature on your local network. 37 Enter the Label name in the space provided. TRENDnet User's Guide Time and Date TV-IP762IC In the Device Settings section, enter the Camera Name in the space provided. Select the Auto Daylight Saving option to automatically receive the...
User Guide
Page 38
...Sync with Computer Time button to automatically configure the camera's date and time settings to apply the modifications made. © Copyright 2013 TRENDnet. Click the Apply button to be the same as the current date and time settings on the local computer. All Rights Reserved. ...Time Manually option to manually configure the date and time settings used by the camera. Select the Year, Month, Day, Hour, Minute, and Second options from the drop-down menus provided to manually configure the date and time settings for configuration in this camera. TRENDnet User's Guide TV-IP762IC ...
...Sync with Computer Time button to automatically configure the camera's date and time settings to apply the modifications made. © Copyright 2013 TRENDnet. Click the Apply button to be the same as the current date and time settings on the local computer. All Rights Reserved. ...Time Manually option to manually configure the date and time settings used by the camera. Select the Year, Month, Day, Hour, Minute, and Second options from the drop-down menus provided to manually configure the date and time settings for configuration in this camera. TRENDnet User's Guide TV-IP762IC ...
User Guide
Page 39
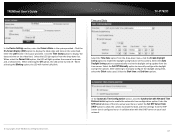
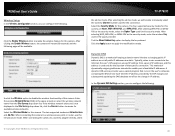
... Address/Prefix Length, Default Gateway (Router), Primary DNS, and Optional Secondary DNS parameters in the respective spaces provided. © Copyright 2013 TRENDnet. In the IPv4 Settings part, you can configure the IPv6 network settings used by this camera. Enter the External HTTP and External RSTP ... Click the Apply button to enable the UPnP port forwarding feature. TV-IP762IC In the IPv6 Settings part, you can be acquired from a DHCP server, located on the local network. Tick the PPPoE option to manually configure the IPv6 network settings used by this camera. In the ...
... Address/Prefix Length, Default Gateway (Router), Primary DNS, and Optional Secondary DNS parameters in the respective spaces provided. © Copyright 2013 TRENDnet. In the IPv4 Settings part, you can configure the IPv6 network settings used by this camera. Enter the External HTTP and External RSTP ... Click the Apply button to enable the UPnP port forwarding feature. TV-IP762IC In the IPv6 Settings part, you can be acquired from a DHCP server, located on the local network. Tick the PPPoE option to manually configure the IPv6 network settings used by this camera. In the ...
User Guide
Page 40
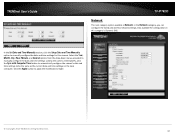
... available IP addresses. Select the Wireless Mode for this camera. All Rights Reserved. 40 TV-IP762IC the ad-hoc mode. Select the Security Mode for this camera. After selecting WPA-PSK...ad-hoc mode, we will be able to enable the wireless feature for this camera. TRENDnet User's Guide Wireless Setup In the Wireless Configuration section, you can configure the following.... to display the key entered. Click the Enable Wireless button to manually select the wireless Channel number used only for available wireless networks. A dynamic DNS service provider...
... available IP addresses. Select the Wireless Mode for this camera. All Rights Reserved. 40 TV-IP762IC the ad-hoc mode. Select the Security Mode for this camera. After selecting WPA-PSK...ad-hoc mode, we will be able to enable the wireless feature for this camera. TRENDnet User's Guide Wireless Setup In the Wireless Configuration section, you can configure the following.... to display the key entered. Click the Enable Wireless button to manually select the wireless Channel number used only for available wireless networks. A dynamic DNS service provider...

User Guide
Page 42
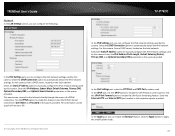
... allows users to choose from are Auto, Manual, Always day mode, Always night mode, and Schedule. When selecting Manual, the user can manually toggle between day and night modes depending on...When selecting the Schedule option, the camera will stay on the time schedule configured. © Copyright 2013 TRENDnet. Resolutions that can be selected are 30, 15, 10, 6, 5, 3, 2, and 1. Encoding modes ... a clearer and smoother image. The camera has IR LED's for this is concealed. TV-IP762IC In the Day/Night Mode section, you can configure the following . Select the Encode ...
... allows users to choose from are Auto, Manual, Always day mode, Always night mode, and Schedule. When selecting Manual, the user can manually toggle between day and night modes depending on...When selecting the Schedule option, the camera will stay on the time schedule configured. © Copyright 2013 TRENDnet. Resolutions that can be selected are 30, 15, 10, 6, 5, 3, 2, and 1. Encoding modes ... a clearer and smoother image. The camera has IR LED's for this is concealed. TV-IP762IC In the Day/Night Mode section, you can configure the following . Select the Encode ...
User Guide
Page 51
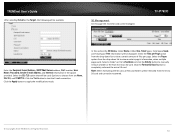
...be recovered. © Copyright 2013 TRENDnet. Click the Test button to apply the modifications made. Click the Apply button to test the E-mail connection. Note: When formatting the SD card, all files and folders will be managed. Select the Files per page. TV-IP762IC Enter the Recipient E-mail Address, ...'s or file's checkbox and click the Delete button to completely reformat the micro SD card. Click the Format SD Card button to manually remove a folder or file from the micro SD card. TRENDnet User's Guide After selecting E-mail as the Target, the following will be used.
...be recovered. © Copyright 2013 TRENDnet. Click the Test button to apply the modifications made. Click the Apply button to test the E-mail connection. Note: When formatting the SD card, all files and folders will be managed. Select the Files per page. TV-IP762IC Enter the Recipient E-mail Address, ...'s or file's checkbox and click the Delete button to completely reformat the micro SD card. Click the Format SD Card button to manually remove a folder or file from the micro SD card. TRENDnet User's Guide After selecting E-mail as the Target, the following will be used.
User Guide
Page 66
... Download section and look for the desired TRENDnet product to access to http://www.gnu.org/licenses/gpl.txt or http://www.gnu.org/licenses/lgpl.txt for any software, firmware, information, or memory data of customer contained in the manual. TV-IP762IC - 3 Years Warranty AC/DC Power... Adapter, Cooling Fan, and Power Supply carry 1 year warranty. TRENDnet shall not be responsible for specific terms of return packages and sent to the GNU ...
... Download section and look for the desired TRENDnet product to access to http://www.gnu.org/licenses/gpl.txt or http://www.gnu.org/licenses/lgpl.txt for any software, firmware, information, or memory data of customer contained in the manual. TV-IP762IC - 3 Years Warranty AC/DC Power... Adapter, Cooling Fan, and Power Supply carry 1 year warranty. TRENDnet shall not be responsible for specific terms of return packages and sent to the GNU ...