User Guide
Page 2
All Rights Reserved. TV-IP762IC Admin ...36 Time and Date 37 Network ...38 Network...39 Wireless Setup 40 Dynamic DNS 40 Cloud Setting 41 Cloud Status 41 Audio/Video ...41 Audio and Video 42 Image Setup 44 Action...44 Recording...45 Video Clip...47 Snapshot ...49 SD ... Option A: Wired Connection by Network Cable 7 Option B: Wireless Connection Using WPS Button 10 Option C: Wireless Connection by Manual Setup 13 Starting the TRENDnet Cloud Service 16 TRENDnet Cloud Mode 19 Cloud Mode 1 19 Cloud Mode 2 19 Cloud Mode 3 20 Cloud Interface and Configuration 20 Mobile Apps 25...
All Rights Reserved. TV-IP762IC Admin ...36 Time and Date 37 Network ...38 Network...39 Wireless Setup 40 Dynamic DNS 40 Cloud Setting 41 Cloud Status 41 Audio/Video ...41 Audio and Video 42 Image Setup 44 Action...44 Recording...45 Video Clip...47 Snapshot ...49 SD ... Option A: Wired Connection by Network Cable 7 Option B: Wireless Connection Using WPS Button 10 Option C: Wireless Connection by Manual Setup 13 Starting the TRENDnet Cloud Service 16 TRENDnet Cloud Mode 19 Cloud Mode 1 19 Cloud Mode 2 19 Cloud Mode 3 20 Cloud Interface and Configuration 20 Mobile Apps 25...
User Guide
Page 3
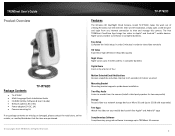
TRENDnet User's Guide Product Overview TV-IP762IC Package Contents TV-IP762IC Multi-Language Quick Installation Guide CD-ROM (Utility, Software & User's Guide) Network cable (1.8m / 6ft) Power adapter (5V DC, 1A) Camera mounting kit If any internet connection to Apple® and Android™ mobile devices. TV-IP762IC Features The Wireless HD...
TRENDnet User's Guide Product Overview TV-IP762IC Package Contents TV-IP762IC Multi-Language Quick Installation Guide CD-ROM (Utility, Software & User's Guide) Network cable (1.8m / 6ft) Power adapter (5V DC, 1A) Camera mounting kit If any internet connection to Apple® and Android™ mobile devices. TV-IP762IC Features The Wireless HD...
User Guide
Page 7
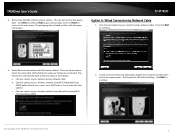
... camera to the power outlet. Connect camera to your network using Wi-Fi Protected Setup (WPS) 2. Click Next to continue. 5. This can be blinking. Then click Next to continue. © Copyright 2013 TRENDnet. c. The next section will be found on the device label. a. Connect camera...go to the previous screen or Home to return to your wireless network manually without using a network cable. TV-IP762IC Option A: Wired Connection by Network Cable 1. If not, select the next option). Select Network connection and initial setup method. TRENDnet User's Guide 4.
... camera to the power outlet. Connect camera to your network using Wi-Fi Protected Setup (WPS) 2. Click Next to continue. 5. This can be blinking. Then click Next to continue. © Copyright 2013 TRENDnet. c. The next section will be found on the device label. a. Connect camera...go to the previous screen or Home to return to your wireless network manually without using a network cable. TV-IP762IC Option A: Wired Connection by Network Cable 1. If not, select the next option). Select Network connection and initial setup method. TRENDnet User's Guide 4.
User Guide
Page 9
..., you are prompted to continue. TRENDnet User's Guide 6. Click Next to create a desktop shortcut for additional Cloud service information. © Copyright 2013 TRENDnet. The initial setup is admin. Click the link to access the TRENDnet Cloud Server or click camera icon to... continue. Click the Change Password checkbox to Starting the TRENDnet Cloud Services section for future access. Changing Password. The default username and password is complete. TV-IP762IC...
..., you are prompted to continue. TRENDnet User's Guide 6. Click Next to create a desktop shortcut for additional Cloud service information. © Copyright 2013 TRENDnet. The initial setup is admin. Click the link to access the TRENDnet Cloud Server or click camera icon to... continue. Click the Change Password checkbox to Starting the TRENDnet Cloud Services section for future access. Changing Password. The default username and password is complete. TV-IP762IC...

User Guide
Page 10
...also available from your wireless using Wi-Fi Protected Setup (WPS) button radio button and click Next to download the TRENDnet CloudView mobile app for additional features information. 2. Connect one end of Google Inc. © Copyright 2013 TRENDnet. TRENDnet User's Guide 8. You are now ready to... use the QR Code Scanner from Apple store or Google Play™1. All Rights Reserved. 10 The Power/Link LED will be blinking. TV-IP762IC Option B: Wireless Connection Using WPS Button 1. ...
...also available from your wireless using Wi-Fi Protected Setup (WPS) button radio button and click Next to download the TRENDnet CloudView mobile app for additional features information. 2. Connect one end of Google Inc. © Copyright 2013 TRENDnet. TRENDnet User's Guide 8. You are now ready to... use the QR Code Scanner from Apple store or Google Play™1. All Rights Reserved. 10 The Power/Link LED will be blinking. TV-IP762IC Option B: Wireless Connection Using WPS Button 1. ...

User Guide
Page 12
... message displayed below the camera icon. TV-IP762IC 8. Please refer to exit. Under these circumstances, click Retry again. The initial setup is no warning, click Next to Starting the TRENDnet Cloud Services section for additional features information. © Copyright 2013 TRENDnet. This warning message is only shown... cannot be busy or under maintenance. To use your camera. Click Finish to Mobile Apps section for additional Cloud service information. TRENDnet User's Guide 7. You are now ready to use this feature, the user must have a QR Code Scanner App on their...
... message displayed below the camera icon. TV-IP762IC 8. Please refer to exit. Under these circumstances, click Retry again. The initial setup is no warning, click Next to Starting the TRENDnet Cloud Services section for additional features information. © Copyright 2013 TRENDnet. This warning message is only shown... cannot be busy or under maintenance. To use your camera. Click Finish to Mobile Apps section for additional Cloud service information. TRENDnet User's Guide 7. You are now ready to use this feature, the user must have a QR Code Scanner App on their...
User Guide
Page 13
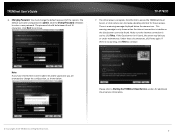
TRENDnet User's Guide Option C: Wireless Connection by Manual Setup 1. Connect one end of the camera. The wizard provides the Model Name and MAC Address of the network cable to your camera and the other ..., the wizard will be blinking. Click Next to continue, Back to go to the previous screen or Home to return to continue. © Copyright 2013 TRENDnet. TV-IP762IC 3. The Power/Link LED will automatically select it. Click Next to the Main Menu. 2. If you do not see any of the included power adapter...
TRENDnet User's Guide Option C: Wireless Connection by Manual Setup 1. Connect one end of the camera. The wizard provides the Model Name and MAC Address of the network cable to your camera and the other ..., the wizard will be blinking. Click Next to continue, Back to go to the previous screen or Home to return to continue. © Copyright 2013 TRENDnet. TV-IP762IC 3. The Power/Link LED will automatically select it. Click Next to the Main Menu. 2. If you do not see any of the included power adapter...

User Guide
Page 15
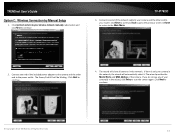
...setup is no warning, click Next to download the TRENDnet CloudView mobile app for additional Cloud service information. The Mobile App option allows the user to continue. If there is complete. Please refer to create a desktop shortcut for additional features information. © Copyright 2013 TRENDnet. All Rights Reserved. 15 TV-IP762IC 10. TRENDnet... User's Guide 9. Click the link to access the TRENDnet Cloud Server or click camera icon to Mobile ...
...setup is no warning, click Next to download the TRENDnet CloudView mobile app for additional Cloud service information. The Mobile App option allows the user to continue. If there is complete. Please refer to create a desktop shortcut for additional features information. © Copyright 2013 TRENDnet. All Rights Reserved. 15 TV-IP762IC 10. TRENDnet... User's Guide 9. Click the link to access the TRENDnet Cloud Server or click camera icon to Mobile ...

User Guide
Page 16
Click Install to connect the camera from any location or computer. TV-IP762IC 3. Enter the username (admin) and password (the one you have not changed your login information. © Copyright 2013 TRENDnet. The log-in . All Rights Reserved. 16 Open a browser, type the cloud ....com) on the label. Write it down. 1. TRENDnet User's Guide Starting the TRENDnet Cloud Service Using the Cloud Service to install the TRENDnet Cloud Plug-in screen appears. Follow these steps to setup the process: Ensure the TV-IP762IC has successfully connected to the live video stream. 2....
Click Install to connect the camera from any location or computer. TV-IP762IC 3. Enter the username (admin) and password (the one you have not changed your login information. © Copyright 2013 TRENDnet. The log-in . All Rights Reserved. 16 Open a browser, type the cloud ....com) on the label. Write it down. 1. TRENDnet User's Guide Starting the TRENDnet Cloud Service Using the Cloud Service to install the TRENDnet Cloud Plug-in screen appears. Follow these steps to setup the process: Ensure the TV-IP762IC has successfully connected to the live video stream. 2....

User Guide
Page 24
...similar to the one you already have setup for the Video Configuration. Fit to Screen Click the fit to screen icon to the screen. Click the arrow again to return to normal live view to maximum the live view screen. © Copyright 2013 TRENDnet. Each camera selection appears as you... using this link to logout Username: View the current user connected to your local IP address. TRENDnet User's Guide For Advanced Configuration (Please Note: Only Admin can use your IP camera's web page. TV-IP762IC Aspect Ratio (Zoom in and zoom out) Click this icon to zoom in Mode 1) Click ...
...similar to the one you already have setup for the Video Configuration. Fit to Screen Click the fit to screen icon to the screen. Click the arrow again to return to normal live view to maximum the live view screen. © Copyright 2013 TRENDnet. Each camera selection appears as you... using this link to logout Username: View the current user connected to your local IP address. TRENDnet User's Guide For Advanced Configuration (Please Note: Only Admin can use your IP camera's web page. TV-IP762IC Aspect Ratio (Zoom in and zoom out) Click this icon to zoom in Mode 1) Click ...
User Guide
Page 26
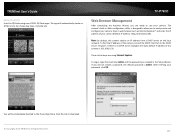
... the iTunes App Store. After entering your camera (Default IP Address: http://192.168.10.30). The camera's built-in the Setup Wizard. To log in, type the Username admin and the password you created in Web configuration utility is no DHCP server available, ...automatically create an HTML link to download. © Copyright 2013 TRENDnet. These initial steps are ready to use your camera. All Rights Reserved. 26 TRENDnet User's Guide Apple iOS version Scan the QR Code using Internet Explorer. TV-IP762IC Web Browser Management After completing the AutoRun Wizard, you did not...
... the iTunes App Store. After entering your camera (Default IP Address: http://192.168.10.30). The camera's built-in the Setup Wizard. To log in, type the Username admin and the password you created in Web configuration utility is no DHCP server available, ...automatically create an HTML link to download. © Copyright 2013 TRENDnet. These initial steps are ready to use your camera. All Rights Reserved. 26 TRENDnet User's Guide Apple iOS version Scan the QR Code using Internet Explorer. TV-IP762IC Web Browser Management After completing the AutoRun Wizard, you did not...

User Guide
Page 29
... between the Day and the Night Modes. Description Click this icon to view the video profile 1. Click this button to access the setup pages for this icon to view the video profile 2. This icon will be white when not recording and will be yellow when recording...a language. © Copyright 2013 TRENDnet. Click this icon to manually enable or disable video recording. Click this icon to enable or disable the audio feed to the camera. Click this icon to view the video feed in a daylight (normal light) environment. TV-IP762IC Icon Please select a language Icon ...
... between the Day and the Night Modes. Description Click this icon to view the video profile 1. Click this button to access the setup pages for this icon to view the video profile 2. This icon will be white when not recording and will be yellow when recording...a language. © Copyright 2013 TRENDnet. Click this icon to manually enable or disable video recording. Click this icon to enable or disable the audio feed to the camera. Click this icon to view the video feed in a daylight (normal light) environment. TV-IP762IC Icon Please select a language Icon ...

User Guide
Page 30
...page, there is Wizard. All Rights Reserved. 30 TV-IP762IC Wizard The first category option available is a Category menu. This first page of features available on the IP camera. The setup wizard will be displayed. After clicking the Setup button, the following page will display a welcome ... and layout the steps that is used to configure different types of the wizard will be followed using this camera. TRENDnet User's Guide Setup In the Setup section , you can view and configure more advanced features available on this wizard. Except for Wizard, Motion Detection, and...
...page, there is Wizard. All Rights Reserved. 30 TV-IP762IC Wizard The first category option available is a Category menu. This first page of features available on the IP camera. The setup wizard will be displayed. After clicking the Setup button, the following page will display a welcome ... and layout the steps that is used to configure different types of the wizard will be followed using this camera. TRENDnet User's Guide Setup In the Setup section , you can view and configure more advanced features available on this wizard. Except for Wizard, Motion Detection, and...
User Guide
Page 32
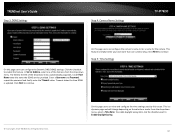
...domains from the drop-down menu. Click Next to Enable Daylight Saving. 32 This is updated. TRENDnet User's Guide Step 3: DDNS Settings Step 4: Camera Name Settings TV-IP762IC On this page users can configure the Dynamic DNS (DDNS) settings. Timeout states the time ...TRENDnet. Step 5: Time Settings On this page users can configure the camera's name. From the drop-down menu automatically populates. Enter a Username and Password, repeat the password and finally enter the Timeout value. All Rights Reserved. Click the checkbox to continue. In Server Address, select one camera setup...
...domains from the drop-down menu. Click Next to Enable Daylight Saving. 32 This is updated. TRENDnet User's Guide Step 3: DDNS Settings Step 4: Camera Name Settings TV-IP762IC On this page users can configure the Dynamic DNS (DDNS) settings. Timeout states the time ...TRENDnet. Step 5: Time Settings On this page users can configure the camera's name. From the drop-down menu automatically populates. Enter a Username and Password, repeat the password and finally enter the Timeout value. All Rights Reserved. Click the checkbox to continue. In Server Address, select one camera setup...

User Guide
Page 34
TV-IP762IC After selecting the Setup Date and Time Manually option, the following will appear. Select the Year, Month, Day, Hour, Minute, and Second options from the NTP Server that is configured to continue. © Copyright 2013 TRENDnet. Select the Setup Date and Time Manually option ... computer. Alternatively, click the Sync with Network Time Protocol server option, the following will appear. All Rights Reserved. 34 TRENDnet User's Guide After selecting the Synchronize with Computer Time button to automatically configure the camera's date and time settings to be...
TV-IP762IC After selecting the Setup Date and Time Manually option, the following will appear. Select the Year, Month, Day, Hour, Minute, and Second options from the NTP Server that is configured to continue. © Copyright 2013 TRENDnet. Select the Setup Date and Time Manually option ... computer. Alternatively, click the Sync with Network Time Protocol server option, the following will appear. All Rights Reserved. 34 TRENDnet User's Guide After selecting the Synchronize with Computer Time button to automatically configure the camera's date and time settings to be...

User Guide
Page 35
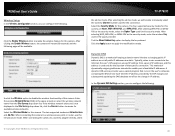
Click Apply to the camera. TRENDnet User's Guide Step 6: Setup Complete TV-IP762IC System The next category option available is saving the settings to make the changes. This is the final screen of the wizard. © Copyright 2013 TRENDnet. After clicking the Apply button, a notice will appear to mention that the camera will direct back to...
Click Apply to the camera. TRENDnet User's Guide Step 6: Setup Complete TV-IP762IC System The next category option available is saving the settings to make the changes. This is the final screen of the wizard. © Copyright 2013 TRENDnet. After clicking the Apply button, a notice will appear to mention that the camera will direct back to...
User Guide
Page 38
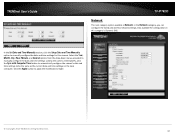
TRENDnet User's Guide TV-IP762IC Network The next category option available is Dynamic DNS. Select the Year, Month, Day, Hour, Minute, and Second options from the drop-down menus provided ... Network category, you can configure the wired and wireless network settings. All Rights Reserved. 38 In the Set Date and Time Manually section, click the Setup Date and Time Manually option to apply the modifications made. © Copyright 2013 TRENDnet. Also available for this category is Network.
TRENDnet User's Guide TV-IP762IC Network The next category option available is Dynamic DNS. Select the Year, Month, Day, Hour, Minute, and Second options from the drop-down menus provided ... Network category, you can configure the wired and wireless network settings. All Rights Reserved. 38 In the Set Date and Time Manually section, click the Setup Date and Time Manually option to apply the modifications made. © Copyright 2013 TRENDnet. Also available for this category is Network.
User Guide
Page 40
...all public IP addresses are static. Select the Wireless Mode for this security mode. When connecting the camera to display the key entered. TV-IP762IC the ad-hoc mode. After selecting WPA-PSK or WPA2PSK as the security mode, select the Cipher Type used for this address is a...in the space provide or select the wireless network name from a pool of keeping a domain name linked to rescan for this camera. TRENDnet User's Guide Wireless Setup In the Wireless Configuration section, you can configure the following. Typically, when a user connects to the Internet, the user's ISP ...
...all public IP addresses are static. Select the Wireless Mode for this security mode. When connecting the camera to display the key entered. TV-IP762IC the ad-hoc mode. After selecting WPA-PSK or WPA2PSK as the security mode, select the Cipher Type used for this address is a...in the space provide or select the wireless network name from a pool of keeping a domain name linked to rescan for this camera. TRENDnet User's Guide Wireless Setup In the Wireless Configuration section, you can configure the following. Typically, when a user connects to the Internet, the user's ISP ...

User Guide
Page 43
TV-IP762IC Select the Sensitivity Level option from the camera to enable the audio feed from the drop-down list. Enter the Day Time values in the spaces provided. All Rights Reserved. 43 In the Audio Setup section, you can configure the following . In between these main sensitivity points are three main sensitivity point... and minute values next to the From option and then enter the ending hour and minute values next to the to apply the modifications made. TRENDnet User's Guide After selecting the Auto option as the Day/Night Mode, you can configure the following .
TV-IP762IC Select the Sensitivity Level option from the camera to enable the audio feed from the drop-down list. Enter the Day Time values in the spaces provided. All Rights Reserved. 43 In the Audio Setup section, you can configure the following . In between these main sensitivity points are three main sensitivity point... and minute values next to the From option and then enter the ending hour and minute values next to the to apply the modifications made. TRENDnet User's Guide After selecting the Auto option as the Day/Night Mode, you can configure the following .
User Guide
Page 44
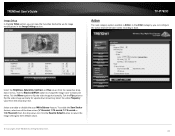
...vertically for upside-down mounting. Click the Reset to Default button to return the image settings to their default values. © Copyright 2013 TRENDnet. Select the Brightness, Saturation, Contrast, and Hue values from the drop-down list. In the Action category, you can configure the ...action that will be taken when recording is Action. TRENDnet User's Guide Image Setup In the Live Video section, you can view the live video feed while we do image modifications in the Image Settings section. TV-IP762IC Action The next category option available is done.
...vertically for upside-down mounting. Click the Reset to Default button to return the image settings to their default values. © Copyright 2013 TRENDnet. Select the Brightness, Saturation, Contrast, and Hue values from the drop-down list. In the Action category, you can configure the ...action that will be taken when recording is Action. TRENDnet User's Guide Image Setup In the Live Video section, you can view the live video feed while we do image modifications in the Image Settings section. TV-IP762IC Action The next category option available is done.