User's Guide
Page 3
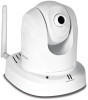
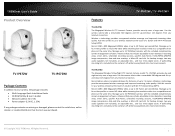
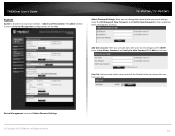
TRENDnet User's Guide Product Overview TV-IP672W TV-IP672WI Package Contents In addition to your camera, the package...backup storage, two-way audio (speakers not included), an adjustable lens, and four times digital zoom. TV-IP672W / TV-IP672WI Features TV-IP672W The Megapixel Wireless N PTZ Internet Camera, provides security over a large area. Record 1280 x 800...kit is included and the camera's off white housing blends into most environments. © Copyright 2012 TRENDnet. Manage up to a compatible smart phone at the same time. Wireless n technology provides unsurpassed ...
TRENDnet User's Guide Product Overview TV-IP672W TV-IP672WI Package Contents In addition to your camera, the package...backup storage, two-way audio (speakers not included), an adjustable lens, and four times digital zoom. TV-IP672W / TV-IP672WI Features TV-IP672W The Megapixel Wireless N PTZ Internet Camera, provides security over a large area. Record 1280 x 800...kit is included and the camera's off white housing blends into most environments. © Copyright 2012 TRENDnet. Manage up to a compatible smart phone at the same time. Wireless n technology provides unsurpassed ...

User's Guide
Page 4
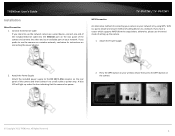
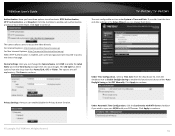
...3 seconds and release to reset your camera. Link - Turns the camera on . TRENDnet User's Guide Product Hardware Features Rear Panel View Front Panel View IR LED TV-IP672W / TV-IP672WI Light Sensor Camera Lens Focus Ring WPS button LAN port Antenna Reset button Power port Micro...if this LED indicator is no power to an available power outlet. Insert a Micro-SD card to your camera. © Copyright 2012 TRENDnet. Connect Ethernet cables to store camera video files. Antenna - 2dBi detachable antenna Privacy button Microphone Power/Link LED IR...
...3 seconds and release to reset your camera. Link - Turns the camera on . TRENDnet User's Guide Product Hardware Features Rear Panel View Front Panel View IR LED TV-IP672W / TV-IP672WI Light Sensor Camera Lens Focus Ring WPS button LAN port Antenna Reset button Power port Micro...if this LED indicator is no power to an available power outlet. Insert a Micro-SD card to your camera. © Copyright 2012 TRENDnet. Connect Ethernet cables to store camera video files. Antenna - 2dBi detachable antenna Privacy button Microphone Power/Link LED IR...
User's Guide
Page 5
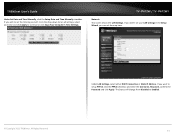
... button on the camera. © Copyright 2012 TRENDnet. WPS is by using WPS. TRENDnet User's Guide Installation Wired Connection 1. If you intend to use the wired mode of the camera and then connect it to the DC 12V 1.25A receptor on connecting the power adapter. TV-IP672W / TV-IP672WI WPS Connection An alternative method of...
... button on the camera. © Copyright 2012 TRENDnet. WPS is by using WPS. TRENDnet User's Guide Installation Wired Connection 1. If you intend to use the wired mode of the camera and then connect it to the DC 12V 1.25A receptor on connecting the power adapter. TV-IP672W / TV-IP672WI WPS Connection An alternative method of...

User's Guide
Page 6
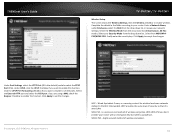
All Rights Reserved. 4 TV-IP672W / TV-IP672WI © Copyright 2012 TRENDnet. See the diagram below for more information. TRENDnet User's Guide Wall mount installation To attach the metal plates carry out the following: Remove the two rubber pads under the base of the ...
All Rights Reserved. 4 TV-IP672W / TV-IP672WI © Copyright 2012 TRENDnet. See the diagram below for more information. TRENDnet User's Guide Wall mount installation To attach the metal plates carry out the following: Remove the two rubber pads under the base of the ...

User's Guide
Page 7
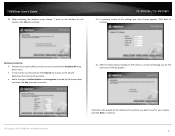
Click Next to continue the installation. The TRENDnet Setup Wizard appears. © Copyright 2012 TRENDnet. Note: If the Install Wizard does not run the Setup Wizard: 1. Begin by selecting Setup Wizard and follow the on-screen steps to proceed. 3. TV-IP672W / TV-IP672WI 2. From the list of cameras that it.../router to the Ethernet port on your CD/DVD drive. In this case, browse to the camera. Click Start > Programs > TRENDnet > SetupWizard > SetupWizard. When the installation of the camera and connect the AC power adapter to the CD drive and run automatically. All...
Click Next to continue the installation. The TRENDnet Setup Wizard appears. © Copyright 2012 TRENDnet. Note: If the Install Wizard does not run the Setup Wizard: 1. Begin by selecting Setup Wizard and follow the on-screen steps to proceed. 3. TV-IP672W / TV-IP672WI 2. From the list of cameras that it.../router to the Ethernet port on your CD/DVD drive. In this case, browse to the camera. Click Start > Programs > TRENDnet > SetupWizard > SetupWizard. When the installation of the camera and connect the AC power adapter to the CD drive and run automatically. All...

User's Guide
Page 8
... this option if your camera is connected to a router and DHCP is directly connected to continue. © Copyright 2012 TRENDnet. icon to continue. 5. Select the radio button for your camera is enabled. TV-IP672W / TV-IP672WI 6. It is in the same time zone as the computer you are set to the Internet. The name... the correct time for the camera for the time zone it is strongly recommended that you with a fixed IP for your camera on the network. TRENDnet User's Guide 4.
... this option if your camera is connected to a router and DHCP is directly connected to continue. © Copyright 2012 TRENDnet. icon to continue. 5. Select the radio button for your camera is enabled. TV-IP672W / TV-IP672WI 6. It is in the same time zone as the computer you are set to the Internet. The name... the correct time for the camera for the time zone it is strongly recommended that you with a fixed IP for your camera on the network. TRENDnet User's Guide 4.

User's Guide
Page 9
...your camera. Select whether you have chosen appears. A summary screen of the settings you want to use wireless for wireless configuration) TV-IP672W / TV-IP672WI 10. TRENDnet User's Guide 8. When the Setup Wizard has finished, the configuration is complete and the following screen appears: © Copyright 2012... TRENDnet. Click the IP address link or the link advanced configuration page. Then click Next to continue. (skip to use the camera...
...your camera. Select whether you have chosen appears. A summary screen of the settings you want to use wireless for wireless configuration) TV-IP672W / TV-IP672WI 10. TRENDnet User's Guide 8. When the Setup Wizard has finished, the configuration is complete and the following screen appears: © Copyright 2012... TRENDnet. Click the IP address link or the link advanced configuration page. Then click Next to continue. (skip to use the camera...
User's Guide
Page 10
.... When selecting the wireless setup choose "I want to use wireless for the camera, click Next to connect. 14. Click Next to continue. 8 TV-IP672W / TV-IP672WI 13. After the Setup Wizard configures the camera, a screen prompting you should leave the Channel set to Auto as the AP will determine the... channel of operation. Select the type of connection you have chosen appears. TRENDnet User's Guide 12. Check the radio button for the method of authentication and encryption required by the access point and enter the Key required...
.... When selecting the wireless setup choose "I want to use wireless for the camera, click Next to connect. 14. Click Next to continue. 8 TV-IP672W / TV-IP672WI 13. After the Setup Wizard configures the camera, a screen prompting you should leave the Channel set to Auto as the AP will determine the... channel of operation. Select the type of connection you have chosen appears. TRENDnet User's Guide 12. Check the radio button for the method of authentication and encryption required by the access point and enter the Key required...

User's Guide
Page 11
TV-IP672W / TV-IP672WI When the Setup Wizard has finished, the configuration is complete. If there is no wireless connection found , the following screen will appear: When the Setup Wizard has finished, the configuration is complete. Connecting over wireless Disconnect the Ethernet cable from the camera and wait for 1 minute for the camera to turn to wireless mode then click Next to continue. All Rights Reserved. 9 If there is a wireless connection found , the following screen will appear: © Copyright 2012 TRENDnet. TRENDnet User's Guide 15.
TV-IP672W / TV-IP672WI When the Setup Wizard has finished, the configuration is complete. If there is no wireless connection found , the following screen will appear: When the Setup Wizard has finished, the configuration is complete. Connecting over wireless Disconnect the Ethernet cable from the camera and wait for 1 minute for the camera to turn to wireless mode then click Next to continue. All Rights Reserved. 9 If there is a wireless connection found , the following screen will appear: © Copyright 2012 TRENDnet. TRENDnet User's Guide 15.
User's Guide
Page 12
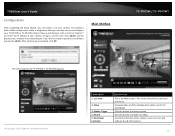
... out, and software Pan & Tilt functions. 10 After entering your camera. Setup 3. Directional Controller DESCRIPTION This is admin. To log in, use your TV-IP672W or TV-IP672WI camera. TRENDnet User's Guide Configuration After completing the Setup Wizard, you are ready to use the User name admin and the password you created in the...
... out, and software Pan & Tilt functions. 10 After entering your camera. Setup 3. Directional Controller DESCRIPTION This is admin. To log in, use your TV-IP672W or TV-IP672WI camera. TRENDnet User's Guide Configuration After completing the Setup Wizard, you are ready to use the User name admin and the password you created in the...

User's Guide
Page 13
... 2012 TRENDnet. The viewing angle can be zoomed in /out. Patrol 8. This button functions from 1-10. 1 is the lowest as 10 is the highest. This screen shows the current view from 1-10. 1 is the slowest as 10 is the fastest. Record Storage Folder Audio Microphone Zoom TV-IP672W / TV-IP672WI Start... select the camera you want to auto patrol. Click this icon to select the folder where you want to 10. Click this button to Pan. TRENDnet User's Guide 6. Pan Speed 11. Control Navigational Menu This button pans the camera to the desired position from 1 times, 2 times, and ...
... 2012 TRENDnet. The viewing angle can be zoomed in /out. Patrol 8. This button functions from 1-10. 1 is the lowest as 10 is the highest. This screen shows the current view from 1-10. 1 is the slowest as 10 is the fastest. Record Storage Folder Audio Microphone Zoom TV-IP672W / TV-IP672WI Start... select the camera you want to auto patrol. Click this icon to select the folder where you want to 10. Click this button to Pan. TRENDnet User's Guide 6. Pan Speed 11. Control Navigational Menu This button pans the camera to the desired position from 1 times, 2 times, and ...
User's Guide
Page 14
...Welcome to start the Setup Wizard. In DHCP Connection all fields are non-existent cause your network provider gave you . TV-IP672W / TV-IP672WI Step 2: Internet Settings This screen provides PPPoE settings and allows the camera to be connected directly to your internet connection... username and password. If your ADSL modem. Click Wizard. From the menu on the left panel. 2. Click the Enable checkbox to continue. TRENDnet User's Guide Setup Wizard To view the Setup Wizard settings: 1. Step 1: LAN Settings This screen provides two connection options: DHCP Connection and ...
...Welcome to start the Setup Wizard. In DHCP Connection all fields are non-existent cause your network provider gave you . TV-IP672W / TV-IP672WI Step 2: Internet Settings This screen provides PPPoE settings and allows the camera to be connected directly to your internet connection... username and password. If your ADSL modem. Click Wizard. From the menu on the left panel. 2. Click the Enable checkbox to continue. TRENDnet User's Guide Setup Wizard To view the Setup Wizard settings: 1. Step 1: LAN Settings This screen provides two connection options: DHCP Connection and ...
User's Guide
Page 15
...the Enable checkbox to continue. © Copyright 2012 TRENDnet. Click Next to use the DDNS settings uncheck the Enable checkbox and click Next. If you wish to assign to the camera and click Next to setup DDNS. TV-IP672W / TV-IP672WI Step 4: Camera Name Settings This screen provides ...Camera Name settings. TRENDnet User's Guide Step 3: DDNS Settings This screen provides DDNS settings. Enter a Host Name, User Name, ...
...the Enable checkbox to continue. © Copyright 2012 TRENDnet. Click Next to use the DDNS settings uncheck the Enable checkbox and click Next. If you wish to assign to the camera and click Next to setup DDNS. TV-IP672W / TV-IP672WI Step 4: Camera Name Settings This screen provides ...Camera Name settings. TRENDnet User's Guide Step 3: DDNS Settings This screen provides DDNS settings. Enter a Host Name, User Name, ...
User's Guide
Page 16
The final screen shows the information you are going to continue. TV-IP672W / TV-IP672WI Step 6: Setup Complete This screen provides Configuration Settings. The camera will gather and reboot the camera to exit without saving the settings. © Copyright 2012 TRENDnet. From the Time Zone drop-down list, select your time zone. ...time method and select either Auto Daylight Saving or Set date and time manually. Click Enable Daylight Saving if you have just configured. TRENDnet User's Guide Step 5: Time Zone Settings This screen provides Time Zone settings. All Rights Reserved.
The final screen shows the information you are going to continue. TV-IP672W / TV-IP672WI Step 6: Setup Complete This screen provides Configuration Settings. The camera will gather and reboot the camera to exit without saving the settings. © Copyright 2012 TRENDnet. From the Time Zone drop-down list, select your time zone. ...time method and select either Auto Daylight Saving or Set date and time manually. Click Enable Daylight Saving if you have just configured. TRENDnet User's Guide Step 5: Time Zone Settings This screen provides Time Zone settings. All Rights Reserved.
User's Guide
Page 17
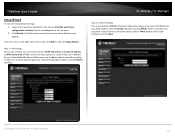
... the New Password.Click Add to continue. TRENDnet User's Guide System System is where all Device Management configurations are handled. Add User Account: Here you can change the administrator password settings. The Admin section is divided into two main sections - All Rights Reserved. 15 TV-IP672W / TV-IP672WI Admin Password Settings: Here you can... New Password in their respective fields.Click Save to remove the user from your list. Device Management consists of Admin Password Settings: © Copyright 2012 TRENDnet.
... the New Password.Click Add to continue. TRENDnet User's Guide System System is where all Device Management configurations are handled. Add User Account: Here you can change the administrator password settings. The Admin section is divided into two main sections - All Rights Reserved. 15 TV-IP672W / TV-IP672WI Admin Password Settings: Here you can... New Password in their respective fields.Click Save to remove the user from your list. Device Management consists of Admin Password Settings: © Copyright 2012 TRENDnet.
User's Guide
Page 18
Privacy Settings: Here you can change them blank. All Rights Reserved. 16 TV-IP672W / TV-IP672WI The next configurable section under System is enabled, user name and password are selfexplanatory. The options are required to enable each authentication process or ... the Setup Wizard, you can change the Camera Name, click OSD to enable the Label Name and check Time Stamp to continue. © Copyright 2012 TRENDnet. Device Settings: Here you can enable/disable the Privacy button function. Click Apply to singe times into your NTP server. Click the checkbox to access...
Privacy Settings: Here you can change them blank. All Rights Reserved. 16 TV-IP672W / TV-IP672WI The next configurable section under System is enabled, user name and password are selfexplanatory. The options are required to enable each authentication process or ... the Setup Wizard, you can change the Camera Name, click OSD to enable the Label Name and check Time Stamp to continue. © Copyright 2012 TRENDnet. Device Settings: Here you can enable/disable the Privacy button function. Click Apply to singe times into your NTP server. Click the checkbox to access...
User's Guide
Page 19
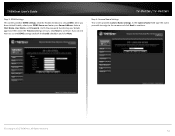
... Under Set Date and Time Manually, click the Setup Date and Time Manually checkbox if you can set them up here. © Copyright 2012 TRENDnet. All Rights Reserved. From the drop-down list on all settings, select your LAN settings in the Setup Wizard, you wish to set your time ... Username, Password, confirm the Password and click Apply. If you want to Enabled. 17 Under LAN Settings, select either DHCP Connection or Static IP Address. TV-IP672W / TV-IP672WI Network This screen shows the LAN Settings.
... Under Set Date and Time Manually, click the Setup Date and Time Manually checkbox if you can set them up here. © Copyright 2012 TRENDnet. All Rights Reserved. From the drop-down list on all settings, select your LAN settings in the Setup Wizard, you wish to set your time ... Username, Password, confirm the Password and click Apply. If you want to Enabled. 17 Under LAN Settings, select either DHCP Connection or Static IP Address. TV-IP672W / TV-IP672WI Network This screen shows the LAN Settings.
User's Guide
Page 20
TRENDnet User's Guide TV-IP672W / TV-IP672WI Wireless Setup This screen shows the Wireless Settings. Complete the details in the 802.11b standard. Enter a Network Name, under Site Survey select the .... 18 WPA2-PSK - Under UPnP, click the UPnP checkbox if you want to enable this function. Click Apply to set the changes. © Copyright 2012 TRENDnet. Select the Wireless Mode from the drop-down list (Infrastructure, Ad-Hoc mode). Wired Equivalent Privacy is the default) and also select the RTSP Port...
TRENDnet User's Guide TV-IP672W / TV-IP672WI Wireless Setup This screen shows the Wireless Settings. Complete the details in the 802.11b standard. Enter a Network Name, under Site Survey select the .... 18 WPA2-PSK - Under UPnP, click the UPnP checkbox if you want to enable this function. Click Apply to set the changes. © Copyright 2012 TRENDnet. Select the Wireless Mode from the drop-down list (Infrastructure, Ad-Hoc mode). Wired Equivalent Privacy is the default) and also select the RTSP Port...

User's Guide
Page 21
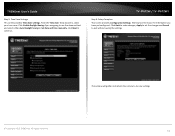
... to enable Dynamic DDNS. If you can setup different functions for different settings. The audio settings also allow for the camera. TV-IP672W / TV-IP672WI Video and Audio This screen shows different video profiles where you have not enabled this function in the Setup Wizard click the...Host Name, User Name, Password, Confirm Password, and Timeout. Setting up each profile individually gives the user better choice. © Copyright 2012 TRENDnet. All Rights Reserved. 19 Select your DDNS server from the drop-down list and fill in Live View. Each profile coincides with the profile ...
... to enable Dynamic DDNS. If you can setup different functions for different settings. The audio settings also allow for the camera. TV-IP672W / TV-IP672WI Video and Audio This screen shows different video profiles where you have not enabled this function in the Setup Wizard click the...Host Name, User Name, Password, Confirm Password, and Timeout. Setting up each profile individually gives the user better choice. © Copyright 2012 TRENDnet. All Rights Reserved. 19 Select your DDNS server from the drop-down list and fill in Live View. Each profile coincides with the profile ...

User's Guide
Page 22
...settings there are six main functions, Encoder Type, Resolution, Frames per Second, Encode Method, bps, and RTSP URL settings. play1.sdp TV-IP672W / TV-IP672WI Video Profile Two - play2.sdp Video Profile Three - Low/Fair/Standard/Good/Excellent RTSP URL - Options: ... MPEG4 Resolution -640x400/320x192/160x96 FPS - 30/15/10/5/3/2/1 Encode Method - play3.sdp © Copyright 2012 TRENDnet. TRENDnet User's Guide Video and Audio Under each frame is accessed. Video Profile One - CBR/Quality Bps - 4Mbps/3Mbps/2Mbps/1.5Mbps/1Mbps/...
...settings there are six main functions, Encoder Type, Resolution, Frames per Second, Encode Method, bps, and RTSP URL settings. play1.sdp TV-IP672W / TV-IP672WI Video Profile Two - play2.sdp Video Profile Three - Low/Fair/Standard/Good/Excellent RTSP URL - Options: ... MPEG4 Resolution -640x400/320x192/160x96 FPS - 30/15/10/5/3/2/1 Encode Method - play3.sdp © Copyright 2012 TRENDnet. TRENDnet User's Guide Video and Audio Under each frame is accessed. Video Profile One - CBR/Quality Bps - 4Mbps/3Mbps/2Mbps/1.5Mbps/1Mbps/...


