User's Guide
Page 2
......13 SetupWizard ...13 USING THE CAMERA WEB MANAGER 29 Accessing the Camera Video Display 29 Login ...30 Web Configuration Utility...30 Administration ...31 Status ...32 System Status ...32 Video Status...33 Wireless Status (for TV-IP600W only 34 Network Status...35 Active Users ...36 ...Configuration ...37 System Configuration...37 Video Settings ...39 Wireless Setup (for TV-IP600W only 41 Network Settings ...46 User ...48 Date/Time...50 Upload ...51 E-mail ...55 Tools...59 FTP Server Test...59 ...
......13 SetupWizard ...13 USING THE CAMERA WEB MANAGER 29 Accessing the Camera Video Display 29 Login ...30 Web Configuration Utility...30 Administration ...31 Status ...32 System Status ...32 Video Status...33 Wireless Status (for TV-IP600W only 34 Network Status...35 Active Users ...36 ...Configuration ...37 System Configuration...37 Video Settings ...39 Wireless Setup (for TV-IP600W only 41 Network Settings ...46 User ...48 Date/Time...50 Upload ...51 E-mail ...55 Tools...59 FTP Server Test...59 ...

User's Guide
Page 3
...Zone Table...98 E. Troubleshooting...93 D. Adjusting Internet Camera Focus 101 G. Reset ...60 Factory Reset...60 Firmware Upgrade ...61 Backup ...62 Help ...63 About ...63 Viewing Video...64 Uploading/E-mailing Video ...65 Controlling the Camera ...66 Adjusting the Viewing Angle...66 Storing ...Positions ...67 Swinging the Camera...67 IPVIEW PRO 2.0 ...68 IPView Pro 2.0 User Interface 71 Camera configuration with IPView Pro 2.0 74 Schedule Recording with IPView...
...Zone Table...98 E. Troubleshooting...93 D. Adjusting Internet Camera Focus 101 G. Reset ...60 Factory Reset...60 Firmware Upgrade ...61 Backup ...62 Help ...63 About ...63 Viewing Video...64 Uploading/E-mailing Video ...65 Controlling the Camera ...66 Adjusting the Viewing Angle...66 Storing ...Positions ...67 Swinging the Camera...67 IPVIEW PRO 2.0 ...68 IPView Pro 2.0 User Interface 71 Camera configuration with IPView Pro 2.0 74 Schedule Recording with IPView...
User's Guide
Page 4
... use the IPCamPlayer application to install the TV-IP600/W Wireless Network camera and use the software. • Chapter 8, Playing Video Files on your network administrator or MIS staff for the Camera. • Chapter 3, Security, explains the security features of the Camera. • Chapter 4, Application of the Camera, provides an illustration of the Camera's applications. • Chapter 5, Using the Utility...
... use the IPCamPlayer application to install the TV-IP600/W Wireless Network camera and use the software. • Chapter 8, Playing Video Files on your network administrator or MIS staff for the Camera. • Chapter 3, Security, explains the security features of the Camera. • Chapter 4, Application of the Camera, provides an illustration of the Camera's applications. • Chapter 5, Using the Utility...
User's Guide
Page 5
... installation procedures and Web-based interface allows you to monitor many other Internet related protocols. You can also be connected directly to adjust the Camera for purchasing the TV-IP600/TV-IP600W Pan/Tilt (Wireless) Internet Camera, a standalone system that can configure and manage the camera directly from your network. Moreover, it and you need is an ideal solution for monitoring. Up...
... installation procedures and Web-based interface allows you to monitor many other Internet related protocols. You can also be connected directly to adjust the Camera for purchasing the TV-IP600/TV-IP600W Pan/Tilt (Wireless) Internet Camera, a standalone system that can configure and manage the camera directly from your network. Moreover, it and you need is an ideal solution for monitoring. Up...
User's Guide
Page 6
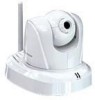
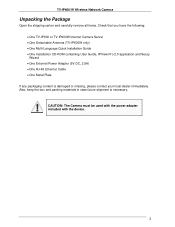
... be used with the power adapter included with the device. 3 TV-IP600/W Wireless Network Camera Unpacking the Package Open the shipping carton and carefully remove all items. Check that you have the following: • One TV-IP600 or TV-IP600W Internet Camera Server • One Detachable Antenna (TV-IP600W only) • One Multi-Language Quick Installation Guide • One Installation CD-ROM...
... be used with the power adapter included with the device. 3 TV-IP600/W Wireless Network Camera Unpacking the Package Open the shipping carton and carefully remove all items. Check that you have the following: • One TV-IP600 or TV-IP600W Internet Camera Server • One Detachable Antenna (TV-IP600W only) • One Multi-Language Quick Installation Guide • One Installation CD-ROM...

User's Guide
Page 7
TV-IP600/W Wireless Network Camera System Requirements Networking • Local Area Network: 10Base-T Ethernet or 100Base-TX Fast Ethernet • Wireless Local Area Network: IEEE 802.11b/g Wireless LAN (TV-IP600W only) Computer • CPU: 1.3GHz or above • Memory: 128 MB or above • VGA Resolution: 1024 x 768 or above (Independent Display Card recommended) • Network Card o For cabled connections: 10BASE-T Ethernet...
TV-IP600/W Wireless Network Camera System Requirements Networking • Local Area Network: 10Base-T Ethernet or 100Base-TX Fast Ethernet • Wireless Local Area Network: IEEE 802.11b/g Wireless LAN (TV-IP600W only) Computer • CPU: 1.3GHz or above • Memory: 128 MB or above • VGA Resolution: 1024 x 768 or above (Independent Display Card recommended) • Network Card o For cabled connections: 10BASE-T Ethernet...

User's Guide
Page 8
...for IP settings by default. Default configuration settings Username This is the IP address you will enter into the Address field of the camera.) Subnet Mask The default subnet mask is configured to belong to enter when you will be prompted to the 192.168.10.X subnet... If a DHCP server is not detected, the default IP address is 192.168.10.30. (Make sure your Web browser to enter when you will be prompted to access the camera monitor screen and configuration menus using a Web browser. The default Username is admin. TV-IP600/W Wireless Network Camera Default Settings Use the...
...for IP settings by default. Default configuration settings Username This is the IP address you will enter into the Address field of the camera.) Subnet Mask The default subnet mask is configured to belong to enter when you will be prompted to the 192.168.10.X subnet... If a DHCP server is not detected, the default IP address is 192.168.10.30. (Make sure your Web browser to enter when you will be prompted to access the camera monitor screen and configuration menus using a Web browser. The default Username is admin. TV-IP600/W Wireless Network Camera Default Settings Use the...

User's Guide
Page 9
It remains dark when powered off. 6 This LED indicator lights blue when the camera is established. TV-IP600/W Wireless Network Camera Camera Hardware Components This section provides information about the Camera's hardware components: Front Panel Components Adjustable focus camera lens Link LED indicator Power LED indicator LED Indicators Front panel of TV-IP600/W LNK PWR This LED indicator lights steady orange when a valid Ethernet link is powered on. It blinks orange when traffic is received or transmitted through the Ethernet link.
It remains dark when powered off. 6 This LED indicator lights blue when the camera is established. TV-IP600/W Wireless Network Camera Camera Hardware Components This section provides information about the Camera's hardware components: Front Panel Components Adjustable focus camera lens Link LED indicator Power LED indicator LED Indicators Front panel of TV-IP600/W LNK PWR This LED indicator lights steady orange when a valid Ethernet link is powered on. It blinks orange when traffic is received or transmitted through the Ethernet link.
User's Guide
Page 10
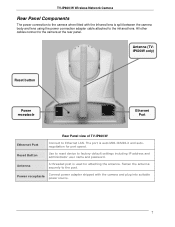
All other cables connect to factory default settings including IP address and administrator user name and password. TV-IP600/W Wireless Network Camera Rear Panel Components The power connection to the camera when fitted with the camera and plug into suitable power source. 7 Power receptacle Connect power adapter shipped with the Infrared lens is auto MDI-II/MDI...
All other cables connect to factory default settings including IP address and administrator user name and password. TV-IP600/W Wireless Network Camera Rear Panel Components The power connection to the camera when fitted with the camera and plug into suitable power source. 7 Power receptacle Connect power adapter shipped with the Infrared lens is auto MDI-II/MDI...

User's Guide
Page 11
TV-IP600/W Wireless Network Camera 2 Installing the Camera The camera is intended for more information. 1. Remove the two rubber pads under the base of the Camera. 3. See the diagram below for indoor use. Install the Camera using the two ceiling screws (n); Make sure the power adapter and its cord and the Ethernet ...Slide the metal plate onto the base of the Camera, making sure that the two holes on the base of the Camera. 2. Install the Camera to the base of the Camera with the two screw holes on the base of the Camera align with the two screws provided. 4. Secure ...
TV-IP600/W Wireless Network Camera 2 Installing the Camera The camera is intended for more information. 1. Remove the two rubber pads under the base of the Camera. 3. See the diagram below for indoor use. Install the Camera using the two ceiling screws (n); Make sure the power adapter and its cord and the Ethernet ...Slide the metal plate onto the base of the Camera, making sure that the two holes on the base of the Camera. 2. Install the Camera to the base of the Camera with the two screw holes on the base of the Camera align with the two screws provided. 4. Secure ...

User's Guide
Page 12
... any electrical device, make sure the power source and camera are located in an area where it to the electrical outlet. TV-IP600/W Wireless Network Camera Connect Ethernet Cable To connect the camera to your network, connect a Category 5 or better Ethernet cable to the network cable connector located on the camera's left side panel, and then attach it to...
... any electrical device, make sure the power source and camera are located in an area where it to the electrical outlet. TV-IP600/W Wireless Network Camera Connect Ethernet Cable To connect the camera to your network, connect a Category 5 or better Ethernet cable to the network cable connector located on the camera's left side panel, and then attach it to...
User's Guide
Page 13
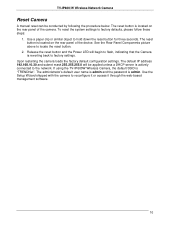
... button for three seconds. If using the TV-IP600W Wireless Camera, the default SSID is admin. Use a paper clip or similar object to locate the reset button. 2. Upon restarting the camera loads the factory default configuration settings. The administrator's default user name is admin and the password is "TRENDNet". The reset button is located on the...
... button for three seconds. If using the TV-IP600W Wireless Camera, the default SSID is admin. Use a paper clip or similar object to locate the reset button. 2. Upon restarting the camera loads the factory default configuration settings. The administrator's default user name is admin and the password is "TRENDNet". The reset button is located on the...

User's Guide
Page 14
The Administrator account can create up to the System Administration configuration settings. TV-IP600/W Wireless Network Camera 3 Security To ensure the highest level of security and prevent unauthorized usage of the Camera, the Administrator account has exclusive access to 64 users and configure different privilege levels for each user. The Camera supports multi-level password protection and access to the Camera is strictly restricted to User's that have been created in the User Configuration menu. 11
The Administrator account can create up to the System Administration configuration settings. TV-IP600/W Wireless Network Camera 3 Security To ensure the highest level of security and prevent unauthorized usage of the Camera, the Administrator account has exclusive access to 64 users and configure different privilege levels for each user. The Camera supports multi-level password protection and access to the Camera is strictly restricted to User's that have been created in the User Configuration menu. 11

User's Guide
Page 15
... information that may assist you with single frame images. TV-IP600/W Wireless Network Camera 4 Application The TV-IP600 / TV-IP600W camera can be applied in a wide range of applications, ...including: • Monitoring of different applications using a web browser. • Using the IPView Pro application to capture singles frame images. • Configuring the Camera to upload images to an FTP Server or sending e-mail messages with installing and configuring the Camera...
... information that may assist you with single frame images. TV-IP600/W Wireless Network Camera 4 Application The TV-IP600 / TV-IP600W camera can be applied in a wide range of applications, ...including: • Monitoring of different applications using a web browser. • Using the IPView Pro application to capture singles frame images. • Configuring the Camera to upload images to an FTP Server or sending e-mail messages with installing and configuring the Camera...

User's Guide
Page 16
Installing the SetupWizard 1. SetupWizard This section describes how to install the SetupWizard and how to use the SetupWizard to set up your Camera quickly and easily. TV-IP600/W Wireless Network Camera 5 Using the Utility This chapter describes the software utilities for the Auto-Run menu screen. The SetupWizard has a user-friendly interface that allows you to...
Installing the SetupWizard 1. SetupWizard This section describes how to install the SetupWizard and how to use the SetupWizard to set up your Camera quickly and easily. TV-IP600/W Wireless Network Camera 5 Using the Utility This chapter describes the software utilities for the Auto-Run menu screen. The SetupWizard has a user-friendly interface that allows you to...
User's Guide
Page 17
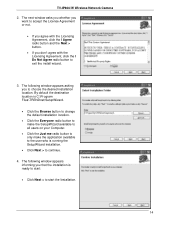
The following window appears asking you to start the Installation. 14 By default the destination location is C:\Program Files\TRENDnet\SetupWizard. • Click the Browse button to change the default installation location. • Click the Everyone radio button to make the SetupWizard available to all ... exit the install wizard. 3. The following window appears informing you don't agree with the Licensing Agreement, click the I Do Not Agree radio button to continue. 4. TV-IP600/W Wireless Network Camera 2.
The following window appears asking you to start the Installation. 14 By default the destination location is C:\Program Files\TRENDnet\SetupWizard. • Click the Browse button to change the default installation location. • Click the Everyone radio button to make the SetupWizard available to all ... exit the install wizard. 3. The following window appears informing you don't agree with the Licensing Agreement, click the I Do Not Agree radio button to continue. 4. TV-IP600/W Wireless Network Camera 2.

User's Guide
Page 18
The software will start to exit the installation After installing the SetupWizard, the application program for the Camera is complete the following window appears, showing the progress of the installation: 6. The following window appears to confirm that the SetupWizard has installed successfully: • Click Close to install. When installation is automatically installed on your computer. 15 TV-IP600/W Wireless Network Camera 5.
The software will start to exit the installation After installing the SetupWizard, the application program for the Camera is complete the following window appears, showing the progress of the installation: 6. The following window appears to confirm that the SetupWizard has installed successfully: • Click Close to install. When installation is automatically installed on your computer. 15 TV-IP600/W Wireless Network Camera 5.
User's Guide
Page 19
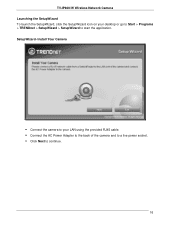
SetupWizard- TV-IP600/W Wireless Network Camera Launching the SetupWizard To launch the SetupWizard, click the SetupWizard icon on your LAN using the provided RJ45 cable. ƒ Connect the AC Power Adapter to the back of the camera and to a live power socket. ƒ Click Next to start the appilcation. Install Your Camera ƒ Connect the camera to your desktop or go to Start > Programs > TRENDnet > SetupWizard > SetupWizard to continue. 16
SetupWizard- TV-IP600/W Wireless Network Camera Launching the SetupWizard To launch the SetupWizard, click the SetupWizard icon on your LAN using the provided RJ45 cable. ƒ Connect the AC Power Adapter to the back of the camera and to a live power socket. ƒ Click Next to start the appilcation. Install Your Camera ƒ Connect the camera to your desktop or go to Start > Programs > TRENDnet > SetupWizard > SetupWizard to continue. 16

User's Guide
Page 20
Select Your Camera The following screen appears showing the cameras that have been found on your network: ƒ Click on the camera you want to configure. ƒ Click Next to continue. 17 TV-IP600/W Wireless Network Camera SetupWizard-
Select Your Camera The following screen appears showing the cameras that have been found on your network: ƒ Click on the camera you want to configure. ƒ Click Next to continue. 17 TV-IP600/W Wireless Network Camera SetupWizard-

User's Guide
Page 21
Authentication On the following screen type in the ID and Password that you will use to configuring the camera settings: ƒ Type a User ID in the ID field. ƒ Type a password for the User in the Password field. ƒ Click Next to continue. 18 TV-IP600/W Wireless Network Camera SetupWizard-
Authentication On the following screen type in the ID and Password that you will use to configuring the camera settings: ƒ Type a User ID in the ID field. ƒ Type a password for the User in the Password field. ƒ Click Next to continue. 18 TV-IP600/W Wireless Network Camera SetupWizard-


