
Datasheet
Page 3
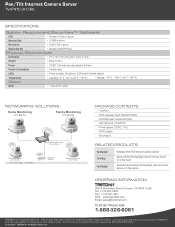
...; GPIO adapter • Mounting kit RELATED PRODUCTS TV-IP410W TV-IP422 TV-IP422W Wireless Pan/Tilt Internet Camera Server Advanced Pan/Tilt Day/Night Internet Camera Server w/ 2-Way Audio Wireless Advanced Pan/Tilt Day/Night Internet Camera Server w/ 2-Way Audio ORDERING INFORMATION 20675 Manhattan Place,Torrance, CA 90501 USA Tel: 1-310-961-5500 Fax: 1-310-961-5511 Web: www.trendnet.com Email: sales@trendnet.com To Order Please Call: 1-888-326...
...; GPIO adapter • Mounting kit RELATED PRODUCTS TV-IP410W TV-IP422 TV-IP422W Wireless Pan/Tilt Internet Camera Server Advanced Pan/Tilt Day/Night Internet Camera Server w/ 2-Way Audio Wireless Advanced Pan/Tilt Day/Night Internet Camera Server w/ 2-Way Audio ORDERING INFORMATION 20675 Manhattan Place,Torrance, CA 90501 USA Tel: 1-310-961-5500 Fax: 1-310-961-5511 Web: www.trendnet.com Email: sales@trendnet.com To Order Please Call: 1-888-326...
User's Guide
Page 2
... any where you start using the Web browser on your network environment instantly. PREFACE The Pan/Tilt Internet Camera Server (TV-IP410) /Wireless Pan/Tilt Internet Camera Server (TV-IP410W) provides real-time security surveillance over a secure or wireless connection. See more with one Internet camera-remotely pan the camera side-toside a remarkable 330 degrees and tilt up easily and work , at work within your PC. You will also know...
... any where you start using the Web browser on your network environment instantly. PREFACE The Pan/Tilt Internet Camera Server (TV-IP410) /Wireless Pan/Tilt Internet Camera Server (TV-IP410W) provides real-time security surveillance over a secure or wireless connection. See more with one Internet camera-remotely pan the camera side-toside a remarkable 330 degrees and tilt up easily and work , at work within your PC. You will also know...

User's Guide
Page 6
CHAPTER 1 INTRODUCTION 1.1 Package Contents The package includes the following: TV-IP410 or TV-IP410W Camera CD-ROM (User's Guide and Utility) Multi-Language Quick Installation Guide External Antenna (for TV-IP422W only) GPIO Connector RJ-45 Cable 12V 1.5A Power Adapter (3.5mm) Wall Mount Kit NOTE: If there is item missing, please contact your local authorized dealer. - 5 -
CHAPTER 1 INTRODUCTION 1.1 Package Contents The package includes the following: TV-IP410 or TV-IP410W Camera CD-ROM (User's Guide and Utility) Multi-Language Quick Installation Guide External Antenna (for TV-IP422W only) GPIO Connector RJ-45 Cable 12V 1.5A Power Adapter (3.5mm) Wall Mount Kit NOTE: If there is item missing, please contact your local authorized dealer. - 5 -
User's Guide
Page 7
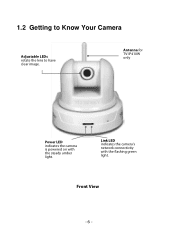
1.2 Getting to Know Your Camera Adjustable LEDs rotate the lens to have clear image. Front View - 6 - Antenna for TV-IP410W only Power LED indicates the camera is powered on with the flashing green light. Link LED indicates the camera's network connectivity with the steady amber light.
1.2 Getting to Know Your Camera Adjustable LEDs rotate the lens to have clear image. Front View - 6 - Antenna for TV-IP410W only Power LED indicates the camera is powered on with the flashing green light. Link LED indicates the camera's network connectivity with the steady amber light.

User's Guide
Page 38
... with the access point's ESS-ID. Network >> Wireless Setting (For TV-IP410W only) The camera supports WLAN while you use the wireless network. Select the Enable option to an - 37 - To connect the camera to a specified access point, set a SSID for the camera to any access point under the infrastructure network mode. Network ID (SSID): Keep the default setting...
... with the access point's ESS-ID. Network >> Wireless Setting (For TV-IP410W only) The camera supports WLAN while you use the wireless network. Select the Enable option to an - 37 - To connect the camera to a specified access point, set a SSID for the camera to any access point under the infrastructure network mode. Network ID (SSID): Keep the default setting...
User's Guide
Page 100
... warranty continues from the date of purchase. TV-IP410/TV-IP410W- 3 Years Warranty AC/DC Power Adapter, Cooling Fan, and Power Supply carry 1 year warranty. Replacement products may be responsible for any software, firmware, information, or memory data of TRENDnet. There are replaced become the property of ...customer contained in material and workmanship, under normal use and service, for their return policies. Limited Warranty TRENDnet warrants its expense, to repair or replace the defective product or part and deliver an equivalent product or part to the ...
... warranty continues from the date of purchase. TV-IP410/TV-IP410W- 3 Years Warranty AC/DC Power Adapter, Cooling Fan, and Power Supply carry 1 year warranty. Replacement products may be responsible for any software, firmware, information, or memory data of TRENDnet. There are replaced become the property of ...customer contained in material and workmanship, under normal use and service, for their return policies. Limited Warranty TRENDnet warrants its expense, to repair or replace the defective product or part and deliver an equivalent product or part to the ...
Quick Installation Guide
Page 3
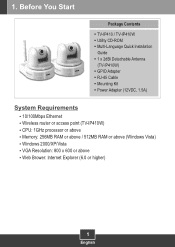
Utility CD-ROM ? GPIO Adapter ? Wireless router or access point (TV-IP410W) ? Windows 2000/XP/Vista ? Mounting Kit ? Memory: 256MB RAM or above / 512MB RAM or above ? Web Brower: Internet Explorer (6.0 or higher) 1 English Before You Start Package Contents ? CPU: 1GHz processor or above (Windows Vista) ? Multi-Language Quick Installation Guide ? 1 x 2dBi Detachable Antenna (TV-IP410W) ? Power Adapter (12VDC, 1.5A) System Requirements ? 10/100Mbps Ethernet ? VGA Resolution: 800 x 600 or above ? 1. TV-IP410 / TV-IP410W ? RJ-45 Cable ?
Utility CD-ROM ? GPIO Adapter ? Wireless router or access point (TV-IP410W) ? Windows 2000/XP/Vista ? Mounting Kit ? Memory: 256MB RAM or above / 512MB RAM or above ? Web Brower: Internet Explorer (6.0 or higher) 1 English Before You Start Package Contents ? CPU: 1GHz processor or above (Windows Vista) ? Multi-Language Quick Installation Guide ? 1 x 2dBi Detachable Antenna (TV-IP410W) ? Power Adapter (12VDC, 1.5A) System Requirements ? 10/100Mbps Ethernet ? VGA Resolution: 800 x 600 or above ? 1. TV-IP410 / TV-IP410W ? RJ-45 Cable ?
Quick Installation Guide
Page 5
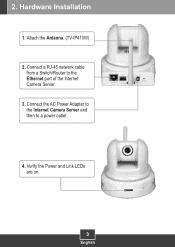
Hardware Installation 1. Connect a RJ-45 network cable from a Switch/Router to a power outlet. 4. Connect the AC Power Adapter to the Internet Camera Server and then to the Ethernet port of the Internet Camera Server. 3. Verify the Power and Link LEDs are on. 3 English 2. Attach the Antenna. (TV-IP410W) 2.
Hardware Installation 1. Connect a RJ-45 network cable from a Switch/Router to a power outlet. 4. Connect the AC Power Adapter to the Internet Camera Server and then to the Ethernet port of the Internet Camera Server. 3. Verify the Power and Link LEDs are on. 3 English 2. Attach the Antenna. (TV-IP410W) 2.
Quick Installation Guide
Page 7
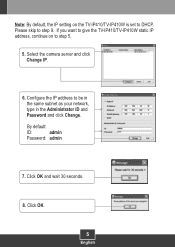
Note: By default, the IP setting on to be in the same subnet as your network, type in the Administrator ID and Password and click Change. Select the camera server and click Change IP. 6. Click OK and wait 30 seconds. 8. By default: ID: admin Password: admin 7. Click OK. 5 English Please skip to DHCP. If you want to give the TV-IP410/TV-IP410W static IP address, continue on the TV-IP410/TV-IP410W is set to step 9. Configure the IP address to step 5. 5.
Note: By default, the IP setting on to be in the same subnet as your network, type in the Administrator ID and Password and click Change. Select the camera server and click Change IP. 6. Click OK and wait 30 seconds. 8. By default: ID: admin Password: admin 7. Click OK. 5 English Please skip to DHCP. If you want to give the TV-IP410/TV-IP410W static IP address, continue on the TV-IP410/TV-IP410W is set to step 9. Configure the IP address to step 5. 5.
Quick Installation Guide
Page 8
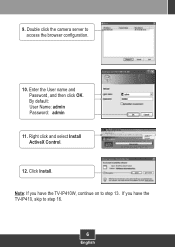
Double click the camera server to step 16. 6 English Right click and select Install ActiveX Control. 12. Click Install. Enter the User name and Password, and then click OK. By default: User Name: admin Password: admin 11. If you have the TV-IP410, skip to access the browser configuration. 10. 9. Note: If you have the TV-IP410W, continue on to step 13.
Double click the camera server to step 16. 6 English Right click and select Install ActiveX Control. 12. Click Install. Enter the User name and Password, and then click OK. By default: User Name: admin Password: admin 11. If you have the TV-IP410, skip to access the browser configuration. 10. 9. Note: If you have the TV-IP410W, continue on to step 13.

Quick Installation Guide
Page 9
... Site Survey. Disconnect the RJ-45 cable and unplug the power. Then plug the power back in (TV-IP410W). Select your network administrator for more information) (TV-IP410W only). 15. If encryption is enabled, select the proper Authentication type, enter the Pre-Shared Key and then click...(Example shows WPA2-PSK. If your wireless network does not support WPA, select open or shared instead. Note: The TV-IP410W will not work wirelessly until you disconnect the Ethernet cable from the back of the camera. 7 English 13. Click Setup, Network and then click Wireless. (TV-IP410W only). 14.
... Site Survey. Disconnect the RJ-45 cable and unplug the power. Then plug the power back in (TV-IP410W). Select your network administrator for more information) (TV-IP410W only). 15. If encryption is enabled, select the proper Authentication type, enter the Pre-Shared Key and then click...(Example shows WPA2-PSK. If your wireless network does not support WPA, select open or shared instead. Note: The TV-IP410W will not work wirelessly until you disconnect the Ethernet cable from the back of the camera. 7 English 13. Click Setup, Network and then click Wireless. (TV-IP410W only). 14.
Quick Installation Guide
Page 10
Click Live View. Note: For detailed information regarding the TV-IP410/TV-IP410W configuration and advanced settings, please refer to register your product Online at http://www.trendnet.com. 16. Verify the Power and Link LEDs are on the Utility CD-ROM, or TRENDnet's website at : www.trendnet.com/register Thank you for choosing TRENDnet 8 English Your installation is now complete. Register Your Product To ensure the highest level of customer service and support, please take a moment to the Troubleshooting section, User's Guide on . 17.
Click Live View. Note: For detailed information regarding the TV-IP410/TV-IP410W configuration and advanced settings, please refer to register your product Online at http://www.trendnet.com. 16. Verify the Power and Link LEDs are on the Utility CD-ROM, or TRENDnet's website at : www.trendnet.com/register Thank you for choosing TRENDnet 8 English Your installation is now complete. Register Your Product To ensure the highest level of customer service and support, please take a moment to the Troubleshooting section, User's Guide on . 17.
Quick Installation Guide
Page 11
Second, disable any questions regarding the TV-IP410/TV-IP410W, please contact TRENDnet's Technical Support Department. 9 Q2: I am unable to configure the TV-IP410/W. A4: First, make sure that you are using a browser that you configure the camera to have followed all the steps in the wireless ...TV-IP410/TV-IP410W is checked. Second, make sure to disconnect the Ethernet cable from the camera and verify that the Enable option is 192.168.10.30, do not have any software firewall programs such as ZoneAlarm or Norton Internet Security. Third, click on your computer's network...
Second, disable any questions regarding the TV-IP410/TV-IP410W, please contact TRENDnet's Technical Support Department. 9 Q2: I am unable to configure the TV-IP410/W. A4: First, make sure that you are using a browser that you configure the camera to have followed all the steps in the wireless ...TV-IP410/TV-IP410W is checked. Second, make sure to disconnect the Ethernet cable from the camera and verify that the Enable option is 192.168.10.30, do not have any software firewall programs such as ZoneAlarm or Norton Internet Security. Third, click on your computer's network...