Data Sheet
Page 3
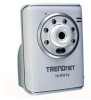
...ºC (32ºF ~ 113ºF); Way Wireless Audio Internet Camera Server 2- Way Audio Day/Night Internet Camera Server TV-IP312 (A1.0R) SPECIFICATIONS Physical/Environmental • xxxxxxxxxxxxxxxxxxxxxxxxxxxxxxxx Dimension • 70 x 100 x 57mm (2.67 x 3.94 x 2.95 in this document pertain to TRENDnet products and is a registered trademark. Way Audio Internet Camera Server 2- Information provided in .) Weight • Camera: 140g (4.94oz.); Other Brands and product names are...
...ºC (32ºF ~ 113ºF); Way Wireless Audio Internet Camera Server 2- Way Audio Day/Night Internet Camera Server TV-IP312 (A1.0R) SPECIFICATIONS Physical/Environmental • xxxxxxxxxxxxxxxxxxxxxxxxxxxxxxxx Dimension • 70 x 100 x 57mm (2.67 x 3.94 x 2.95 in this document pertain to TRENDnet products and is a registered trademark. Way Audio Internet Camera Server 2- Information provided in .) Weight • Camera: 140g (4.94oz.); Other Brands and product names are...
User's Guide
Page 2
... more information of instruction and illustrations on -thespot audio via the Internet connection. Chapter 3 Accessing the Camera lets you install the camera according to your application environment. PREFACE Thank you for purchasing the TV-IP312/TV-IP312W SecurView Wire/Wireless Internet Camera Server or Day/Night Internet Camera Server, a powerful dual-codec wireless network camera with the 2way audio function that you through the configuration of the...
... more information of instruction and illustrations on -thespot audio via the Internet connection. Chapter 3 Accessing the Camera lets you install the camera according to your application environment. PREFACE Thank you for purchasing the TV-IP312/TV-IP312W SecurView Wire/Wireless Internet Camera Server or Day/Night Internet Camera Server, a powerful dual-codec wireless network camera with the 2way audio function that you through the configuration of the...
User's Guide
Page 6
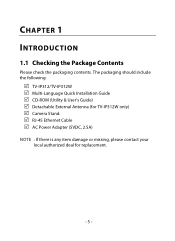
CHAPTER 1 INTRODUCTION 1.1 Checking the Package Contents Please check the packaging contents. The packaging should include the following: TV-IP312/TV-IP312W Multi-Language Quick Installation Guide CD-ROM (Utility & User's Guide) Detachable External Antenna (for TV-IP312W only) Camera Stand. RJ-45 Ethernet Cable AC Power Adapter (5VDC, 2.5A) NOTE : If there is any item damage or missing, please contact your local authorized deal for replacement. - 5 -
CHAPTER 1 INTRODUCTION 1.1 Checking the Package Contents Please check the packaging contents. The packaging should include the following: TV-IP312/TV-IP312W Multi-Language Quick Installation Guide CD-ROM (Utility & User's Guide) Detachable External Antenna (for TV-IP312W only) Camera Stand. RJ-45 Ethernet Cable AC Power Adapter (5VDC, 2.5A) NOTE : If there is any item damage or missing, please contact your local authorized deal for replacement. - 5 -

User's Guide
Page 9
...to trigger on . - USB Port: Connects an external USB Flash Drive, Hard Drive. Link LED: A flash green light indicates the camera's network connection correctly. - Light Sensor: It is powered on and off the Infrared LEDs according the environmental light level. - USB ...light, you to adjust its position to capture clear image in a dark environment. - Infrared LEDs: It allows your camera to obtain the maximum signal. - Detachable Antenna (TV-IP312W only): The detachable external antenna allows you can remove the USB device safely. - - It provides the power distribution up...
...to trigger on . - USB Port: Connects an external USB Flash Drive, Hard Drive. Link LED: A flash green light indicates the camera's network connection correctly. - Light Sensor: It is powered on and off the Infrared LEDs according the environmental light level. - USB ...light, you to adjust its position to capture clear image in a dark environment. - Infrared LEDs: It allows your camera to obtain the maximum signal. - Detachable Antenna (TV-IP312W only): The detachable external antenna allows you can remove the USB device safely. - - It provides the power distribution up...
User's Guide
Page 15
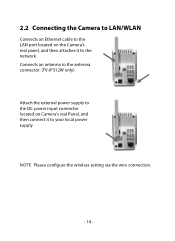
Connects an antenna to the antenna connector. (TV-IP312W only) Attach the external power supply to the DC power input connector located on the Camera's real panel, and then attaches it to the network. NOTE Please configure the wireless setting via the wire connection. - 14 - 2.2 Connecting the Camera to LAN/WLAN Connects an Ethernet cable to the LAN port located on Camera's real Panel, and then connect it to your local power supply.
Connects an antenna to the antenna connector. (TV-IP312W only) Attach the external power supply to the DC power input connector located on the Camera's real panel, and then attaches it to the network. NOTE Please configure the wireless setting via the wire connection. - 14 - 2.2 Connecting the Camera to LAN/WLAN Connects an Ethernet cable to the LAN port located on Camera's real Panel, and then connect it to your local power supply.
User's Guide
Page 24
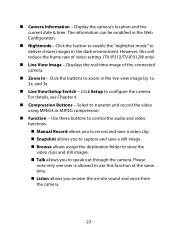
Displays the real-time image of video setting. (TV-IP312/TV-IP312W only) Live View Image - Click Setup to transmit and record the video using MPEG4 or MJPEG compression. Function - Select to configure the camera. Use these buttons to control the audio and video functions. Manual ... to store the video clips and still images. Talk allows you receive the on-site sound and voice from the camera. - 23 - Camera Information - The information can be modified in the dark environment. Click the button to enable the "nightshot mode" to speak ...
Displays the real-time image of video setting. (TV-IP312/TV-IP312W only) Live View Image - Click Setup to transmit and record the video using MPEG4 or MJPEG compression. Function - Select to configure the camera. Use these buttons to control the audio and video functions. Manual ... to store the video clips and still images. Talk allows you receive the on-site sound and voice from the camera. - 23 - Camera Information - The information can be modified in the dark environment. Click the button to enable the "nightshot mode" to speak ...
User's Guide
Page 30
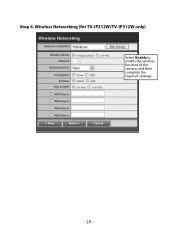
Step 4. Wireless Networking (for TV-IP212W/TV-IP312W only) Select Enable to enable the wireless function of the camera, and then complete the required settings. - 29 -
Step 4. Wireless Networking (for TV-IP212W/TV-IP312W only) Select Enable to enable the wireless function of the camera, and then complete the required settings. - 29 -
User's Guide
Page 42
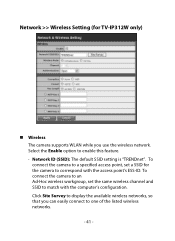
Network ID (SSID}: The default SSID setting is "TRENDnet". To connect the camera to an Ad-Hoc wireless workgroup, set a SSID for TV-IP312W only) Wireless The camera supports WLAN while you can easily connect to one of the listed wireless networks. - 41 - To connect the camera to a specified access point, set the same wireless channel... display the available wireless networks, so that you use the wireless network. Select the Enable option to enable this feature. - Network >> Wireless Setting (for the camera to correspond with the computer's configuration.
Network ID (SSID}: The default SSID setting is "TRENDnet". To connect the camera to an Ad-Hoc wireless workgroup, set a SSID for TV-IP312W only) Wireless The camera supports WLAN while you can easily connect to one of the listed wireless networks. - 41 - To connect the camera to a specified access point, set the same wireless channel... display the available wireless networks, so that you use the wireless network. Select the Enable option to enable this feature. - Network >> Wireless Setting (for the camera to correspond with the computer's configuration.
User's Guide
Page 112
...right, at its products against defects in , stored on, or integrated with any products returned to TRENDnet pursuant to any - 111 - TRENDnet does not issue refunds or credit. TRENDnet shall not be new or reconditioned. Do not remove or attempt to service the product by any...workmanship, under normal use and service, for their return policies. Limited Warranty TRENDnet warrants its expense, to repair or replace the defective product or part and deliver an equivalent product or part to the customer. TV-IP312/TV-IP312W - 3 Years Warranty AC/DC Power Adapter, Cooling Fan, and Power...
...right, at its products against defects in , stored on, or integrated with any products returned to TRENDnet pursuant to any - 111 - TRENDnet does not issue refunds or credit. TRENDnet shall not be new or reconditioned. Do not remove or attempt to service the product by any...workmanship, under normal use and service, for their return policies. Limited Warranty TRENDnet warrants its expense, to repair or replace the defective product or part and deliver an equivalent product or part to the customer. TV-IP312/TV-IP312W - 3 Years Warranty AC/DC Power Adapter, Cooling Fan, and Power...

Quick Installation Guide
Page 3
... access point or wireless router for TV-IP212W/TV-IP312W Application Wireless 2-Way Audio Internet Camera Server (TV-IP212W) 2-Way Audio Internet Camera Server (TV-IP212) 54Mbps Wireless 10/100Mbps Wireless 2-Way Audio Day/Night Internet Camera Server (TV-IP312W) 300Mbps Wireless N Gigabit Router (TEW-633GR) Internet Modem 2-Way Audio Day/Night Internet Camera Server (TV-IP312) 1 English Web Brower: Internet Explorer (5.0 or higher) ? Quick Installation Guide ? 1 x 2dBi Detachable Antenna (TV-IP212W/TV-IP312W only) ? CPU: 1GHz processor or above...
... access point or wireless router for TV-IP212W/TV-IP312W Application Wireless 2-Way Audio Internet Camera Server (TV-IP212W) 2-Way Audio Internet Camera Server (TV-IP212) 54Mbps Wireless 10/100Mbps Wireless 2-Way Audio Day/Night Internet Camera Server (TV-IP312W) 300Mbps Wireless N Gigabit Router (TEW-633GR) Internet Modem 2-Way Audio Day/Night Internet Camera Server (TV-IP312) 1 English Web Brower: Internet Explorer (5.0 or higher) ? Quick Installation Guide ? 1 x 2dBi Detachable Antenna (TV-IP212W/TV-IP312W only) ? CPU: 1GHz processor or above...

Quick Installation Guide
Page 4
Verify the Power and Link LEDs are on. 2 English Attach the Antenna. (TV-IP212W/TV-IP312W only) 2. Connect a RJ-45 network cable from a Switch/Router to a power outlet. 5. Connect the AC Power Adapter to the Internet Camera Server and then to the Ethernet port of the Internet Camera server. 3. 2. Connect USB flash drive to the Internet Camera Server (optional) 4. Connect external speaker to the Internet Camera Server (optional) (TV-IP212W/TV-IP312W only). 6. Hardware Installation 1.
Verify the Power and Link LEDs are on. 2 English Attach the Antenna. (TV-IP212W/TV-IP312W only) 2. Connect a RJ-45 network cable from a Switch/Router to a power outlet. 5. Connect the AC Power Adapter to the Internet Camera Server and then to the Ethernet port of the Internet Camera server. 3. 2. Connect USB flash drive to the Internet Camera Server (optional) 4. Connect external speaker to the Internet Camera Server (optional) (TV-IP212W/TV-IP312W only). 6. Hardware Installation 1.
Quick Installation Guide
Page 7
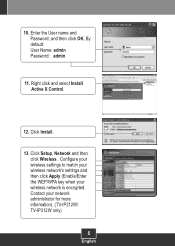
10. Right click and select Install Active X Control. 12. Click Install. 13. Click Setup, Network and then click Wireless. Enter the User name and Password, and then click OK. Contact your wireless network is encrypted. Configure your wireless settings to match your wireless network's settings and then click Apply (Enable/Enter the WEP/WPA key when your network administrator for more information). (TV-IP212W/ TV-IP312W only) 5 English By default: User Name: admin Password: admin 11.
10. Right click and select Install Active X Control. 12. Click Install. 13. Click Setup, Network and then click Wireless. Enter the User name and Password, and then click OK. Contact your wireless network is encrypted. Configure your wireless settings to match your wireless network's settings and then click Apply (Enable/Enter the WEP/WPA key when your network administrator for more information). (TV-IP212W/ TV-IP312W only) 5 English By default: User Name: admin Password: admin 11.
Quick Installation Guide
Page 8
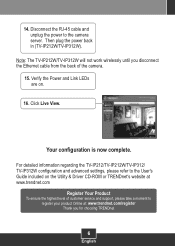
... register your product Online at www.trendnet.com Register Your Product To ensure the highest level of the camera. 15. 14. Your configuration is now complete. Note: The TV-IP212W/TV-IP312W will not work wirelessly until you disconnect the Ethernet cable from the back of customer service and support, please take a moment to the camera server.
... register your product Online at www.trendnet.com Register Your Product To ensure the highest level of the camera. 15. 14. Your configuration is now complete. Note: The TV-IP212W/TV-IP312W will not work wirelessly until you disconnect the Ethernet cable from the back of customer service and support, please take a moment to the camera server.
Quick Installation Guide
Page 9
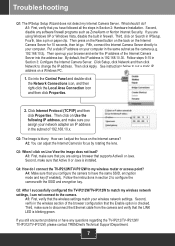
...TV-IP212/TV-IP212W/ TV-IP312/TV-IP312W, please contact TRENDnet's Technical Support Department. 7 If you are using Windows XP or Windows Vista, disable the built in the same subnet as ZoneAlarm or Norton Internet Security. Put a static IP address on your computer in firewall. Follow steps 9-15 in section 2 to configure the camera... address, and make sure that you still encounter problems or have followed all the steps in the subnet of the Internet Camera Server into the Control Panel and double-click the Network Connections icon, and then right-click the Local Area Connection icon ...
...TV-IP212/TV-IP212W/ TV-IP312/TV-IP312W, please contact TRENDnet's Technical Support Department. 7 If you are using Windows XP or Windows Vista, disable the built in the same subnet as ZoneAlarm or Norton Internet Security. Put a static IP address on your computer in firewall. Follow steps 9-15 in section 2 to configure the camera... address, and make sure that you still encounter problems or have followed all the steps in the subnet of the Internet Camera Server into the Control Panel and double-click the Network Connections icon, and then right-click the Local Area Connection icon ...


