
User's Guide
Page 2
... THE STAND 14 CONNECTING THE ETHERNET CABLE 15 ATTACHING THE POWER SUPPLY 15 SECURITY 16 APPLICATIONS 17 APPLICATIONS OF THE CAMERA 18 USING THE CAMERA 20 WEB CONFIGURATION UTILITY 20 INFORMATION 23 CONFIGURATION 25 SYSTEM 43 VIEWING IMAGE - JAVA MODE 59 IPVIEW PRO 62 INSTALLATION 62 GETTING STARTED 66 USING ...
... THE STAND 14 CONNECTING THE ETHERNET CABLE 15 ATTACHING THE POWER SUPPLY 15 SECURITY 16 APPLICATIONS 17 APPLICATIONS OF THE CAMERA 18 USING THE CAMERA 20 WEB CONFIGURATION UTILITY 20 INFORMATION 23 CONFIGURATION 25 SYSTEM 43 VIEWING IMAGE - JAVA MODE 59 IPVIEW PRO 62 INSTALLATION 62 GETTING STARTED 66 USING ...
User's Guide
Page 6
...requirement you can configure and manage the camera directly from your camera. Web Configuration Using a standard web browser, the administrator can view the picture and receive sound from his own web page via the Intranet or Internet. Once you have a valid IP Address, just connect it and you... and Benefits Simple to 64 users name and password are permitted with privilege setting controlled by the administrator. 5 The camera supports DirectX 9.0; Up to Use TV-IP301/TV-IP301W Advanced Day/Night (Wireless) Internet Camera Server with Audio is the web browser software such as Windows.
...requirement you can configure and manage the camera directly from your camera. Web Configuration Using a standard web browser, the administrator can view the picture and receive sound from his own web page via the Intranet or Internet. Once you have a valid IP Address, just connect it and you... and Benefits Simple to 64 users name and password are permitted with privilege setting controlled by the administrator. 5 The camera supports DirectX 9.0; Up to Use TV-IP301/TV-IP301W Advanced Day/Night (Wireless) Internet Camera Server with Audio is the web browser software such as Windows.

User's Guide
Page 21
.... 20 This chapter describes the Web Configuration Utility, and provides the instructions on using the camera with the camera's IP address in the Name and Password box, and then click Login. NOTE: The computer's IP address must correspond with a web browser. When the login page appears, type admin in ...the same segment for the two devices to configure the camera, open your web browser (e.g. Internet Explorer in this manual), and type the default IP address http://192.168.1.30 in the Address bar and press [Enter]. 5 USING THE...
.... 20 This chapter describes the Web Configuration Utility, and provides the instructions on using the camera with the camera's IP address in the Name and Password box, and then click Login. NOTE: The computer's IP address must correspond with a web browser. When the login page appears, type admin in ...the same segment for the two devices to configure the camera, open your web browser (e.g. Internet Explorer in this manual), and type the default IP address http://192.168.1.30 in the Address bar and press [Enter]. 5 USING THE...

User's Guide
Page 22
Login the Web Configuration Utility "admin" is the default username and password of the Web Configuration Utility will show as below, which includes one Live Show (ActiveX / JAVA) button and three areas: Information, Configuration, and System. 21 Enter the default IP address in the Web Configuration Utility. Enter the default username and password. After login, the default page of the camera, and can be changed in the Address bar.
Login the Web Configuration Utility "admin" is the default username and password of the Web Configuration Utility will show as below, which includes one Live Show (ActiveX / JAVA) button and three areas: Information, Configuration, and System. 21 Enter the default IP address in the Web Configuration Utility. Enter the default username and password. After login, the default page of the camera, and can be changed in the Address bar.

User's Guide
Page 25
The Connections page provides the information of Event. About The About page displays the Device Information and Network Information. 24 Event Log The Event Log page displays a list containing the event log of the camera, including the Date, Time, and description of user connecting the camera, including the IP, Username, and Login Time.
The Connections page provides the information of Event. About The About page displays the Device Information and Network Information. 24 Event Log The Event Log page displays a list containing the event log of the camera, including the Date, Time, and description of user connecting the camera, including the IP, Username, and Login Time.

User's Guide
Page 38
You will receive an e-mail automatically regarding to test the function. - Or 37 Enter the receiver's e-mail address in the two fields to login the mail server. - SMTP username/password: Enter the user name and password in the following box and click Test to your camera's IP address once you select this option. Enable sending mail with IP address on startup when using PPPoE: You will get the test result as below information window (OK or Fail).
You will receive an e-mail automatically regarding to test the function. - Or 37 Enter the receiver's e-mail address in the two fields to login the mail server. - SMTP username/password: Enter the user name and password in the following box and click Test to your camera's IP address once you select this option. Enable sending mail with IP address on startup when using PPPoE: You will get the test result as below information window (OK or Fail).

User's Guide
Page 46
...enter the required information in each option, click Save to set the time manually. 45 When selecting the option, you have to set up the camera's time and date. Time Zone: Select the time zone for the time zone selection table. Synchronize with Time Server Select this option and the ...time will be based on GMT setting. IP Address: Enter the IP Address of the Time Server. - down menu. The Date & Time page contains the commands to store the settings. Once you have changed...
...enter the required information in each option, click Save to set the time manually. 45 When selecting the option, you have to set up the camera's time and date. Time Zone: Select the time zone for the time zone selection table. Synchronize with Time Server Select this option and the ...time will be based on GMT setting. IP Address: Enter the IP Address of the Time Server. - down menu. The Date & Time page contains the commands to store the settings. Once you have changed...

User's Guide
Page 48
... network uses the DHCP server, select this option. blank - Obtain IP address automatically via PPPoE: If your camera. - changed the settings in each option, click Save to this setting, the camera will be assigned an IP address from an ADSL modem through the camera's RJ-45 LAN port, select this option and enter the User...
... network uses the DHCP server, select this option. blank - Obtain IP address automatically via PPPoE: If your camera. - changed the settings in each option, click Save to this setting, the camera will be assigned an IP address from an ADSL modem through the camera's RJ-45 LAN port, select this option and enter the User...

User's Guide
Page 49
...enable the Dynamic DNS feature of the camera, which allows you filled from the ISP as starting up. Dynamic DNS Service Select the Enable Dynamic DNS Service option to run your camera's IP address once you check the "Enable sending mail with IP address on startup when using PPPoE" option... (see page 35). Please kindly note that translates domain names into IP addresses. Moreover, this feature only applied to your domain...
...enable the Dynamic DNS feature of the camera, which allows you filled from the ISP as starting up. Dynamic DNS Service Select the Enable Dynamic DNS Service option to run your camera's IP address once you check the "Enable sending mail with IP address on startup when using PPPoE" option... (see page 35). Please kindly note that translates domain names into IP addresses. Moreover, this feature only applied to your domain...

User's Guide
Page 70
Click the System Configuration button to search the available camera(s) within the network. 69 If you are not sure of the camera's IP address, you can click Search to enter the System Configuration. Using IPView Pro Adding a Camera To add a camera: 1.
Click the System Configuration button to search the available camera(s) within the network. 69 If you are not sure of the camera's IP address, you can click Search to enter the System Configuration. Using IPView Pro Adding a Camera To add a camera: 1.

User's Guide
Page 72
Select the Input IP tab. Click the Add Camera button. Click Save, and then click the System Configuration button to return to View Window. The selected camera's video will be displayed now. 71 Enter the camera's IP address and Port. 5. Enter the camera's IP address (default: 192.168.1.30) and Port (default: 80), and then click Add Camera. 6. Alternately, you can add a camera by entering the its IP address directly: 4. The camera is added.
Select the Input IP tab. Click the Add Camera button. Click Save, and then click the System Configuration button to return to View Window. The selected camera's video will be displayed now. 71 Enter the camera's IP address and Port. 5. Enter the camera's IP address (default: 192.168.1.30) and Port (default: 80), and then click Add Camera. 6. Alternately, you can add a camera by entering the its IP address directly: 4. The camera is added.

User's Guide
Page 94
... security. Q: What network cabling is required for users. A: Yes. Q: What algorithm is used to be used outdoors and it consists of only private IP addresses? Q: Can the MPEG4 Internet CCD Camera be used outdoors? It needs to be setup as a PCcam on Ethernet and Fast Ethernet network. Q: Can the MPEG4 Internet CCD...
... security. Q: What network cabling is required for users. A: Yes. Q: What algorithm is used to be used outdoors and it consists of only private IP addresses? Q: Can the MPEG4 Internet CCD Camera be used outdoors? It needs to be setup as a PCcam on Ethernet and Fast Ethernet network. Q: Can the MPEG4 Internet CCD...

User's Guide
Page 95
... will provide useful explanation to the specific address and waiting for a reply. Start a DOS window. The succeeding replies as illustrated below to confirm if the IP address conflicts with the camera's IP address. 94 It can determine whether a specific IP address is the IP address of the problem with the...
... will provide useful explanation to the specific address and waiting for a reply. Start a DOS window. The succeeding replies as illustrated below to confirm if the IP address conflicts with the camera's IP address. 94 It can determine whether a specific IP address is the IP address of the problem with the...

User's Guide
Page 96
...the problem, run the PING utility (follow the instructions in Appendix B - If the camera is already being used by another device. Therefore the IP address of the camera must be the IP Address for the camera is situated on a different subnet than your workstation. To correct the possible problem, you ...a different subnet. To verify make sure the first 3 sections of the IP address of the camera corresponds to the first 3 sections of the camera is located on the same subnet. 95 Another possible reason is the IP Address is within the same subnet as below: In Windows 98SE/ME/2000...
...the problem, run the PING utility (follow the instructions in Appendix B - If the camera is already being used by another device. Therefore the IP address of the camera must be the IP Address for the camera is situated on a different subnet than your workstation. To correct the possible problem, you ...a different subnet. To verify make sure the first 3 sections of the IP address of the camera corresponds to the first 3 sections of the camera is located on the same subnet. 95 Another possible reason is the IP Address is within the same subnet as below: In Windows 98SE/ME/2000...

Quick Installation Guide
Page 5
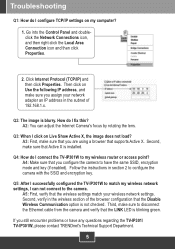
... 192.168.1.30, make sure no other network devices are assigned an IP address of 192.168.1.x. Click System and then click Network. Then click Save. 3 English Before the Internet Camera can be configured, a Static IP address must be in the same subnet as your network. Enter user name...be assigned on your computer's network adapter in the Address bar, and press Enter. 2. Configure the network settings to configure TCP/IP settings on your PC.) 1. User name: admin Password: admin 3. Since the Internet Camera's default IP address is recommended that you configure the Internet...
... 192.168.1.30, make sure no other network devices are assigned an IP address of 192.168.1.x. Click System and then click Network. Then click Save. 3 English Before the Internet Camera can be configured, a Static IP address must be in the same subnet as your network. Enter user name...be assigned on your computer's network adapter in the Address bar, and press Enter. 2. Configure the network settings to configure TCP/IP settings on your PC.) 1. User name: admin Password: admin 3. Since the Internet Camera's default IP address is recommended that you configure the Internet...
Quick Installation Guide
Page 7
...that Active X is blurry. Q5: After I successfully configured the TV-IP301W to have any questions regarding the TV-IP301/ TV-IP301W, please contact TRENDnet's Technical Support Department. 5 Third, make sure that supports Active X. Click Internet Protocol (TCP/IP) and then click Properties. A5: First, verify that you ...match your network adapter an IP address in the wireless section of 192.168.1.x. Q3: When I connect the TV-IP301W to configure the camera with the SSID and encryption key. How do I configure TCP/IP settings on Use the following IP address, and make sure ...
...that Active X is blurry. Q5: After I successfully configured the TV-IP301W to have any questions regarding the TV-IP301/ TV-IP301W, please contact TRENDnet's Technical Support Department. 5 Third, make sure that supports Active X. Click Internet Protocol (TCP/IP) and then click Properties. A5: First, verify that you ...match your network adapter an IP address in the wireless section of 192.168.1.x. Q3: When I connect the TV-IP301W to configure the camera with the SSID and encryption key. How do I configure TCP/IP settings on Use the following IP address, and make sure ...
Datasheet
Page 1
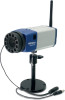
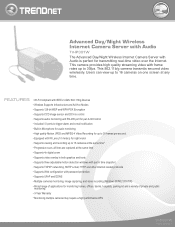
... TCP/IP networking, SMTP e-mail, HTTP and other Internet related protocols • Supports Web configuration with frame rates up to 16 cameras at the same time* • Progressive scan, all lines are captured at any time. Advanced Day/Night Wireless Internet Camera Server with Audio TV-IP301W The ...Advanced Day/Night Wireless Internet Camera Server with IR Lens (10 meters) for night vision • Supports viewing and recording up to 30fps....
... TCP/IP networking, SMTP e-mail, HTTP and other Internet related protocols • Supports Web configuration with frame rates up to 16 cameras at the same time* • Progressive scan, all lines are captured at any time. Advanced Day/Night Wireless Internet Camera Server with Audio TV-IP301W The ...Advanced Day/Night Wireless Internet Camera Server with IR Lens (10 meters) for night vision • Supports viewing and recording up to 30fps....
Datasheet
Page 2
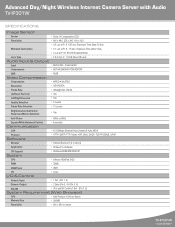
...60Hz • Automatic • 10/100Mbps Ethernet Auto-Sensed & Auto MDIX • HTTP, SMTP, FTP, Telnet, NTP, DNS, DHCP, TCP/IP, DDNS, UPnP • Internet Explorer 5.0 or above • IPView Pro Software OS Support System CPU • Windows 98SE/ME/2000/XP •... CPU • Intel Pentium 1GHz or Above Memory Size • 256MB Resolution • 800 x 600 or above TV-IP301W rev:03.09.2007 Advanced Day/Night Wireless Internet Camera Server with Audio TV-IP301W SPECIFICATIONS Image Sensor Sensor • Sony 1/4" progressive CCD Resolution • 640 x 480, 320 x 240, 160...
...60Hz • Automatic • 10/100Mbps Ethernet Auto-Sensed & Auto MDIX • HTTP, SMTP, FTP, Telnet, NTP, DNS, DHCP, TCP/IP, DDNS, UPnP • Internet Explorer 5.0 or above • IPView Pro Software OS Support System CPU • Windows 98SE/ME/2000/XP •... CPU • Intel Pentium 1GHz or Above Memory Size • 256MB Resolution • 800 x 600 or above TV-IP301W rev:03.09.2007 Advanced Day/Night Wireless Internet Camera Server with Audio TV-IP301W SPECIFICATIONS Image Sensor Sensor • Sony 1/4" progressive CCD Resolution • 640 x 480, 320 x 240, 160...


